Contents
4 parts · 21 sections
 About Us
Compare frameless shower-door styles, room requirements, glass, water control, support, cost, and maintenance before choosing the right configuration.
Choose / Selection guide
4 parts · 21 sections
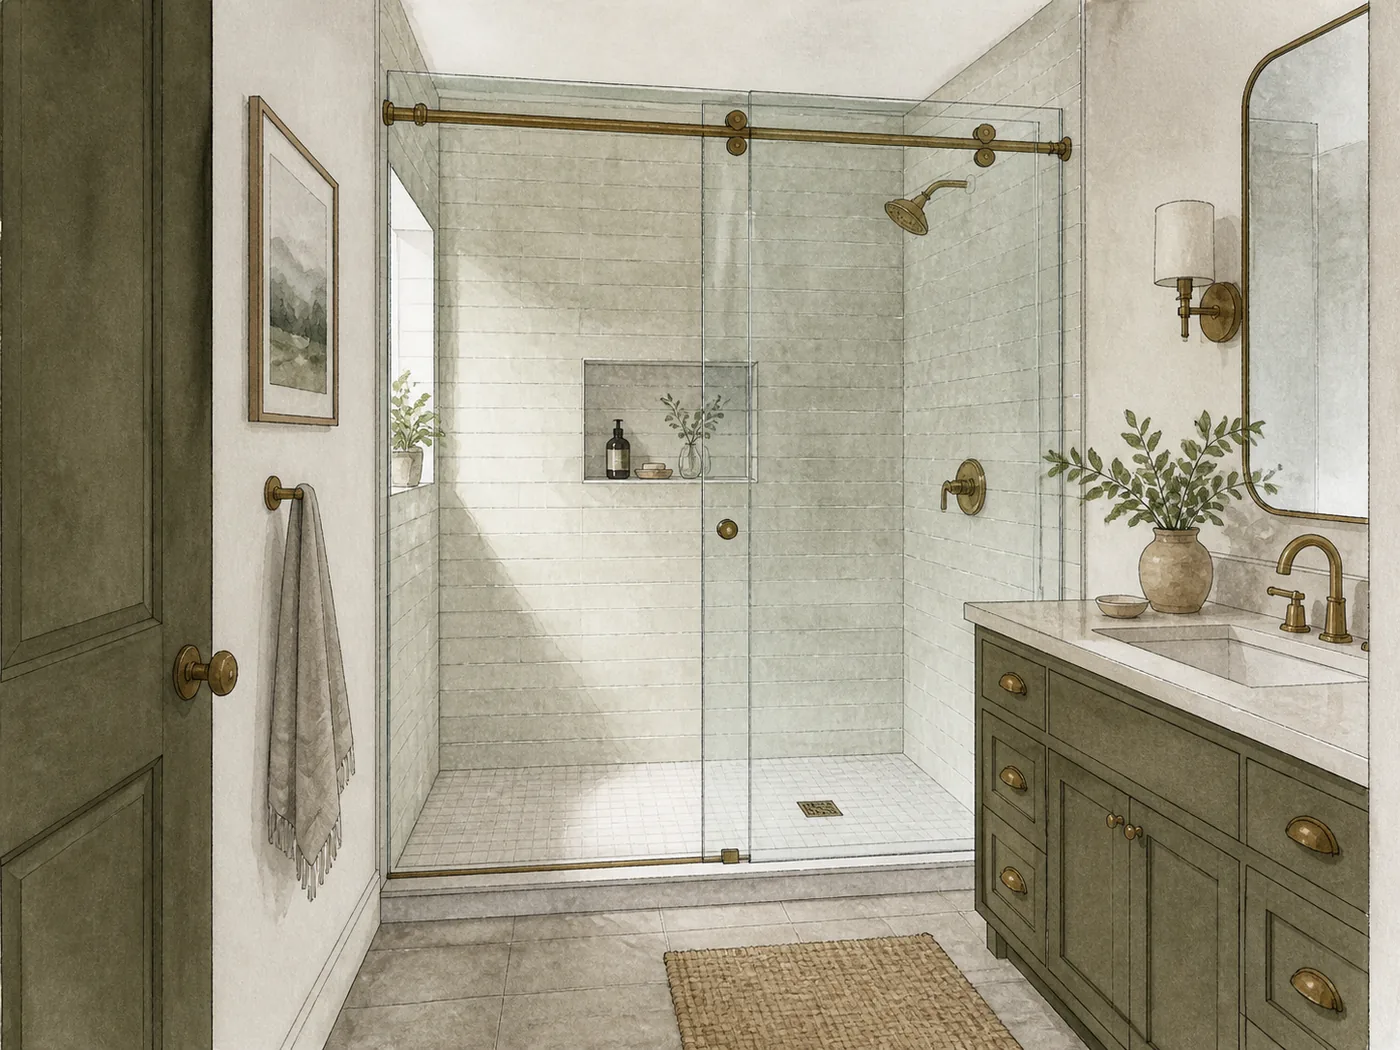
A frameless door should be chosen around the room: how the glass moves, what sits beside it, where the water goes, and what supports the hardware.
This guide combines official product and installation documents, CPSC and National Glass Association safety guidance, current cost references, and a documented customer project in Round Rock, Texas. The homeowner supplied the measurements, installed model, completed-project photo, and four-month follow-up; Aurivedo checked the product details against Delta’s official documentation. The technical guidance was reviewed by Ronni, a Texas-based engineer with 25 years of experience. Recommendations are organized around verifiable decision points: door movement, walk-through width, water control, wall support, and installed cost.
If you only want the quick answer, use these seven calls:
Make the decision in this order: door movement, clear walk-through width, spray direction, mounting support, then glass and finish. A matte black handle will not fix a door that hits the vanity or leaves you squeezing through a narrow opening every morning.
| Door style | Best for | Main advantage | Main drawback | Skip it when |
|---|---|---|---|---|
| Sliding | Small bathrooms and alcove showers | Needs no swing space | Panel overlap reduces the walk-through opening | You want the widest entry or no bottom guide |
| Hinged | Bathrooms with open floor space | Wide, direct entrance | Needs a clear swing and solid hinge support | The door could hit a toilet, vanity, or bathroom door |
| Pivot | Layouts that benefit from an offset turning point | Can split the door movement between the shower and bathroom | Still needs clear space on both sides | A bench, faucet, or fixture sits in either part of the swing |
| Fixed panel | Deep showers with controlled spray | No moving hardware and easy cleaning | Lets out more heat and splash | The shower is shallow or the showerhead faces the opening |
| Door + fixed panel | Wide alcove openings | Keeps the moving door at a sensible size | Costs more and needs a support plan for the fixed glass | The remaining entrance would be too narrow |
| Corner or neo-angle | Corner showers with two or more open sides | Uses corner space well | More joints, angles, and possible water paths | You want the simplest or lowest-cost enclosure |
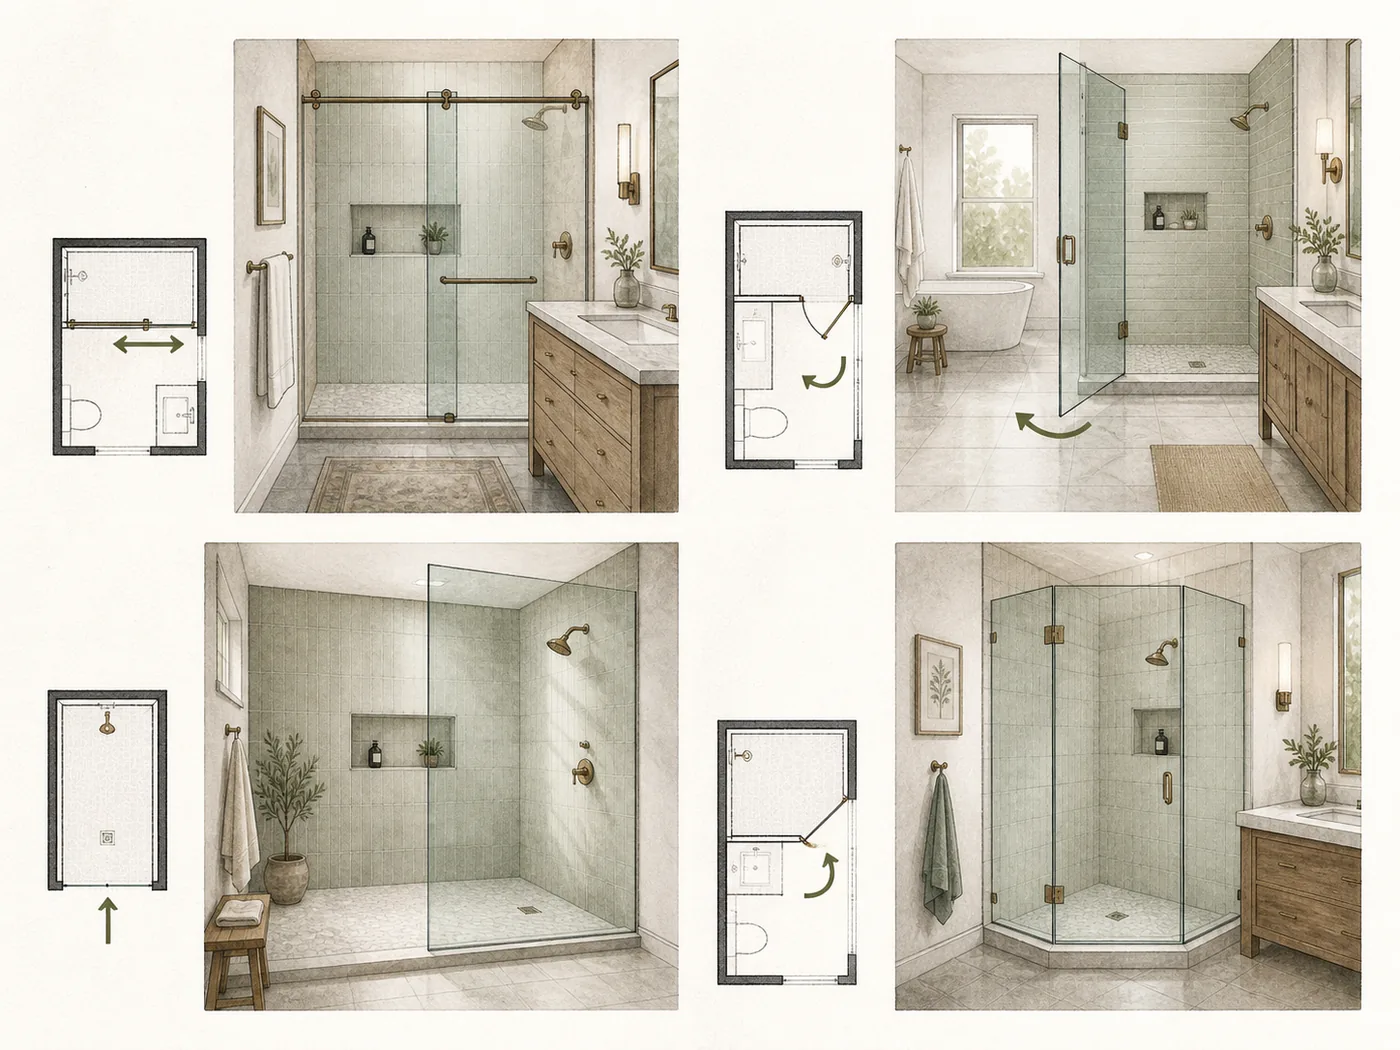
From top left: sliding for a tight layout, hinged when the swing is clear, a fixed screen for a deep shower, and a neo-angle enclosure for an open corner.
Use the first condition that clearly matches your bathroom.
| Your bathroom | Our recommendation | Why |
|---|---|---|
| A toilet or vanity blocks a full door swing | Start with sliding | The glass stays within the opening |
| The swing is clear and a wide entrance matters | Choose hinged | It gives you the most direct walk-through |
| An edge-hinged door clips a fixture, but an offset rotation clears it | Try pivot | The pivot changes how the glass moves |
| The shower is deep and the spray faces a tiled wall | Choose a fixed panel | You probably do not need a moving door |
| The alcove is too wide for one practical door leaf | Choose a door + fixed panel | The fixed glass fills the extra span |
| Two sides of the shower are open | Choose a corner enclosure | One inline door cannot contain both sides |
| The walls are uneven and you need more adjustment | Start with semi-frameless | A channel can handle more variation than exposed-edge glass |
| The shower is small and the spray points at the entrance | Favor stronger water-control features | A very open frameless layout will frustrate you |
Already know your style? Compare exact products by opening range, glass thickness, and walk-through width using the six fields below.
Once you know the style, compare products on the numbers that affect daily use. A long feature list is less useful than a clear answer to these six points.
| Product | Opening range | Walk-through width | Out-of-plumb adjustment | Bottom track or guide | Installed price |
|---|---|---|---|---|---|
| Option 1 | |||||
| Option 2 | |||||
| Option 3 |
Remove any product that does not fit the finished opening, blocks the room, or leaves too little space to enter. Compare glass, finish, and price only after that first cut.
I like to make this decision in a very ordinary way: picture yourself using the bathroom on a busy morning. Can the door open? Is the entrance comfortable? Does the shower spray hit a gap? After that, look at support, cleaning, and the installed price. Glass color and hardware finish can wait.
A customer shared this April 2026 project from Round Rock, just north of Austin. The layout measurements and four-month follow-up below came from the customer. We checked the door specifications against Delta’s official product page and installation guide.
The finished tiled opening measured 57-3/4 inches. A bathroom vanity sat immediately to the left of the shower, leaving very little clear space between the shower and the edge of the vanity.
The homeowner considered a pivot shower door and a sliding door. A pivot door would have offered a wider entrance and a cleaner look, but with the pivot position and opening direction planned for this layout, the glass could have contacted the vanity when fully opened. That made the sliding door the more practical option.
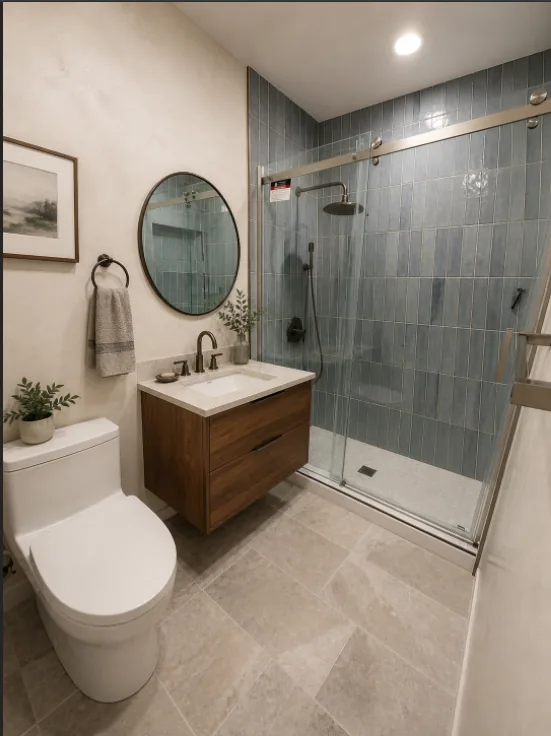
The finished installation used the 60-inch Delta Commix 8mm frameless sliding shower door, model SDES860-BN-R in brushed nickel. Delta specifies 5/16-inch (8 mm) tempered glass and an opening range of 54-3/8 to 60 inches. The 57-3/4-inch opening fell inside that range, and the customer reported a finished walk-through width of 24 inches. Delta’s Commix installation guide confirms the same installation range.
Before installation, one more detail had to be checked: the wall-stud position on both sides. Delta requires the Commix top track to be secured into studs. That is the main installation difference between Commix and Delta’s Traditional sliding system, which does not require studs. The customer did not provide the purchase or installation cost, so no project price is included here.
Four months later, the homeowner reported that the entrance was comfortable, the panels had never contacted the vanity, and normal use produced only a few drops carried out by the bottom sweep, with no noticeable splash outside the shower. The sliding door cleared the vanity and still provided a practical entrance. The vanity position and the finished walk-through width ultimately settled the choice.
If this is your main bathroom and you love the open-glass look, frameless is easy to justify. You get cleaner sightlines and fewer frame channels to scrub.
But I would not force it into every room. Walls that need plenty of adjustment are usually happier with a semi-frameless system. If budget, easy replacement, and stronger everyday water control sit at the top of your list, a framed door may simply be the better buy.
The label on the box does not decide where the water goes. Gaps, seals, the threshold, drainage, and spray direction do. Our frameless vs. framed shower door guide covers that choice in more detail.
Stand in front of the shower for a minute. Open the vanity drawer. Look at the toilet, towel bar, and bathroom door. That quick check usually eliminates half the options before you read a single product spec.
If the toilet or vanity sits close to the shower, do not overthink this one. Start with a sliding door. The panels move side to side, so nothing swings into the room. It is also the practical default for many alcove showers and tub-shower combinations.
The catch is the overlap. A 60-inch opening does not give you a 60-inch entrance, and two products built for the same opening can leave very different walk-through widths. You will also spend a little more time cleaning the rollers, guides, and overlapping glass.
Need the widest possible entrance or a completely clear threshold? Sliding is probably not your door. Check the actual walk-through width and bottom guide before you buy.
See our sliding vs. hinged shower door comparison if those are your final two options.
Got a clear swing? I would choose hinged. It feels simple, opens wide, and keeps most of the hardware out of your sightline.
Before you fall in love with one, picture the whole door leaf open. Does it meet the toilet, vanity, towel bar, bath mat, or bathroom door? If yes, move back to sliding. Also remember that the hinge side carries moving glass, so the material behind the finished wall and the anchors have to suit the job.
A door can hinge from a fixed glass panel, but that is not a shortcut around weak wall support. The panel and its hardware must be designed to carry the door.
Pivot doors are useful, but they are sometimes sold as if they magically solve every tight layout. They do not. What they do is move the rotation point inward, which changes how much glass enters the bathroom and how much enters the shower.
If that new path clears a real obstacle, choose pivot. If it still clips a faucet, bench, shower control, curb, or toilet, skip it. The plan view in the installation guide will tell you far more than the front-facing product photo.
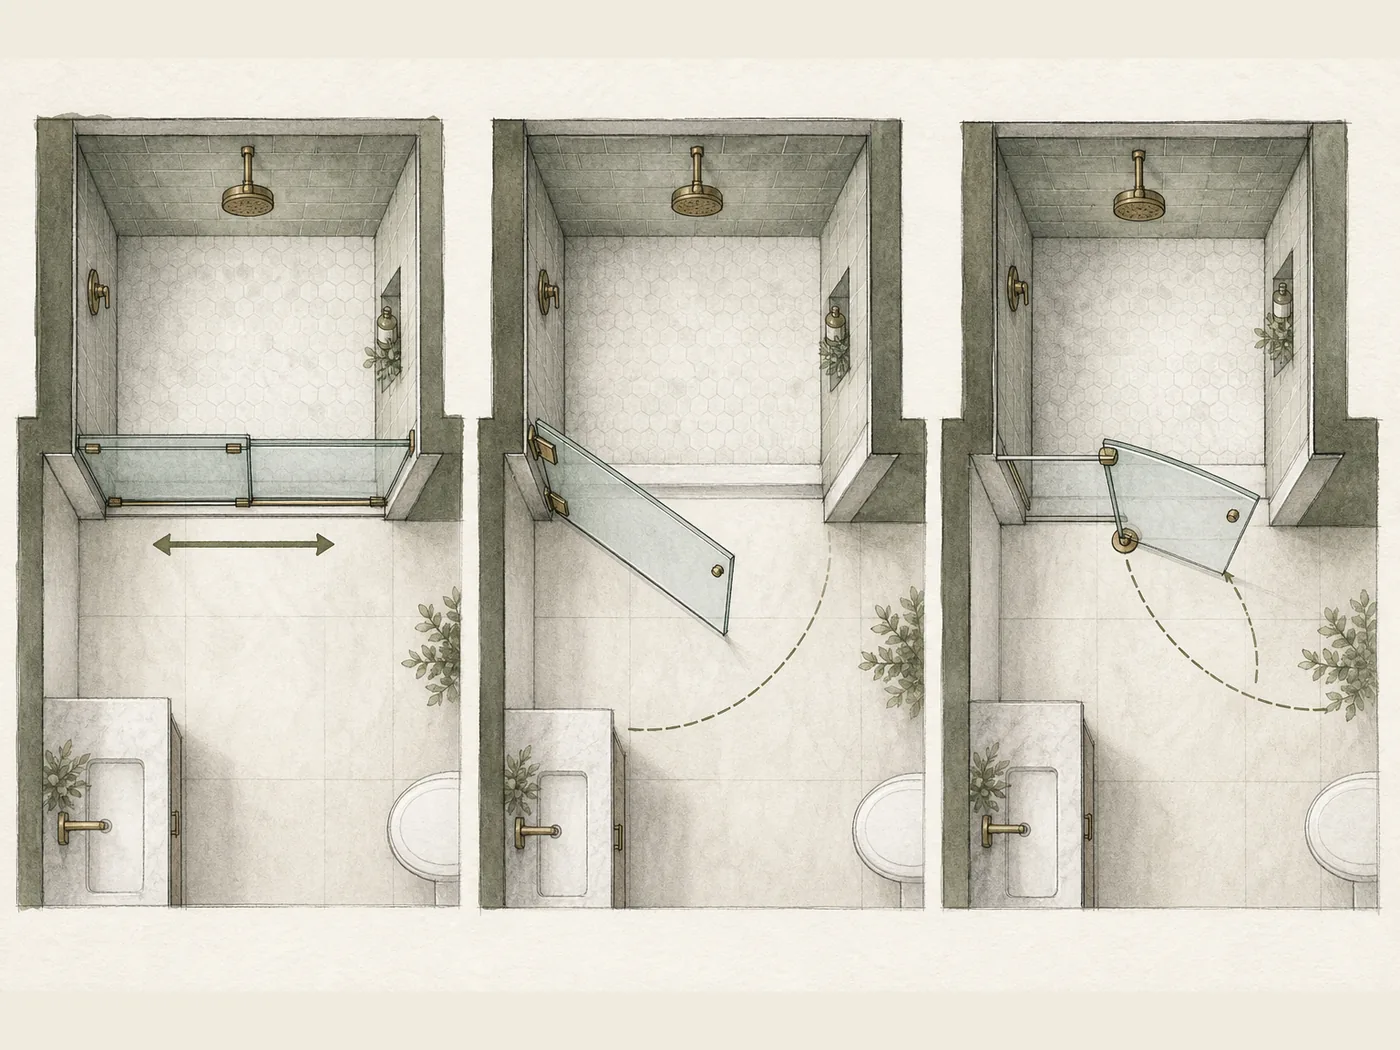
Left to right: sliding glass stays within the opening, a wall-hinged door needs a full outward arc, and an offset pivot divides the door movement between the shower and the bathroom.
A fixed panel looks effortless. In the right shower, it is. There are no hinges or rollers to adjust, and cleaning is about as simple as shower glass gets.
The room has to earn that open design, though. You need enough shower depth to keep the main spray in the wet zone, with the showerhead pointing toward tile rather than the entry. The opening will also let out more warmth. Handheld sprays and body jets make splashing harder to control.
If the shower is shallow, the room already feels cold, or water outside could reach wood flooring or cabinetry, add a door.
Wide alcove? Do not turn all that extra width into one giant moving door. A fixed inline panel fills the span while the door stays at a comfortable size. It can also put the entrance closer to the shower controls, which is a small detail you will appreciate every day.
You will pay for more glass and hardware, and every added joint needs a reason to be there. Keep an eye on the remaining walk-through width. If the fixed panel makes the entrance feel cramped, the proportions are wrong.
Treat the door, panel, hinges, clips, and support bar as one system. They depend on one another.
Corner layouts are less forgiving, but sometimes they are exactly what the room needs. When two sides are open, one inline door simply cannot finish the enclosure. A neo-angle front can also give a tight bathroom a bit more walking space.
The price for that flexibility is more glass, more joints, and more possible water paths. Door placement affects the support of the panels around it too.
If a simple alcove layout is available and budget matters, take the simpler route. For a true corner or neo-angle base, use an enclosure made for that footprint instead of trying to force an inline door into it.
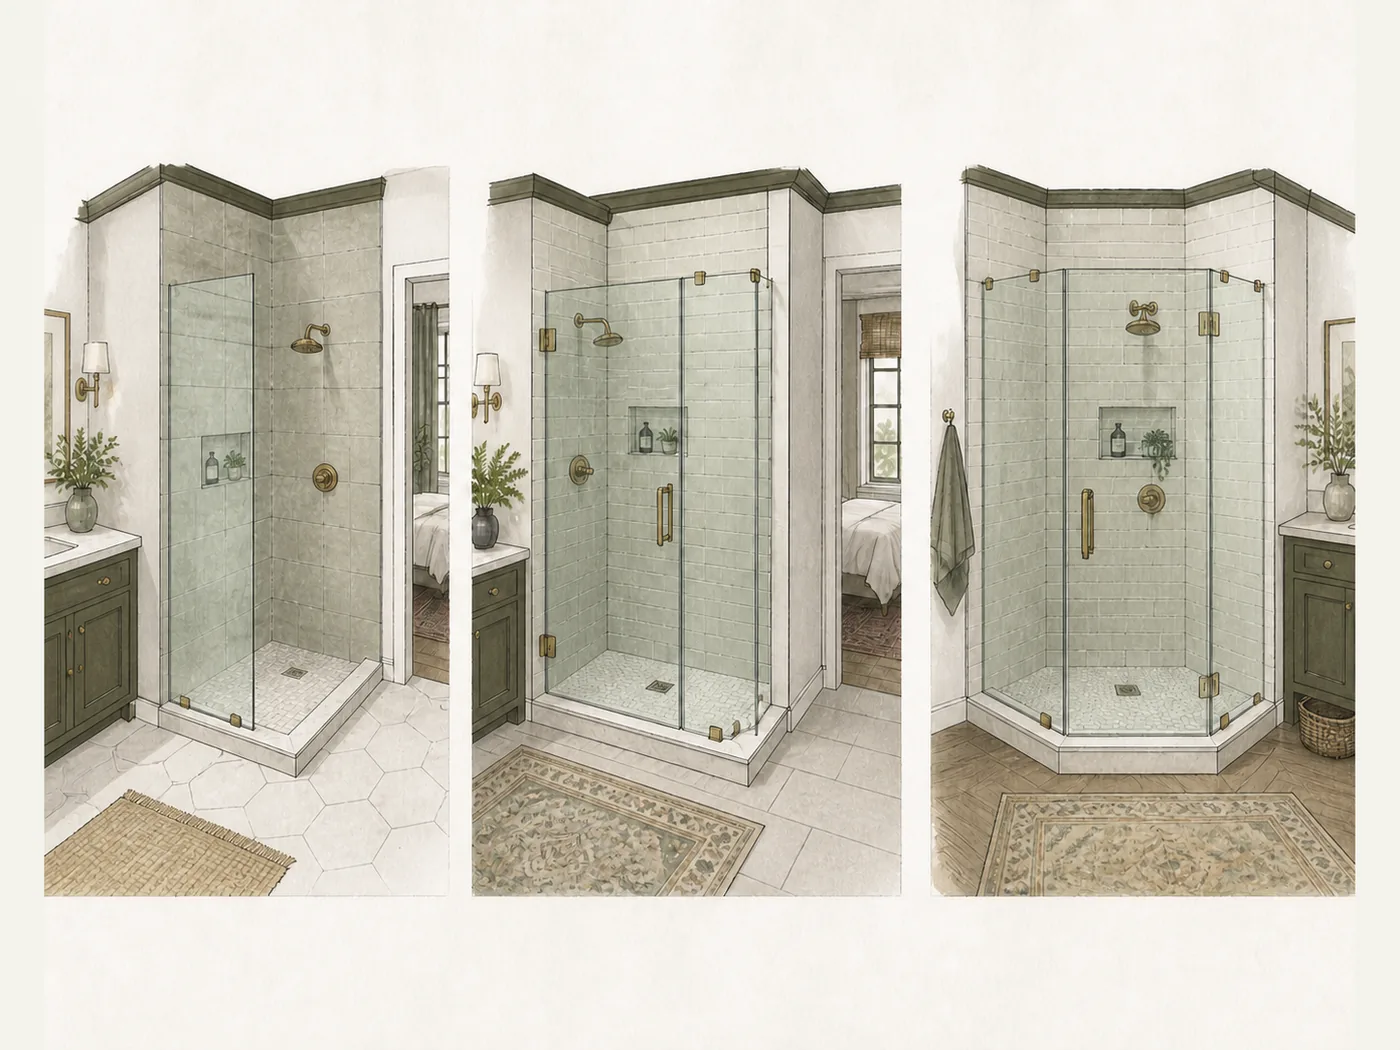
Left to right: a single fixed screen, a hinged door with a fixed inline panel, and a neo-angle enclosure built around a corner footprint.
For a deep curbless shower, I would start with a fixed panel. The entry stays open and there is no moving door over the floor. If the shower is too shallow for an open screen, go hinged when the swing is clear. Otherwise look for a low-profile slider whose guide does not undo the accessibility you worked to create.
Floor slope and drainage do more of the water-control work in a curbless design. Keep the outward path of a hinged door level enough that the glass does not drag, and make sure users can reach the controls without stepping into the spray.
For most tub-shower combinations, sliding is the easy answer. It keeps glass from swinging over the toilet or into the bathing area. I would choose hinged only when the room has a genuinely clear swing and the product is made for that tub ledge.
Buy a system designed as a steam enclosure. A standard frameless door is not enough. Steam control may need taller glass, tighter seals, a transom, and suitable ventilation. This is one of the few places where custom work usually earns its price.
The names get fuzzy fast. Ignore the label for a moment and look at the hardware in the installation drawing.
| Construction | Choose it for | Main compromise |
|---|---|---|
| Framed | Lower cost, easier replacement, and more tolerance for imperfect openings | More visible metal and more channels to clean |
| Semi-frameless | A middle ground for adjustment, water control, price, and appearance | Less open-looking than true frameless glass |
| Frameless | Open sightlines and minimal perimeter framing | Higher cost and less tolerance for a poor fit |
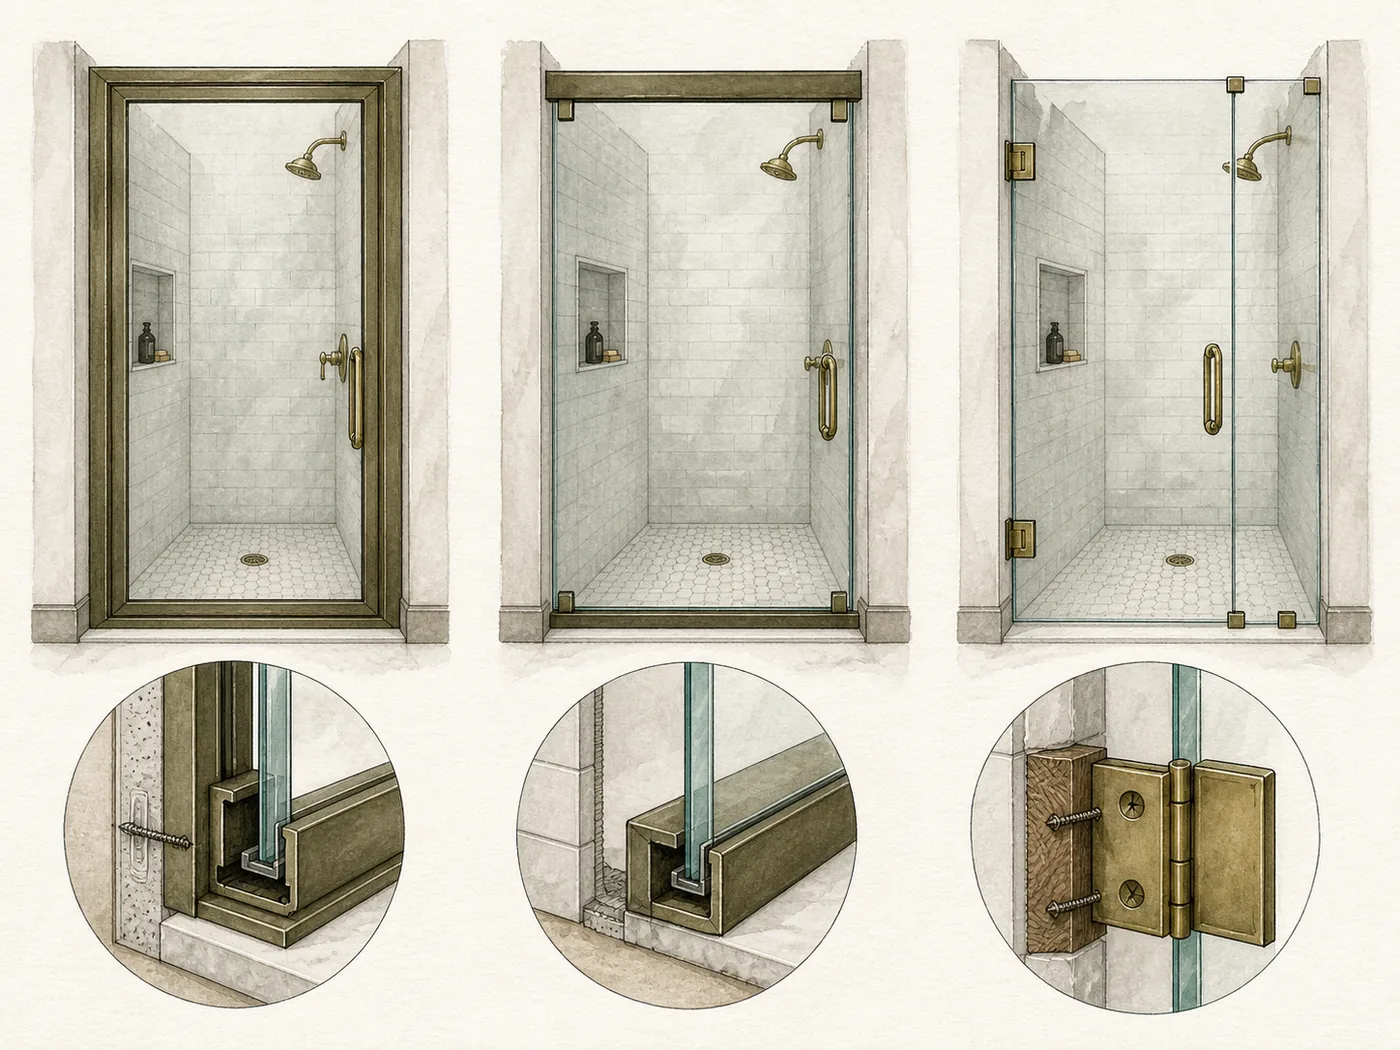
Left to right: continuous perimeter framing, reduced framing with structural rails, and exposed-edge frameless glass supported by hinges and clamps.
A sliding door can have a top rail and still be marketed as frameless. A fixed panel may sit in a slim U-channel. Those parts are not automatically a problem. They simply change the look, cleaning routine, adjustment range, and water control.
For most standard residential frameless doors, 3/8-inch glass is where I would start. Move to 1/2-inch when a larger panel or the design needs the extra rigidity and the hardware and wall can carry the weight. Thicker sounds more premium. That alone is not a reason to buy it.
| Glass thickness | Common use | Our take |
|---|---|---|
| 1/4 inch | Framed and some semi-frameless systems | Let the product system decide. Do not use it as a substitute for frameless glass |
| 3/8 inch | Many frameless doors and panels | Best starting point for a typical residential enclosure |
| 1/2 inch | Large panels and some custom designs | Choose it when the design benefits from it, not as an automatic upgrade |
Glass thickness, door size, hardware rating, and wall support work together. A well-designed 3/8-inch door is a better choice than heavier glass on hardware that is near its limit. Our shower glass thickness guide explains the details.

The left samples show relative changes in glass edge thickness, not a measurement scale. The right samples show standard clear, low-iron, frosted, and textured glass under the same background.
Finish still comes last. First check the permitted glass thickness, door size, and weight. Then look at adjustment, fixed-panel support, and replacement parts. It is less exciting than color samples, but much more useful.
Brushed finishes hide daily marks better than chrome or matte black. That makes them the easiest choice for a busy bathroom. Choose another finish if you prefer the look, but expect to wipe it more often.
Frameless shower enclosures need small working gaps, so they are not watertight. Still, you should not be mopping the bathroom after every shower. A sensible layout keeps direct spray away from the hinge, strike, glass overlap, and open edge.
For better water control:

The useful question is not whether the enclosure has a frame. It is whether spray direction, glass overlap, seals, floor slope, and the drain work together.
A few drops near a moving door can happen. A puddle, a regular trail toward the vanity, or a new leak after the door starts to sag is different. Follow the water back to the source instead of filling every gap with silicone. Our frameless shower door leak guide helps with that detective work.
Use safety glazing made for shower doors. In the United States, the Consumer Product Safety Commission’s 16 CFR Part 1201 glazing standard covers glazing used in shower doors and enclosures. The seller should be able to show how the glass is certified or marked.
Tempered glass is not unbreakable. Protect its edges and stop using a door that rubs, clicks, drops, or suddenly loses an even gap.
The wall behind the tile must also suit the hardware. The National Glass Association’s frameless shower enclosure manual describes suitable mounting materials and compatible anchors. Tile over drywall without a stud behind the connection point is not normally enough for a wall-mounted frameless door.
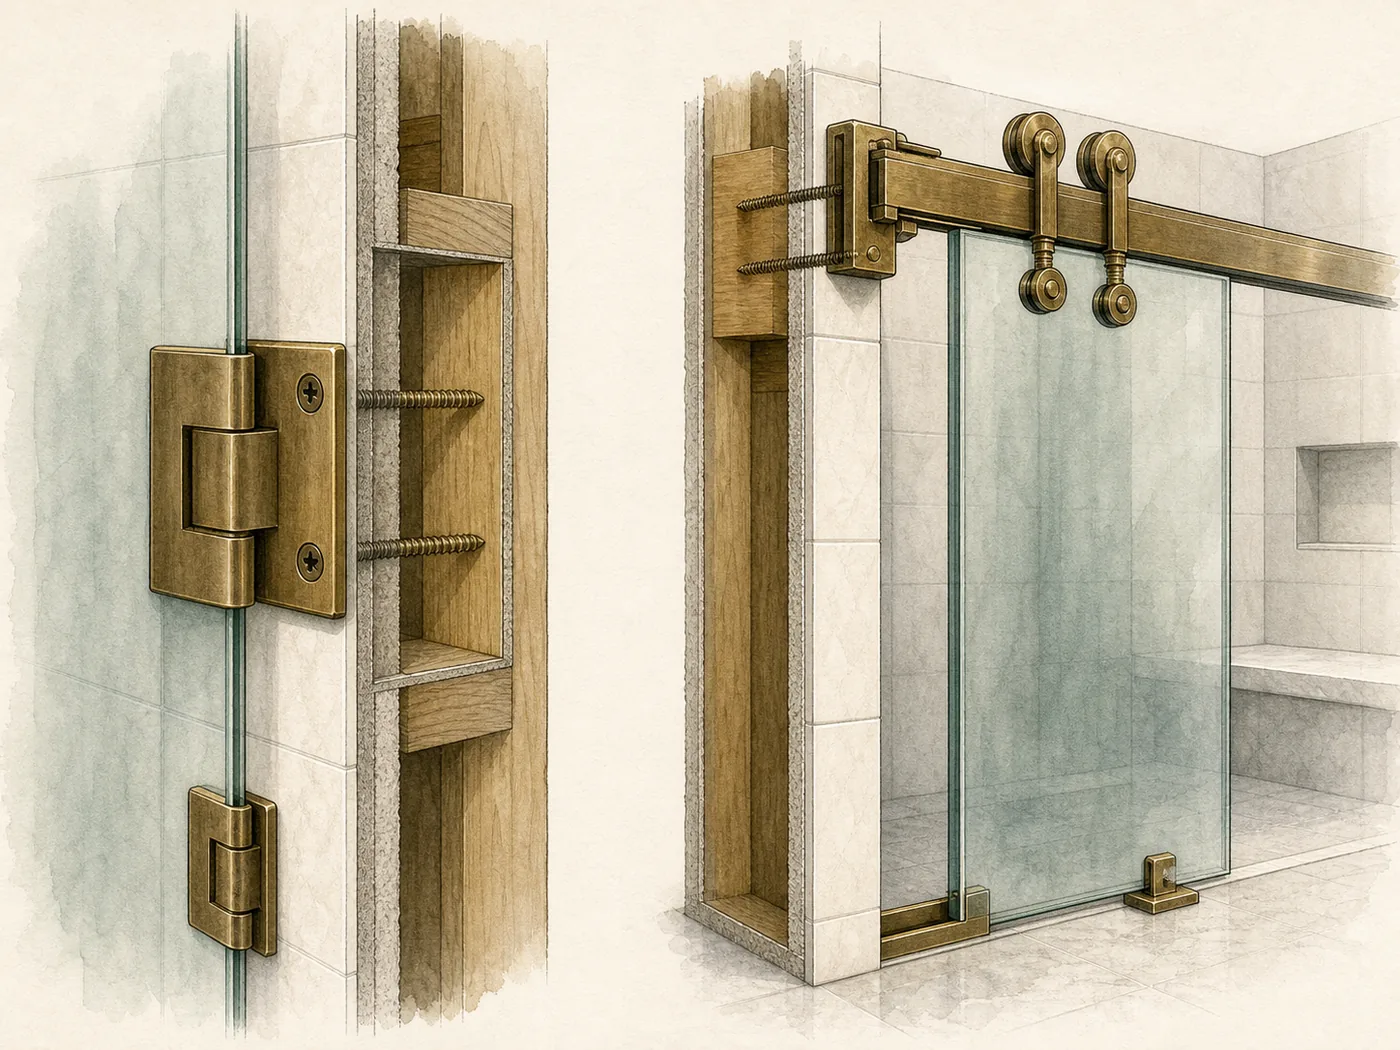
Heavy glass depends on what is behind the tile. Hinges and rail brackets need a continuous load path into suitable studs or blocking, while fixed and moving panels still need the specified channels, clamps, and guides.
For a swinging door, choose a setup that allows safe outward exit. Many hinges swing both ways. If the door is limited to one direction, outward is the sensible choice because an inward-only door can block emergency access. The outward swing still needs to clear the bathroom.
Angi’s U.S. guide, updated August 31, 2026, puts frameless shower door installation at roughly $1,100 to $5,000. That broad range includes simple doors as well as larger and more complex work. Check Angi’s current cost data when you set the budget.
For a cleaner comparison, start with the type of construction. These ranges separate the product price from the installed total:
| Construction | Product only | Typical price with installation |
|---|---|---|
| Framed shower door | $250 to $750 | $400 to $1,100 |
| Semi-frameless shower door | $350 to $1,000 | $500 to $1,550 |
| Frameless shower door | $400 to $1,300 | $600 to $1,900 |
| Single fixed panel / shower screen | $150 to $800 | $300 to $1,000 |
| Custom frameless glass | Quote required | $1,400 to $3,300 |
The figures above come from HomeGuide’s shower door cost guide. Its reported ranges cover ordinary national-market comparisons; oversized panels, unusual hardware, difficult access, and high local labor rates can move a quote beyond them.
Opening style changes the product price too. The next table is for the door or enclosure only. Installation is not included:
| Opening style | Framed | Semi-frameless | Frameless |
|---|---|---|---|
| Sliding / bypass | $250 to $780 | $350 to $1,100 | $450 to $1,450 |
| Hinged / pivot | $200 to $750 | $300 to $850 | $300 to $1,220 |
| Neo-angle | $500 to $1,000 | $500 to $1,400 | $550 to $1,250 |
| Full glass enclosure | $500 to $1,000 | Not listed by the source | $700 to $2,000 |
HomeGuide lists installation labor separately at about $150 to $550 for framed doors, $200 to $600 for frameless doors, and $800 to $1,500 for a custom enclosure. Add the applicable labor and local charges when comparing a product-only listing with an installed quote.
Special projects need their own context. ELSO Contracting’s 2026 guide lists $1,800 to $2,800 installed for a 3/8-inch clear-glass door with a fixed panel in Brevard County, Florida. The Sauna Place puts a professional-grade custom steam glass enclosure at $1,800 to $4,500. That figure covers the glass enclosure. Fixr’s steam shower cost guide lists a complete prefab steam shower at $2,800 to $6,200 installed and a complete custom steam shower at $4,000 to $10,000.
Your final price will still depend on where you live. Stock sizes, online purchases, and independently arranged installation tend to land near the lower end. Custom glass, difficult angles, and extra-tall panels move the price upward, and local labor rates can change the quote substantially. An installer in central New York City is not going to charge the same as one in rural Texas. Use this table to set a working budget, then compare two or three itemized local quotes before you decide.
Ask for glass, hardware, site verification, delivery, installation, old-door removal, and warranties to be listed separately. A low supply-only price can look great until you start paying for everything around it. Our frameless shower door cost guide explains the full breakdown.
If the finished opening sits comfortably inside the product range and the walls are reasonably straight, buy a stock sliding or hinged door from a retailer. That is usually the fastest and least expensive route.
A door with fixed panels, a corner enclosure, unusual wall conditions, or glass mounted to glass is where I would move to a shower-door specialist. Go custom for neo-angle bases, steam showers, tall enclosures, and openings outside stock adjustment ranges. In those projects, the glass and hardware really do need to be designed together.
If you are confident with careful DIY work, or you know a handyman who has real experience installing heavy shower glass, a stock kit from Amazon or another online marketplace can cost much less upfront. Add delivery, tools, help with lifting, and installation labor before comparing the final price. The item price alone can make the saving look bigger than it is.
Check the listing before you order. You should be able to identify the manufacturer, download the full installation manual, and confirm the opening range, out-of-plumb adjustment, glass thickness, hardware limits, replacement parts, warranty, and damage-return policy. For a U.S. installation, look for documentation that the safety glass meets the applicable shower-glazing requirements and check how the glass itself is marked. A small certification icon on a marketplace image is not enough.
This route works best for a straightforward stock sliding or hinged door when the opening fits, the walls are reasonably straight, and the mounting support is known. Skip it for custom glass, neo-angle or steam enclosures, glass-to-glass hinges, uncertain wall support, or oversized panels. Those jobs are poor places to save money on installation.
| Configuration | Where cleaning and wear show up first |
|---|---|
| Sliding | Panel overlap, bottom guide, and rollers |
| Hinged or pivot | Hinges, alignment, and bottom sweep |
| Fixed panel | Open glass edge and the floor beside the entry |
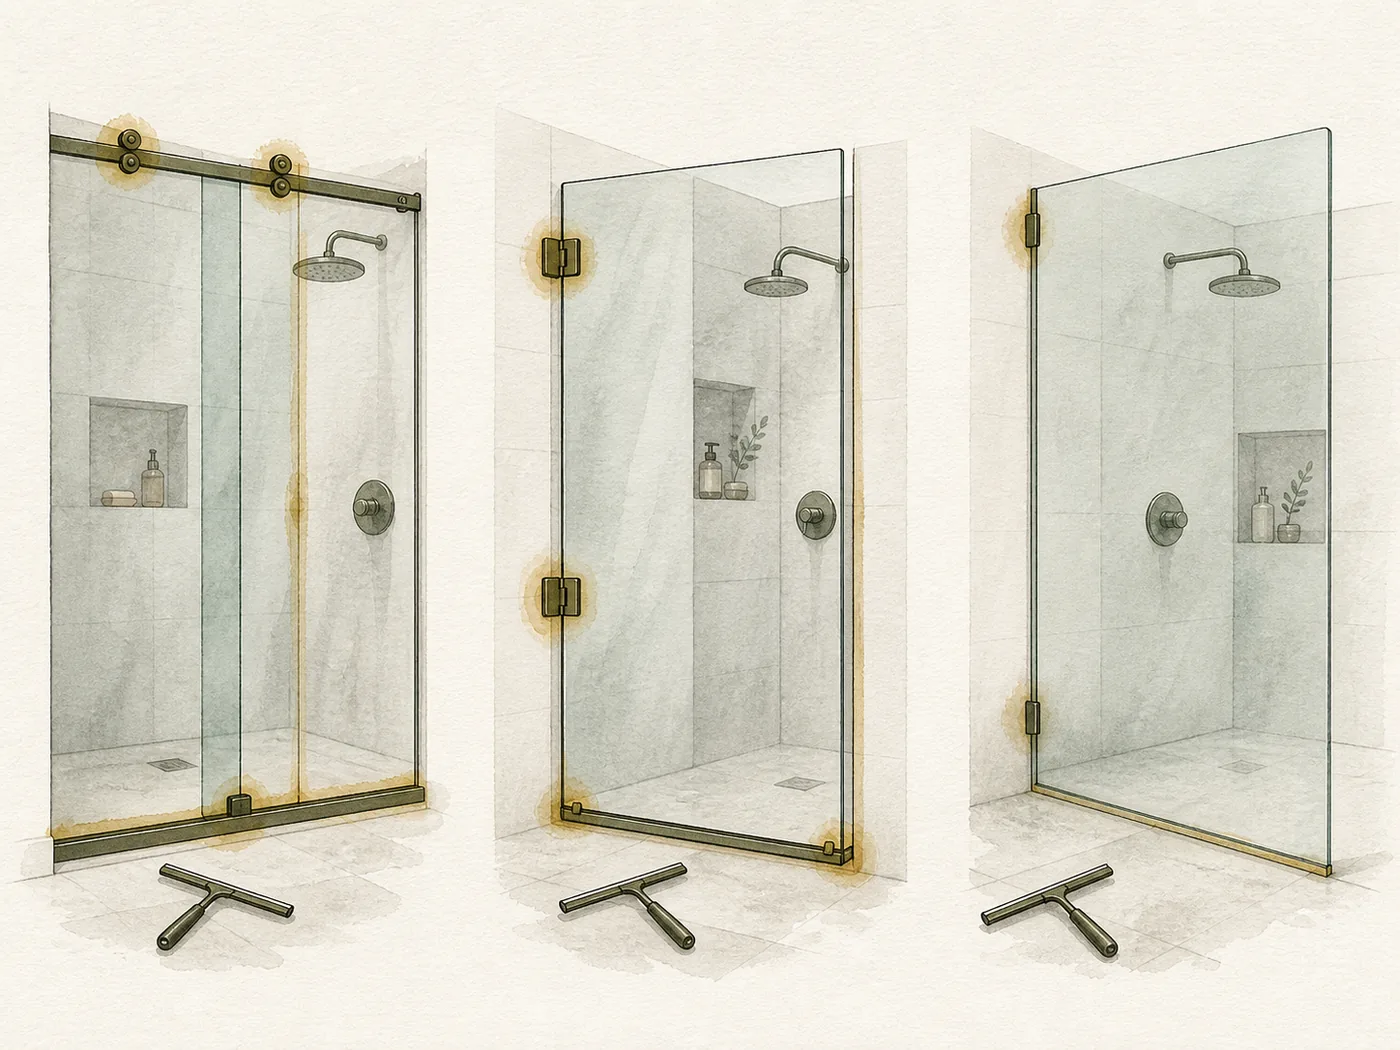
Sliding systems have the most overlap, guides, and roller contact points; hinged doors concentrate maintenance around hinges and sweeps; a fixed panel has no moving hardware.
If hard-water spots drive you crazy, keep a squeegee in the shower. Avoid abrasive pads on the glass and plated finishes, and use cleaners approved for any protective coating. Our shower glass cleaning guide has the full routine.
You do not need to become a glass fabricator to choose a door style. You do need to confirm that the product fits once the tile, base, and other permanent finishes are complete.
Check the product’s opening range, out-of-plumb adjustment, full door path, mounting surface, and required support. For custom glass, unusual angles, glass-mounted hinges, or a very tall enclosure, have the final dimensions verified before fabrication. Tempered glass cannot be trimmed on site. Use our measurement guide to prepare for that final check.
I would choose semi-frameless or framed when the opening needs more adjustment, the shower needs stronger water-control features, or the budget does not cover the right glass, hardware, and installation. If the curb sends water outward or the hinge location has no safe support, fix the room first.
If a door cannot open without blocking the room, switch to sliding. If a fixed panel leaves the floor wet, add a door. If a stock product cannot handle the wall variation, move to a channel-based or custom system. When a bathroom works better with a frame, use one.
The styled photo may hide panel overlap, a bottom guide, seals, or a support bar. Read the installation drawing before you buy.
Sliding overlap and fixed panels reduce the space you actually walk through. Compare the clear walk-through width.
Pivot changes the swing. It does not remove it. Check the movement inside and outside the shower.
Choose the glass thickness that suits the door size and hardware. Extra weight is not a quality score.
The configuration, spray direction, gaps, seals, slope, and drainage decide where the water goes.
Choose the door movement, entry width, glass, and hardware first. Then pick chrome, brushed nickel, brass, or black.
You want product specifications here. “It should fit” is not an answer.
This table is intentionally blank. Copy or print it, then make every seller quote the same scope. Otherwise the cheapest total may simply be missing delivery, site verification, or installation.
| What to compare | Quote A | Quote B | Quote C |
|---|---|---|---|
| Door style and model | |||
| Glass thickness and finish | |||
| Clear walk-through width | |||
| Hardware and support | |||
| Final site verification | |||
| Delivery and installation | |||
| Old-door removal | |||
| Glass, hardware, and labor warranties | |||
| Total installed price |
Save this list for checkout. If you can say yes to every point, you are ready to buy:
If those answers are clear, choose the door. Do not let another week of finish samples send you back to the beginning.
Choose sliding first. It keeps the glass inside the opening and avoids collisions with nearby fixtures. Choose pivot only when its offset movement solves a specific obstruction and both sides of the swing stay clear.
Choose sliding when floor clearance is tight. Choose hinged when the swing is clear and you want a wider, more direct entrance. For most roomy bathrooms, hinged feels simpler. For most compact bathrooms, sliding fits better.
Yes, when the shower is deep, the panel keeps the main spray in the wet zone, and the showerhead points away from the opening. In a shallow shower with the spray facing outward, choose a door.
Minor variation may fit within a product’s adjustment range. For more noticeable variation, choose semi-frameless, a wall channel, or custom glass. Do not buy a stock door until its stated adjustment covers the finished opening.
Yes, for many standard residential frameless doors. Start with 3/8-inch unless the panel size, hardware instructions, or custom design calls for 1/2-inch glass.
Narrow the list to one or two styles, then compare those products by walk-through width, adjustment range, glass, hardware, water-control features, replacement parts, and installed cost.
Measure the finished opening before comparing exact models. Start with the configuration that fits your bathroom, then pick the finish you actually want to look at every day.
Use these with the exact product and room conditions behind your decision.
Your response helps us make the next guide more useful.
Loading responses…
Continue with the next decision in your bathroom project.