
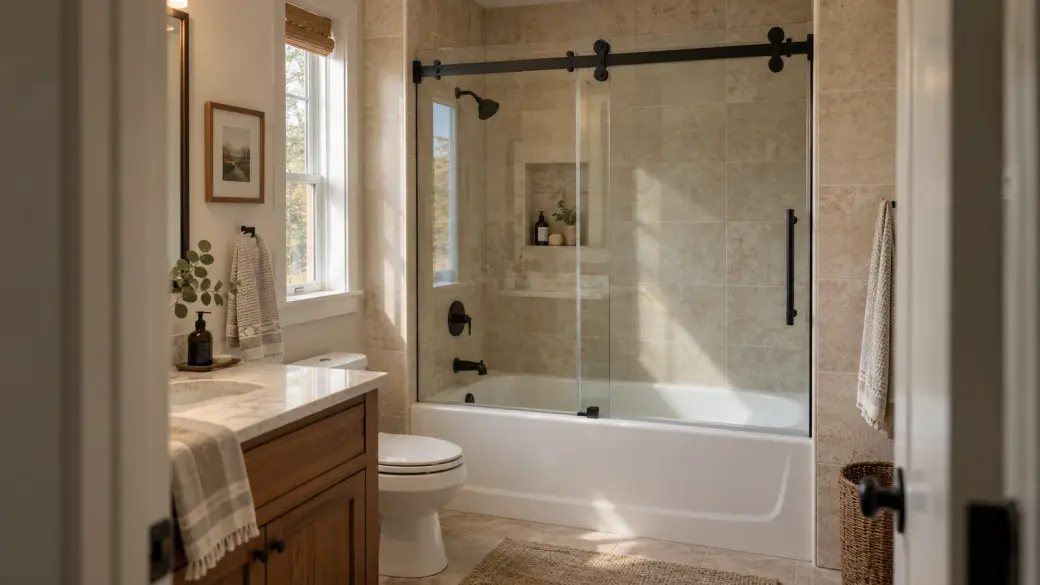
Barn door style sliding glass shower doors make sense when a swinging door would bump a fixture and you like exposed hardware. Buy one when the entry is comfortable, the opening fits, the hanging glass has reliable support, and you can reach it to clean. A handsome door you have to squeeze through gets old fast.
Picture an ordinary Tuesday morning: can you get in, turn on the water, and wipe the glass without making a small production of it? Settle those questions before choosing the finish.
Two-minute check: is this style right for you?
- A swinging door would hit the vanity or toilet? Consider a slider.
- You like seeing the rail and rollers? Keep the barn style on your list.
- The taped-out entry feels cramped? Choose a layout with more usable entry.
- You don’t know what’s behind the tile, or the walls lean? Hold the order until support and wall fit are settled.
Do your part of the two-column checklist, then use the order-decision table.
Barn-style shower doors: who they suit and how you enter
Barn-style shower doors slide sideways on a visible upper rail. They save swing space, but overlapping glass still occupies part of the opening. Judge the room left for you to enter.
Is this a good fit for your bathroom?
Choose a slider when the panels have room to overlap and a hinged door would hit a fixture. Moffat’s overview shows the arrangement. Your bathroom doesn’t need a farmhouse theme to wear a pair of rollers.
Choose another layout if the entry is cramped, you want hidden hardware, or fixtures block cleaning access. Removing the door swing helps; it won’t move the toilet out of your path.
One sliding panel or two moving panels?
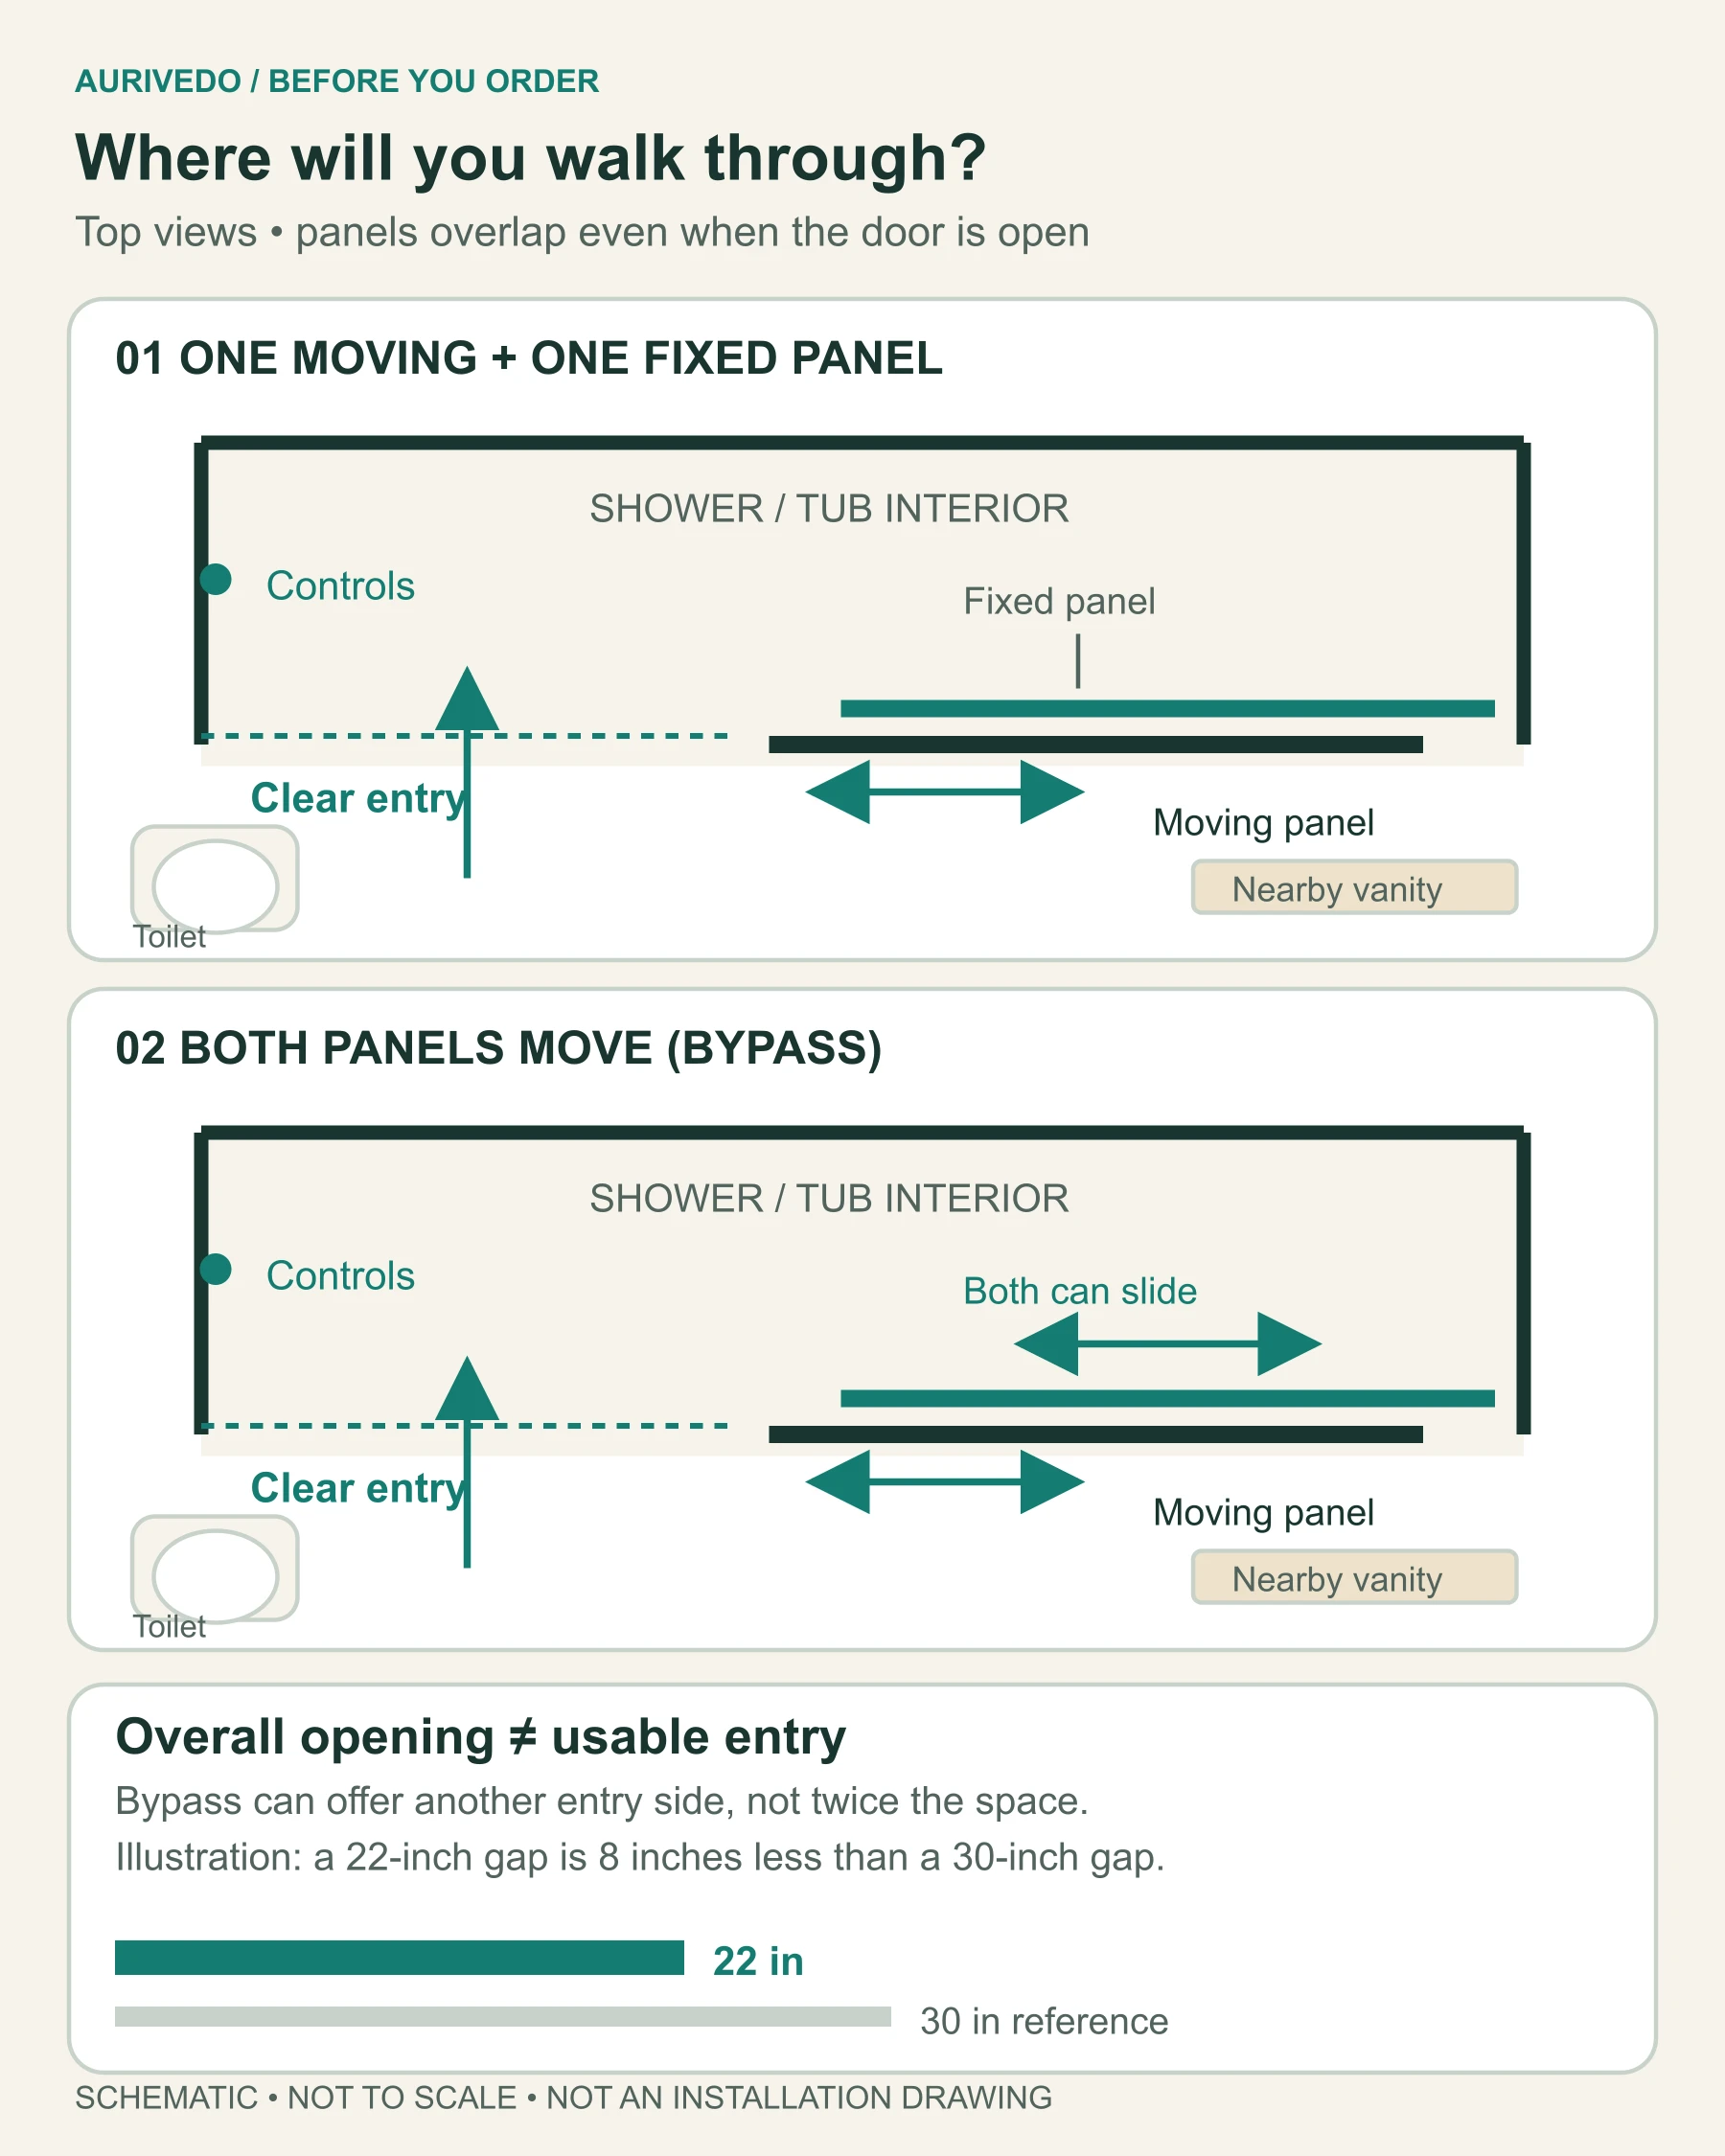
With single sliding vs. bypass shower doors, one fixed panel means a designated entry side. True bypass doors let both panels move, giving you different access positions. The glass still overlaps rather than disappearing like a pocket door. Hillcrest’s systems include both layouts.
“Bypass” describes movement, not load distribution. Both panels can hang from the header even when a bottom sill is present, as the example below shows. Two moving panels don’t automatically mean a wider entry.
Sketch the toilet, vanity, controls, and entry. Compare open and closed panel positions, including both entry sides for bypass doors. Choose a layout that lets you reach the controls before stepping under the spray. Nobody needs a cold-water surprise before coffee.
Check the walk-through opening separately
Overall width and sliding shower door walk-through opening differ. One 56-60-inch model lists only 22-26 inches of entry. That figure belongs to that configuration, identified in the source notes, not every 60-inch slider.
Measure a doorway you use comfortably. If its clear opening is 30 inches, a 22-inch shower entry is 8 inches narrower. Your approach and movement decide whether that difference works for you.
Tape a 22-inch gap on a dry floor and try the approach and step-through. It’s a cheap audition for an expensive door. Repeat at the candidate’s actual entry width for your opening, including handle and stop limits.
Consider everyone using the bathroom. Tape tests comfort, not structural fit or accessibility compliance. Assisted access or mobility-device use needs an assessment of the entry and threshold for that purpose.
Customer case: replacing a framed bathtub door with a barn-style enclosure
The customer said the old door was showing its age and leaking a little. They already wanted a replacement, so they chose a barn-style enclosure that better matched their home’s decor. These authorized before-and-after photos show the change, with a toilet and vanity close to the tub.
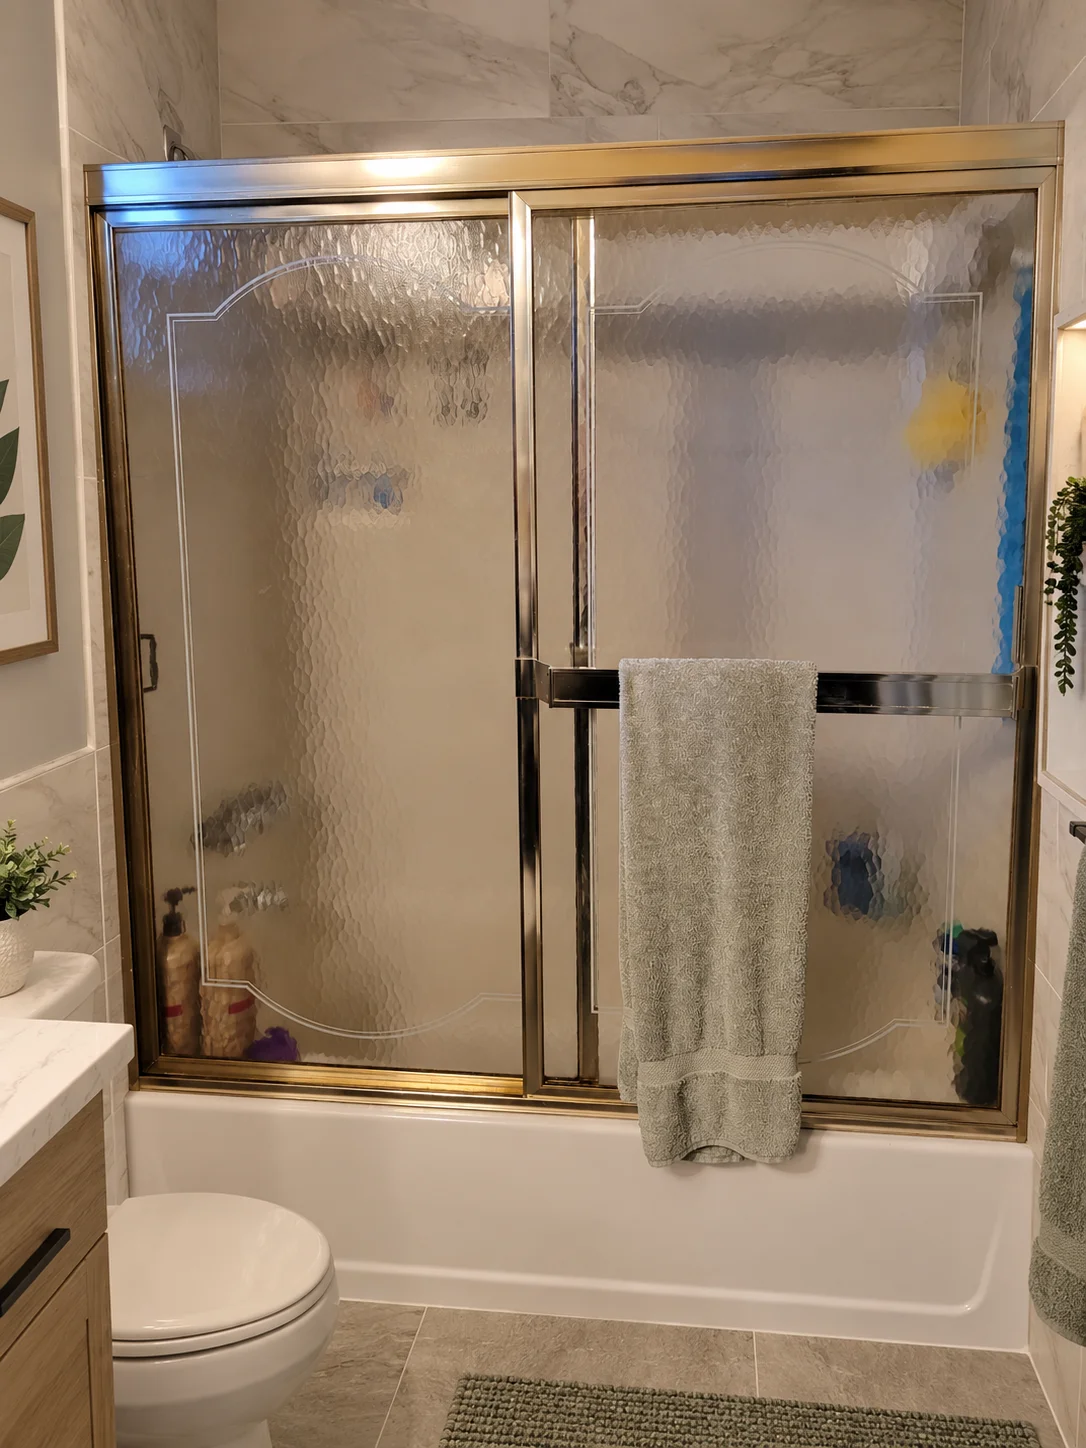
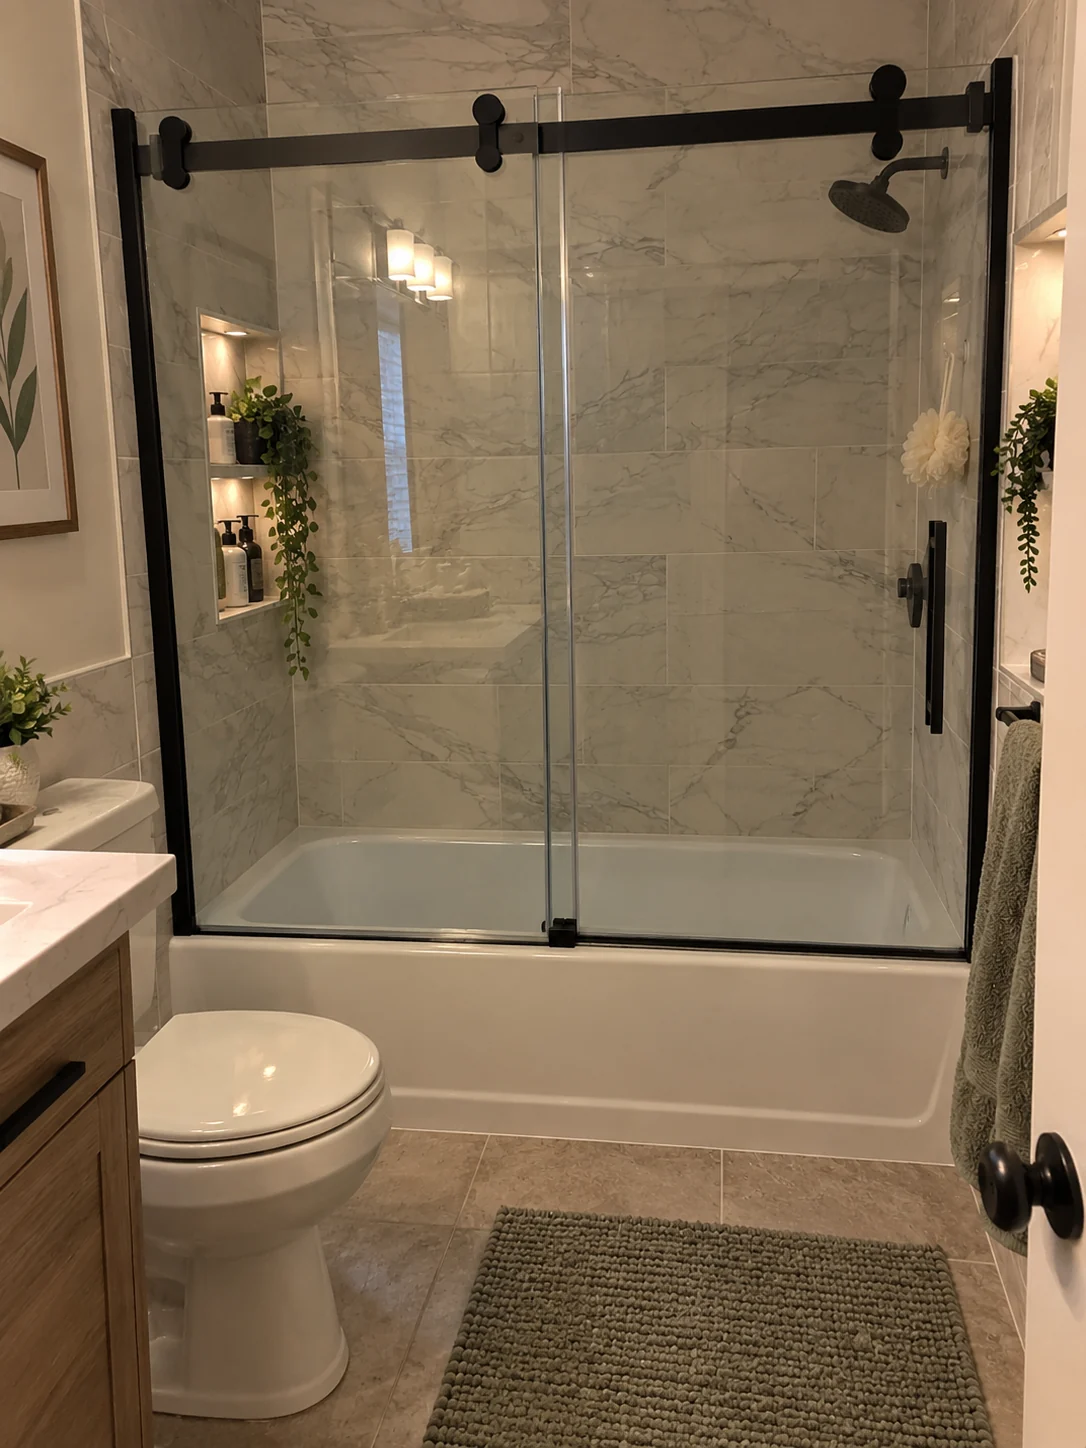
Clear glass brings the tile, niches, and shower fittings into view, with less visual privacy than the old textured panels. The tile gets to leave backstage. Choose that openness if you like it; choose textured glass if privacy matters more.
For a similar replacement, check the entry beside your fixtures and the tub rim’s flat mounting space. The new enclosure still has lower hardware, and you still step over the tub side. A new door doesn’t turn a bathtub into a walk-in shower.
The model, measurements, and concealed support details weren’t supplied. These photos document appearance, not a wider entry, easier cleaning, or better water containment. Use them for the visual comparison and the checks below for your own tub’s fit.
Sliding shower door hardware: look beyond the exposed rollers
Buy sliding shower door hardware as a matched system, including glass, rail, brackets, rollers, guides, and retainers. Matching by appearance alone is like buying a tire because you like the tread.
Round or square rails don’t, by themselves, prove strength or smoother movement. Between two suitable systems, operate a display door instead of relying on a promise of “smooth operation.”
What carries the glass, and what keeps it on the rail?
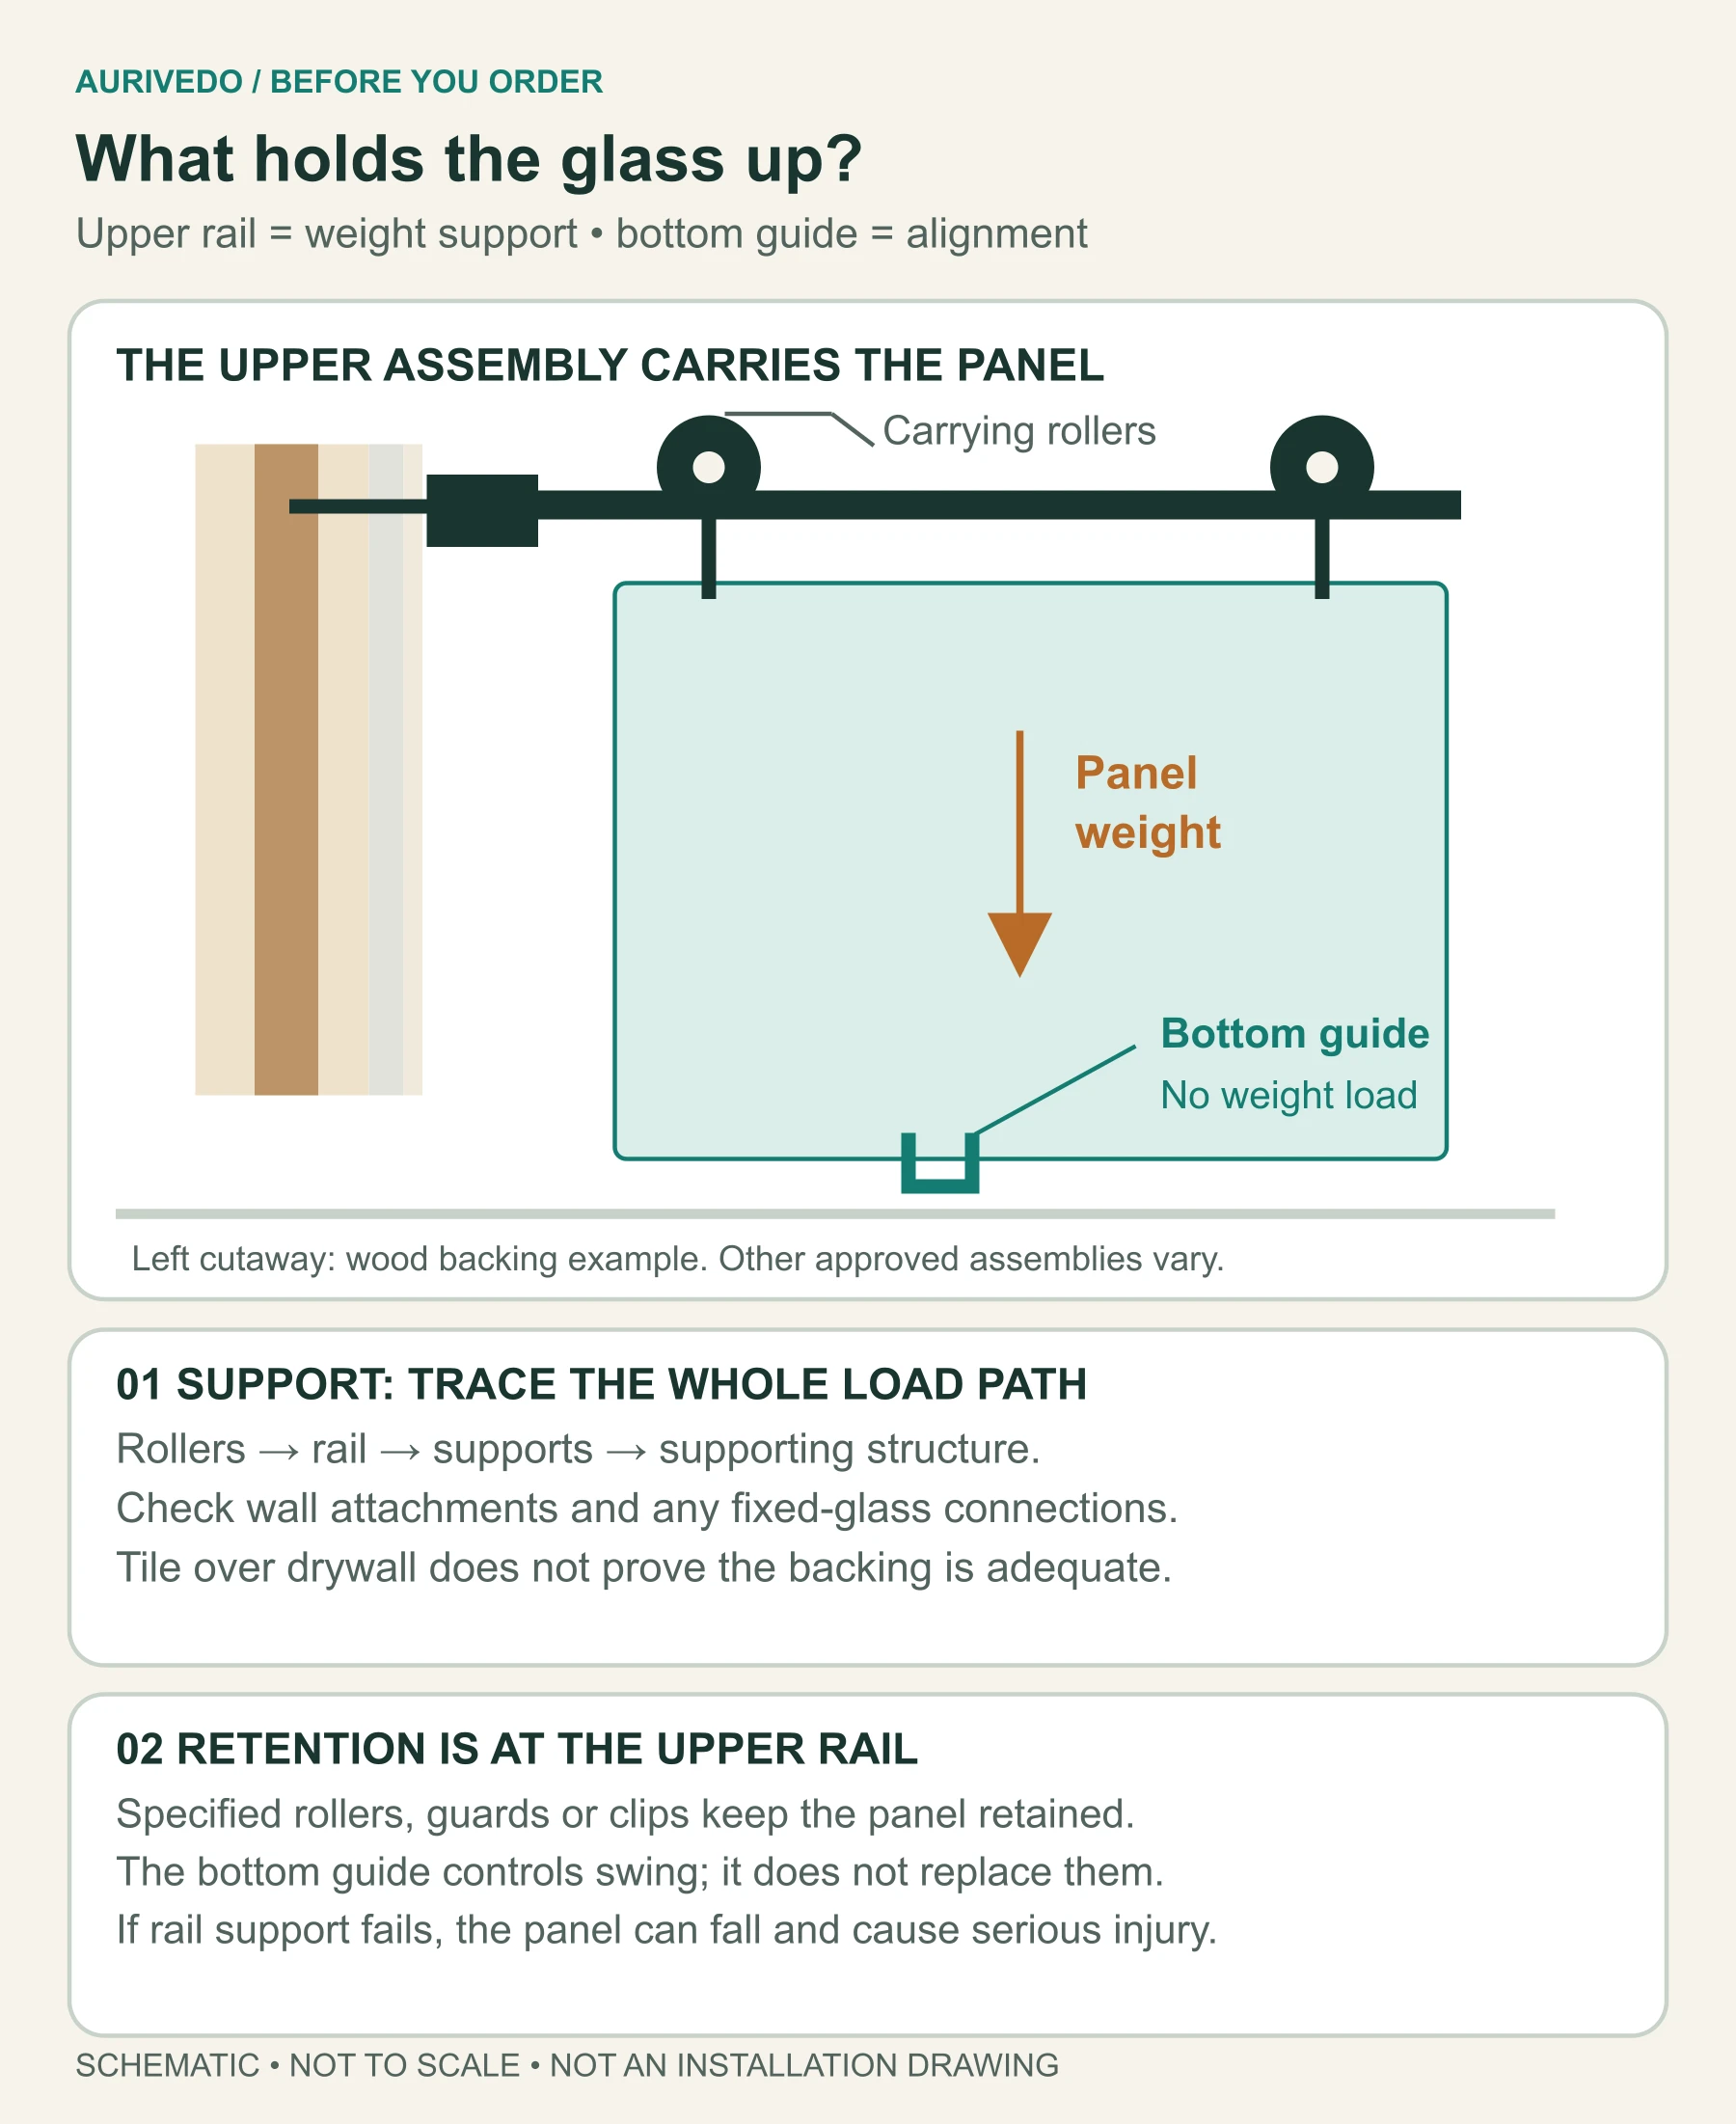
In a top-hung exposed-roller system, the upper rail carries the moving glass panel’s full weight. The bottom guide controls alignment and swing; it carries none of that weight. If the rail support fails, the panel can fall and cause serious injury. Settle support before buying.
Wall attachments must engage studs, blocking, solid masonry, or an approved anchor-and-wall assembly. Tile over drywall proves nothing about backing. Have the installer establish the actual support before ordering. This system’s manual, pp. 4-5 strongly recommends studs or wood reinforcement and documents a wall-anchor option on p. 22 for its specified arrangement. That isn’t permission to use any anchor that fits the hole.
If the rail connects to fixed glass, include its brackets and panel supports in that assessment. The weight must reach the supporting structure through the complete assembly; a photo or stud-finder reading alone doesn’t verify that route.
Anti-lift parts work at the upper rail and rollers. This system uses lower rollers against that upper rail; others use guards, clips, or retainers. “Lower rollers” here are still overhead. KOHLER’s guidance shows header anti-jump clips. The bottom guide controls swing and cannot replace upper retaining parts.
Use these functions to read the system drawing; component shapes vary.
| Part or function | What it means for you | Before you buy |
|---|---|---|
| Upper carrying rail and its supports | Support the hanging panel; support failure can let the glass fall | Actual wall substrate, approved attachments, any fixed-glass connections, and installed height |
| Rollers | Door movement and later servicing | Compatible glass and available replacement assemblies |
| Guide at the bottom of the glass | Controls lateral movement and alignment; does not carry the top-hung panel’s weight | Engagement, mounting footprint and cleaning access |
| Travel stops | Where the door stops when opening or closing | Usable entry and handle clearance |
| Upper-rail retaining or anti-lift components | Restrain lifting out of the upper running arrangement | The exact rollers, guards, clips or retainers and their prescribed engagement |
“Soft-close” must specify whether it’s included and which end of travel it controls. “Adjustable” must name width, height, or wall alignment. Put missing details in the single checklist below.
A clear glass edge does not mean an empty threshold
Check the guide, sill, water dam, or raised hardware for both step-over clearance and cleaning access. A side-section drawing shows height and footprint when the front photo hides them.
This frameless bypass kit, pp. 2-3, for example, hangs panels from its header but still has jambs, a sill track, and a bottom guide. It differs from exposed-rail doors. “Frameless” doesn’t promise an empty curb.
Barn-style shower doors: check the finished opening’s shape
Measure after tile and other surface work are finished. Record opening widths, wall alignment, flat threshold space, and overhead clearance. Rule out poor fits before debating black versus brushed nickel.
Wall lean and threshold width can rule out a model
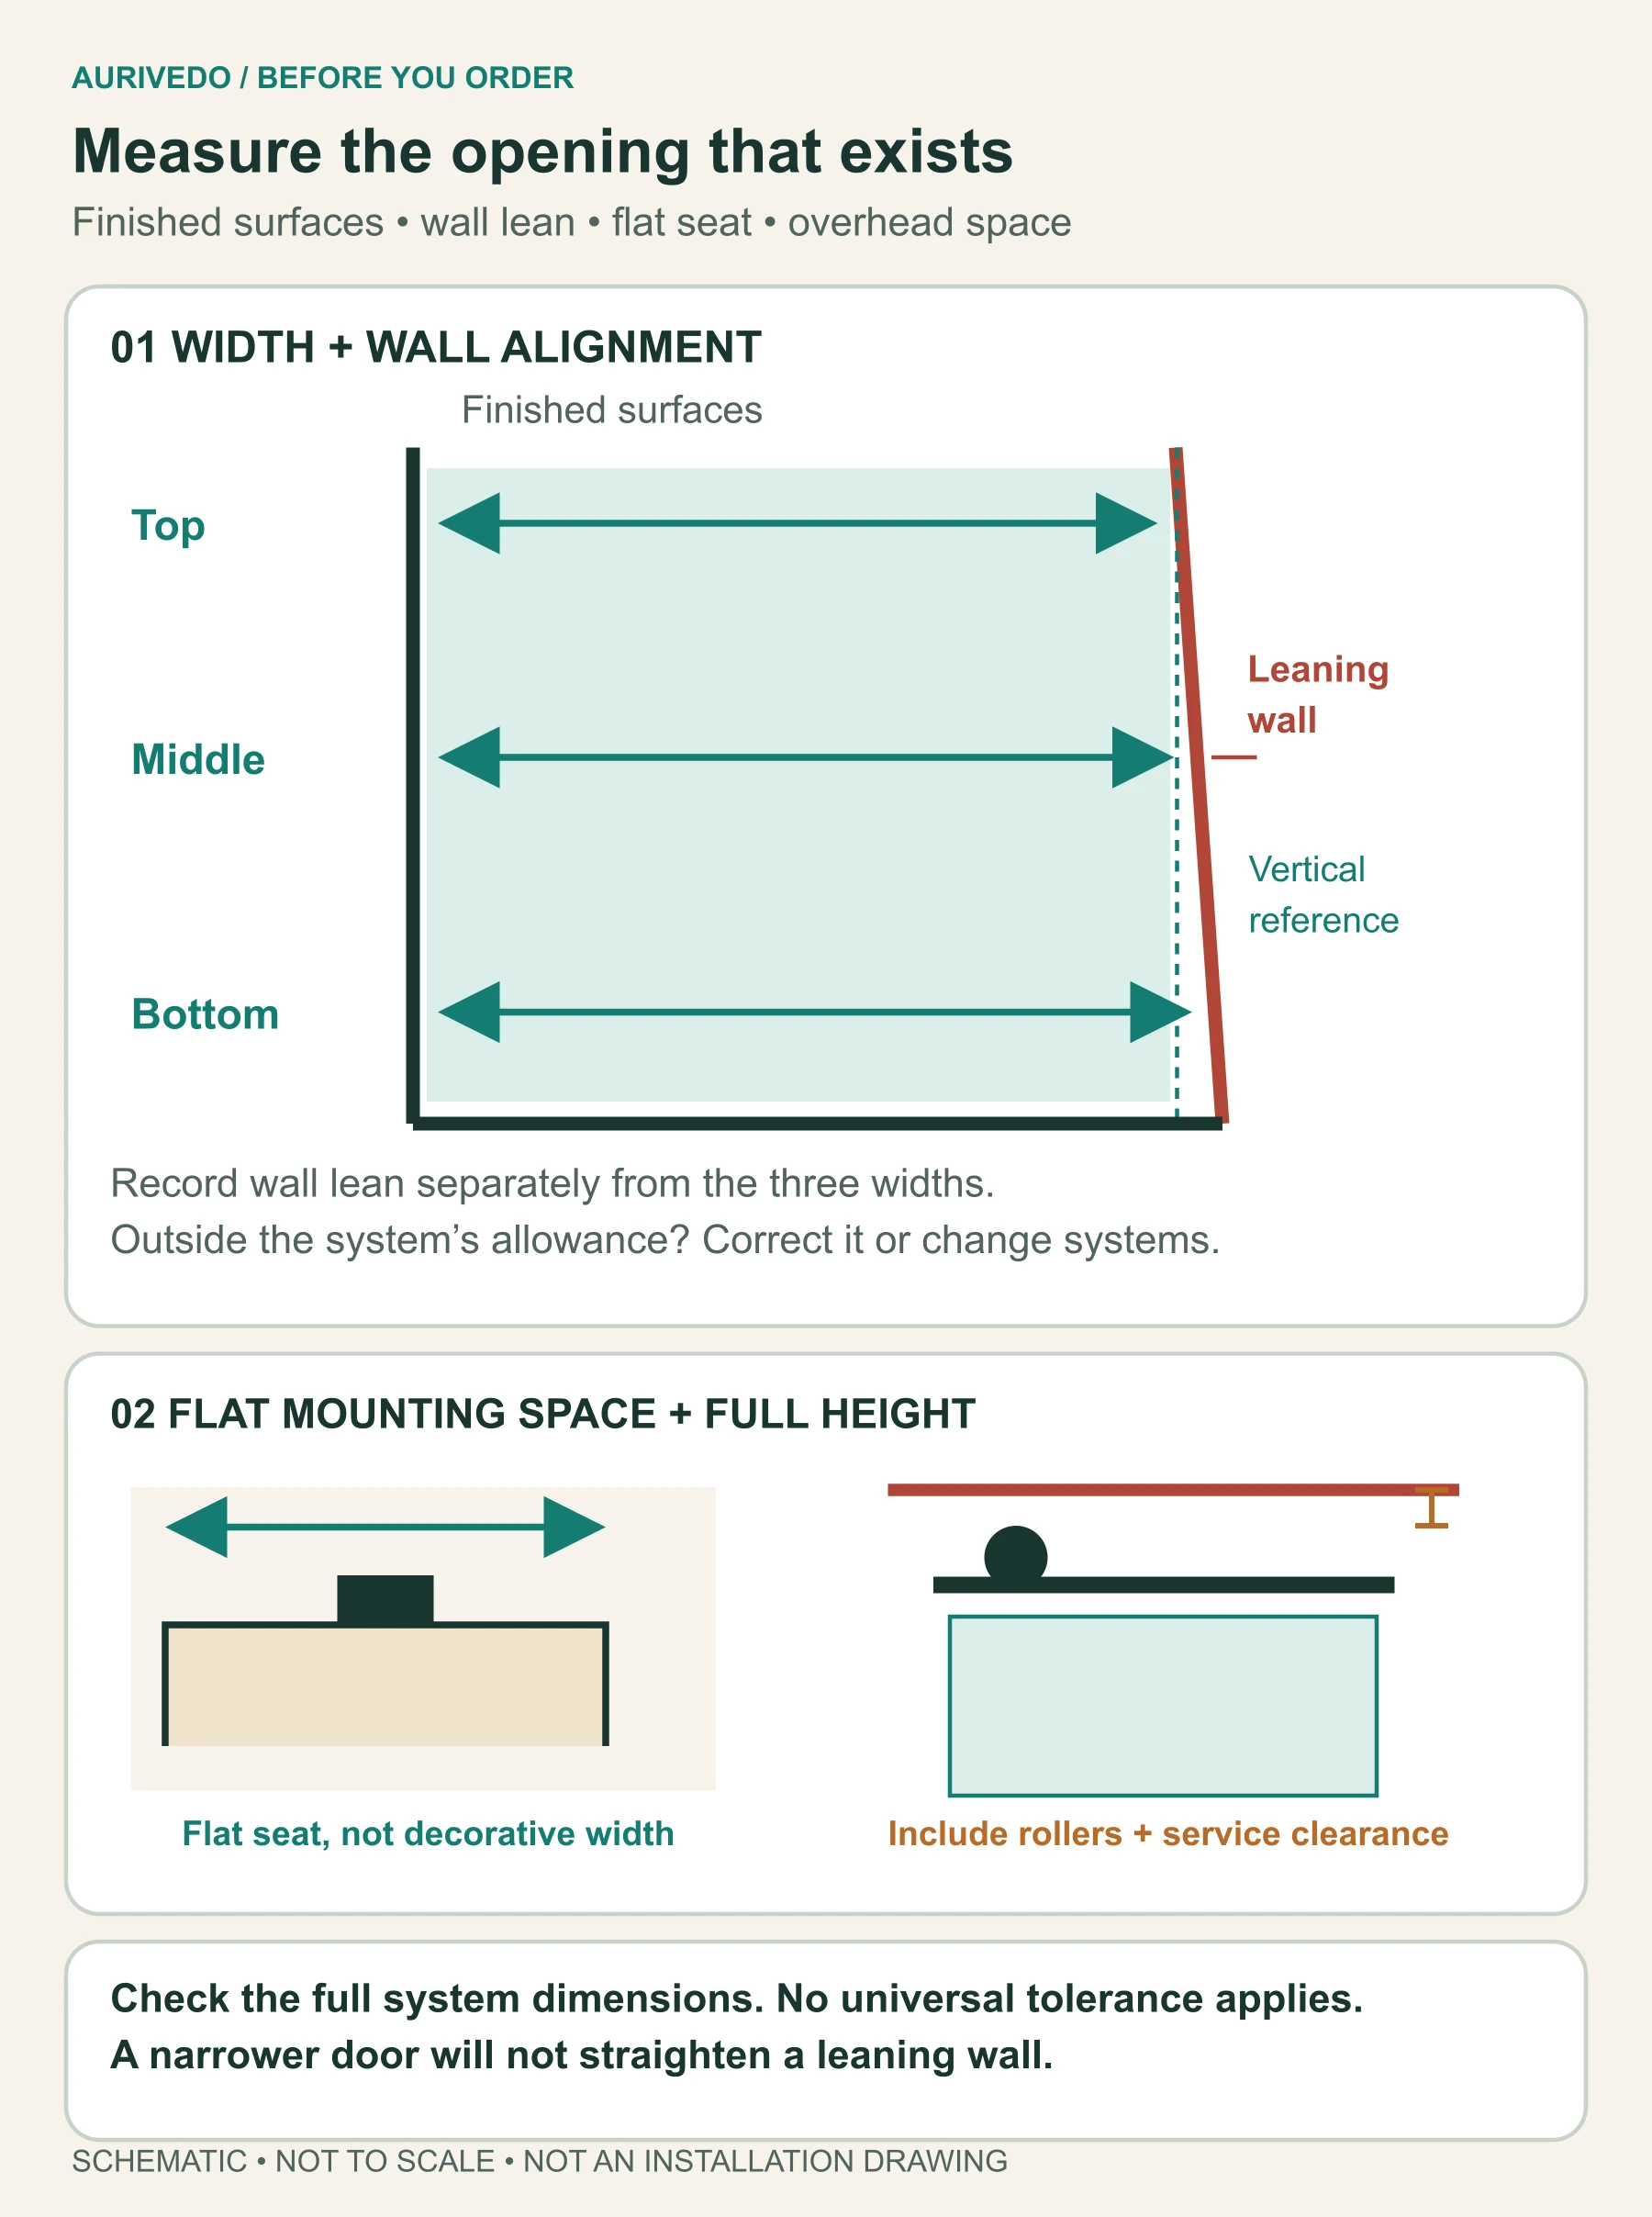
Measure top, middle, and bottom widths and check both walls with a level. “Out of plumb” means a wall leans. Beyond the door’s adjustment range, correct the opening or change systems. A narrower door won’t straighten the wall. Once the wall passes, size the door using that system’s measuring method.
One exposed-roller system, pp. 6 and 13-14 requires plumb walls with no adjustment allowance, a level threshold, and at least 2¾ inches of flat mounting space. Miss one condition and that model is out until the opening changes. Its rail-cut calculation uses width at model height, so “always use the narrowest reading” isn’t a universal slider rule.
Measure the flat hardware seat, not the curb’s decorative overall width. Record wall lean separately from opening widths. The finished-opening guide and wall-plumb checks explain both tasks.
Check the full hardware height under a low or sloped ceiling
Under a soffit or sloped ceiling, compare the lowest obstruction with the rail, brackets, and rollers’ highest installed point. Include assembly and service clearance in your side sketch. Glass height alone isn’t enough, just as a car with a roof rack needs more clearance than its windshield.
Alcoves, corner returns, and angled openings need different drawings
The 56-60-inch example is for an alcove: three walls and one front opening. An open-sided corner needs side glass and its support too. Matching front width doesn’t turn an alcove kit into a complete corner enclosure.
For knee walls, sloped ceilings, or angled entries, match dimensioned front and overhead sketches to the complete system. A drawing that omits your side panel hasn’t solved the fit. The neo-angle guide covers angled geometry.
Sliding shower door hardware and fit: your pre-order checklist
Keep one order record linking your opening to the exact model, layout, entry, and mounting plan. Include preparation work and who handles it.
Send these details to the supplier
Do the left column with a tape measure, level, photos, and a rough sketch. Send the packet once for the right-column dimensions and installation assessment. Keep the answers with the quote.
| You can check at home | Supplier or installer: settle these in the quote |
|---|---|
| Opening: Record top, middle and bottom widths, height, flat curb space, wall lean and overhead obstructions | Exact system fits those measurements; width/height and wall-adjustment limits; required overhead clearance |
| Layout: Sketch the toilet, vanity, controls and preferred entry side | Fixed or bypass panels, open/closed positions and access to controls |
| Entry: Mark the proposed clear width on a dry floor; try the approach and step-through | Actual clear entry width and usable height at your opening, including handle/stop limits |
| Mounting: Photograph both mounting walls and the curb; gather any existing backing photos or plans | Installer verifies actual support, approved attachments, fixed-panel connections and preparation work |
| Hardware: Save the listing and flag unclear soft-close or adjustment claims | Exact glass/kit, carrying rollers, guides, stops and retaining parts; included features |
| Care: Note where a vanity blocks reach and which surfaces you can access | Normal cleaning access demonstrated, compatible care instructions and replacement-part source |
Test the cleaning access and compare the complete quote
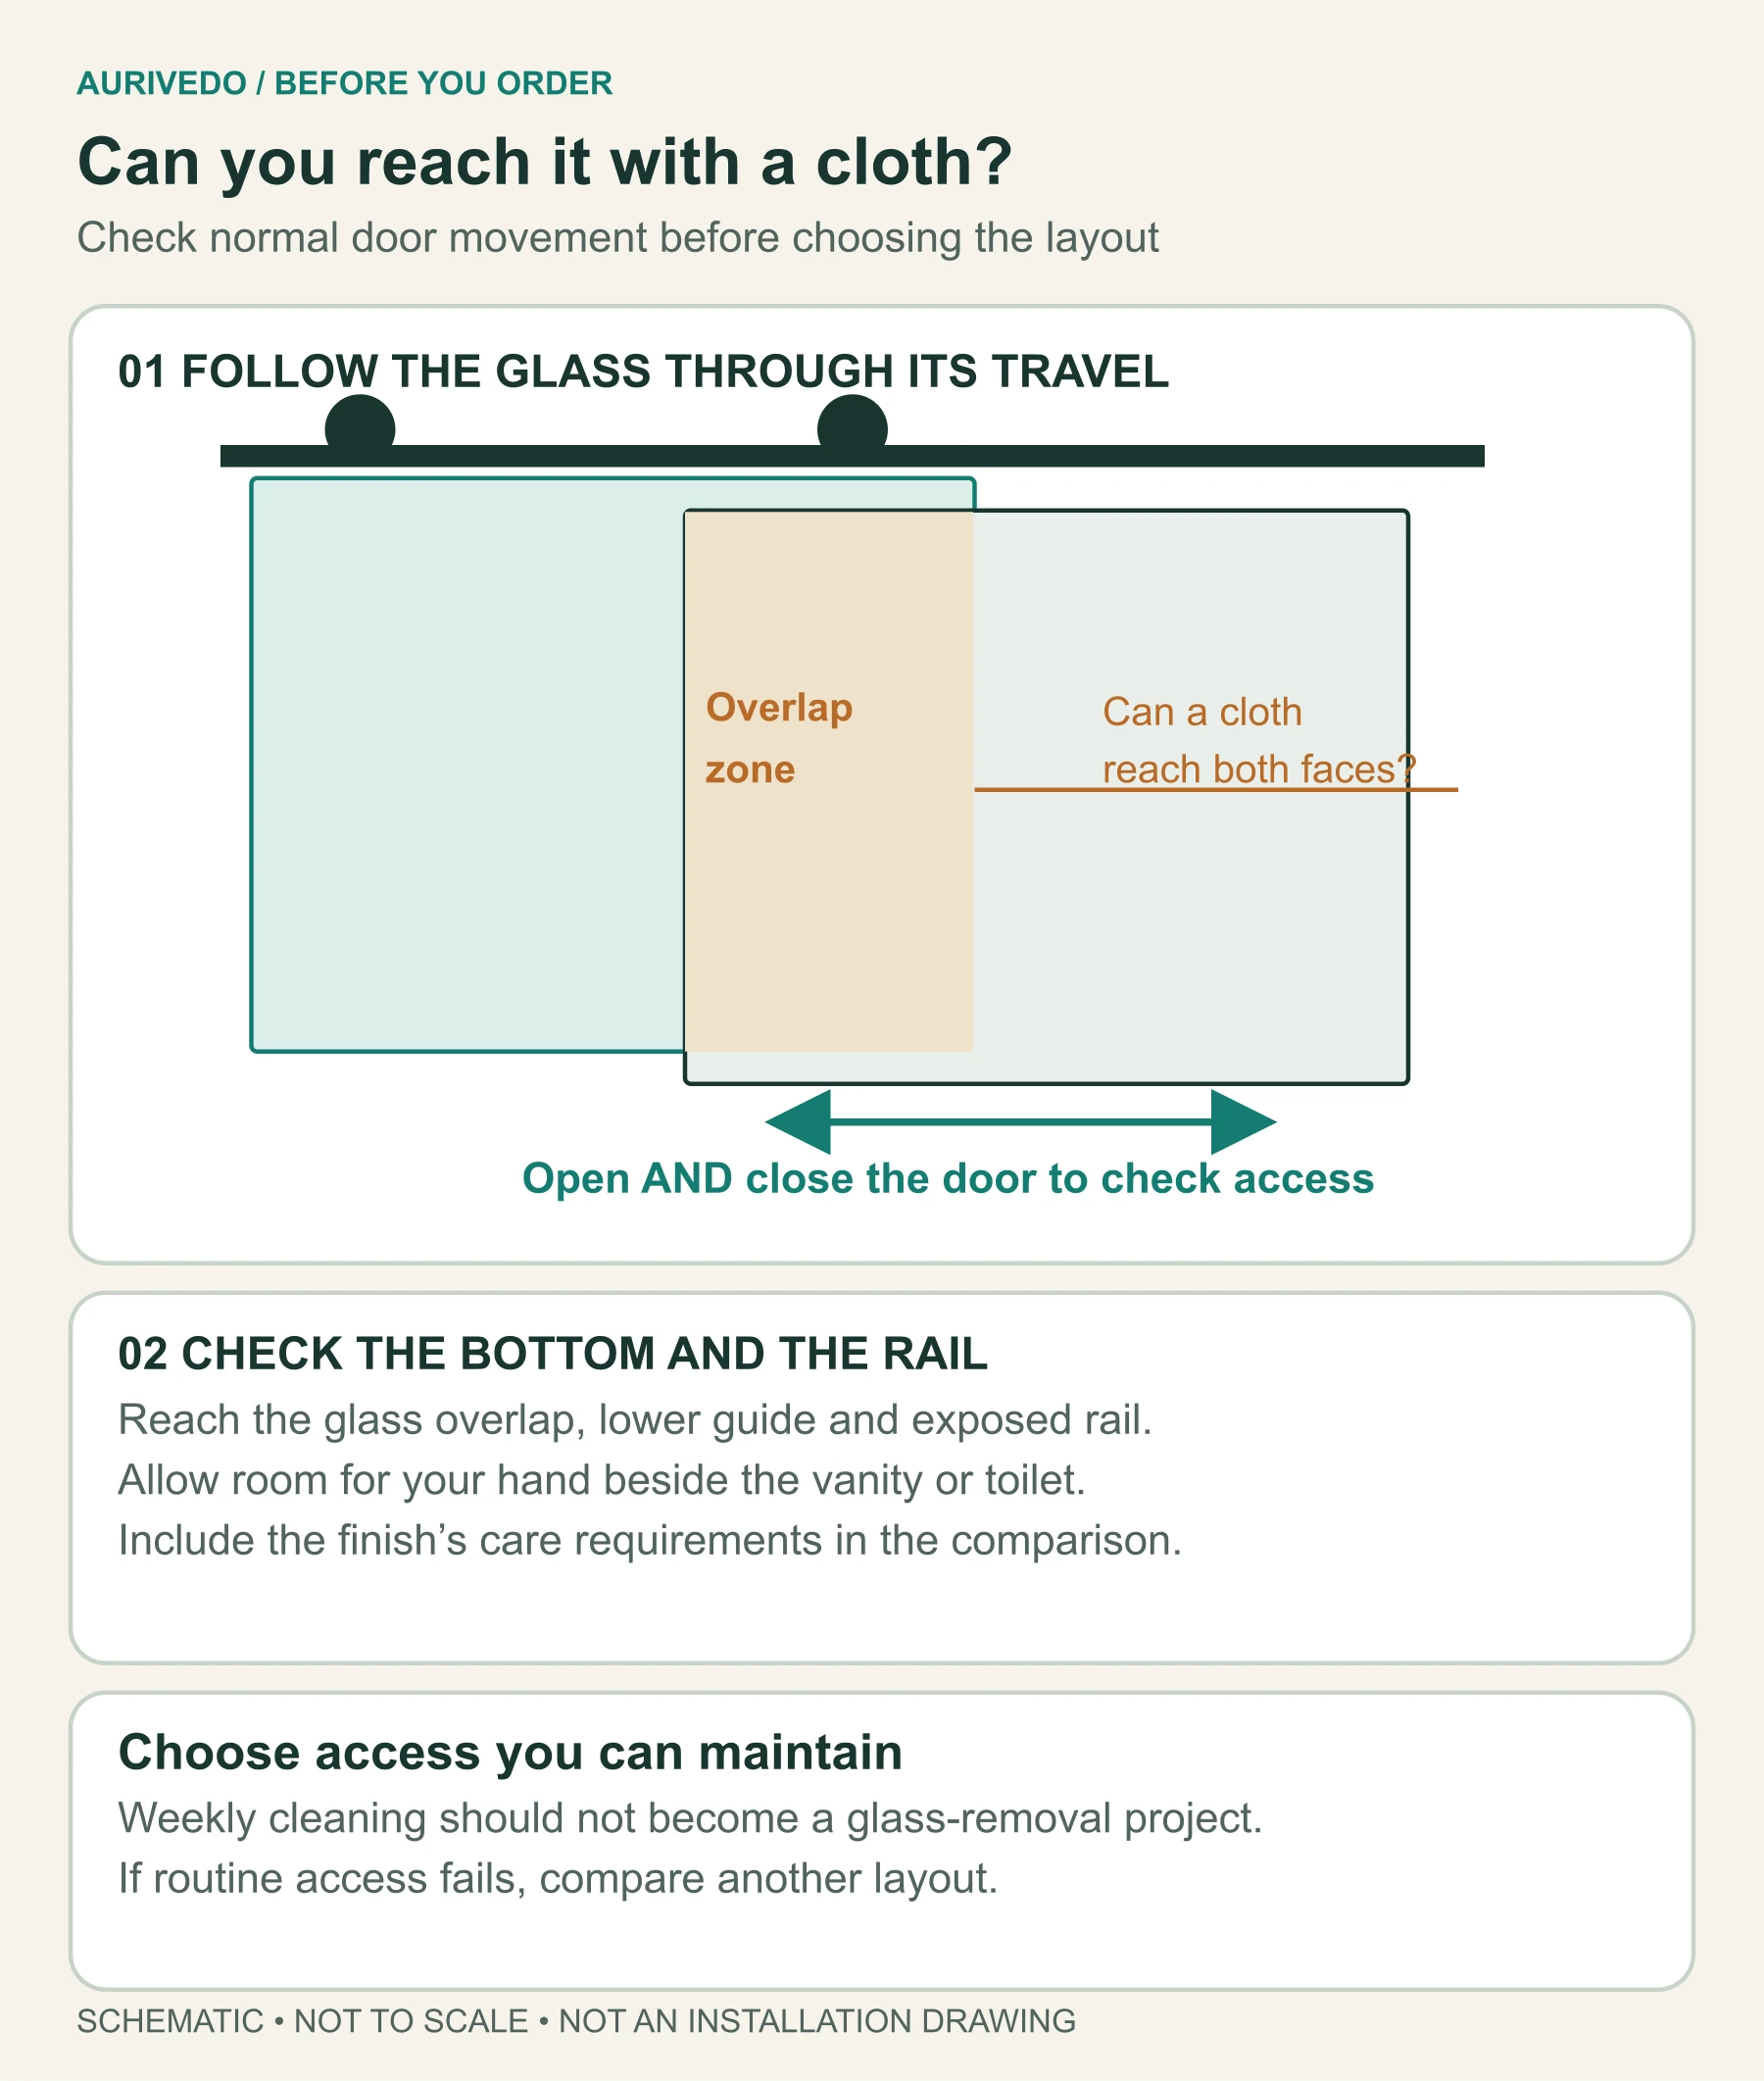
Slide a display door open and closed to check access to both glass faces, the overlap, lower guide, and exposed rail. Compare that reach with your bathroom, especially where a vanity would block your arm.
If routine cleaning requires removing glass or releasing retainers without a suitable care method, choose better access. Weekly cleaning shouldn’t become a glass-removal project. Include the finish’s care requirements in that choice.
Compare equal scope: glass, hardware, delivery, installation, old-door removal, and necessary wall or curb work. Leaving work out doesn’t lower the real total. Use the custom-door checklist for specifications, then the sliding-door installation guide once fit is settled.
Can you order, or should you change the plan?
Use the table after the checks. A sale price doesn’t turn an unresolved entry or support question into “ready to order.”
| Decision | What you know | Next action |
|---|---|---|
| Ready to order | The exact system fits the measured opening; entry and controls work; mounting and routine cleaning are resolved | Save the drawing, model, scope and written confirmation before paying |
| Confirm first | Width fits but entry, wall allowance, support, overhead clearance or cleaning access is unresolved | Request the missing dimension or demonstration; pause the order |
| Change the system or opening | A measured condition exceeds the system’s limits, or the usable entry does not meet your needs | Compare a different layout or price the required opening work, then check again |
Conclusion
Buy barn door style sliding glass shower doors when entry, support, fit, and cleaning all work for you. Change the layout or opening when they don’t. Choose the finish last. Still deciding how it should open? Compare sliding and hinged doors or use the selection guide.
FAQ
These are the short answers to the questions that most affect this buying decision.
What makes a shower door “barn door style”?
An exposed upper rail, visible rollers, and sideways glass movement. Some layouts have one moving panel; true bypass layouts let both move. Choose by entry and control access.
Why isn’t the entry as wide as the shower opening?
Parked and overlapping panels occupy part of the opening; handles and stops limit travel. Judge access by the installed clear entry, not the enclosure’s advertised overall width.
Can a barn-style slider fit out-of-plumb walls?
Yes, within that system’s stated wall-adjustment range. With no adjustment allowance, correct the opening or change systems. A narrower door won’t fix excessive wall lean.
How do I choose one for a corner shower?
Choose a complete corner configuration covering side glass, rail support, and entry. Match front and overhead dimensions; front width alone won’t establish fit.
Are barn-style shower doors easy to clean?
Yes, if normal movement lets you reach the overlapping glass, guide, and rail. If fixtures block access or routine care requires unsuitable disassembly, choose another layout.
Sources to check
Use these with the exact product and room conditions behind your decision.
- Moffat Glass barn-door style overviewExposed upper rail, rollers and sliding arrangement.
- Hillcrest Glass barn-door systemsFixed-panel and bypass configuration descriptions.
- VIGO Elan VG6041STCLSC6076, variant 47377551556930The named 56-60-inch configuration lists a 22-26-inch entry; this is a model-specific example, not a universal slider dimension.
- DreamLine ENIGMA-XO shower and tub door manual, September 2023September 2023 version. Printed pp. 4-6 cover support and opening conditions (PDF pp. 7-9); pp. 13-14 cover measurement and rail sizing (PDF pp. 16-17); p. 22 documents the specified wall anchors (PDF p. 25); p. 32 shows lower rollers at the upper rail (PDF p. 35). Checked October 5, 2026.
- FHC CDK Classic installation instructionsAugust 8, 2024 version. Page 2 lists the header, jambs, sill and bottom guide; page 3 shows panels hanging from the header. A separate bypass construction example, not a barn-style product recommendation. Checked October 5, 2026.
- KOHLER Levity roller installation and adjustmentHeader anti-jump clips illustrate why upper retention and lower guidance are different functions.
- Customer bathtub-door replacement photographsCustomer-provided before-and-after photos, used with permission confirmed October 5, 2026. The customer reported an aging door with some leakage and chose the barn-style replacement to suit the home's decor. Sam prepared the case narrative from the supplied account and photographs.
- Editorial visual scopeThe cover and explanatory diagrams illustrate design and selection checks. Customer before-and-after photos appear only in the customer case. No installation, laboratory testing or external technical review is claimed for this article.