Contents
4 parts · 25 sections
 About Us
Measure the finished opening, wall condition, threshold, and clearance before choosing a shower door that can actually fit.
Measure & Fit / Measurement guide
4 parts · 25 sections
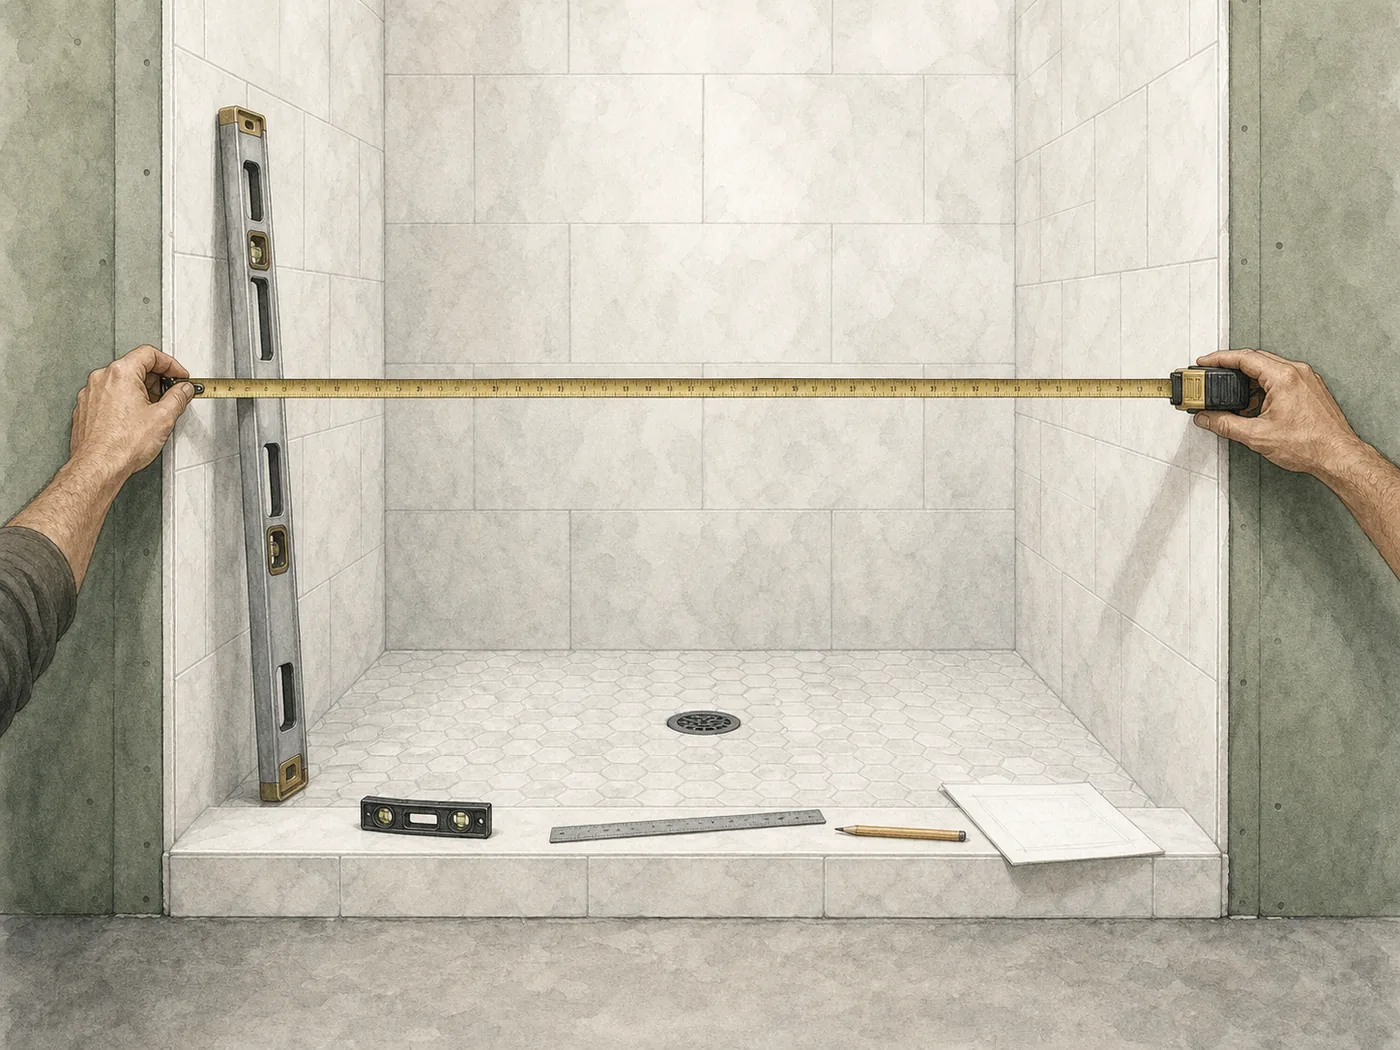
If you are standing in the bathroom with a tape measure right now, remember this first: a product name that says “60 inches” does not mean it will fit just because your opening measures 60 inches somewhere.
You need a full set of numbers. Every width the product asks you to measure must fall within its installation range. The height, wall plumb, curb, and overhead installation clearance also have to work. Looking only at the smallest width is not enough, and averaging the three widths does not work either. Both shortcuts can hide a spot that falls outside the range.
Do not take final measurements while the bathroom is still being finished. Wait until the tile, wall panels, shower base, curb, tub deck, and permanent trim are all in place. You do not need to have the door picked out yet. Start with a rough width and height to rule out models that clearly will not work. Once you have a candidate, download its installation manual from the product page and remeasure where it tells you to. You can usually see the manual before buying the door. You do not have to bring a giant box home first.
If you only want the quick version, follow these seven steps:
Step 7 is where people are most likely to get tripped up. Check every width the manual asks for. Each reading has to fall between the minimum and maximum installation widths. If the manual does not give you a different measuring method, check W1, W2, and W3, and make sure the difference between the largest and smallest readings stays within the door’s out-of-plumb allowance.
Keep all three numbers. Together, they tell you whether the opening gets wider toward the top, narrows as it rises, or has a bow hiding in the middle. Bathroom walls are remarkably good at looking straight when they are not, and tile has never felt obligated to respect geometry.
Keep this guide beside you and work through it one step at a time. By the end, you should have three widths, two or three heights, the required overhead clearance, notes on both walls, and a sketch showing the curb and nearby fixtures. Write down exactly what the tape says. Do not average the readings or make one look a little prettier because it almost matches a product page.
If this guide and your door’s manual disagree, side with the manual. Every track, hinge, and seal system is different. Your job here is to measure the finished opening accurately. The manufacturer’s rules determine the final glass and hardware dimensions.
I did not put this method together by guesswork. I compared measuring instructions from Delta Shower Doors, Basco Shower Doors, Dulles Glass, and Lowe’s. I checked them again on September 1, 2026.
Open those guides side by side and you will notice that they do not always use the same measurement points or even define out-of-plumb the same way. That is why I keep telling you to save the raw numbers. Record the opening as it is, then follow the manual for the exact door. For custom tempered glass, have the fabricator or installer approve the final dimensions before production.
Where should the tape touch? The finished surfaces that are installed for good. Not the old door frame, and not the framing hidden behind the tile.
Finished surfaces include:
Backer board, bare studs, uncured mortar, and an unset shower base do not count. Those surfaces can still get thicker, move, or receive trim. You can measure them with great care today and still end up with a very expensive sheet of glass living in the garage.
If you are replacing an old door, the exposed finished opening gives you the best final measurements. Just do not pick a fight with tempered glass because you want a number today. If the old door has to stay for now, treat this round as an estimate and send the supplier clear photos. Ordering custom glass through the old frame is too risky.
You do not need to drag the whole toolbox into the bathroom. This is enough:
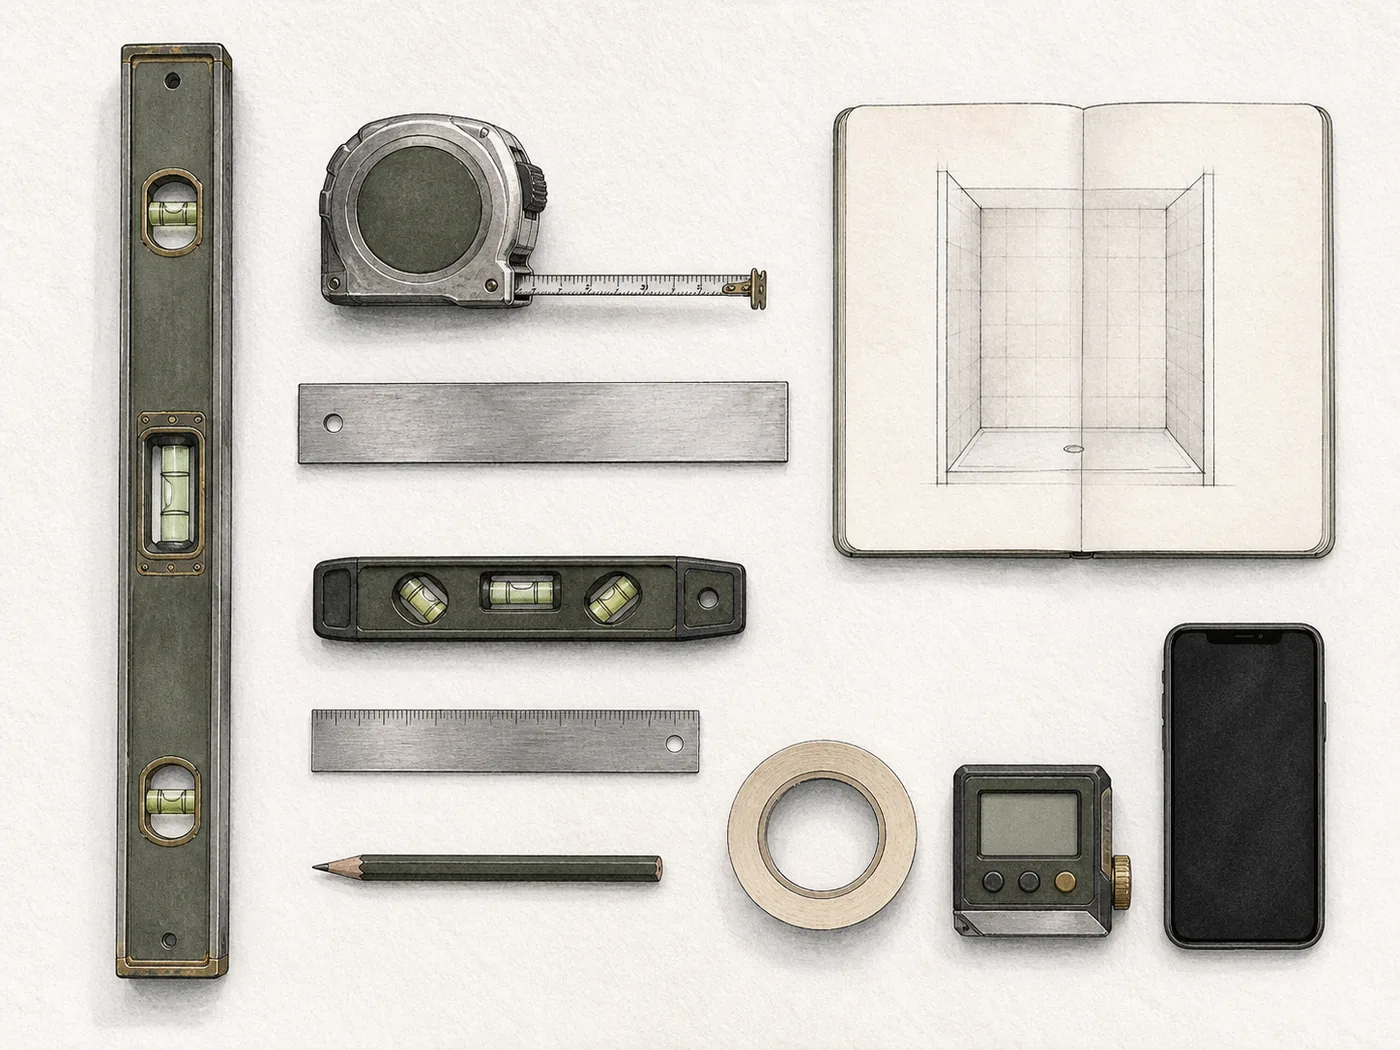
If you have a laser measure, use it for long distances and diagonal checks. I would still verify the final opening dimensions with a metal tape unless the manufacturer says otherwise. Leave the cloth sewing tape in the drawer. It already has enough work measuring waistlines.
This does not need to look like a construction drawing. Stand outside the shower and draw the opening as you see it, then label the left and right walls. Add the showerhead, controls, curb, toilet, vanity, towel bars, and grab bars. If the new door might hit it later, do not let it hide off the page now.
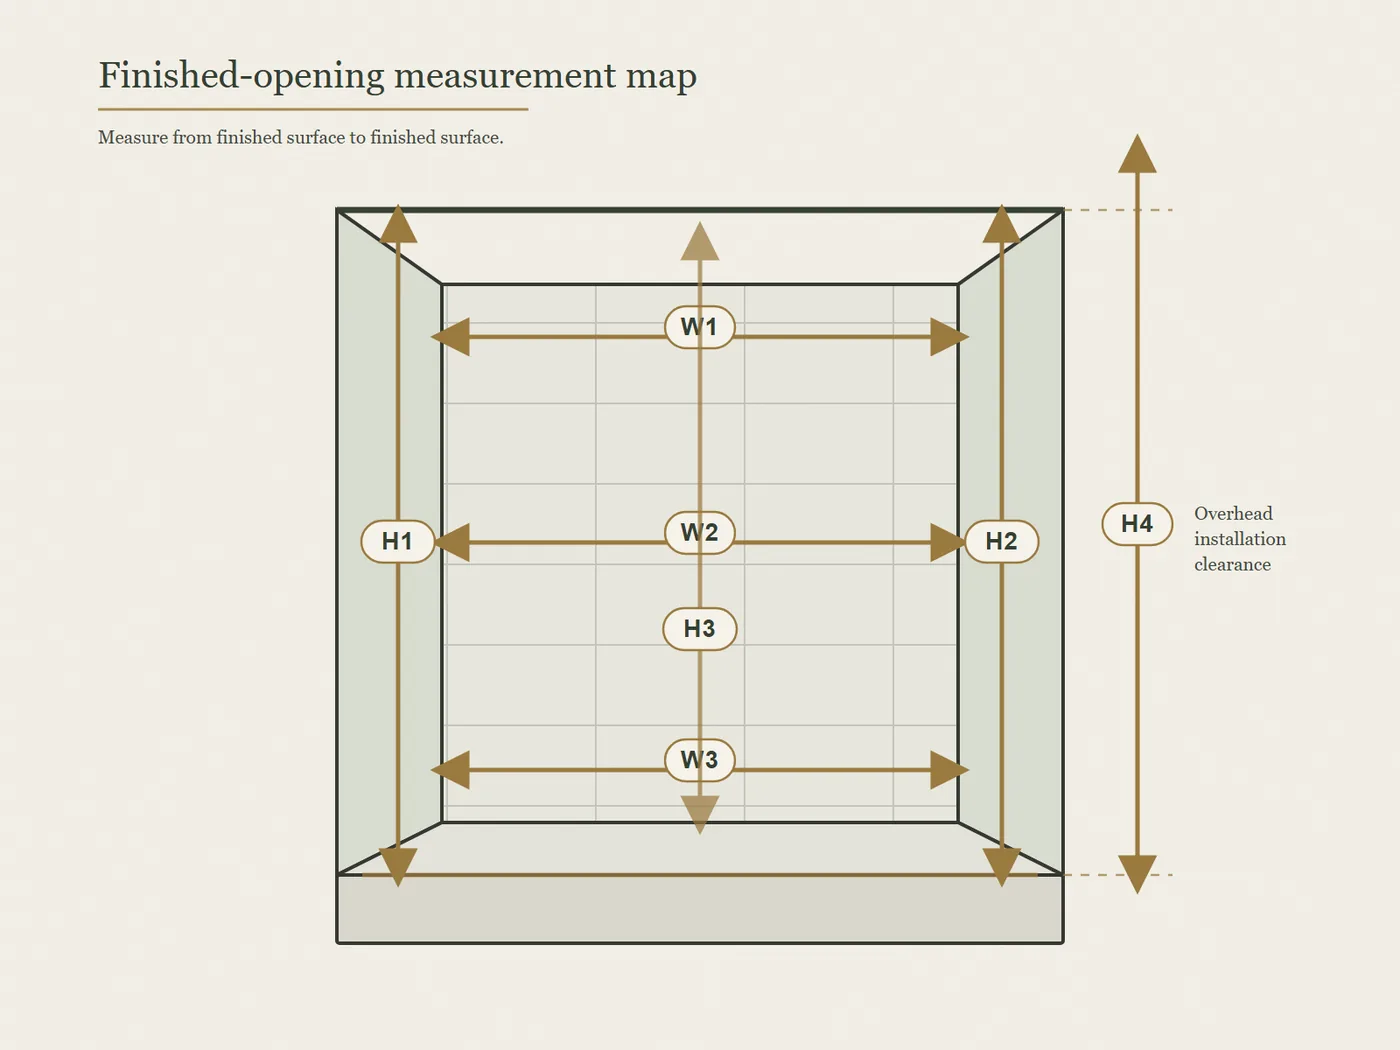
Fill in this table as you measure:
| Label | What to measure | Your measurement |
|---|---|---|
| W1 | Width near the top | __________ |
| W2 | Width at the middle | __________ |
| W3 | Width just above the curb or tub deck | __________ |
| H1 | Height at the left side | __________ |
| H2 | Height at the right side | __________ |
| H3 | Center height, if needed | __________ |
| H4 | Installation clearance to the lowest ceiling, soffit, or overhead obstruction | __________ |
| P1 | Left wall plumb deviation and direction | __________ |
| P2 | Right wall plumb deviation and direction | __________ |
| C1 | Flat mounting width on top of the curb | __________ |
| C2 | Overall curb or threshold depth | __________ |
| C3 | Side-to-side level and inward slope notes | __________ |
| D1 | Top-left to bottom-right diagonal, optional | __________ |
| D2 | Top-right to bottom-left diagonal, optional | __________ |
| S1 | Available swing clearance or sliding entry | __________ |
Write the unit beside every number. A lonely 59 7/8 is not very helpful a few days later when you cannot remember whether it means inches, centimeters, or the number of times the project made you sigh.
Take a look around. Are all the permanent surfaces installed and cured? Once they are, wipe down the walls and curb. A little piece of old caulk under the tape or level can move the reading with it.
If the old enclosure has already been removed safely, measure the exposed finished opening. If it is still there, stop for now. Do not start wrestling with tempered glass just because this guide says the bare opening is best. Delta recommends safety gear and two capable adults for glass handling. Follow the removal instructions, or hire an installer if you are unsure. Until the finished surfaces are exposed, the measurements are for planning only.
Run your hand over the places where the new hardware will sit. Do not miss raised tile edges, thick grout joints, trim, stone overhangs, bowed wall panels, or old caulk. Your fingers will often find trouble before your eyes do. One small bump can keep a rigid wall channel from sitting flat.
You do not have to memorize all the door names yet. Start with the shape of the opening:
Once you know the opening, think about the kind of door you want. A hinged door needs room to swing. A sliding door needs enough curb space for the bottom track or guide, and the overlapping glass still has to leave a practical entry. A fixed panel should block spray without making you turn sideways every time you step into the shower. That rather defeats the point.
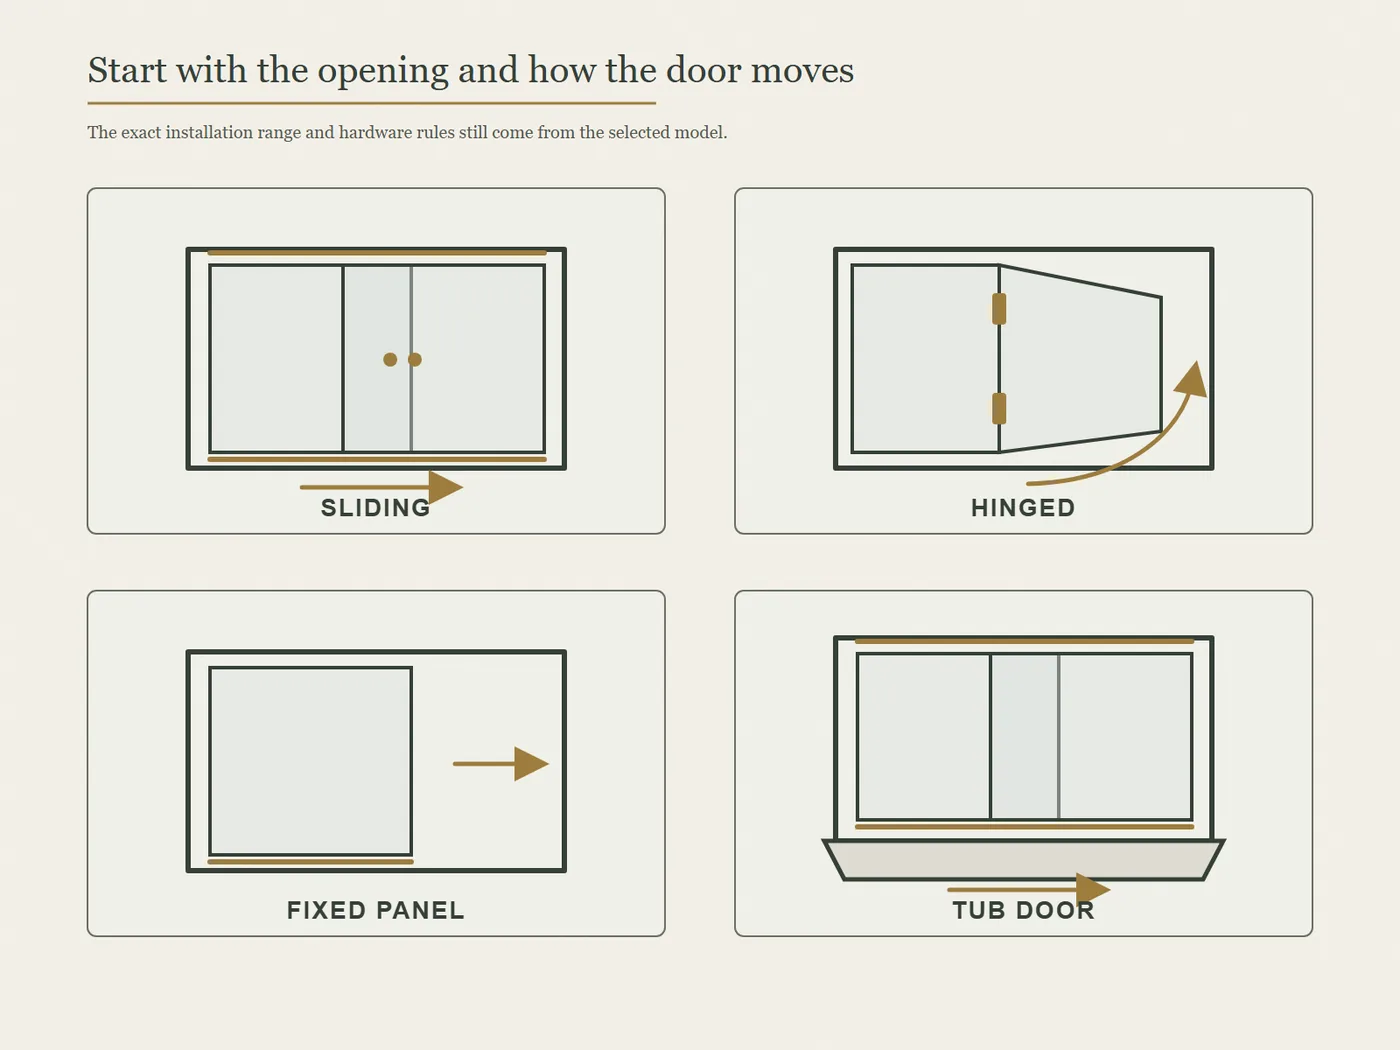
Mark the showerhead and controls on your sketch too. Always describe left and right as viewed from outside the shower looking in. It sounds like a small detail, but plenty of backward orders begin with two people standing on opposite sides of the glass.
A rough width and height are enough at this point. Use them to narrow the door type and make a short list of models. You do not have to buy a door to see its requirements. Many manufacturers post the installation manual or spec sheet right on the product page.
Once one or two models look promising, check their installed height, required measurement points, minimum sill depth, wall-height requirement, and overhead installation clearance. If the information is not online, ask the seller or manufacturer. If nobody can give you the full installation range and all you have is “60 inches” in the product name, wait before ordering. You can keep measuring, but the numbers are still planning notes until you have the product requirements or written fit confirmation from the supplier.
All right, now you can pull out the tape. I would slow down for this part because almost every door choice depends on these three numbers. Measure from one finished wall to the other with the tape straight and level. Do not follow a grout line. It may look cooperative while quietly wandering uphill.
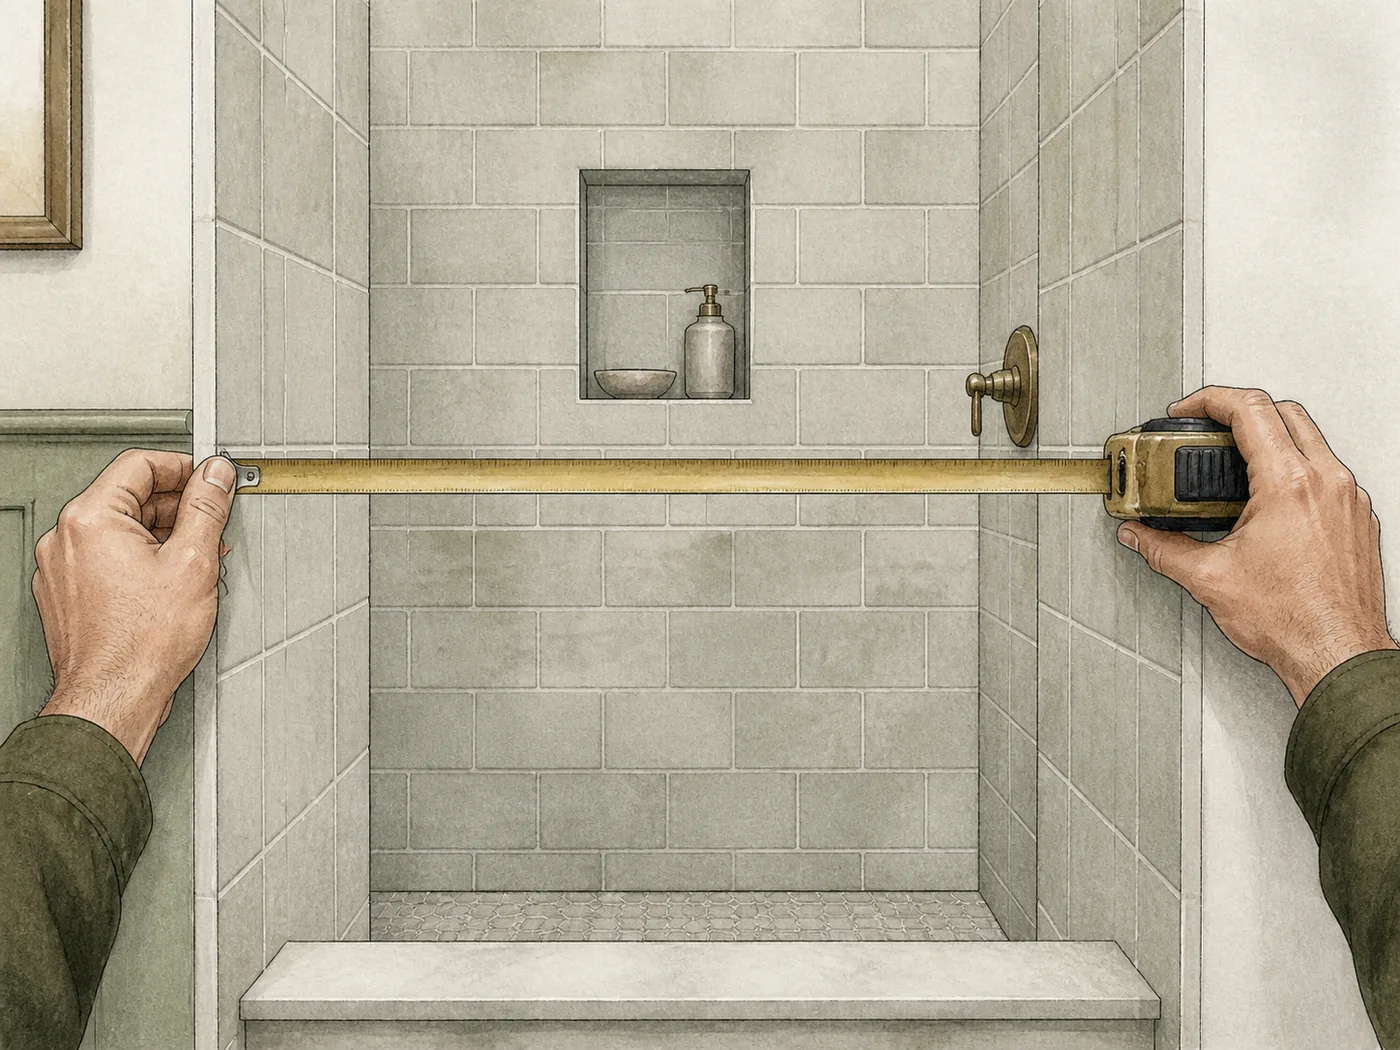
Measure three times, at these specific locations:
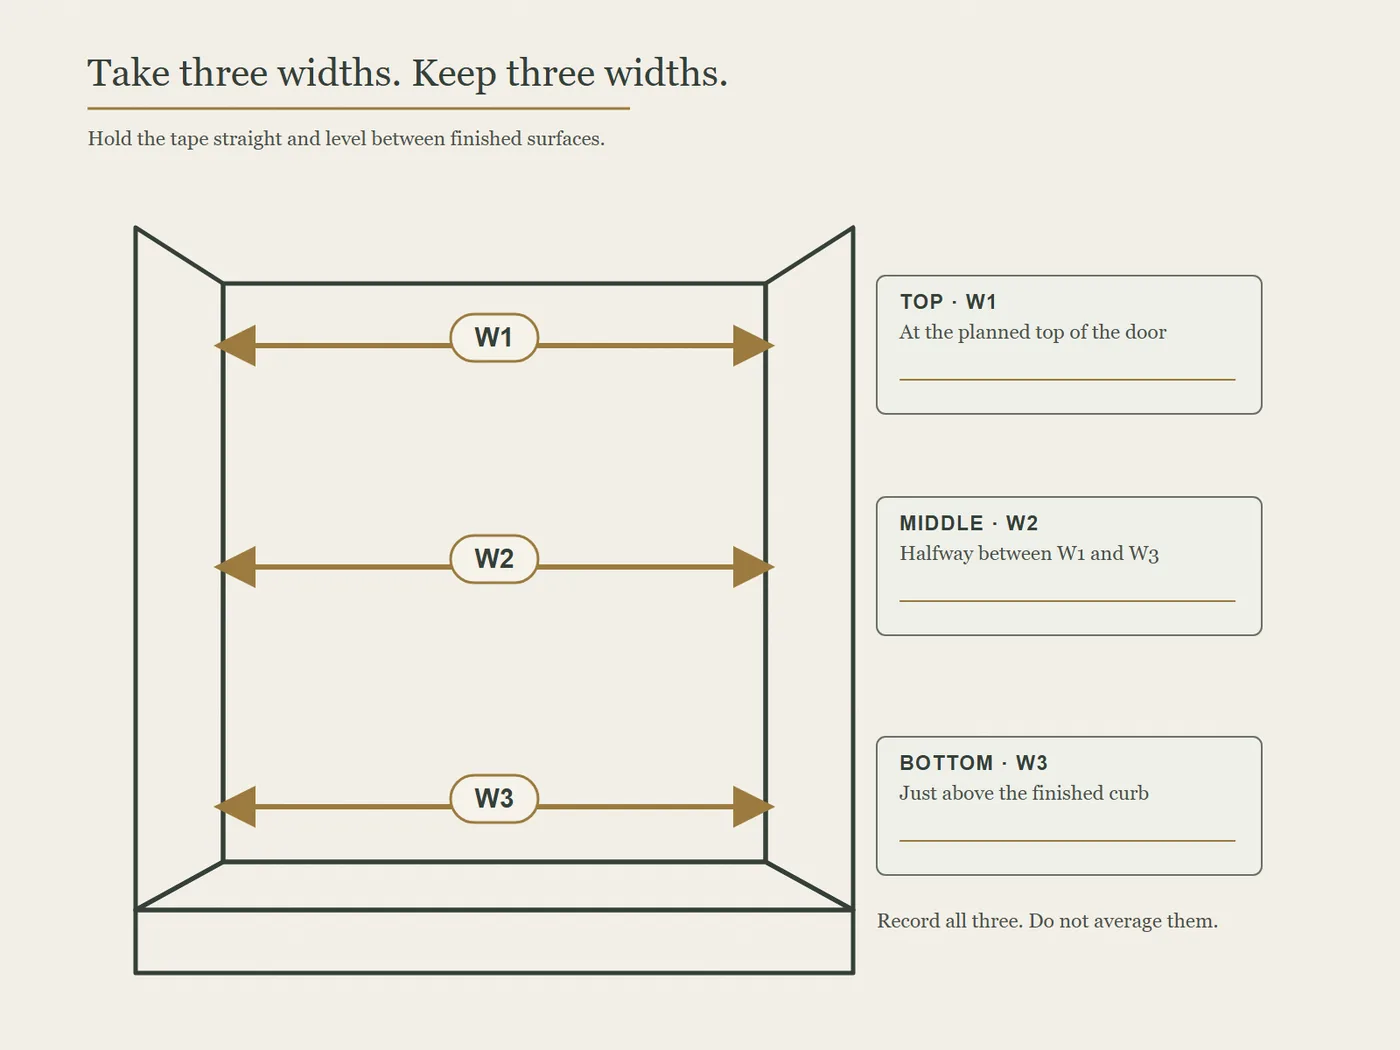
If you can read the tape to 1/16 inch, record it to 1/16 inch. Write the number down before you move the tape. Trust me, five minutes from now, 59 7/8 and 59 5/8 will start looking like twins.
Inside measurements get awkward at the corners. Check whether the tape housing has its case length printed on it. If it does, press the case against one wall, read the blade, and add the case length. If it does not, have a helper hold the other end. Kinking the blade into a corner and guessing where the bend starts is certainly fast. So is ordering the wrong door.
Once you have all three numbers, circle the smallest and largest. You are circling them to see the variation, not to pick one and go shopping. Check every point named in the manual. If it gives no different method, W1, W2, and W3 must all fit the installation range, and the difference between the largest and smallest must stay within the door’s out-of-plumb allowance.
Do not average them. The opening is not a report card, and a nice average does you no favors if it hides one spot that is too narrow or too wide. Keep all three readings even if they match. If they do not, the walls may lean, taper, or bow. The project is not automatically dead, but the door needs enough adjustment to handle the difference.
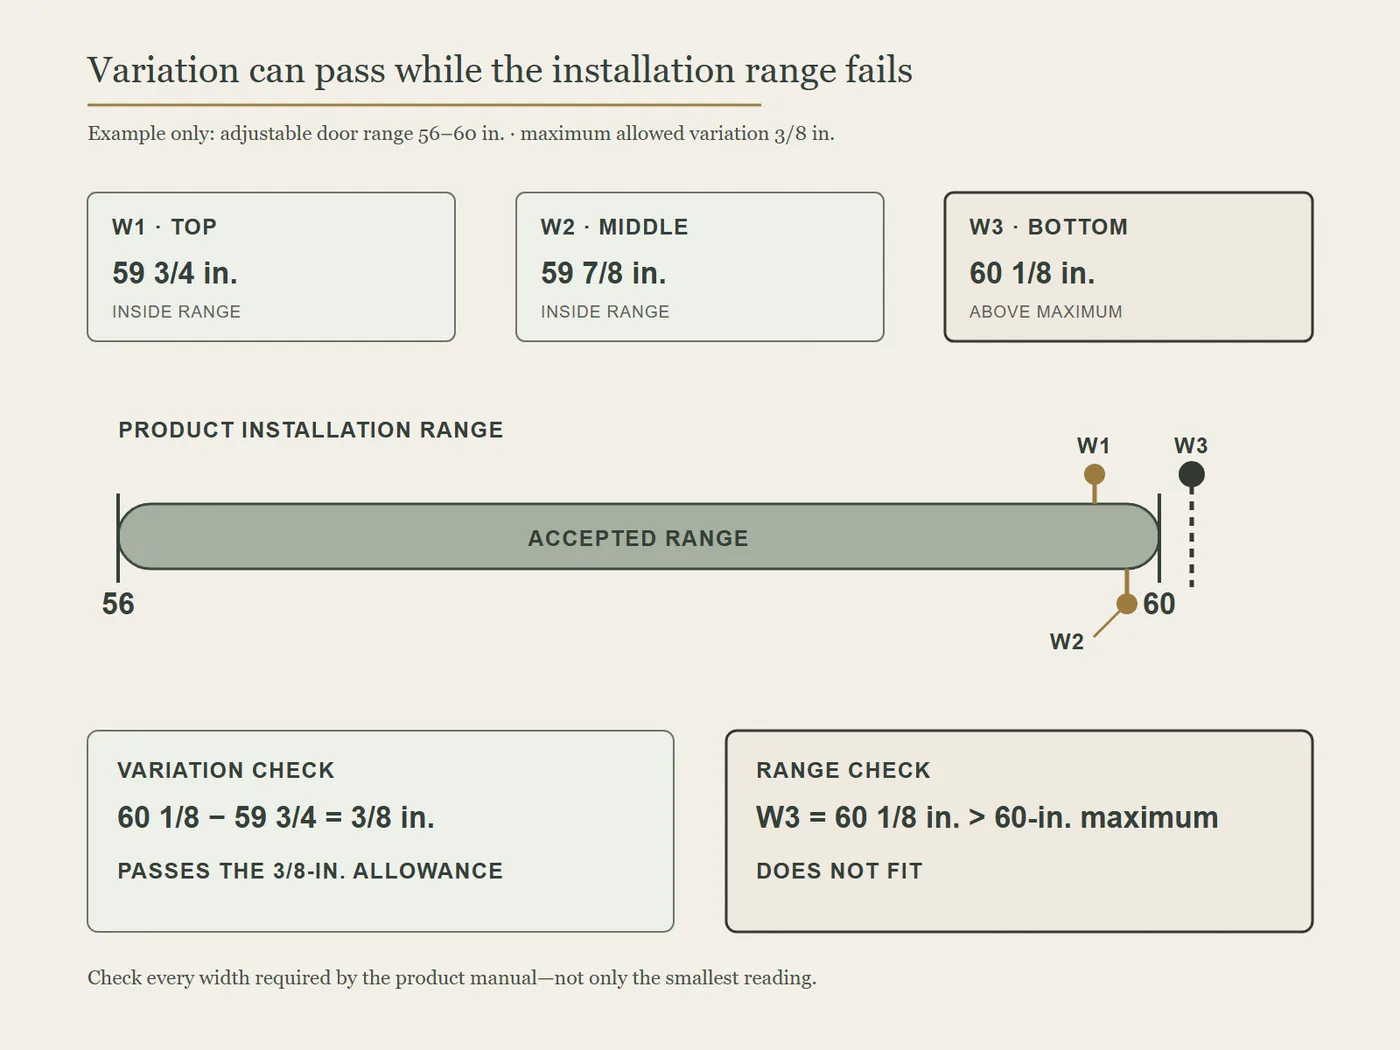
A set of numbers makes this easier to see. Suppose a door requires all three widths to be checked. Its installation range is 56 to 60 inches, and it allows up to 3/8 inch of variation among those measurement points.
| Measurement | Example reading | Range check |
|---|---|---|
| W1, top | 59 3/4 inches | Inside the range |
| W2, middle | 59 7/8 inches | Inside the range |
| W3, bottom | 60 1/8 inches | Above the 60-inch maximum |
Check the variation first. The readings differ by 3/8 inch, so that part passes. Now check the installation range. W3 is 1/8 inch over the 60-inch maximum, so that part fails. The door still does not fit. Looking only at the smallest width would lead you to the wrong door here. These numbers are only an example, so do not treat 56 to 60 inches as a universal range.
At this point, you may be thinking, “But some measuring guides tell me to use the smallest width.” They are not necessarily wrong. They may be answering a different question. Dulles Glass uses the smallest reading so custom glass or a door system can clear the tightest spot. Lowe’s also calls the shortest of the three readings the shower-space width. When a fabricator or supplier will review the other measurements and calculate fabrication deductions, that smallest number can be a starting point.
A boxed adjustable door plays by different rules. Its manual may set minimum and maximum installation widths at specific points. Every one of those points has to pass, along with the out-of-plumb limit. One narrow point that fits cannot rescue another point that exceeds the maximum. Keep every reading, and use the smallest one by itself only when the fabricator or product instructions tell you to.
With the widths done, move on to height. Start on top of the finished curb, threshold, shower base, or tub deck. Hold the tape vertically and measure to the planned top of the glass or to the point named in the instructions.
Start with both sides:
If the opening is wide, the curb looks uneven, or the system uses a full-width header, add H3 in the center. It takes another thirty seconds and saves you from guessing later.
Some doors also require overhead installation clearance. Record that separately as H4. Measure from the curb, threshold, shower base, or tub deck to the lowest ceiling, soffit, trim, or other obstruction overhead. H4 is not the door height. It is the room needed to lift the glass, tip it into position, and set it into the track or hardware.
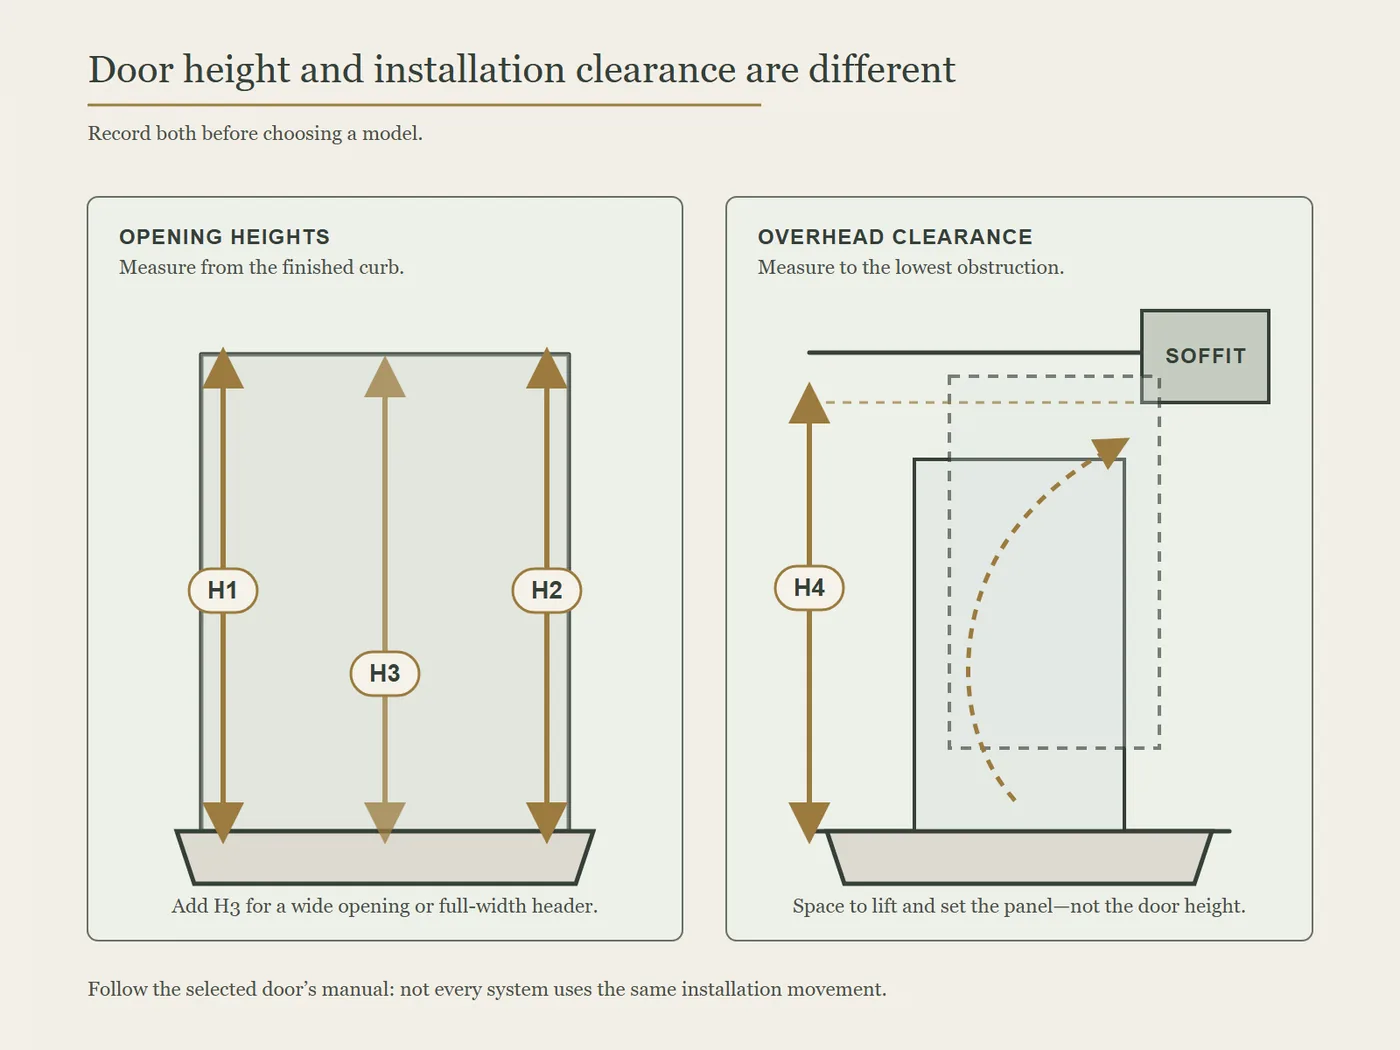
The tape likes to lean forward here, so have a helper hold the bottom if possible. If the tile stops below the planned top of the glass, wait before ordering. Check the instructions because some hardware needs a solid finished mounting surface all the way up.
Write down both side heights. If they differ, do not choose the largest or smallest on your own. The right number depends on the door, the walls, the curb, and whether you are buying a standard door or custom glass. Giving the supplier the raw heights is more useful than guessing on their behalf.
Your eyes are not very good at judging whether a wall is plumb. If I were measuring, I would not skip this step because the wall “looks pretty straight.” It may look perfectly respectable and still lean enough to interfere with a seal or wall channel.
Hold a 4-foot level vertically against the left wall where the hardware will mount and check the bubble. Then move to the right wall and do it again.
If the bubble is off center, do not worry. Record it this way:
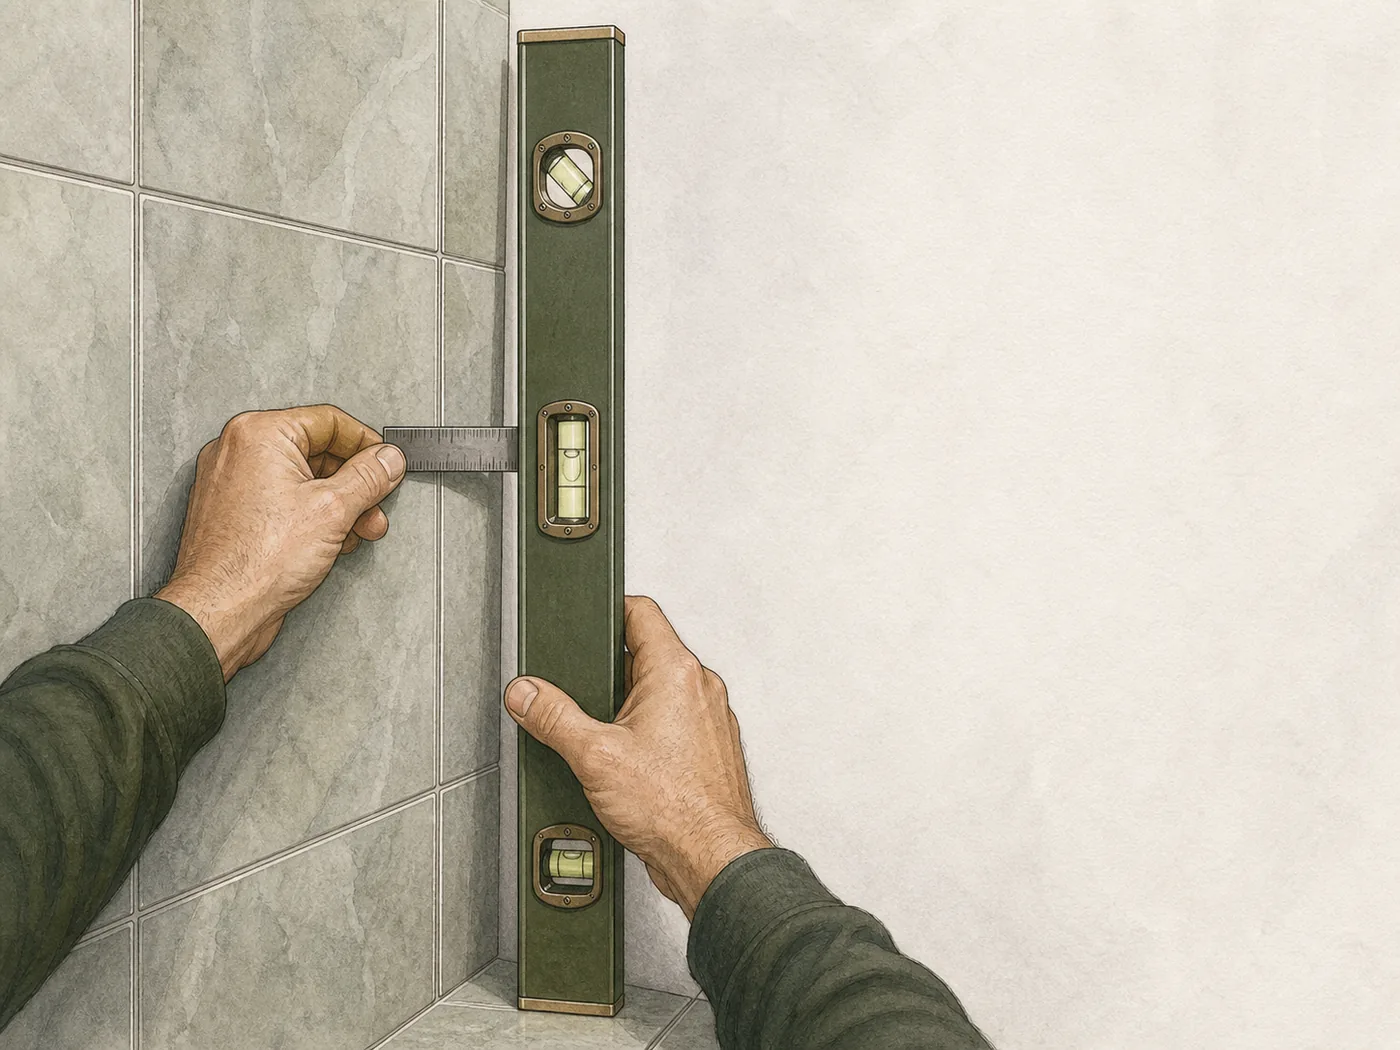
If the wall looks bowed in the middle, move the level sideways and check again. A vertical level check is better at showing which way the whole wall leans. The three width readings may catch a curve that the level misses. Use both sets of information together.
There is an easy trap here. A 4-foot level only tells you what is happening along the 48 inches it touches. It does not automatically represent the entire wall, and the gap behind it should not automatically be compared with a product’s out-of-plumb allowance. Some manuals measure the gap from a plumb line. Others compare the opening width at the top and bottom. Use the definition in your manual.
There is no single out-of-plumb allowance that works for every shower door. Delta’s measuring guide, for example, compares the required top and bottom widths and allows a total difference of 3/8 inch for its shower and bathtub doors. That 3/8 inch belongs to those products. Do not lend it to another door. Framed and semi-frameless doors often allow more adjustment than heavy frameless glass, but the manual gets the final word.
The curb is easy to overlook because everyone is busy staring at the walls. But it may have to support a track, guide, seal, or even the glass itself, so do not walk away after one quick width measurement.
First, measure the flat area on top from front to back. Compare that number with the door’s minimum curb or threshold width. A sliding door needs room for the bottom track or guide, while a hinged door needs space for the sweep and bottom hardware. Rounded edges and slopes may look like part of the curb, but the hardware may not be able to stand on them.
Then measure the full depth and draw any rounded edges, bevels, trim, or raised lips on your sketch. That makes it easier to see how much of the overall depth is truly flat enough for hardware.
Next, use a level or straightedge long enough to span the opening and check the curb from left to right. If one side is high, write down which side. If the opening is wider than your 4-foot level and you have to check overlapping sections on the left, center, and right, label them honestly as separate readings. Do not pretend you measured the whole width in one shot. Read the installation manual before inventing a homemade shim strategy.
Finally, place the small level front to back along the planned track, guide, or seal line. Check the left, center, and right because the slope can change. Water should head into the shower, not make a break for the bath mat. Record any reverse slope, flat spot, or noticeable hump.
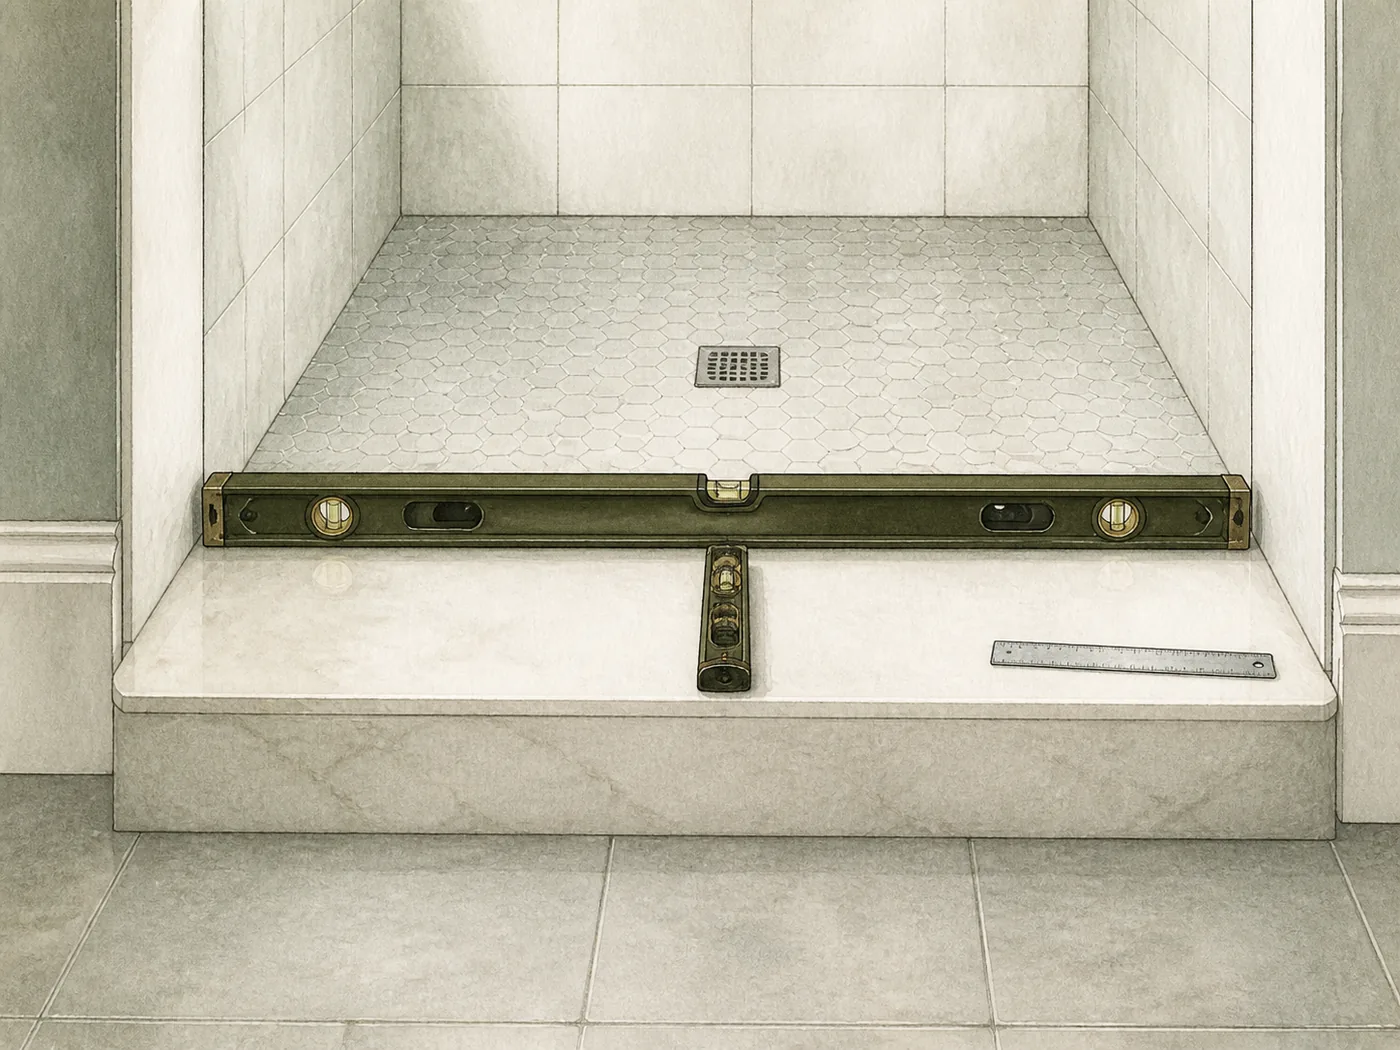
For a corner enclosure or return panel, mark the glass centerline on the curb and measure where the glass will actually sit. The easiest outside edge is not necessarily the glass line.
Do not skip this step for a curbless shower. Mark the glass line on the finished floor, note changes in slope along that line, and simulate the door sweep. It has to clear the floor through the entire swing.
This step is not for everyone. Most standard alcove doors do not require diagonal measurements unless the manual or supplier specifically asks for them. If the opening looks rectangular and you have a clear top reference, diagonals can be a useful secondary check. Before you start, make sure the top and bottom widths match within repeatable measurement error and that both reference lines are level.
Why add those conditions? Because equal diagonals do not prove by themselves that an opening is rectangular. A symmetrical opening that is narrower at the top, such as an isosceles trapezoid, can have equal diagonals too.
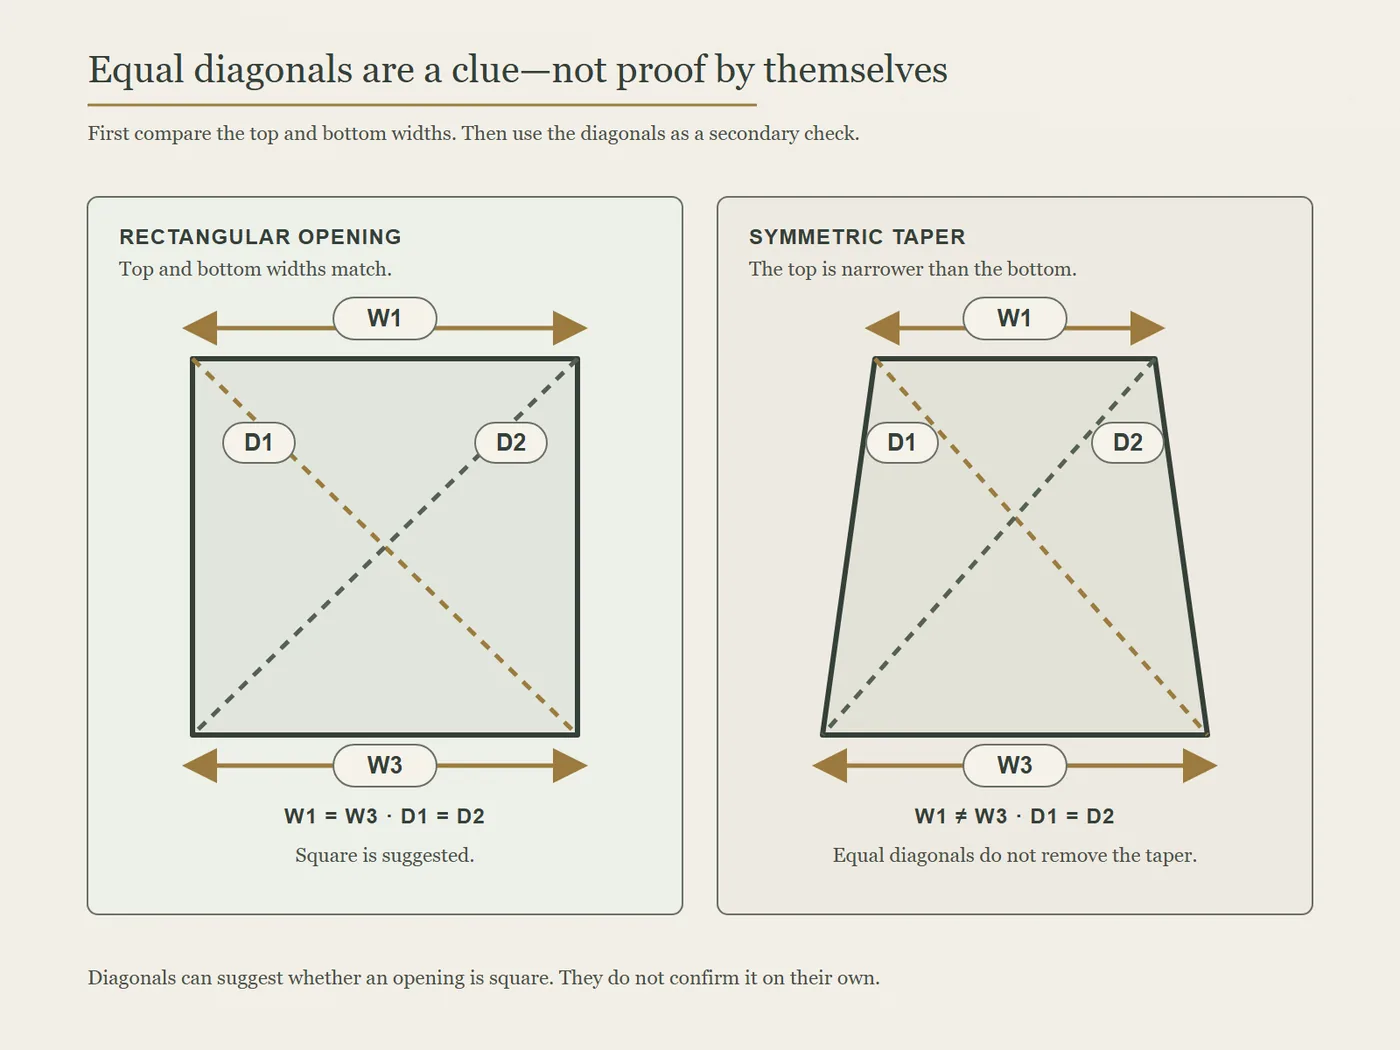
Once those conditions are met, mark the left and right top reference points at the same height. Measure from the top-left mark to the bottom-right corner and record D1. Then measure from the top-right mark to the bottom-left corner and record D2.
Matching diagonals give your other measurements a little more support, but they are not a final stamp of approval. If the numbers differ, measure again. A reference point may have moved. Give D1 and D2 to the supplier instead of turning the difference into a glass deduction yourself.
A neo-angle shower takes a little more patience. Measure each wall run and the front opening along the curb centerline, and check every angled joint with an angle finder. Many products use 135 degrees, but your walls have opinions of their own. Do not answer for them in advance.
For a quadrant enclosure, record the tray width, depth, and radius. Match the enclosure to the exact tray whenever possible. Two curved trays with the same advertised width may still have different curves.
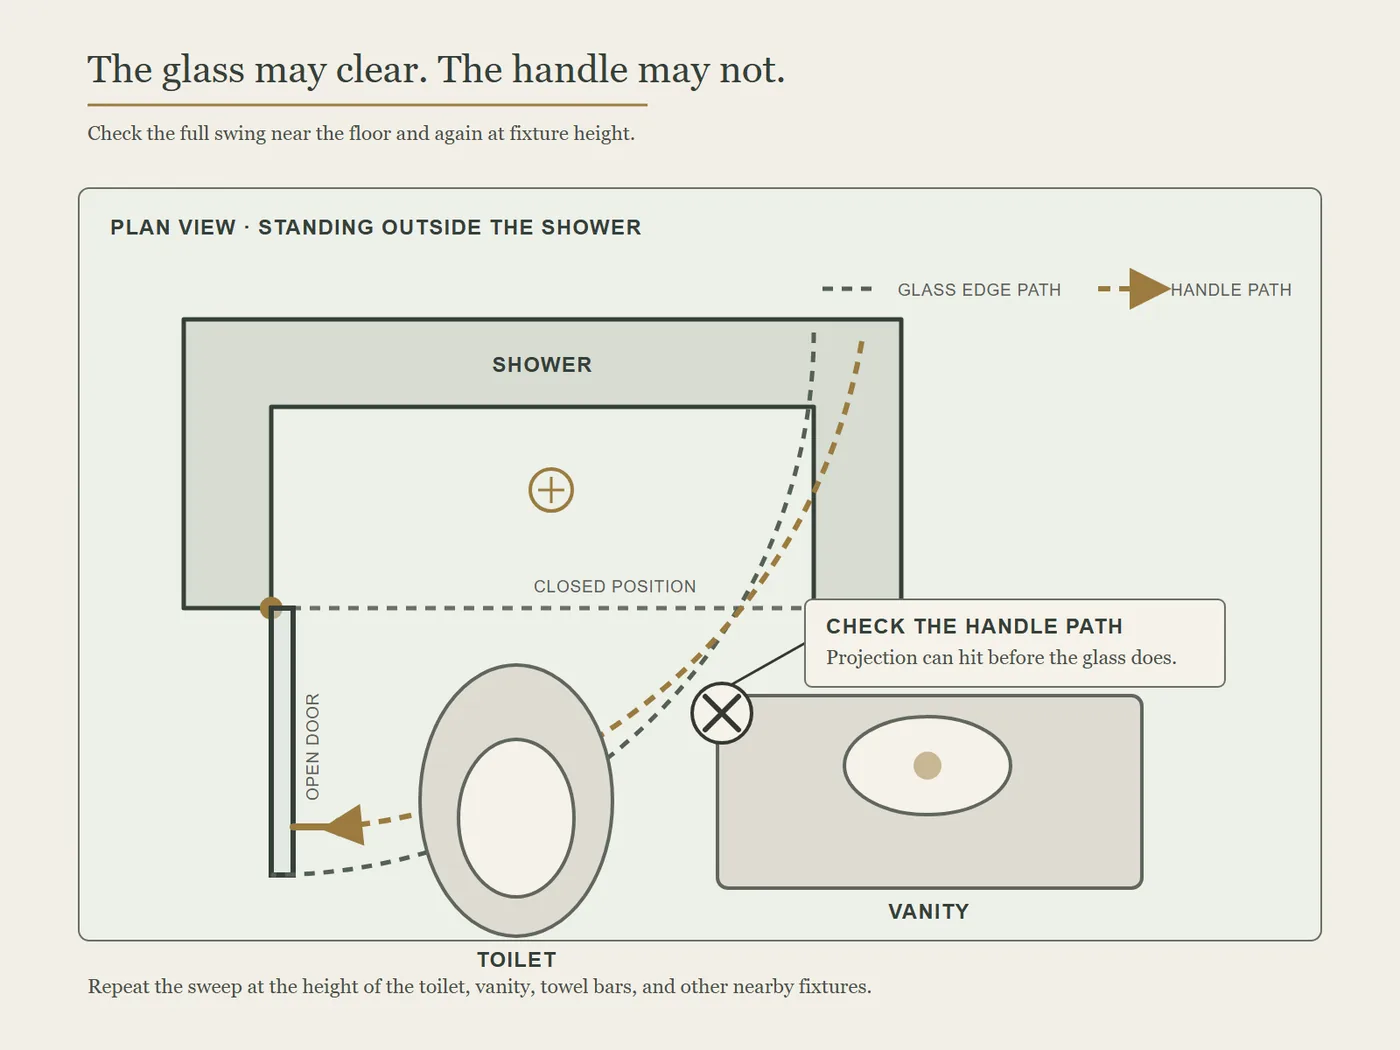
A door can fit the opening and still be unusable. It may match the opening perfectly, then hit the toilet the first time it swings open. The toilet usually wins.
For a hinged or pivot door, use the tape measure as a temporary swing radius:
Do not simulate only the glass. Include the handle, towel bar, and enough room for your hand. Check the walls, bathroom door, toilet, vanity, faucets, and that one cabinet drawer someone will leave open at exactly the wrong time.
For a sliding door, find the listed walk-in opening instead of using the overall enclosure width. The panels overlap, so the actual entry will be smaller. Confirm which side you will enter from, where the fixed panel sits, which wall holds the showerhead, and how much curb space the lower guide needs.
For a bi-fold door, check how much interior space the folded panels use. A fixed walk-in panel is simpler, but you still need to look at the showerhead direction, the likely spray path, and how much entry space remains.
Whether the door can stand securely depends on what is behind the wall. Wall-mounted hinges and heavy glass often need studs or wood blocking behind the tile. Check the manual or building plans. A stud finder can help, though it may deliver a very confident wrong answer through tile or certain wall systems. If you cannot confirm the support, ask an installer before ordering.
Look up and around the opening too. Support bars, header rails, ceilings, soffits, trim, and sloped ceilings can all interfere with installation. Some panels cannot simply drop straight down. They have to be lifted, tilted, and set into the track or hardware, so do not cut the overhead clearance too close.
Finally, take the tape from the entry door all the way to the bathroom. Measure doorways, hallways, stair turns, and tight corners along the route. A large tempered-glass panel will not bend, even if everyone becomes very optimistic halfway up the stairs. Plan on at least two people for safe handling.
This is the point where you decide whether the door will actually fit. Open the candidate model’s installation manual, official specifications, or written requirements from the supplier and compare them with your measurement sheet one by one. The size in the product name is often a convenient round number used for sorting. Delta gives a good example: one of its 60-inch doors has a maximum installation width of 59 3/8 inches, and it has a minimum too. You need both ends of the range.
Before ordering, go through this list:
Do not guess the deductions for hinges, seals, or expansion gaps, and do not borrow a glass overlap from the model next door. Measure the finished opening accurately, then follow the deduction rules for this specific hardware.
Custom glass is not the place to gamble. Dulles Glass explains that the glass is cut to size first and tempered afterward. If it turns out to be 1/8 inch too large after tempering, it cannot come back for a little trim. At that point, the glass is done negotiating.
We have covered a lot of rules. Walking through a set of real measurements from a successful installation makes them easier to see in action.
These measurements and installation notes came from Jimmy, a friend of the site owner and a shower-door installer with more than 10 years of experience serving homeowners in Delaware. He measured the finished opening, installed the door himself, and later confirmed that the installation was successful.
The product was the 60-inch version of the Delta Traditional 6mm Shower Door with Simplicity Handle, model 1117876. Do not let the “60-inch” label lead the way. Its actual opening-width range is 50 1/8 to 59 3/8 inches, and the top and bottom widths may differ by no more than 3/8 inch. The matching 2022 installation manual also requires a sill at least 2 inches deep (Delta’s term for the curb), a minimum shower-wall height of 71 inches, and 73 1/2 inches of installation clearance.
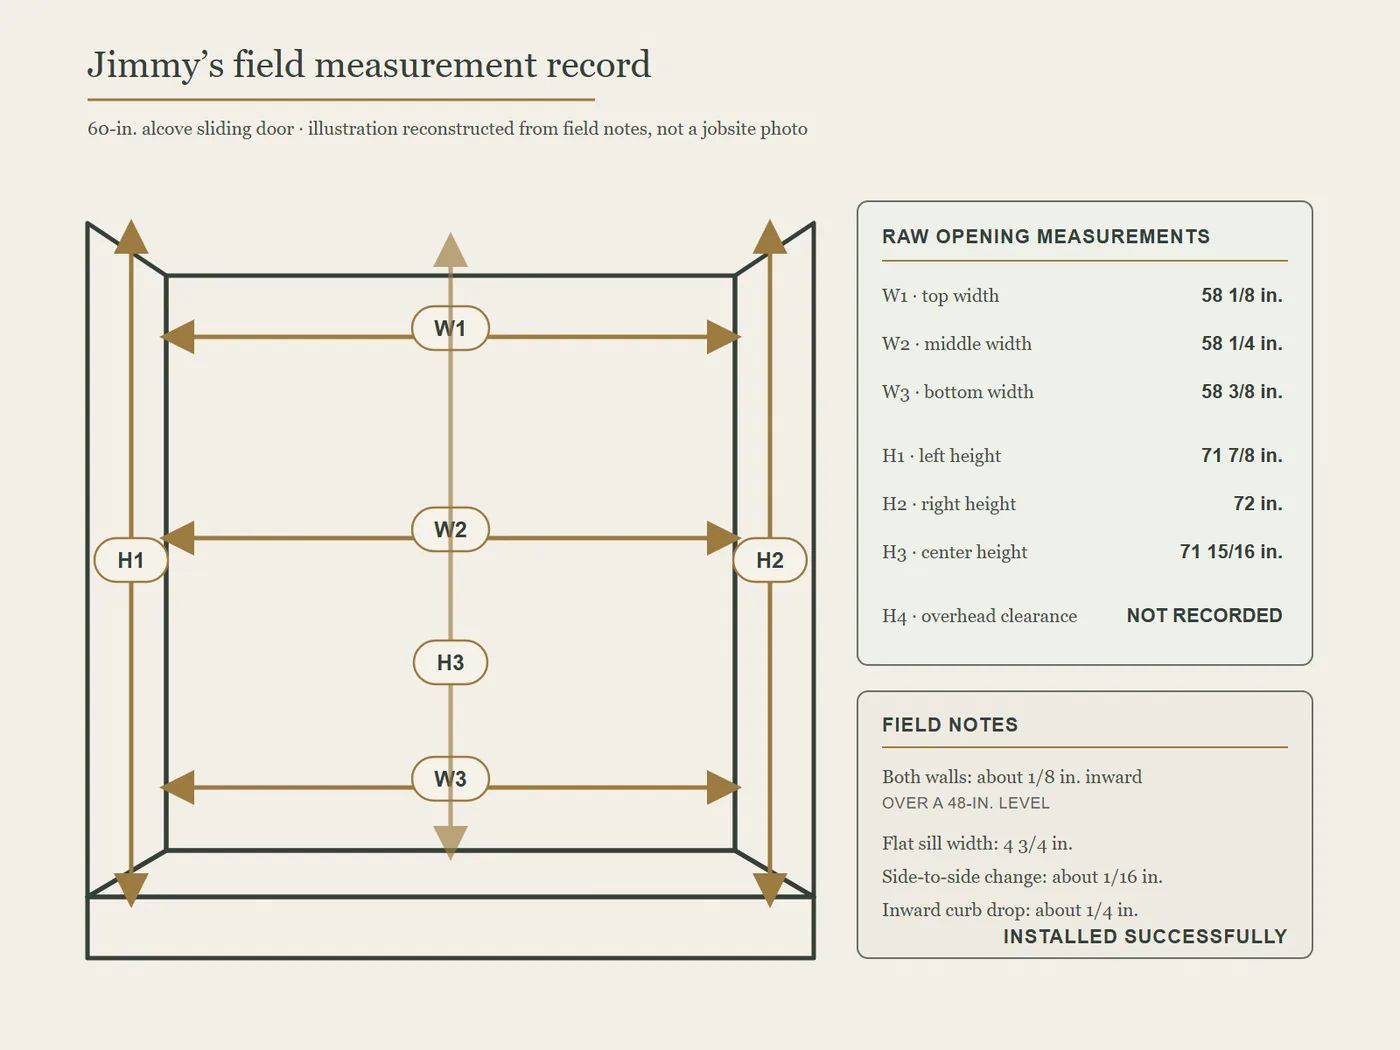
Illustration reconstructed from Jimmy’s field measurements; not a photograph of the jobsite.
| Check | Field reading |
|---|---|
| Opening type | Three-wall alcove, walk-in shower |
| Door type | Sliding bypass system with 1/4-inch glass |
| W1, top width | 58 1/8 inches |
| W2, middle width | 58 1/4 inches |
| W3, bottom width | 58 3/8 inches |
| H1, left height | 71 7/8 inches |
| H2, right height | 72 inches |
| H3, center height | 71 15/16 inches |
| H4, overhead installation clearance | Not recorded |
| Left-wall level check | About 1/8 inch inward over a 48-inch level |
| Right-wall level check | About 1/8 inch inward over a 48-inch level |
| Flat sill width | 4 3/4 inches |
| Sill level, side to side | About 1/16 inch of change over the full opening |
| Sill drainage | About 1/4 inch of drop toward the shower across the curb |
| Reported result | Installed successfully |
Start with the widths. All three readings fall within the specified range of 50 1/8 to 59 3/8 inches. The narrowest point is 58 1/8 inches and the widest is 58 3/8 inches, clear of both limits. That check passes.
Now compare the top and bottom. W1 and W3 differ by 1/4 inch. Delta allows up to 3/8 inch, so the opening has 1/8 inch to spare. That check passes too.
The record also notes about 1/8 inch of inward lean on each wall over the length of a 48-inch level. That helps describe the opening, but it is not the out-of-plumb calculation Delta specifies for this door. Delta says to compare W1 and W3, so you cannot add the two 1/8-inch level readings together or use them in place of W1 and W3.
Next, look at the sill. The flat mounting area is 4 3/4 inches wide, more than the 2-inch minimum. It is nearly level from side to side and slopes toward the shower. The recorded change across the full width is about 1/16 inch, but the manual does not define 1/16 inch as a universal pass. It is simply the reading from this opening. Do not turn it into a standard for another door.
For height, H1, H2, and H3 are all above the 71-inch minimum wall height. The record is missing the 73 1/2-inch overhead installation clearance, or H4. The door was installed successfully, but the sheet still has an empty box. Remember to measure H4 on your own project.
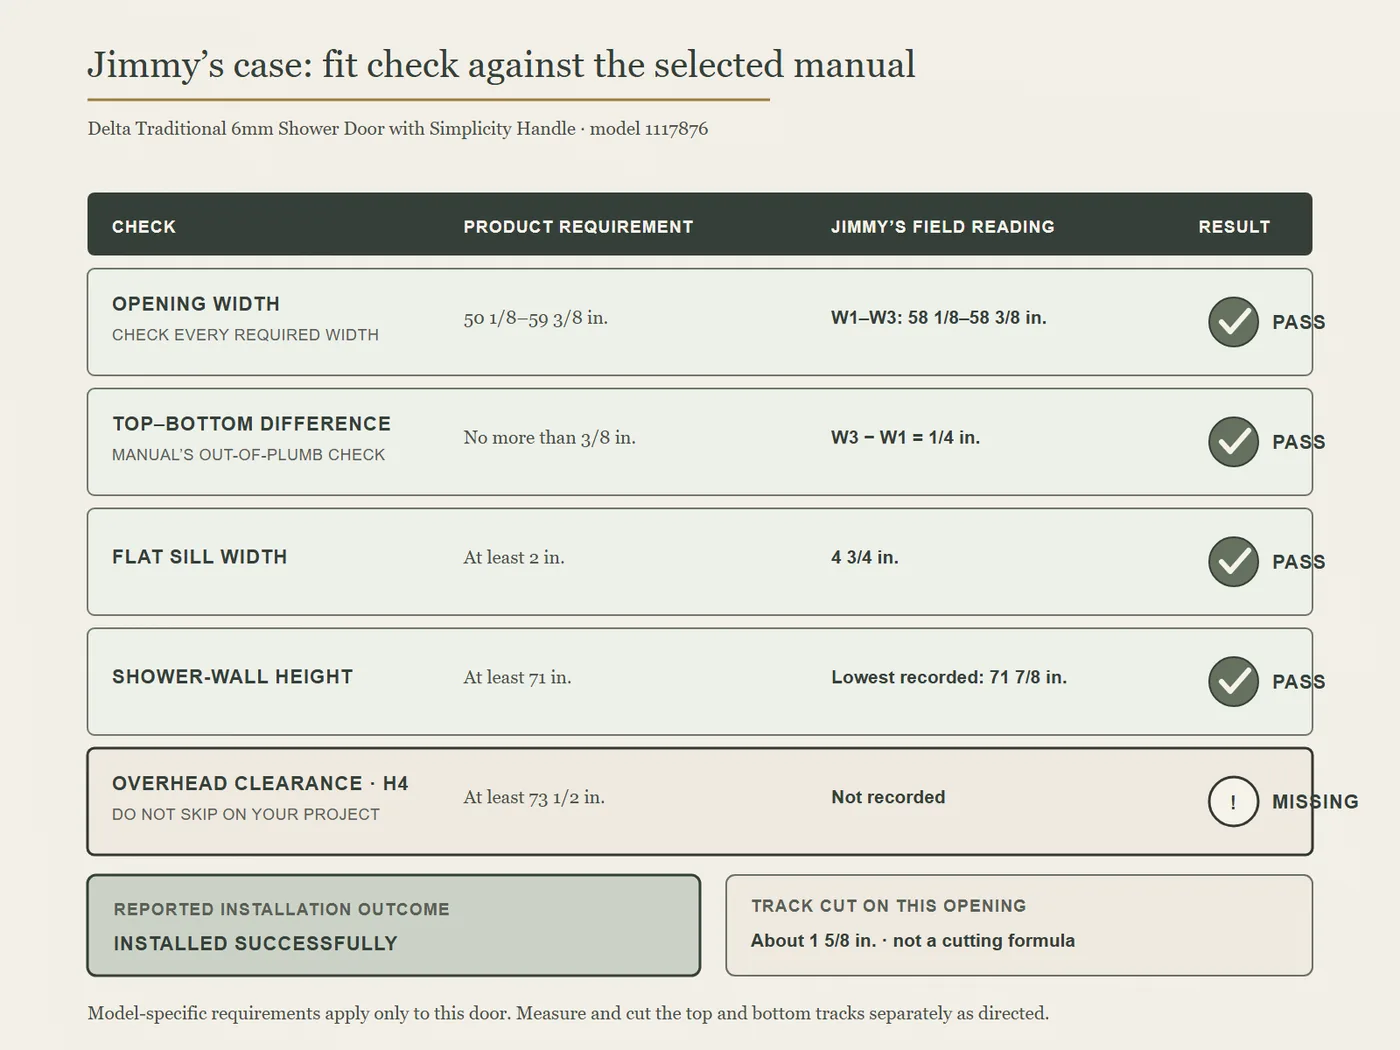
Jimmy’s measurements compared with the selected model’s installation manual. The successful installation does not turn the recorded track cut or site conditions into universal specifications.
Jimmy said the nominal 60-inch track was cut down by about 1 5/8 inches during the installation. Do not copy that number. It is the result for this opening, not a cutting formula for yours. Delta requires separate measurements for the top and bottom tracks. Step 32 on page 24 of the manual says not to cut both tracks to the same length.
The right order is to confirm first that every required width is in range, the difference between W1 and W3 is under 3/8 inch, the sill is wide enough, and the walls are tall enough. Only after those checks pass does the saw get a turn, with each track measured and cut according to its own instructions.
Do not put the tape away yet. I know measuring everything again right after you finish is a little annoying, but these few minutes are worth it. Return to the same labeled points and repeat every measurement. If the second number differs from the first, do not keep the one you like better. Take a third reading and find out what moved. The tape may be angled, the hook may have slipped, or the starting point may have changed.
Before you wrap up, run through this list:
Have your helper watch the sheet while you read every number aloud. It feels awkward for about ten seconds, right up until the read-back catches two digits you wrote in reverse.
| Door or enclosure type | Measurements that matter most | Extra checks |
|---|---|---|
| Sliding or bypass door | Three widths, heights, curb mounting width | Walk-in opening, panel overlap, lower guide, entry side |
| Hinged or pivot door | Three widths, heights, wall plumb | Swing radius, handle projection, wall support, nearby fixtures |
| Frameless door | All raw widths and heights, wall plumb, curb level | Hardware locations, custom gaps, support, professional verification |
| Framed or semi-frameless door | Three widths and the installation range | Wall-channel adjustment, track fit, seal contact |
| Tub door | Three widths from finished tile to tile, height from tub deck | Tub-deck width, tub slope, faucets, towel bars |
| Neo-angle enclosure | Wall runs, front opening, centerlines, angles | Curb joints, face angles, hinge side, support hardware |
| Quadrant enclosure | Tray width, depth, height, and radius | Exact tray compatibility and curved-door specifications |
| Fixed panel or walk-in screen | Panel span, height, floor or curb line | Showerhead direction, splash control, support-arm clearance |
This happens all the time. The work is not finished, but everyone is already excited about picking a door. Measuring early is fine, but tile, wall panels, mortar, stone caps, and the shower base all change the opening. Early numbers are for planning, not ordering.
The old frame hides part of the finished opening, and it may be crooked itself. Use it for a rough estimate if you need to, but ordering custom glass from it is a gamble. Take final measurements from the exposed opening after the old enclosure has been removed safely.
Walls can lean, taper, or bow in the middle. With only one number, you cannot even tell which option they chose.
An average is very good at hiding trouble. Keep all three widths. Unless the manual gives you another method, every width must fit the range, and the difference between the largest and smallest must stay within the out-of-plumb allowance.
When the next size looks almost perfect, it is easy to become a little too generous with the tape. Do not. Write down what it says and let the product specifications decide whether the door fits.
The width readings tell you that something changes. The level tells you which way it leans. It can also catch curb problems before a sliding door starts dragging or a hinged door begins moving on its own.
Bottom hardware needs a solid place to stand too. Measure the usable flat area, check it from side to side, and make sure water slopes toward the shower. Perfect wall measurements will not rescue a curb that slopes the wrong way.
A 60-inch sliding enclosure does not hand you a 60-inch entrance. The panels overlap, so the space you can actually walk through is much smaller. Check the listed walk-in opening.
The glass may clear an obstacle while the handle does not. Sweep the full arc once near the floor, then again at the height of the toilet, vanity, and other fixtures.
The size in the product name is often a rounded category. It is easy to scan, but it does not promise a fit. The installation range in the technical specifications is what decides.
If you ask me for the safest approach, I would let the finished opening choose the door instead of forcing the opening to accommodate a model you already like. Get the top, middle, and bottom widths first. Then check the heights, walls, curb, drainage slope, and operating space. Finally, open the manual and compare every number it asks for.
When all those checks pass and the entry or swing path is clear, a standard adjustable door is usually still a reasonable DIY project. For a frameless, curbless, neo-angle, steam-sealed, visibly uneven, or otherwise custom opening, you do not need to prove anything. Send the measurements, sketch, and photos to a fabricator or installer before gambling on a sheet of tempered glass.
Sometimes putting down the tape and calling a pro is the least expensive choice. I would have a professional take the final measurements when:
One site visit usually costs less than remaking a piece of custom tempered glass. In Basco’s custom-door process, a local installer checks the dimensions, walls, out-of-plumb conditions, and blocking before the order is placed. If the opening or hardware is already outside the range of a standard adjustable door, hand that final confirmation to a professional.
Take the final measurements after tile. Wait until the tile, grout, wall panels, shower base, curb, tub deck, and permanent trim are all finished, then bring out the tape. Measurements taken during construction can help you choose a door type, but do not use them to place the order.
Keep all three: top, middle, and bottom. Check every point named in the manual against both ends of the installation range. If the manual gives no other method, all three finished-opening widths must pass, and the difference between the largest and smallest must meet the out-of-plumb allowance. Do not choose the number that seems most useful for the supplier. Give them all three.
Not necessarily. Measure both sides and add the center for a wide opening. There is no universal rule that says you should always use the smallest or largest height. Follow the product manual. For custom glass, give the supplier every height.
If you can read the tape clearly and hold it steady, aim for the nearest 1/16 inch. An awkward number is fine as long as it is real. Never make it look nicer just to match an advertised size.
You can get a rough width and height without a level, but you cannot tell whether the walls are plumb or the curb is level. That is enough for early shopping. Before ordering, find a level.
Record which way each wall leans and by how much, then compare those readings using the definition and allowance in the manual. Exceeding the limit does not mean the bathroom is doomed. It means this particular door is not a fit. Look for a model with more adjustment, or have a professional take the final measurements.
Lowe’s U.S. size guide lists common retail categories of about 22 to 36 inches wide for single doors, 48 to 60 inches for sliding doors, and 72 to 78 inches high for shower doors. Tub doors are usually shorter. Delta currently has two useful examples: one has a 55 3/8-inch walk-through height and a 58 3/8-inch threshold-to-top requirement, while another has a 56 3/4-inch walk-through height and a 60 3/16-inch threshold-to-top requirement. These numbers can help you shop, but they cannot confirm fit. Use the installation range and clearance requirements for the model you actually buy.
There is no single gap that works for every door. Glass thickness, hinges, wall channels, seals, and sweeps all change the answer. Do not automatically deduct 1/8 inch. Use the manufacturer’s rules for that door.
You can use the old door as a rough reference, but not for final sizing. The old frame hides the real opening and may be crooked itself. After the enclosure has been removed safely, measure between the finished surfaces.
The method is much like measuring a shower enclosure. Measure between the finished walls at the top, middle, and just above the tub deck. Then measure upward from the finished tub deck to the planned top of the door. Check the tub deck too. It needs enough flat space for the lower track or guide.
Jimmy is a shower-door installer with more than 10 years of experience serving homeowners in Delaware. He reviewed the order of the steps, the product-range rules, the wall-plumb checks, and the 60-inch sliding-door example. He also provided the field measurements, installed the door himself, and confirmed that the installation was successful.
Before you click “Buy,” take one more look at your notes. You should have:
A page full of numbers, arrows, and notes is a good result. If you only have one width and one height, the shower probably has not finished sharing its opinions.
If anything looks odd, do not guess. Send the raw measurements, sketch, and photos to the supplier. For a standard adjustable door, make sure every width required by the manual falls within the full installation range and that the variation stays within the limit. For custom glass, have the fabricator or installer confirm the dimensions before production.
Use these with the exact product and room conditions behind your decision.
Your response helps us make the next guide more useful.
Loading responses…
Continue with the next decision in your bathroom project.