
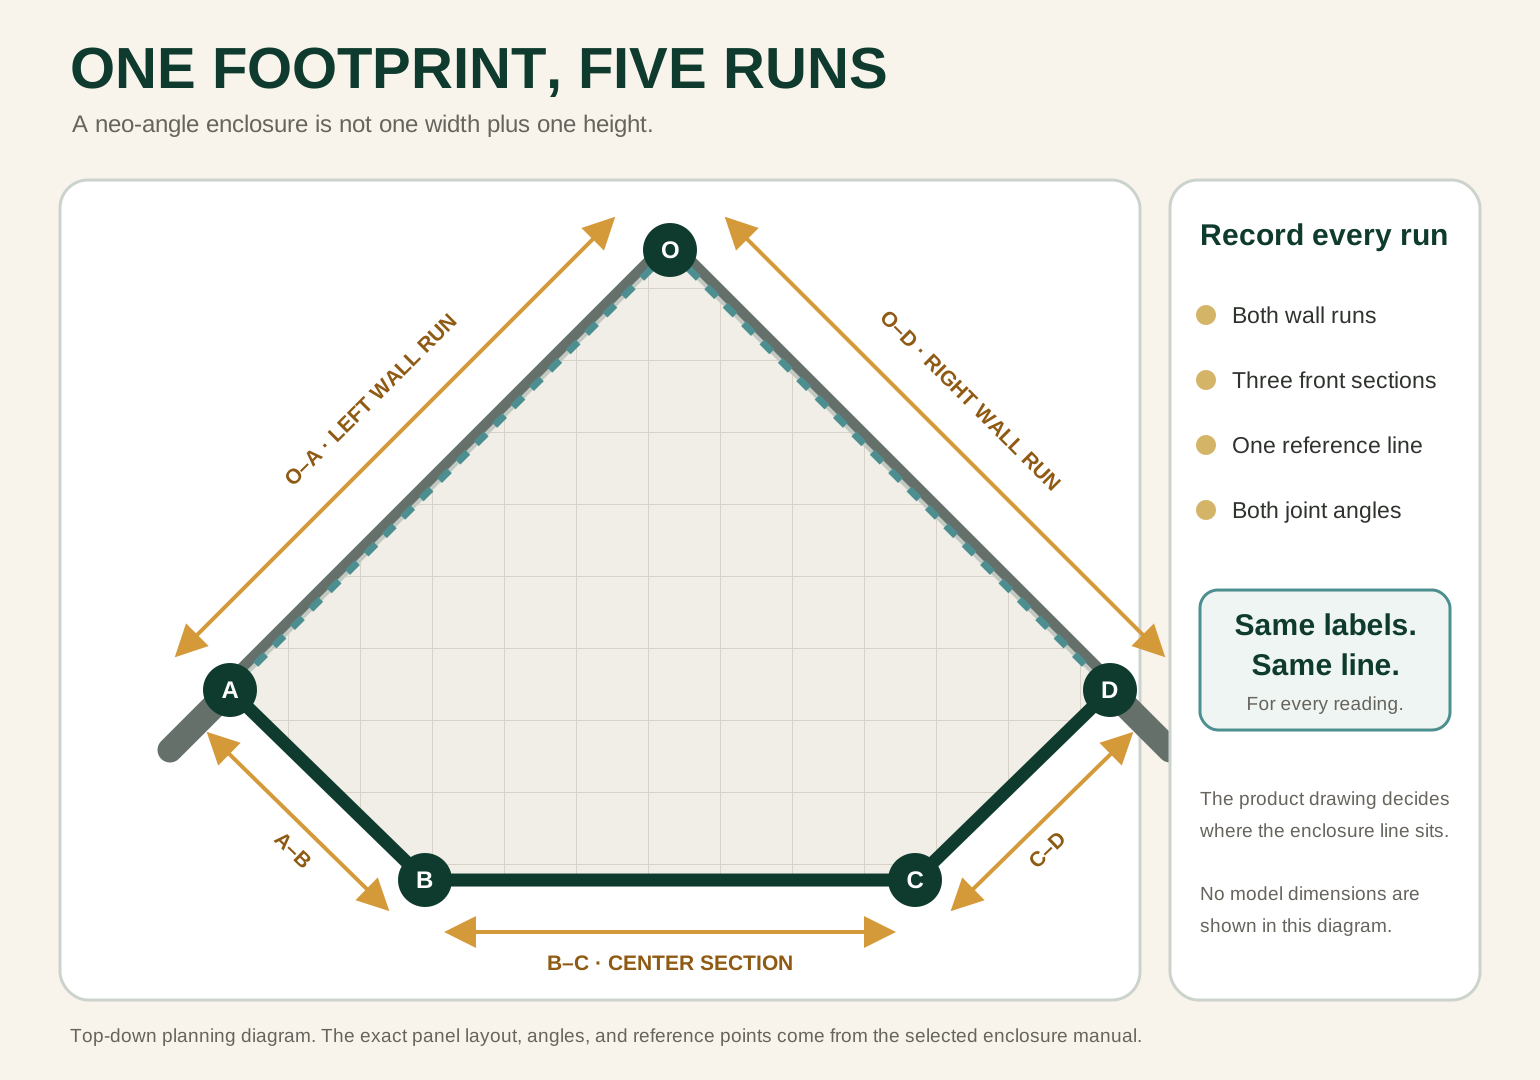
A neo-angle shower sits in a room corner with the front corner cut back at an angle. The common layout has a door between two fixed panels, giving you three front sections and two wall runs to measure.
Take final measurements after the permanent base, curb, and wall finishes are complete. Keep the whole sketch on one reference line, then check the shape, mounting support, and door swing before approving a fit.
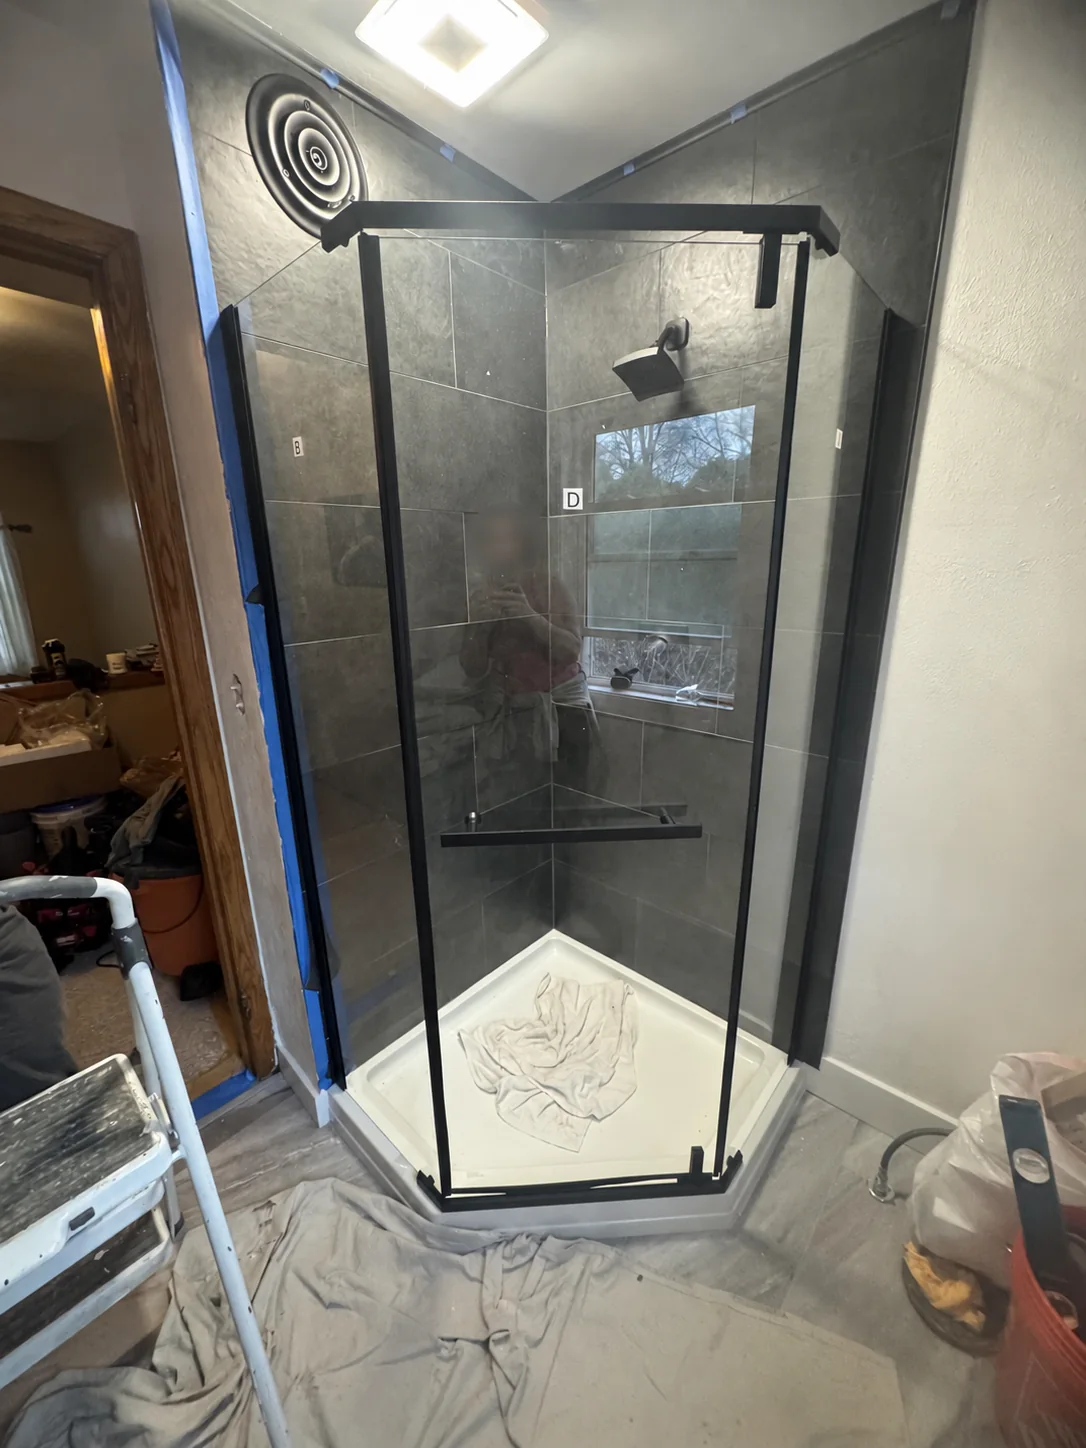
In the July 2026 customer case, ordering by the “38-inch” label led to an enclosure that failed its dry fit. The correctly sized replacement fit the same base. The full footprint explains the difference.
First decide what you are measuring
The door, fixed panels, wall attachments, and base have to fit together. Pick your job below before putting the tape on the curb.
| Your project | What to record and where to continue |
|---|---|
| New matching base and enclosure | Save the listed base/enclosure pairing, then check its finished mounting positions with the eight steps below. |
| Different enclosure on an existing base | Record the complete footprint, wall conditions, and support, then compare the candidate in Step 8. |
| Complete enclosure replacement | Use visible dimensions for a shortlist; take final base and wall measurements after safe removal. See replacement checks. |
| Center door replacement | Identify the original system and match its door, hardware, seals, and frame. Start with the center-door checks. |
| Custom frameless glass | Record the planning footprint and site conditions. The fabricator approves the production dimensions. |
| Replacing the shower base itself | Record the actual pan’s outside footprint, front shape, and drain location against the base drawing. Those are separate from the enclosure-line measurements below. |
For an enclosure, measure where the profiles or glass will sit. A replacement pan also needs its actual outside dimensions and drain location, as the base instructions explain. Use the wall reference on that base drawing. A glass-centerline reading can’t stand in for the outside pan measurement.
Buying the base and enclosure together? Choose a documented pairing. Delta base 422062 lists its compatible enclosures. Matching “38 inch” labels on two unrelated products doesn’t establish compatibility.
The eight-step measuring order
- Measure from finished surfaces.
- Find and mark the enclosure reference line.
- Check corner O, then mark A, B, C, and D.
- Measure the three front sections: A-B, B-C, and C-D.
- Record both wall runs and both heights.
- Check walls, curb, mounting support, and both joints.
- Check the door, handle, fully open position, and usable entry.
- Compare the same sketch with one exact model drawing.
Keep the worksheet beside the sketch. The curb has more than one measuring lane; choose the right one and keep every related reading in it.
What you need
- steel tape with 1/16-inch marks
- painter’s tape, pencil or fine-tip marker, paper, and phone camera
- 4-foot level and a short level
- framing square and angle finder
The general measuring guide covers the full setup. Write A, B, C, and D on painter’s tape on the curb; pencil can disappear on glazed tile. Photograph each tape-measure reading with both endpoint labels visible before moving on.
Step 1: measure from finished surfaces
Take final fit readings with the base, curb cap, tile, grout, and permanent wall panels in place. Bare studs, backer board, and the old metal frame don’t establish the finished boundaries.
Use rough measurements to plan. Order from finished measurements. The rough-versus-finished guide explains what the remaining wall layers change.
An old frame can hide the curb and wall attachments. While it’s still in place, use what you can see to make a shortlist. Take final readings after safe removal exposes the mounting surfaces.
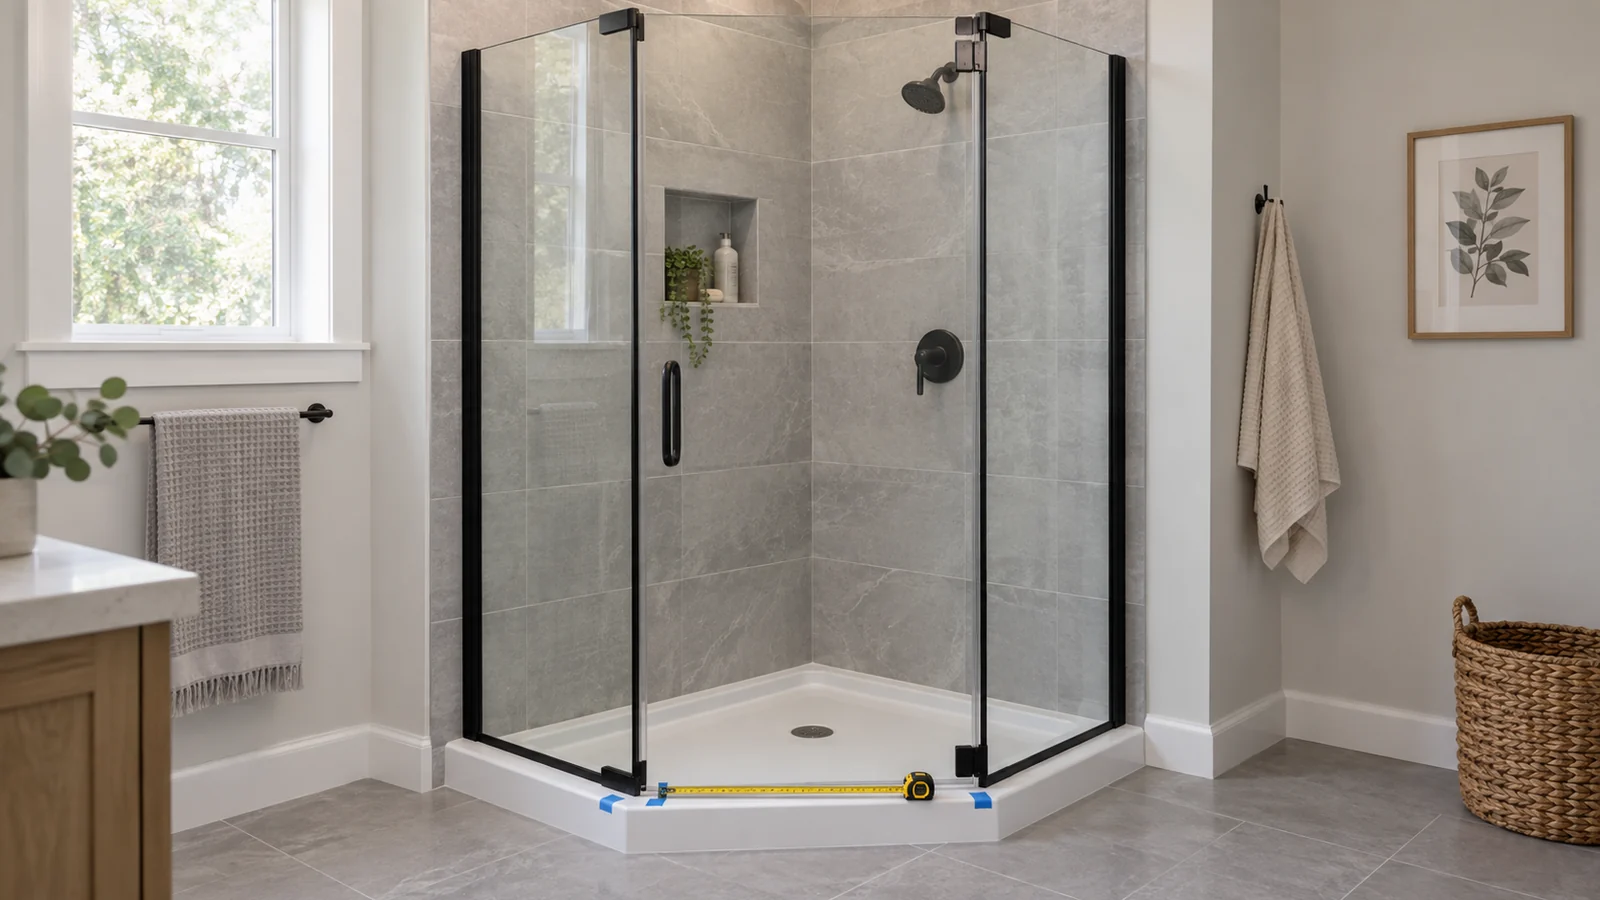
Before moving on: The permanent finishes are complete. If an old frame still hides the mounting surfaces, label the readings preliminary and use them only for a shortlist.
Step 2: find the line where the enclosure will sit
You can put the tape on a curb’s inside edge, outside edge, or intended enclosure path and get three different lengths. Decide which line the enclosure uses before recording a number.
For custom frameless work, the National Glass Association says many fabricators prefer glass-centerline dimensions. Label inside or outside readings when you use them. A boxed kit may instead locate a wall channel from the finished wall.
Use the reference identified on the product drawing. If it calls for a profile edge, a curb-centerline number answers a different question.
The centerline runs through the planned glass or frame position. It can sit off-center on the curb.
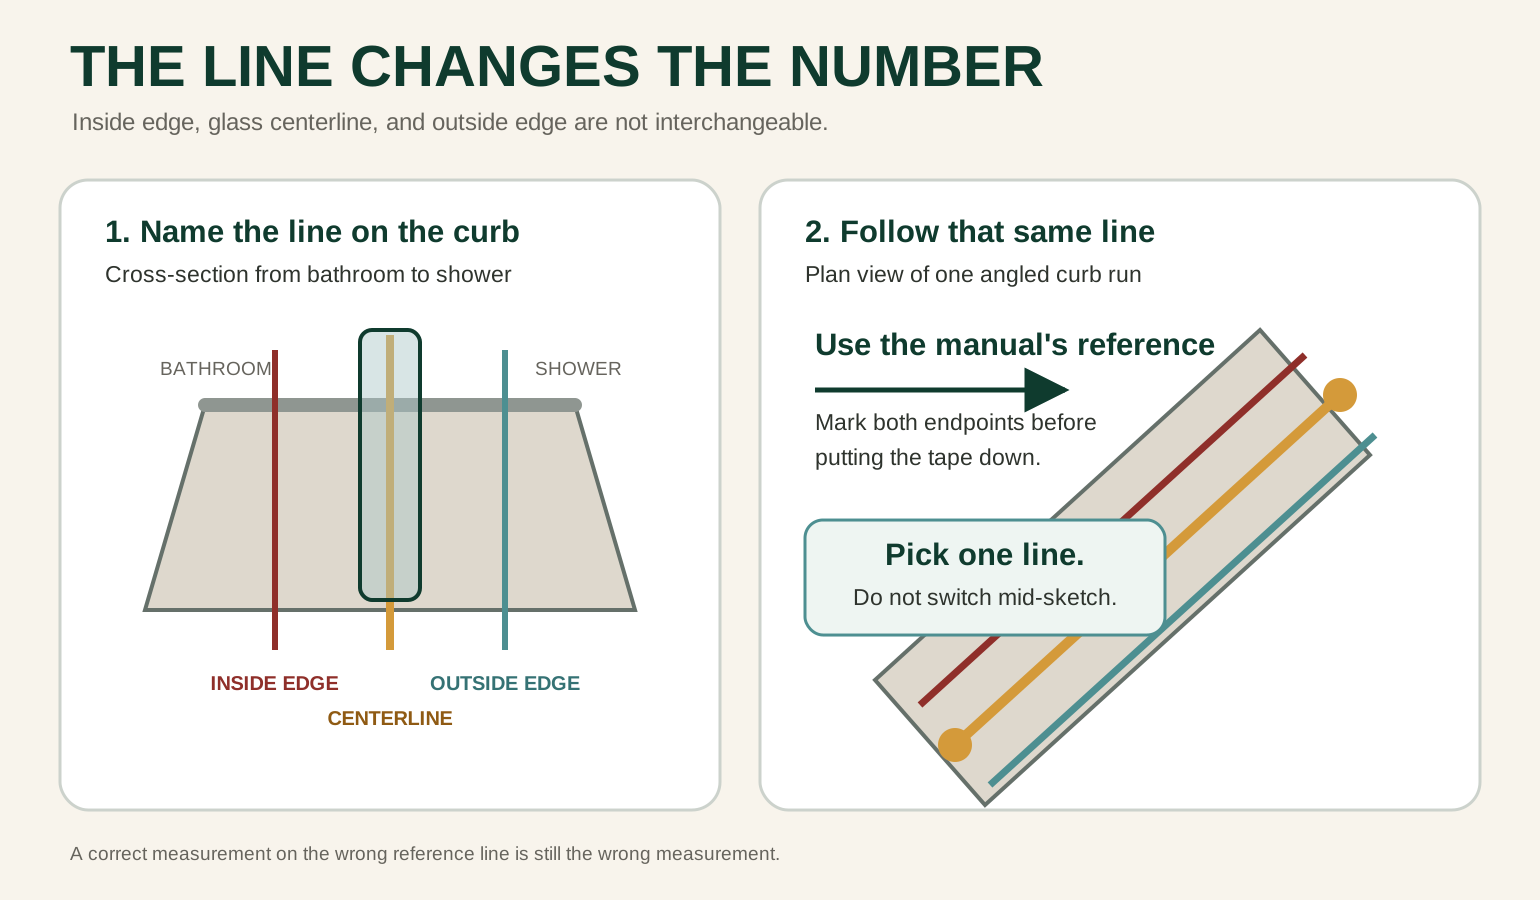
Mark the line at both walls and every change of direction. Keep those marks for the whole sketch.
Before moving on: Name the reference on the sketch: glass centerline, profile edge, or another stated installation line. Keep it unchanged for every related reading.
Step 3: check the 90-degree corner, then mark four endpoints
Stand outside the shower and sketch it from above. A grocery-receipt doodle is fine if the labels are clear and the corners stay in the same places.
Check inside corner O before laying out A through D. A framing square checks a small area. For a larger check, mark 36 inches along one finished wall and 48 along the other from the same projected corner. Those marks are 60 inches apart at 90 degrees. Use the same 3-4-5 ratio at another scale when an obstruction blocks the larger triangle.
With 36- and 48-inch legs, a 1/8-inch diagonal error is about 0.25 degrees at the corner; a 1/4-inch error is about 0.5 degrees. Here, more than 1/8 inch earns a suspect note beside O and a second check with an angle finder. That’s this guide’s screening trigger, not a universal installation tolerance. Compare the actual angle with the candidate’s requirements. Reject a kit that can’t accept it, and correct a base or finished-wall condition that fails the selected layout before measuring for final fit again.
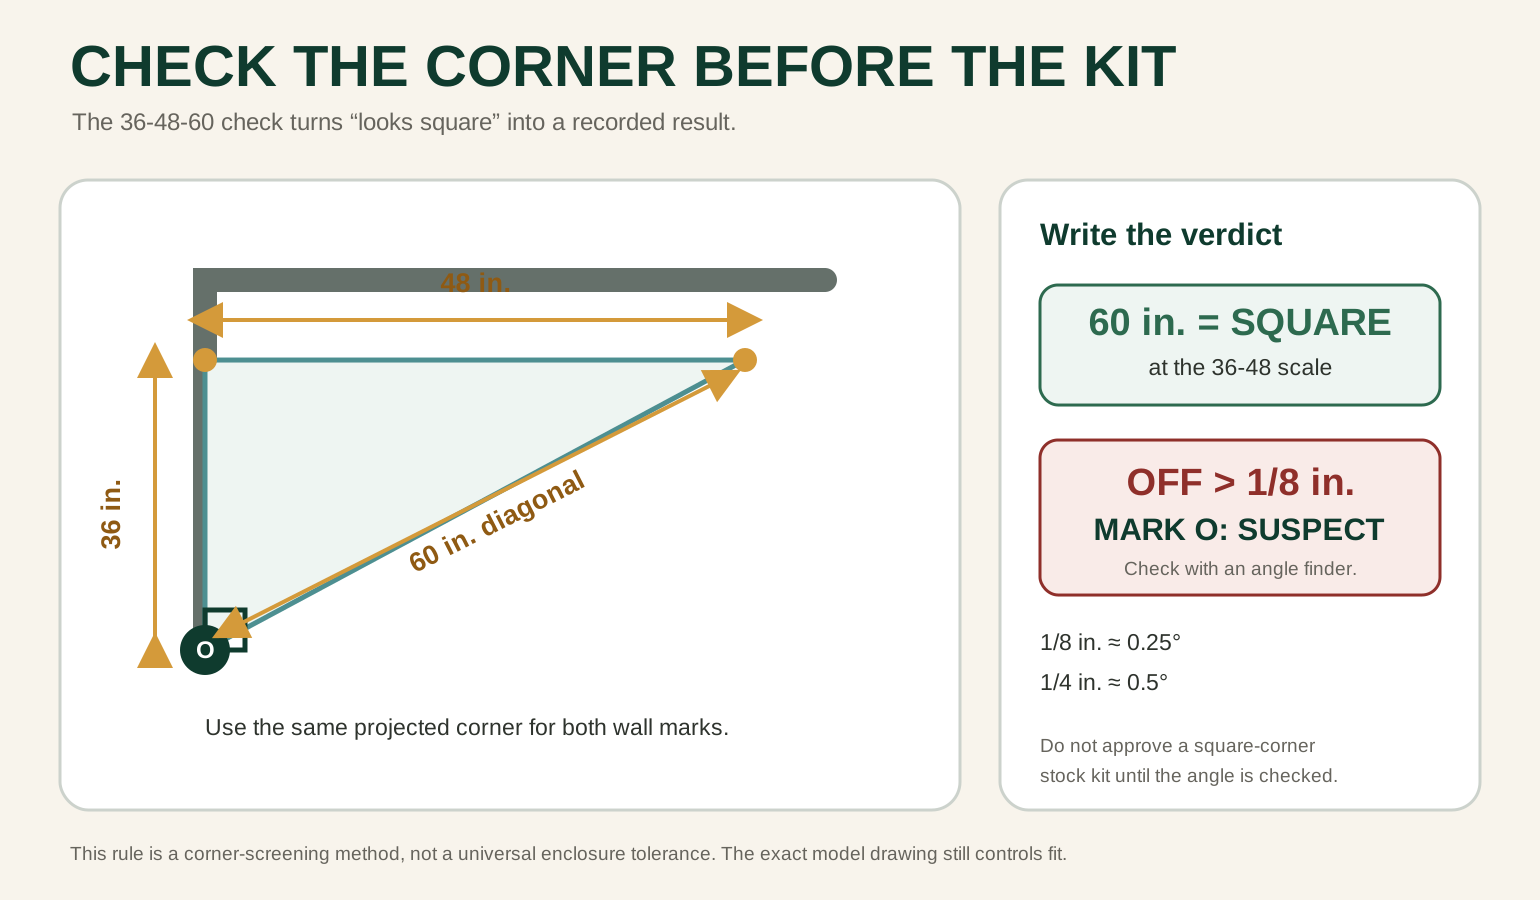
A 38 x 38 drawing doesn’t make a crooked corner square. DreamLine’s SlimLine instructions require a level, solid installation surface and right-angle walls, and warn that an incorrect wall angle causes installation problems. Write O = square, the diagonal reading, or the measured angle on your sketch.
Label these four points:
A: left wall attachment pointB: left angle pointC: right angle pointD: right wall attachment point
That gives you three front sections:
A-B: left sectionB-C: center door or front sectionC-D: right section
Label the inside corner where the two walls meet as O.
Keep the endpoint marks still. Moving B between readings means you’re recording a different shape.
Before moving on: Record corner O and its square/suspect check, and mark A, B, C, and D. The mounting base must meet the level and corner requirements before final approval.
Step 4: measure the three front sections
Measure each front section on the line chosen in Step 2. Record to the nearest 1/16 inch.
| Section endpoints | What this length measures | Your number |
|---|---|---|
A-B | Left front section | ______ in. |
B-C | Center front section | ______ in. |
C-D | Right front section | ______ in. |
Measure both side sections, even on a base that looks symmetrical. Keep unequal readings separate.
Take the photo before moving the tape, with both endpoints in frame. A labeled B-C reading lets you retrace the measurement later; a number on a neat worksheet alone doesn’t show where the tape sat.
Some stock kits locate the wall channels first and establish the front opening during assembly. Keep the three-section sketch, then compare the actual fields on that kit’s drawing. The same letter on another manufacturer’s sheet can mean something else.
Don’t create upper B and C points by holding a tape in midair. For a stock kit, mark the bottom wall-channel positions and project them upward with a checked level or laser. Record a leaning wall’s gap from that vertical line at the planned hardware height. Measure an upper corner-to-channel run only if the kit calls for it. You’re checking the wall there. A custom fabricator measures the upper geometry and calculates the glass sizes.
Before moving on: Record A-B, B-C, and C-D separately to the nearest 1/16 inch, with labeled photographs. Do not average unequal sides or invent an upper B-C reading.
Step 5: record the wall runs and height
Measure from inside corner O along each finished wall to A and D. Keep both wall runs with the front-section readings; stock drawings often use them to locate the wall profiles.
A 36- or 38-inch label works a bit like a shirt size: it narrows the search, but the actual cut still matters. It doesn’t supply the door width, side-panel width, or clear entrance.
Keep the product’s field names beside your endpoint labels. In the Prism Plus example, W1 and W2 end at the outside edges of the wall profiles, starting at the finished wall corner. They correspond to O-A and O-D only when A and D sit on those same edges. A U-channel is the narrow metal profile holding a glass edge. Its adjustment amount is another field.
The 60-inch fit guide uses the same distinction between a size label and the dimensions that establish fit.
Start height readings at the finished curb top on the enclosure line. Measure at both wall attachments to the required installed height. Starting at the bathroom floor, shower floor, or bottom of the pan changes the reference. Record the lowest ceiling or soffit and any trim crossing a wall channel, then compare the height for the selected model.
Before moving on: Record O-A and O-D on the chosen reference, both heights from the finished curb top, and the lowest overhead obstruction. Identify any drawing-specific edge used for W1/W2.
Step 6: check the walls, curb, mounting structure, and both angles
At each attachment line, note wall lean and direction, bowing, and tile lippage. Plumb means vertical; level means horizontal. The wall-plumb guide covers the check. Bring the result back to this sketch.
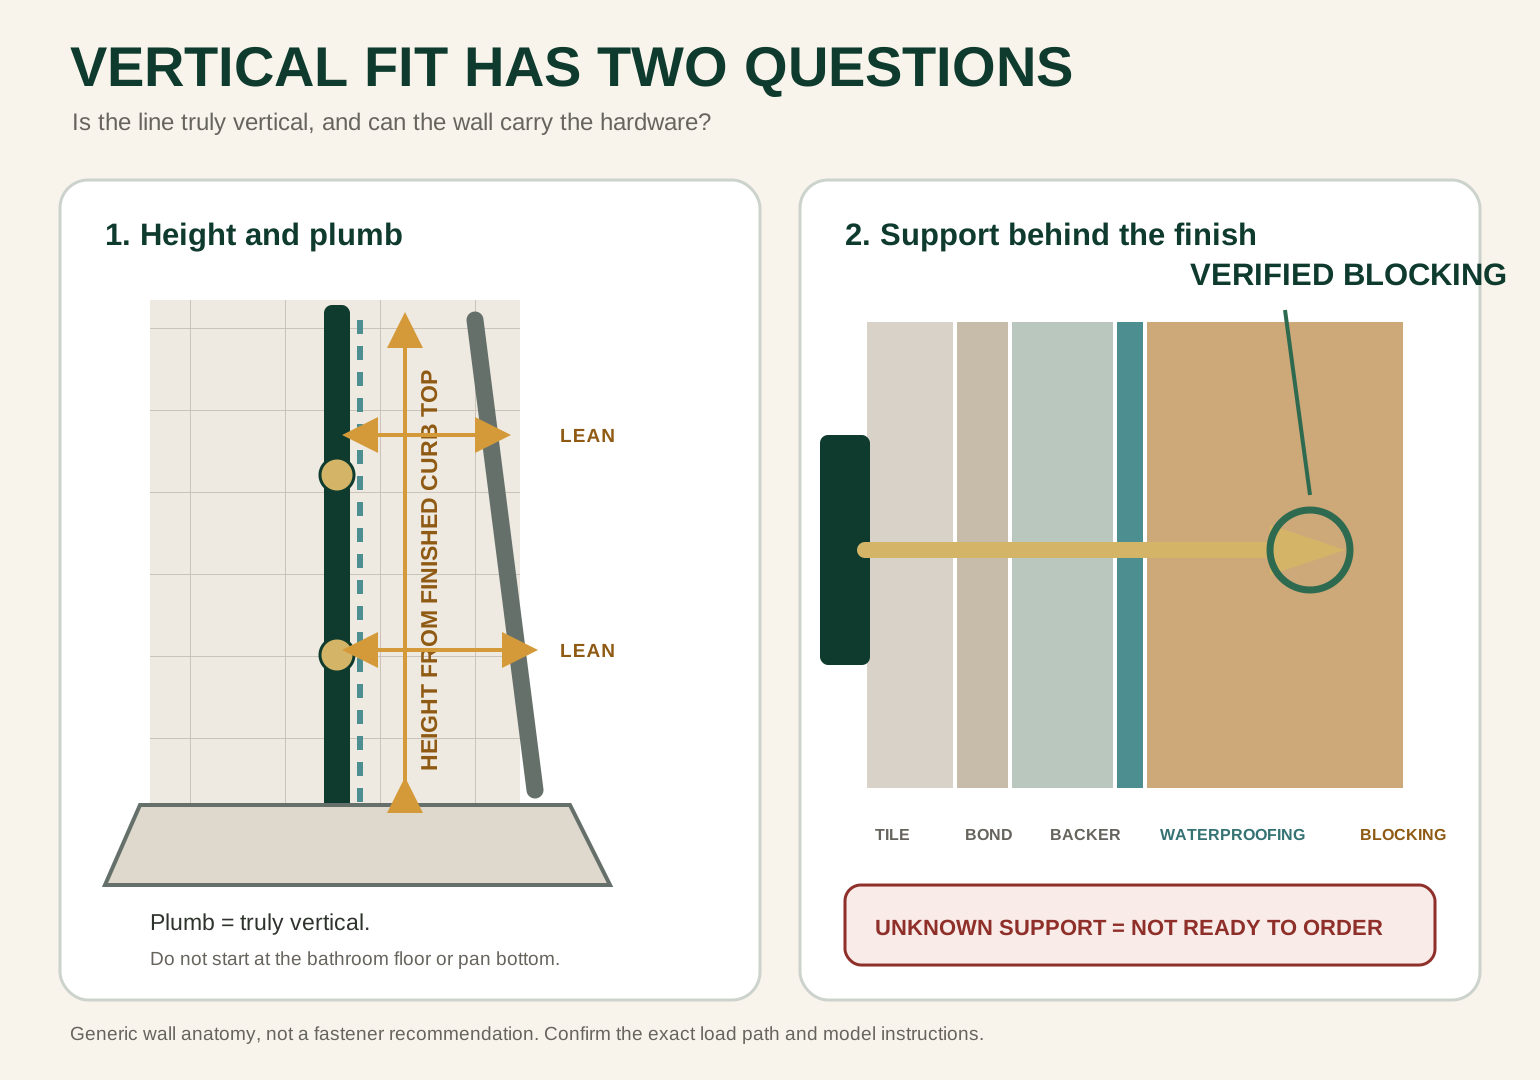
Check the curb in two different directions:
- Along the enclosure line: Place the 4-foot level along each run. The curb top must meet the model’s level requirement without twist, humps, or a section that rises and falls.
- Across the curb: Use the short level from the bathroom side toward the shower. This is where the inward drainage pitch belongs. On a 4- to 6-inch-wide curb, use the level to confirm the direction of fall, not to calculate a precise angle. The pitch should be small but clearly toward the shower, without making the door or sweep bind. If the model requires a numeric slope, use a longer straightedge and measure rise over run.
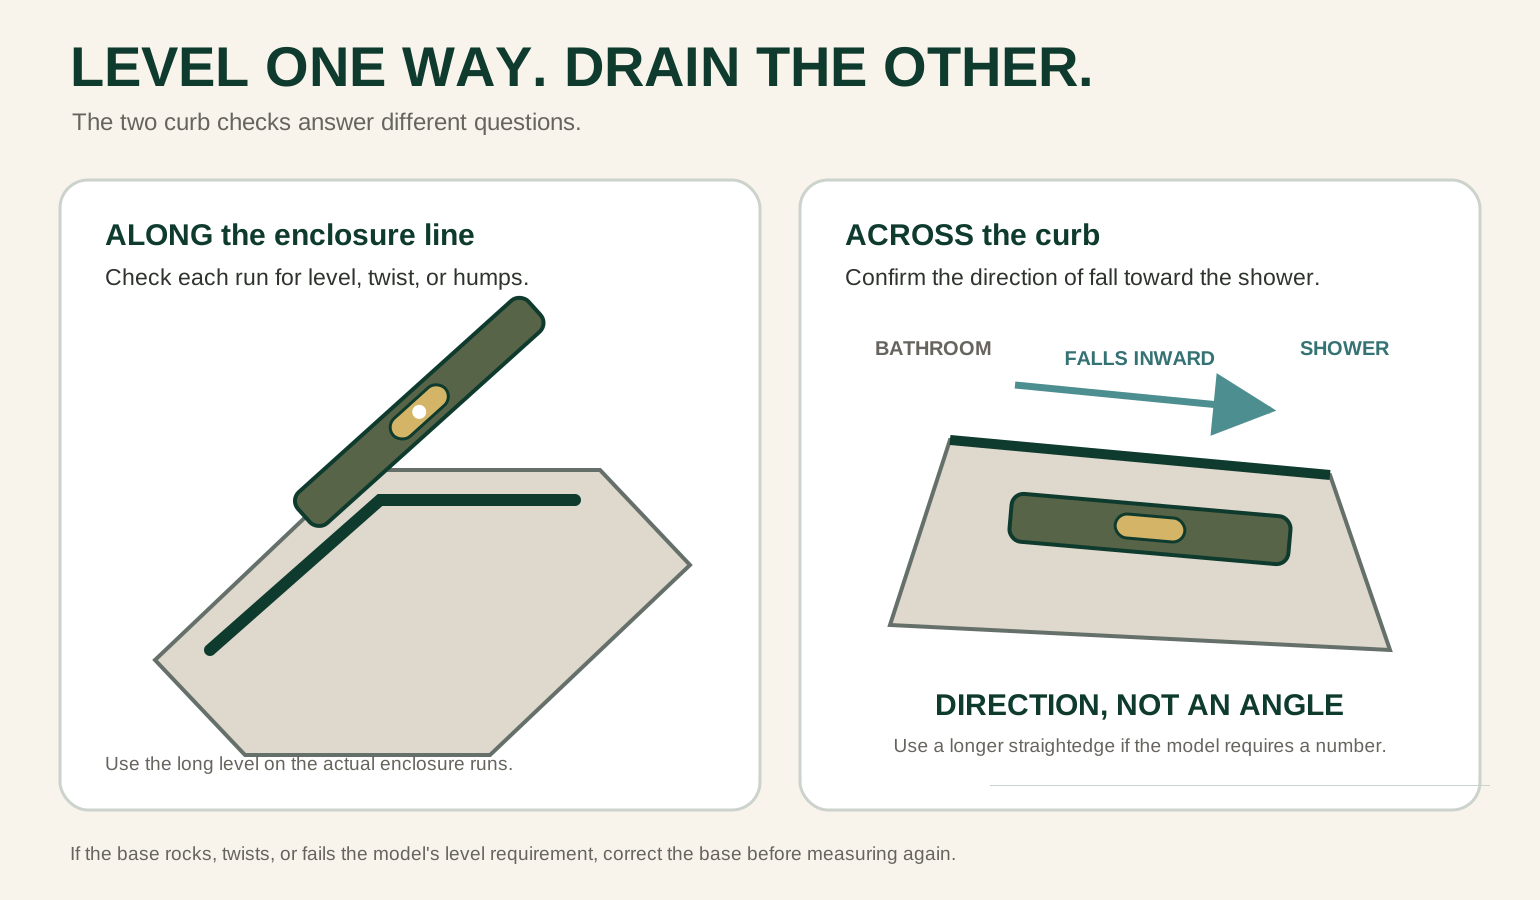
Prism Plus calls for a threshold that’s level along the installation runs and pitched inward across the curb. Those checks use different directions. Stop for a base that rocks, twists, or fails its required level check. Correct the base or curb before taking final fit readings; changing a number or using more glass adjustment won’t fix that mounting condition.
Record the mounting structure
Mark the wall channels, hinges, clamps, brackets, and pivots, then record the support behind each mounting point. Framing photos, plans, a reliable detector, or access from the opposite side provide evidence. Knocking on tile doesn’t establish what’s behind it.
Follow the load through the hardware. Wall hinges need adequate substrate at their mounting points. Glass-to-glass hinges pass the door’s load through the fixed panel and its brackets, curb attachments, and supports. Pivots use another set of connections. Identify the support for that actual layout rather than assuming every frameless door hangs from a wall stud.
The NGA warns against mounting heavy wall-hinged glass without proper structural support. On a reversible system, verified backing may decide which side carries the door. An inexpensive stud finder can provide a first check on accessible drywall; tile and backer can make its readings unreliable. Check framing photos, plans, or access from the opposite side next. Mark any unverified required support unknown and hold the wall-hinged heavy-glass order until it’s confirmed.
Measure the left and right changes of angle separately.
The NGA describes “true neo-angle” geometry as 135 degrees/45 degrees and notes that field angles vary. At a typical front joint, 135 degrees is the inside angle between sections, while 45 degrees is the turn along their path. The room-wall corner O is a separate 90-degree check. Measure each front joint with an angle finder or labeled paper pattern and protractor.
Record both actual angles. Fixed 135-degree hinges, adjustable hinges, and pivots accept different layouts, so compare each joint with the chosen system’s geometry.
Keep unequal angles separate. Custom panel deductions also include hardware, seals, clearances, and the chosen glass line; curb dimensions alone don’t give you glass production sizes.
Before moving on: Record each wall condition, along-run level, cross-curb drainage direction, both joint angles, and support evidence. A failed mounting condition rules out the layout; unknown required support holds the order.
Step 7: check the door swing and usable entry
Stand outside the shower when you describe left and right. Then record:
- hinge or pivot side
- permitted swing direction
- clearance to nearby fixtures and the bathroom door
- handle projection
- usable walk-through width
Walk-through width is the clear entrance you can pass through with the door open. Frames, pivots, glass, and seals can make it narrower than the door panel.
Hold the tape at the hinge or pivot line, extend it to the door edge, and sweep that radius near the floor and at handle height. Include the fully open stopping point. Imagine a door that clears the vanity while swinging but parks in front of a drawer when open. The room needs to work in that position too, including clearance to the toilet and bathroom door.
Close the door and check where its sweep and closing gap meet the curb. Note a grout joint, curb seam, or change of pitch under that line; it can affect sealing.
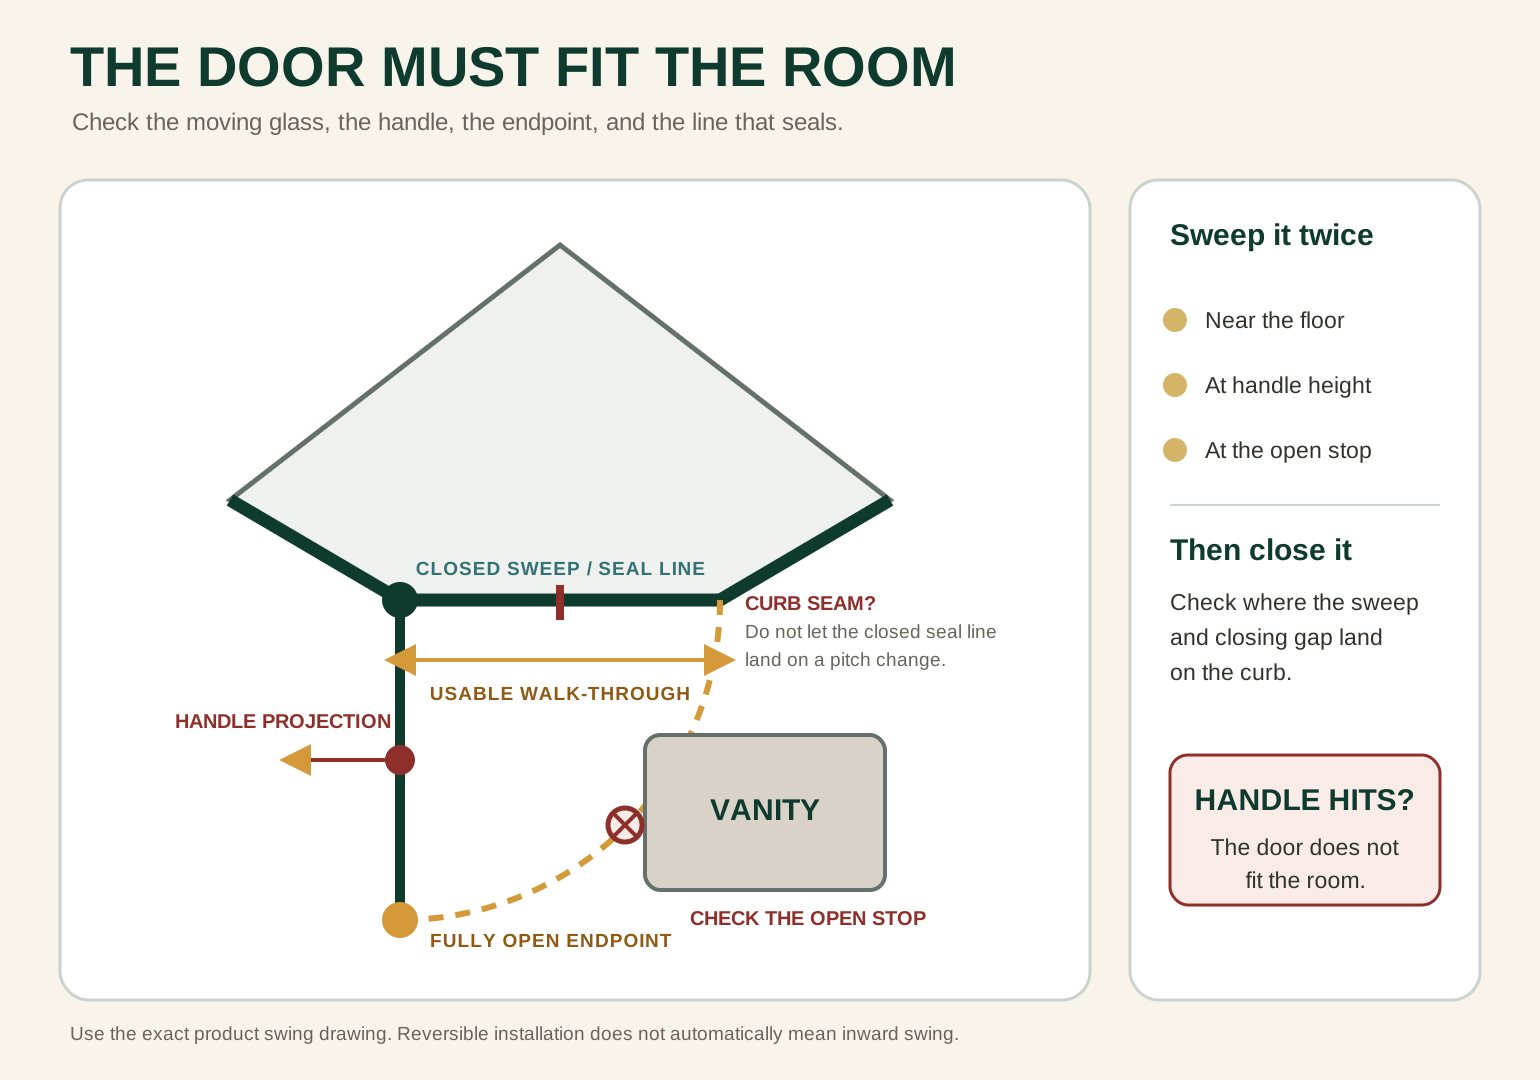
Confirm the allowed travel on the swing drawing. Left/right reversibility doesn’t add an inward-swing option. Delta 422061, for example, allows either hand, and Delta states that it does not open inward.
A handle that hits the vanity rules out the layout even when the glass clears it.
Before moving on: Record the permitted hand and swing, handle clearance, fully open stopping position, closed sweep line, and usable entry. A door or handle hitting a fixture means the layout fails.
Step 8: compare the sketch with the exact model drawing
Put the site sheet beside the candidate drawing and compare the same fields. Keep the raw readings even when they rule out a favorite enclosure.
| Your measurement | Product information to find |
|---|---|
| Left and right wall runs | Required finished-wall dimensions or installation range |
| Left, center, and right sections | Panel layout and front-opening dimensions |
| Measurement reference | Centerline, wall-channel position, inside edge, or outside edge |
| Wall condition | Published adjustment method and limit |
| Flat curb width | Minimum mounting surface required by the frame or hardware |
| Height | Installed height and overhead working clearance |
| Door position | Left, right, or reversible configuration |
| Center opening | Door-panel size and usable walk-through width |
| Joint angles | Required footprint and compatible hardware |
| Base model | Listed matching base or complete set of verified fit dimensions |
Finish the comparison with one of these results:
Fits: Every required dimension, site condition, support, and clearance passes for the documented stock pairing or candidate enclosure. You can place that stock order.
Does not fit: A required dimension, base condition, support, or mounting surface fails. Cross that model off.
Still need to confirm: A required dimension, limit, support detail, or compatibility statement is missing. Hold the order until that particular gap is resolved.
“Close enough” is not a fourth result.
Before moving on: Save one candidate model and drawing with the sketch, then mark Fits, Does not fit, or Still need to confirm. Keep custom-glass production approval with the fabricator.
Field case: the holes that almost lined up
In July 2026, a semi-frameless neo-angle enclosure with black hardware arrived for a white neo-angle base. At dry fit, two factory screw holes in the door-and-frame assembly wouldn’t align with their preset positions. The crew stopped before fastening.
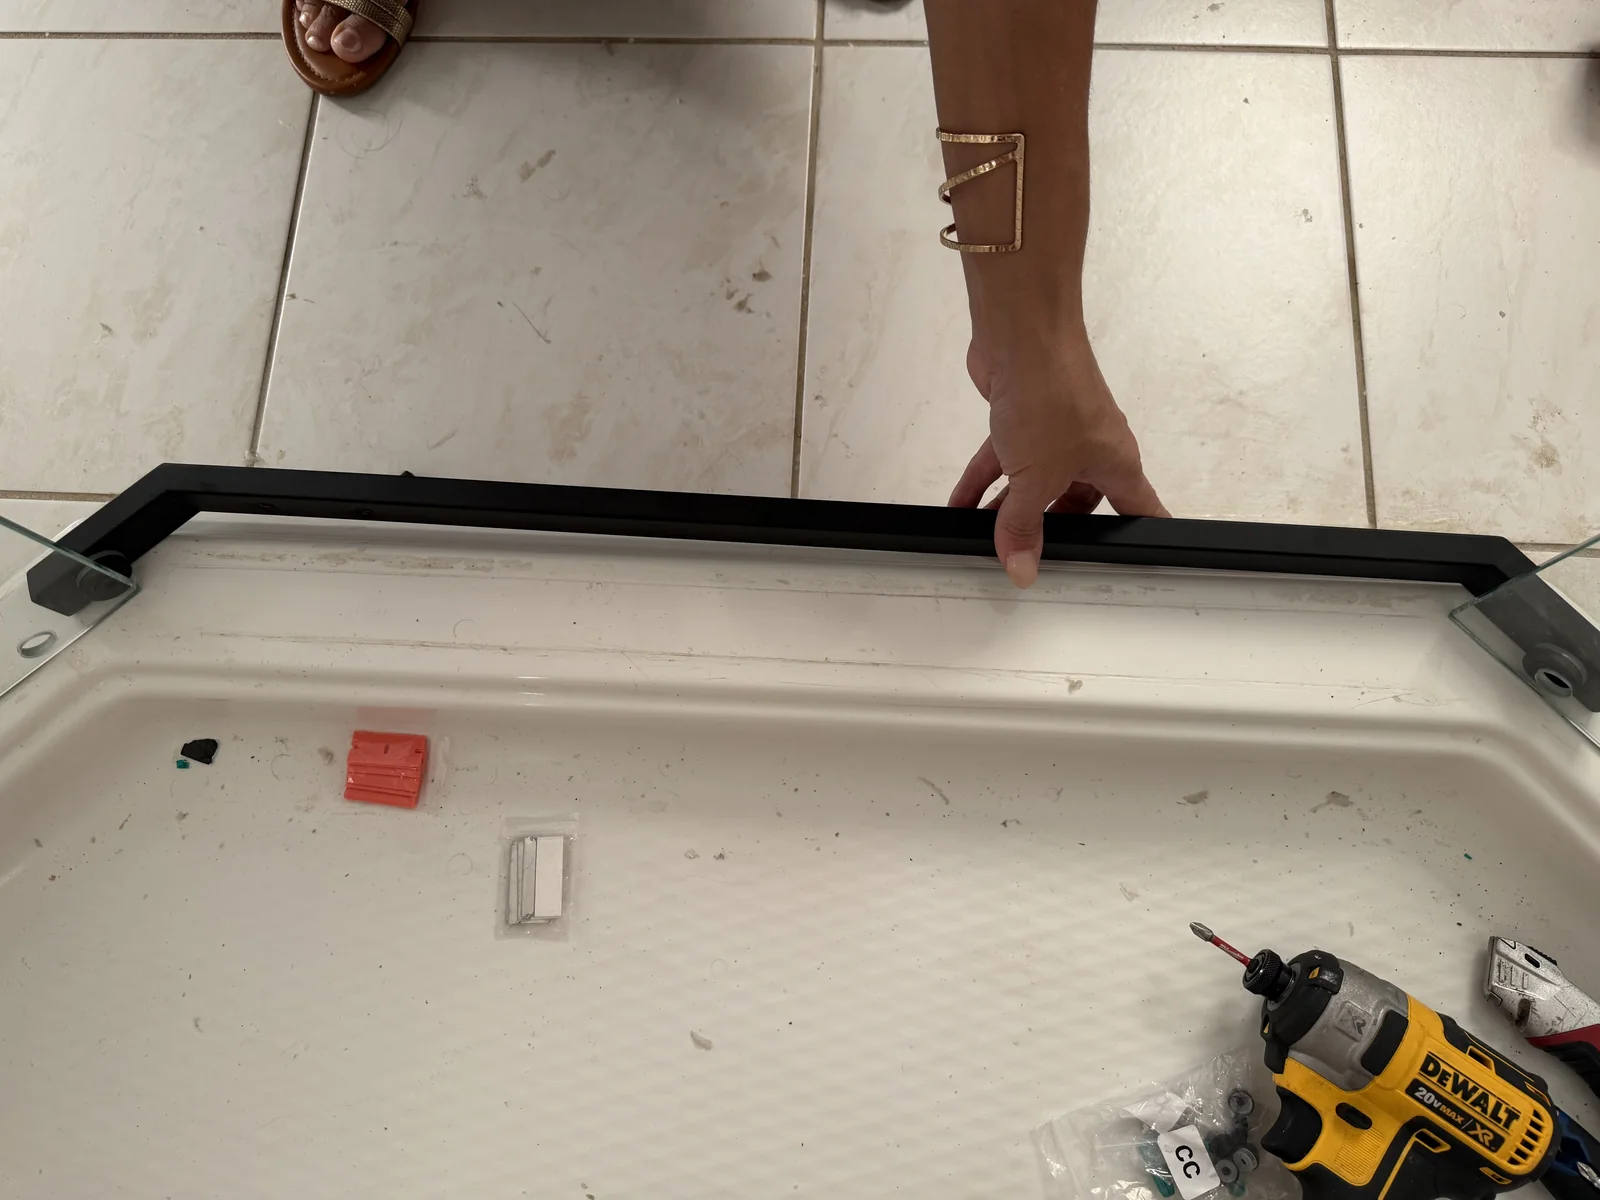
The measurement marks were still on the base, so the crew could compare the frame with the recorded layout before forcing anything together. The base matched the marks; the delivered enclosure didn’t match the footprint. Enlarging holes, drilling new ones, or stacking shims wouldn’t correct that factory hole-pattern mismatch and could damage the safety glass. The result was Does not fit.
The review traced the mismatch to the order. The site had been measured, but the order carried forward the nominal “38-inch” size instead of the complete footprint. The correctly sized replacement went in successfully.
The job left three practical lessons:
- Carry the full measured footprint into the order. Correct site measurements help only when the order uses them.
- Mark and dry-fit before silicone or permanent fastening. Here, the marks showed that the base layout was right and the delivered enclosure was wrong, giving the crew a clear replacement issue to report.
- Keep the three front sections and both wall runs with a nominal “38-inch” description. Those readings would have exposed this mismatch before the wrong enclosure reached the site.
The customer took both photographs and authorized their publication after the reflected face was obscured. Ronni reviewed the finished article for technical accuracy.
A real 38-inch example
The advertised size of DreamLine SHEN-2638380-04 is 38 x 38 x 72 inches. Its combined manual gives several dimensions for different parts of that Prism Plus configuration. Keep this example with its matched model.
| Drawing field | Value in this example | What to compare |
|---|---|---|
| Advertised enclosure size | 38 x 38 x 72 in. | Product identification; it does not supply every panel or entrance dimension. |
W1 and W2 | 38 in. on each wall run | Finished wall corner to the outside edge of the wall profile, measured at the bottom and projected upward with plumb lines. |
| Stationary-panel spacing | 23 15/16 in. | Distance between the two fixed-panel edges during assembly, not glass-door width or usable walk-through width. |
| Adjustment in each U-channel | Up to 1/4 in. | This model’s channel adjustment; it does not establish a tolerance for another enclosure or every corner angle. |
PDF page 24 identifies the wall-profile reference. PDF pages 35 and 36 show the fixed-panel spacing and channel adjustment. Use the published walk-through information for the clear entrance, which is a separate measurement from the fixed-panel gap. Another 38-inch enclosure needs its own matching dimensions.
Measuring an existing neo-angle shower for replacement
Look for the original enclosure’s etched marks, frame labels, paperwork, base model, and parts diagram. Photograph the full enclosure, its hardware, seals, wall channels, and every visible identifying mark.
After removal, inspect the old wall-channel holes before approving the new layout. Put the new channels where the new drawing locates them, even when that doesn’t reuse every old hole. Abandoned holes need a proper waterproof repair. Oversized or cracked holes, or holes in the wrong place, may need tile repair or another channel layout. Don’t shift the enclosure just to reuse them.
Can you replace only the center door?
Usually, you need to identify the original enclosure and obtain the compatible door or replacement assembly supplied for it by the manufacturer.
Glass thickness, cutouts, pivots, seals, angles, and closing gaps differ between neo-angle systems. The NGA states that cutting, notching, edging, and drilling happen before tempering. A tempered door cannot be trimmed or drilled to make it fit.
If you can’t identify the old system, replacing the complete enclosure is usually more reliable than adapting an unrelated center door.
When your measurements are enough
| Task | Are homeowner measurements normally enough? |
|---|---|
| Rejecting stock models that clearly do not fit | Yes |
| Checking a documented matching kit | Yes, if every requirement passes |
| Confirming a boxed enclosure | Usually, if the drawing, base, and support pass |
| Ordering custom tempered panels | No; the fabricator approves final measurements |
| Replacing an unidentified door | Usually no |
| Mounting heavy glass on unknown structure | No; identify the load path and substrate first |
Use your readings to shortlist stock models and check a documented kit. A custom fabricator still approves the dimensions used to make tempered panels.
Common neo-angle measuring mistakes
- Ordering from the nominal size alone.
- Using the wrong curb reference line.
- Moving
BorCbetween readings. - Assuming equal sides or 135-degree joints.
- Skipping the wall-corner and base-level checks.
- Measuring before permanent finishes are complete.
- Ignoring mounting support, flat curb width, or the open-door position.
- Mixing two product drawings.
- Rounding numbers to make a model fit.
- Ordering custom glass from a preliminary sketch.
Neo-angle measurement worksheet
Use one sheet per candidate model. Keep the raw readings beside the drawing requirements and the result. A new reference line or product means a new comparison, rather than mixing the useful numbers from two drawings.
| Step or field | Your site record | Compare with this candidate |
|---|---|---|
| Project and model | ______; model ______ | Listed base pairing or the full enclosure drawing; save its revision/date. |
| 1. Finished surfaces | Complete / preliminary: ______ | Final fit needs exposed, permanent mounting surfaces. |
| 2. Measurement reference | ______ | Same glass centerline, profile edge, or named line throughout. |
| 3. Corner and endpoints | O: diagonal ______ in.; square/suspect ______; A/B/C/D marked | Candidate’s actual wall-corner requirements; the screening flag is not its tolerance. |
| 4. Three front sections | A-B ______; B-C ______; C-D ______ in. | Same three runs and reference on the layout; no averaging. |
| 5. Two wall runs | O-A ______; O-D ______ in. | Drawing’s wall runs and named edge, including W1/W2 if applicable. |
| 5. Heights and overhead limit | Left ______; right ______; obstruction ______ in. | Installed height and required working clearance from the finished curb top. |
| 6. Walls | Left ______; right ______; lean/bow/lippage ______ | Actual adjustment method and limit. |
| 6. Flat mounting area | ______ in. | Required curb or profile footprint. |
| 6. Level and pitch | Along-run level ______; inward cross-curb pitch ______ | Correct direction for each check and any specified numeric requirement. |
| 6. Front joint angles | Left ______; right ______ degrees | Both measured joints and compatible hardware. |
| 6. Mounting support | Substrate ______; evidence ______ | Required load path at each fitting; mark unknown when unverified. |
| 7. Movement and entry | Hand/swing ______; handle ______; open stop ______; closed sweep ______ | No collision through permitted travel; suitable closing location. |
| 7. Clear entrance | Needed ______; published walk-through ______ in. | Usable opening, separate from door width or stationary-panel spacing. |
| 8. Decision | Fits / Does not fit / Still need to confirm | Every required dimension and site condition passes before a stock order. |
Photograph the completed sheet beside the base so left and right are clear. Keep it with the labeled tape-measure photos.
Frequently asked questions
What does neo-angle mean?
A neo-angle shower sits in a room corner with an angled front, commonly a door between two fixed panels. Typical front joints have 135-degree inside angles, or 45-degree changes of direction. The room-wall corner is a separate 90-degree angle. Compare the actual joints with the enclosure’s geometry.
Where do you measure a neo-angle shower base?
For a new enclosure, use its glass centerline or specified profile-edge reference on the finished base. Keep the three front sections and both wall runs on that line. For a replacement pan, record the outside footprint and drain location separately against the base drawing.
Are all neo-angle showers 135 degrees?
No. The NGA’s “true neo-angle” uses 135-degree/45-degree geometry, but actual field angles can vary. A matching molded base normally establishes the new system’s geometry. Check both joints, especially on an old base, a site-built or tiled curb, or a base installed out of square. Both angles must suit the enclosure.
Does a 38-inch neo-angle enclosure fit every 38-inch base?
No. Match the complete footprint, joint angles, and attachments. Use a listed base/enclosure pairing or verify all the drawing requirements; matching size labels alone don’t establish fit.
Can I replace only the center shower door?
Usually only when you can identify the original enclosure and obtain a compatible part. Similar width and height don’t establish matching pivots, cutouts, seals, or angles.
Should I measure before or after tile?
Plan with unfinished dimensions. Take final stock and custom measurements after the permanent finishes are complete.
What if the left and right sides are different?
Record both sides as measured. Don’t average them. The selected system has to accept the actual layout.
Is door width the same as walk-through width?
No. Frames, pivots, fixed glass, and seals can reduce the entrance. Use the published walk-through width, separately from the panel width.
Final measurement check
Before placing a stock order, check every line:
- Finished surfaces and reference line confirmed
-
A,B,C,D, andOmarked - Corner
Odiagonal and square/suspect verdict recorded - Base level confirmed
- Front sections, wall runs, heights, and angles recorded
- Along-curb level and cross-curb pitch recorded separately
- Hardware load path and mounting substrate confirmed
- Door, handle, open position, and walk-through clearance work
- Exact model and current drawing saved
- Every required number passes
- Base compatibility documented or all fit dimensions verified
Order a stock enclosure when every requirement passes. A failed required dimension rules that model out. A missing requirement keeps the order on hold until that field is resolved.
Sources to check
Use these with the exact product and room conditions behind your decision.
- Ronni technical reviewRonni, a Texas-based engineer with 25 years of experience, completed technical review of the finished article on September 23, 2026.
- Authorized customer field case and photographsThe July 2026 dry-fit mismatch and successful replacement are a real customer field case. The customer took both photographs and authorized publication after the reflected face was obscured.
- National Glass Association frameless shower enclosure manual2023 professional guidance on neo-angle geometry, centerline measurement, curb pitch, structural backing, hinge load paths, and tempered-glass fabrication limits. Accessed September 22, 2026.
- DreamLine Prism Plus and Neo-Angle Base installation manualCombined manual checked September 22, 2026. Base preparation supports the level, solid-surface, and right-angle requirements. The enclosure section supports the W1/W2 outside-edge reference, level-and-inward-pitched threshold, 23 15/16-inch stationary-panel spacing, and 1/4-inch U-channel adjustment.
- DreamLine Prism Plus model SHEN-2638380-04Current U.S. product identification and advertised 38 x 38 x 72-inch size. Checked September 22, 2026.
- Delta 38-inch neo-angle base model 422062Manufacturer-listed compatible Delta enclosure models. Checked September 22, 2026.
- Delta frameless neo-angle enclosure model 422061Matching-base requirement, left- or right-hand installation, height, and swing information. Checked September 22, 2026.