Contents
4 parts · 19 sections
 About Us
Learn how to install a frameless shower door with pivot, hinged, and sliding routes, safe glass handling, sealing checks, and a documented installation case.
Install & Own / Installation guide
4 parts · 19 sections
Installing a frameless shower door is a precision job: the finished opening, mounting support, glass handling, and hardware alignment all need to be right before drilling begins. This guide follows the job from inspection through water testing, with separate paths for top-and-bottom pivot, side-hinged, and top-hung sliding doors. Jimmy’s documented Comfystyle installation is the pivot-door case and took about four hours; it is not a field example of the other two systems. The dimensions, fasteners, clearances, and sequence for your project must come from the manual for your exact door.
Safety first: Aurivedo recommends one lead installer plus at least one capable helper whenever a glass panel is lifted, positioned, or held during fastening. Use glass-rated suction cups, cut-resistant gloves, eye protection, closed-toe shoes, and setting blocks. Never cut or drill tempered glass. If you find a chipped edge or corner, stop.
Use the shared preparation checks first, then choose the matching door system. If you are still comparing mechanisms, start with our sliding vs. hinged shower-door guide. The steps below group the work into stages; they do not replace the manual’s order for trial fitting, drilling, or adjustment.
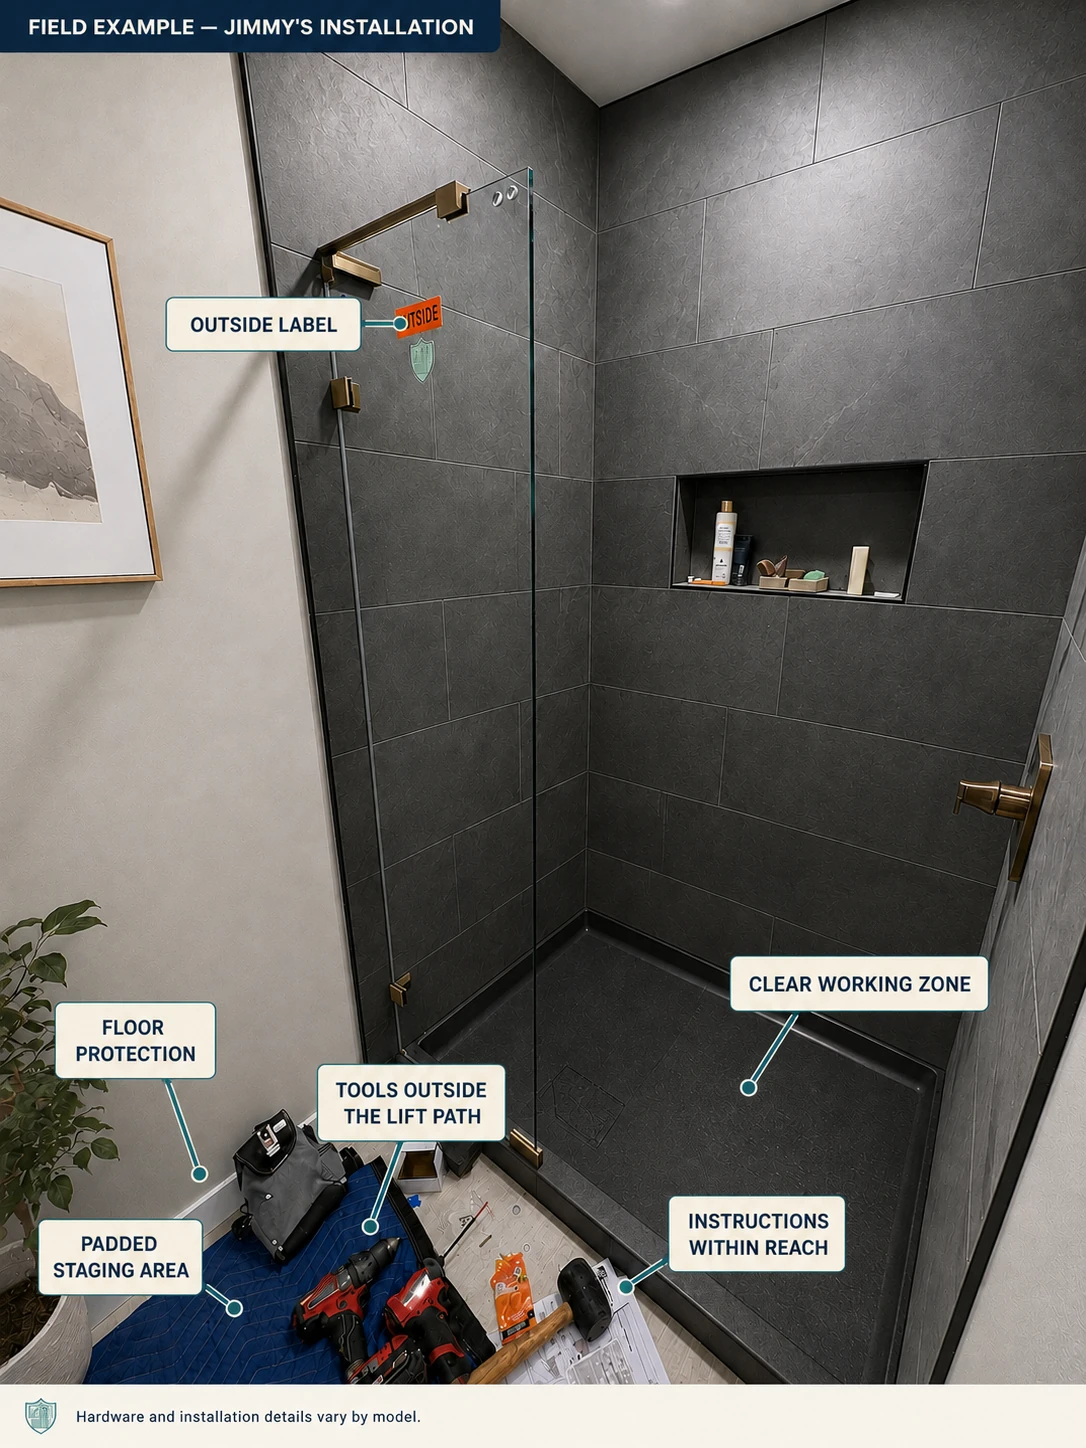
The installation shown here: The one part problem was a bent wall-mounted magnetic strip. Jimmy corrected it during installation and got a clean water test with no leaks. The project details and photo permissions are recorded below.
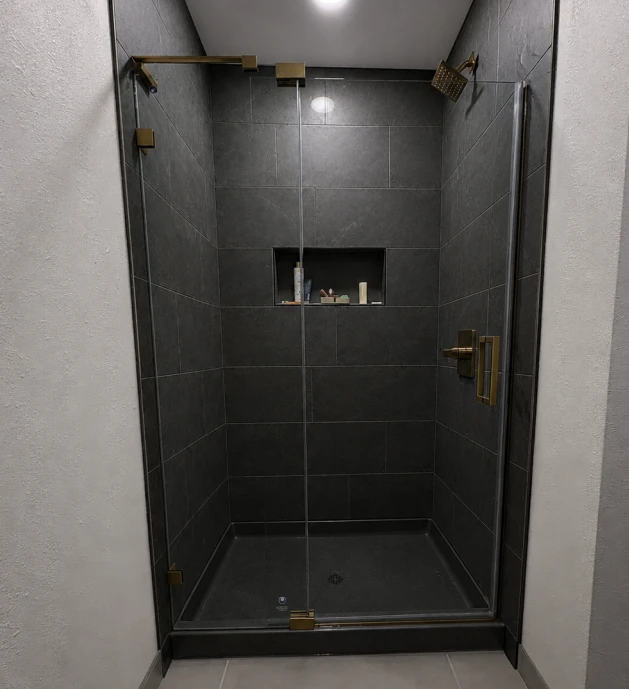
| Detail | This installation |
|---|---|
| Installer | Jimmy, Aurivedo installation partner |
| Product | Comfystyle frameless pivot shower door |
| Door mechanism | Top-and-bottom pivots; wall connectors secure the fixed glass |
| Manual checked | Project-supplied 22FXSD4870P08CBN-instruction.pdf; BT294, series SDP08-22, R 1.1 |
| Size | 48 x 70 inches |
| Installed | May |
| Wall surface | Tile |
| Crew | One installer; two helpers briefly steadied the glass |
| Time | About 4 hours |
| Product source | Self-purchased for the project |
| Final test | Water-tested with no leaks found |
| Photos | Authorized for publication |
| Review | Ronni, Aurivedo |
Choose one installation route for steps 5–8, then continue to the finishing and testing sections:
| Route | Door system | Installation order covered here |
|---|---|---|
| A: Jimmy’s pivot-door case | Top-and-bottom pivots with a supported fixed panel | Fixed panel and support arm → lower pivot bracket → door and upper pivot connection → magnetic closing alignment |
| B: Side-hinged reference | Door hung from wall-mounted side hinges | Wall-side hinge bases → glass-side hinges → hang the door → align the swing and closing gap |
| C: Sliding reference | Top-hung sliding door | Level top track → fixed panel → moving panel and rollers → bottom guide and stops |
Jump to: Pivot doors: Jimmy’s case · Side-hinged doors · Sliding doors · Final checklist · Water test · Troubleshooting · When to call a professional · FAQ
Some kits are reasonable DIY projects for an experienced homeowner. The opening needs to fall within the model’s stated range, the wall support needs to be known, and two people need to be able to control the glass safely. Custom or oversized glass, damaged parts, a poor fit, or unknown backing are good reasons to call a professional.
Run through this table before opening every package:
| Check | DIY may be reasonable | Stop and call a professional |
|---|---|---|
| Product | Manual permits homeowner installation | Manual or warranty requires a qualified installer |
| Wall | Required support is verified | Mounting structure is unknown |
| Opening | Within the model’s stated range | Glass or hardware doesn’t fit |
| Handling | Two capable adults and proper lifting gear | Panel can’t be controlled safely |
| Tile | Flat, sound, and drillable as specified | Loose, cracked, raised, or unfamiliar |
| Adjustment | Within the stated range | Fix requires forcing hardware or altering glass |
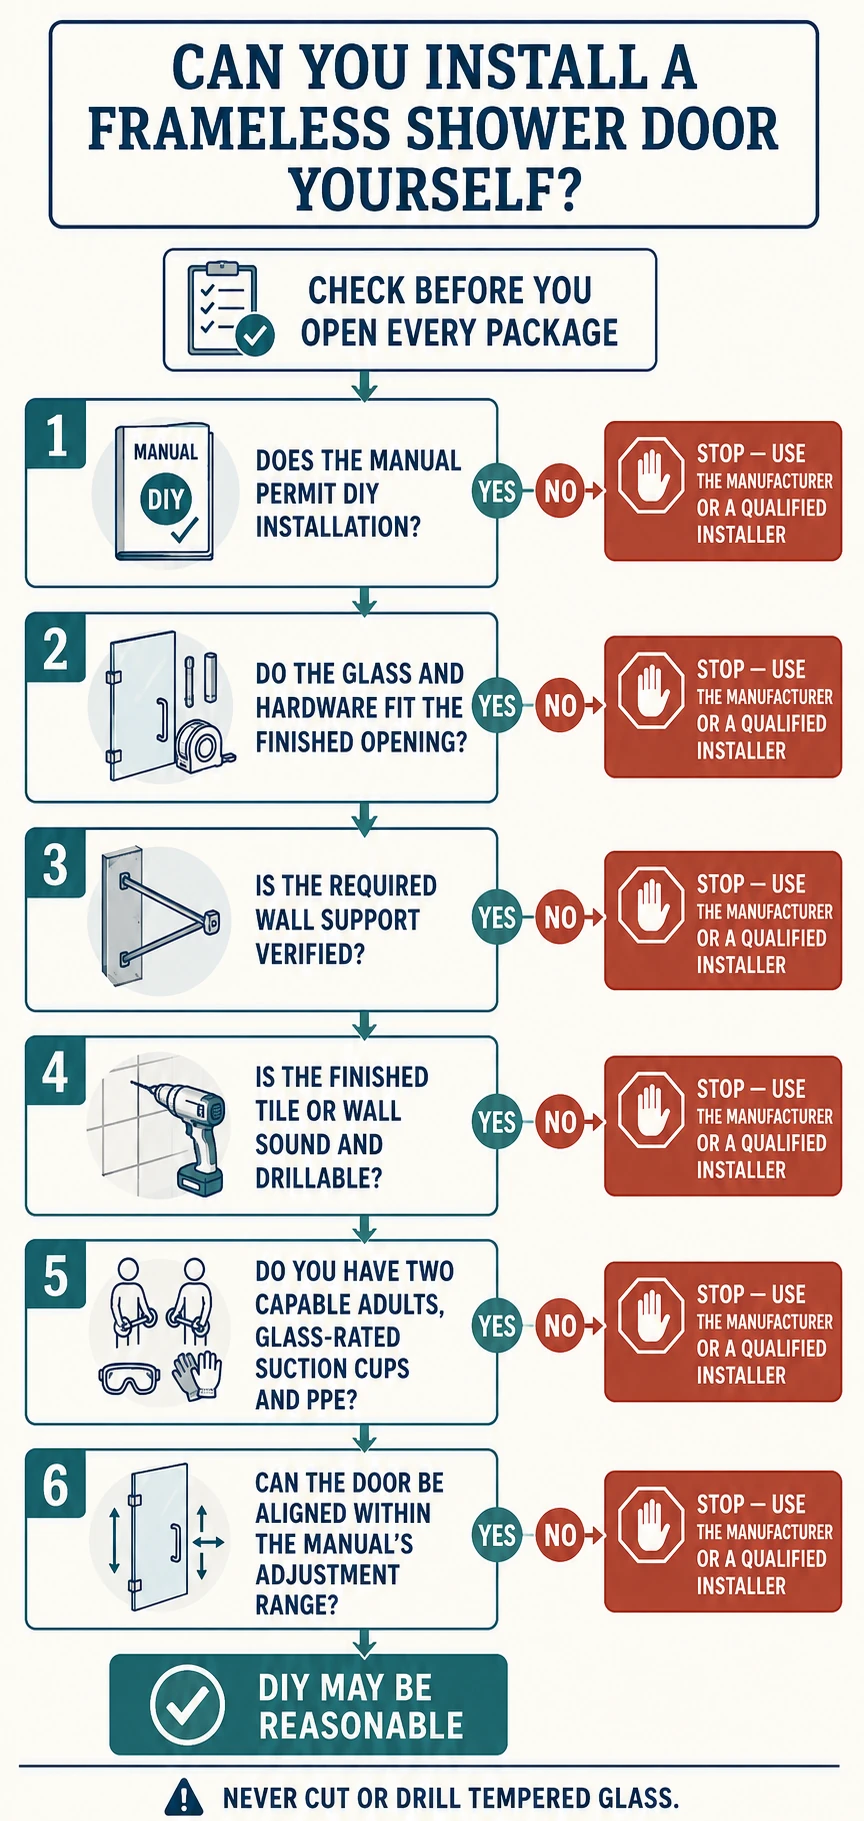
Make sure you have the manual for the exact model, revision, configuration, and opening direction. If the glass doesn’t match the finished opening, go back to the frameless shower-door measuring guide. Don’t try to turn a measuring problem into a field adjustment. If you can’t confirm what the mounting hardware will fasten into, contact Aurivedo before you drill.
Lay out the parts in installation order before you start. Use the supplied hardware or a manufacturer-approved equivalent. Look-alike screws, anchors, and gaskets can have different dimensions or load ratings.
| Category | Typical items | What must be model-specific |
|---|---|---|
| Layout | Tape, level or laser, square, pencil, painter’s tape | Clearances and hardware positions |
| Drilling | Variable-speed drill, approved tile and substrate bits, vacuum | Bit size, hammer-mode permission, depth |
| Fastening | Hand screwdriver, hex keys, supplied fasteners | Backing, anchor, screw, torque |
| Handling | Two people, glass suction cups, setting blocks, padded surface | Panel weight and lift points |
| Finishing | Knife, cleaner, cloths, caulking gun | Seals, sealant, joint, cure time |
| PPE | Eye protection, cut-resistant gloves, closed-toe shoes | Tool-specific requirements |
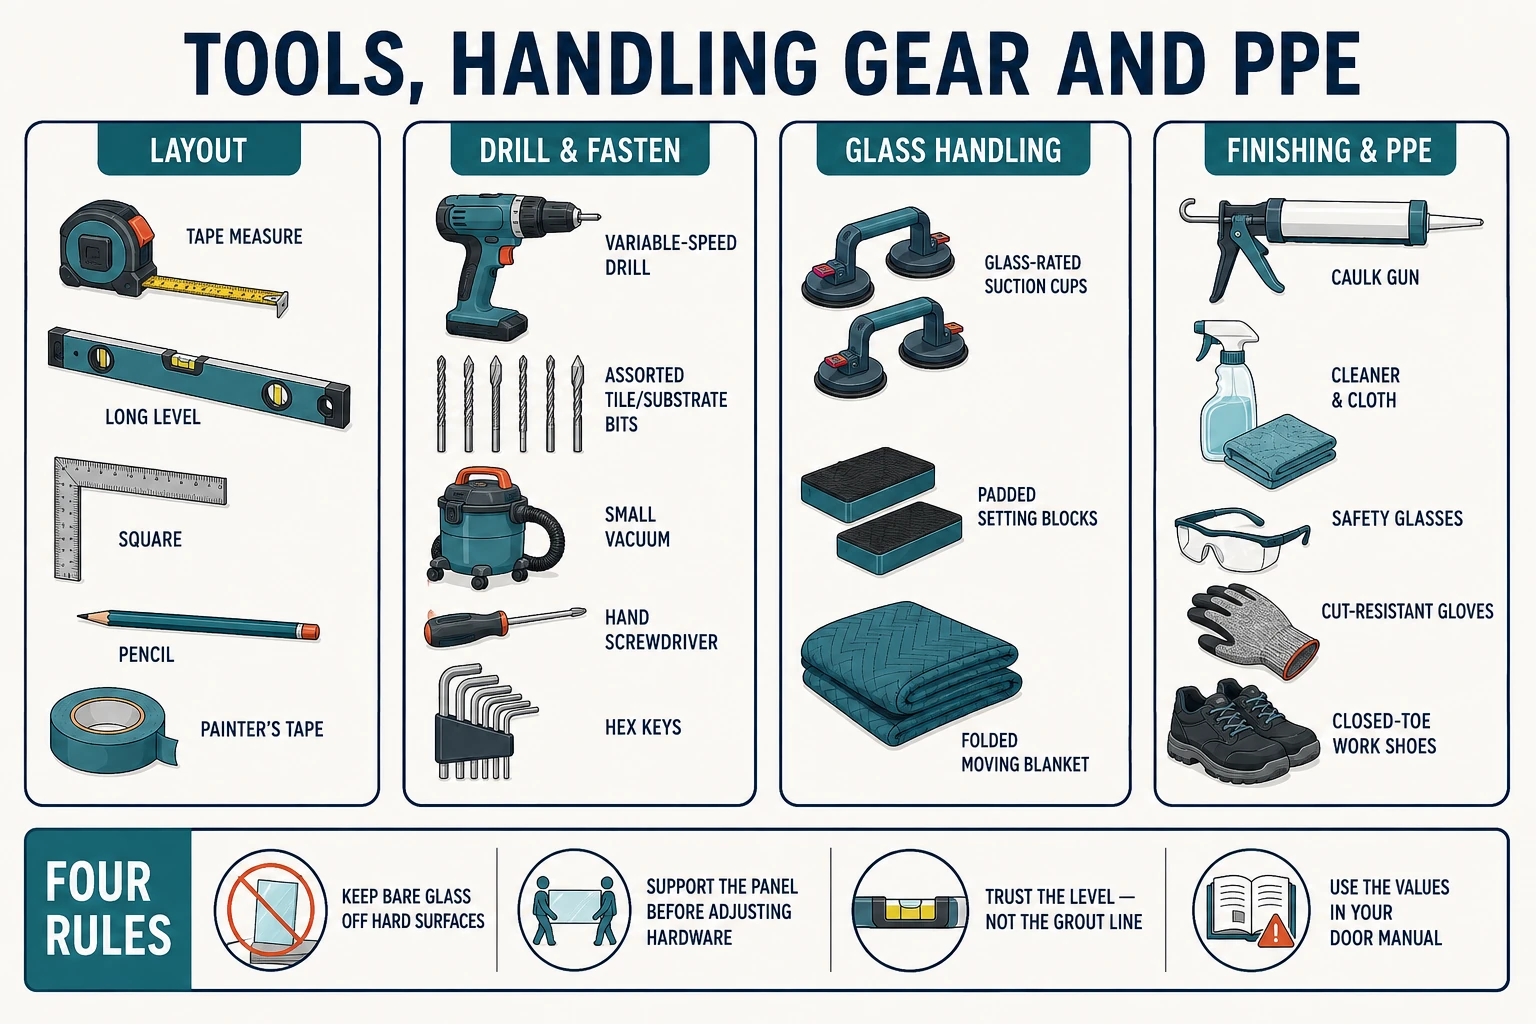
The National Glass Association’s manual includes equipment commonly used for this work. In the U.S., shower doors and enclosures are also covered by 16 CFR Part 1201, the federal safety standard for architectural glazing materials.
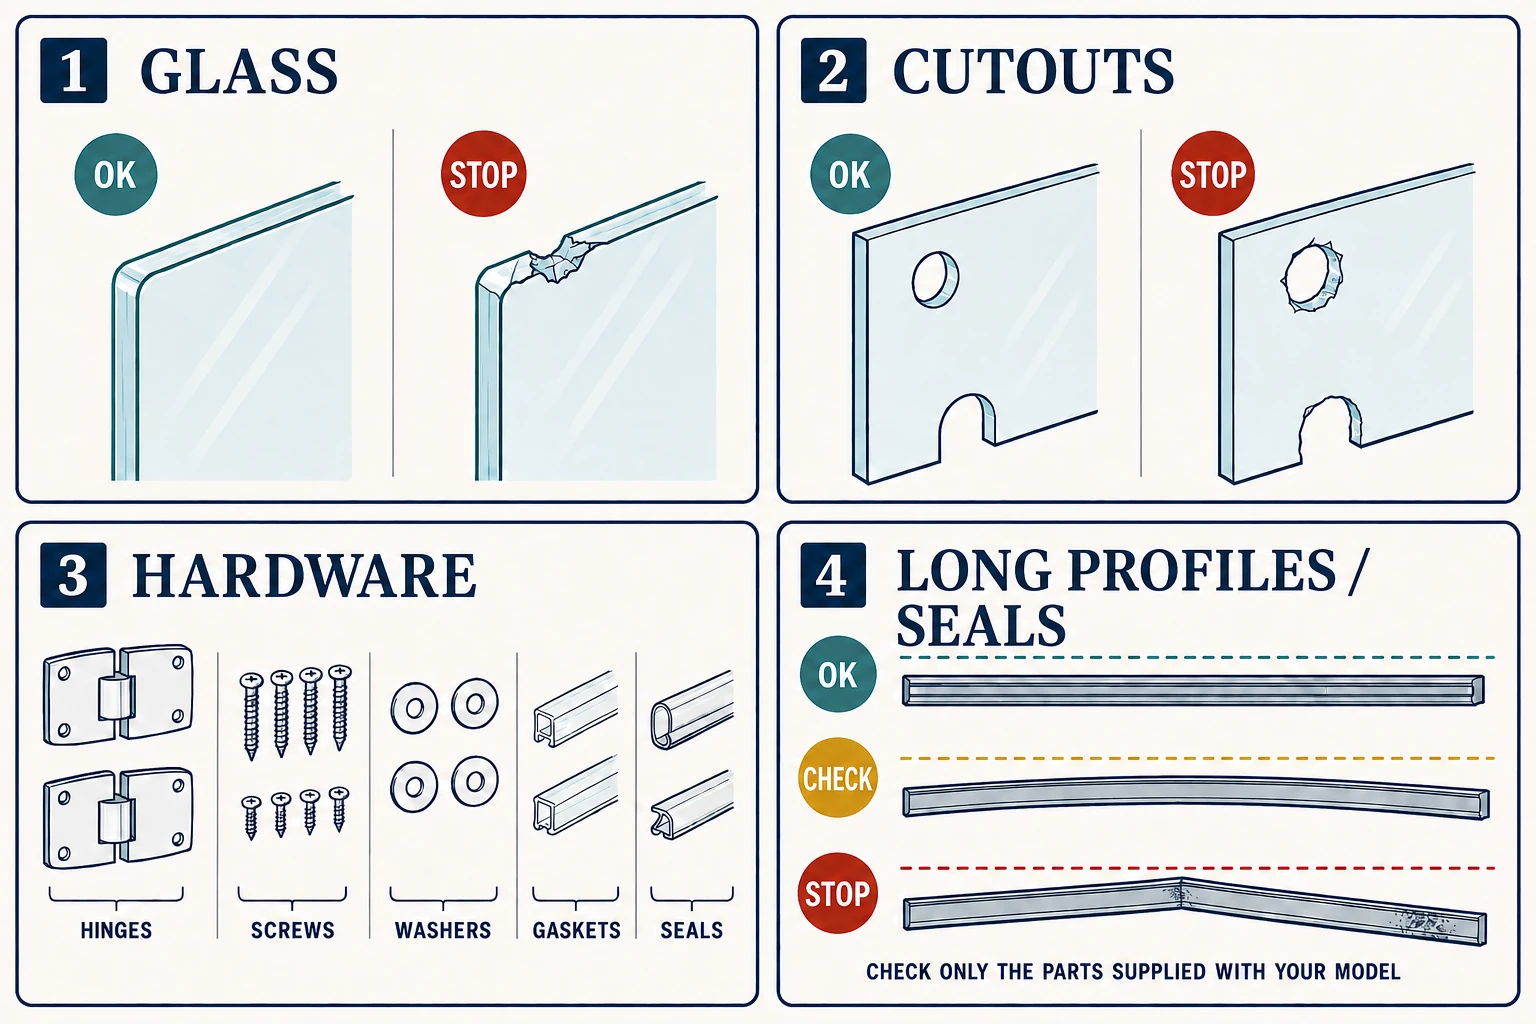
Leave the corner protectors on as long as the manual allows. Set the glass on padded blocks and look closely at every edge, corner, hole, and notch under good light. Compare the parts with the packing list, separate gaskets that look similar, and label any left- and right-handed hardware.
Measure the finished opening at the points named in the manual. If the glass is outside the allowed range, stop before you drill anything.
Before moving on, you should have undamaged glass, every required part, and hardware that matches both the glass cutouts and the opening. Don’t strip off all the edge protection and lean a panel against a hard wall. If you find damage or mismatched hardware, take photos and contact the supplier.
What Jimmy found during inspection: Every listed part was present, and the manual matched the hardware well. The wall-mounted magnetic closing strip, however, had arrived bent. That mattered because it had to sit straight for the door to close evenly. Put long metal profiles against a flat reference during your inspection. A complete box doesn’t always mean every part is ready to install.
Cover the shower base, drain, curb, floor, and nearby fixtures. Clear the route from the staging area to the shower so the installer and helper can turn and lower the panel without stepping over tools or packaging.
Keep each panel upright, restrained, and resting on stable padded blocks. Never set bare glass on tile, stone, concrete, metal, or another glass panel. Test clean, glass-rated suction cups according to their maker’s directions before trusting them with a panel.
If the installer and helper can’t control the lift without stretching, twisting, or reaching too far, reset the route or add another capable person before moving the glass.
How the crew worked on this job: Jimmy handled the installation itself. Two helpers stepped in briefly when the glass needed to be steadied and when parts had to stay aligned during fastening. That kept one person in control of the hardware without leaving the panel unsupported.
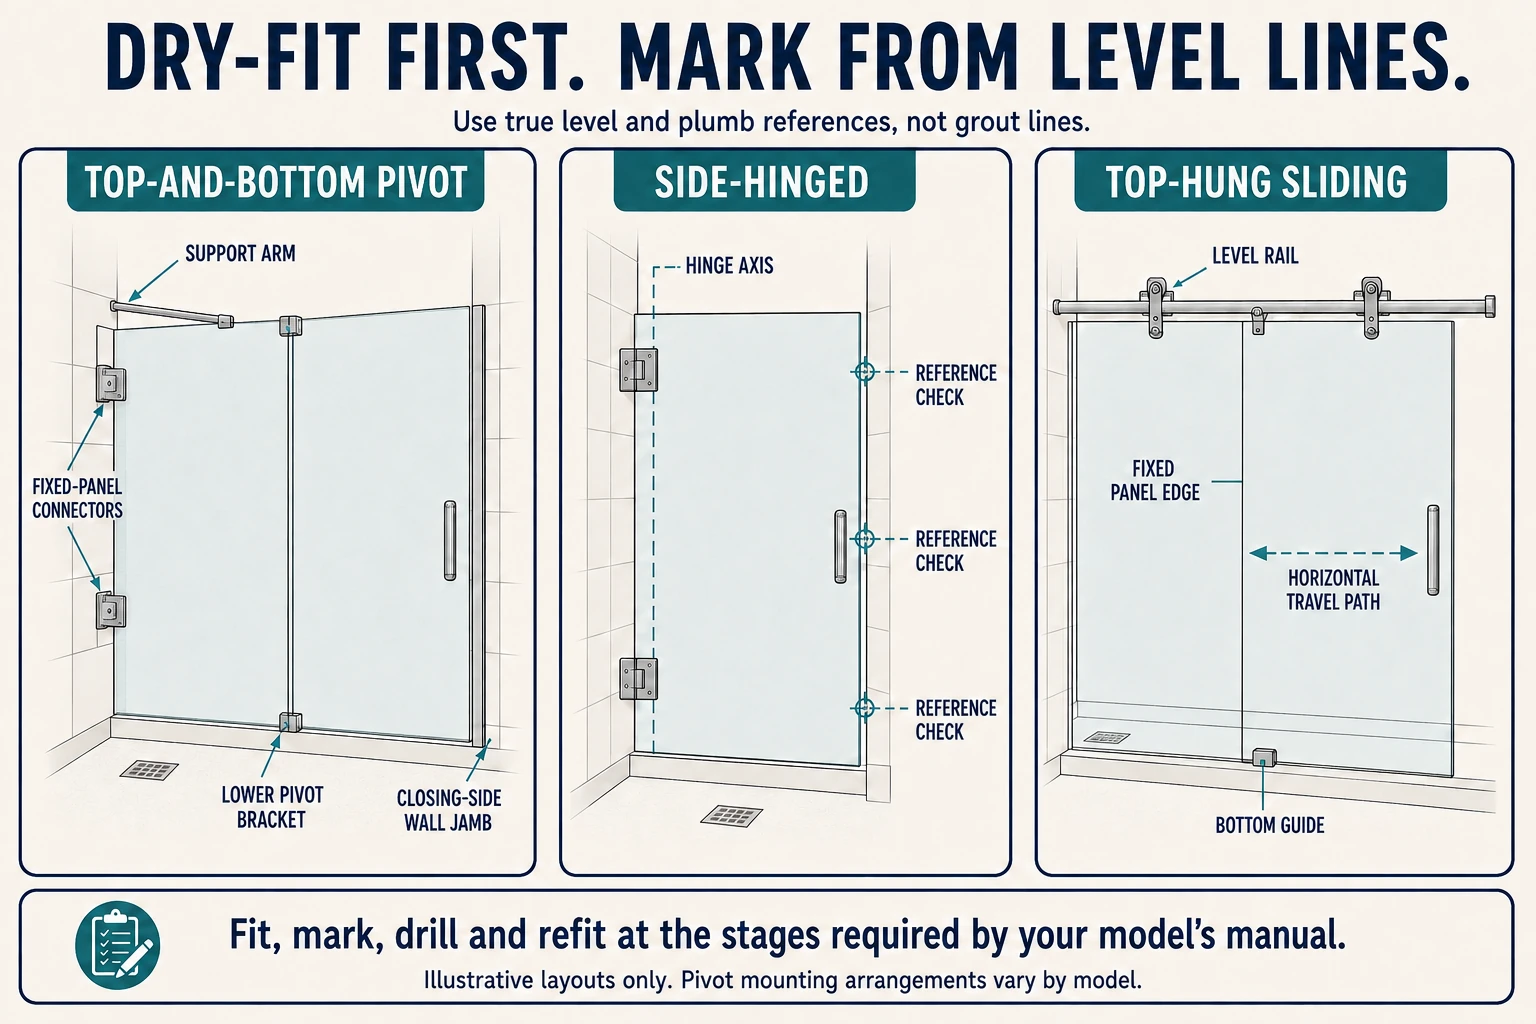
Put painter’s tape over the areas you need to mark. Using a laser or long level, transfer the glass centerline, fixed-panel position, hinge footprints, rail brackets, bottom guide, and door stops from the manual.
Dry-fit the channels and brackets. For a hinged door, temporarily position the panel and compare the gap at the top, middle, and bottom. For a sliding door, check the entire travel path. Don’t move a bracket just because a nearby grout joint looks easier to drill unless the manufacturer allows that change.
The marks should match the glass cutouts, the door should clear the room, and every mounting point should reach the required support. If you can’t get the specified overlap or clearance, find out why before drilling.
For the Comfystyle pivot system, the fixed-panel connectors, support arm, lower pivot bracket, and closing-side wall jamb are located at different stages of assembly. Check the bottom mounting surface as well as the walls. Do not treat the side-hinge or sliding-track positions in the illustration as this model’s drilling template.
Jimmy’s drilling workflow: Jimmy reported measuring the hardware, establishing level and plumb references, cross-checking the mounting locations, and drilling the confirmed holes in one batch to reduce repeated handling. That is a case note, not the sequence prescribed here. The supplied pivot-door manual uses staged fitting and marking; follow that sequence for this model, including the lower pivot bracket and closing-side wall jamb.
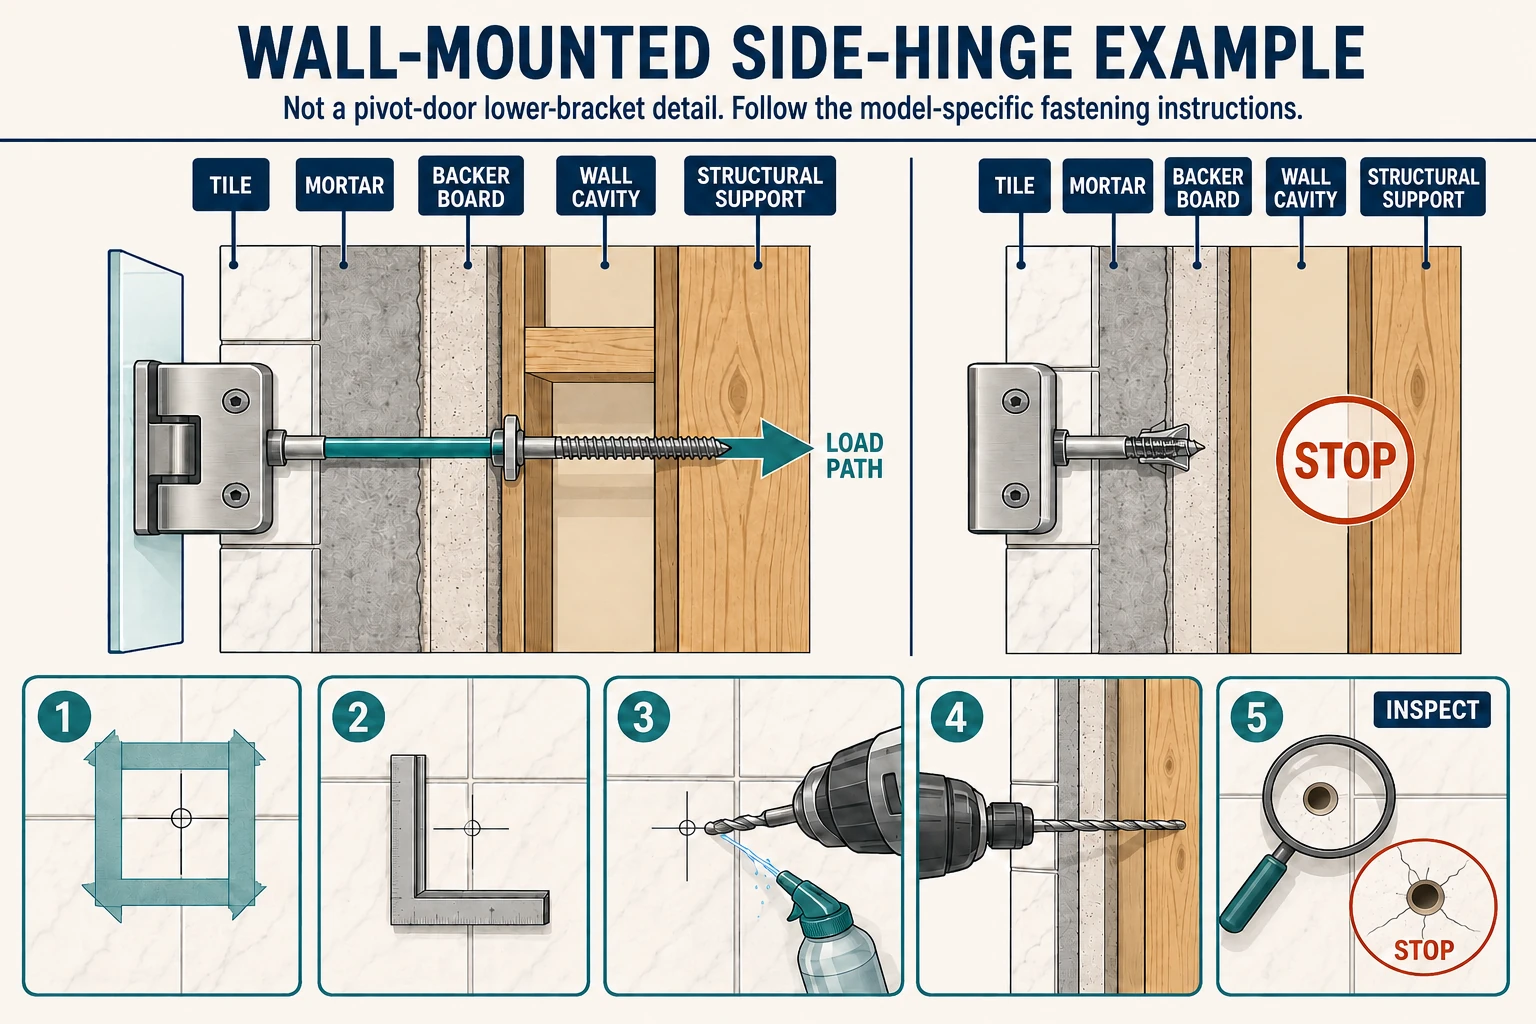
Yes, you can install a frameless shower door on tile. The tile itself doesn’t tell you whether the fastener will hold. Your manual and the wall construction decide whether you need wood blocking, a stud, masonry, metal framing, or an approved anchor system.
Choose a bit made for the tile you have. Ceramic, porcelain, natural stone, and glass tile don’t all drill the same way. Check the likely plumbing and wiring routes first. Also confirm whether the tool maker and door manufacturer allow hammer mode. Never switch it on through finished tile out of habit.
Start the hole using the bit maker’s method. Keep the drill square, use controlled speed and light pressure, and cool the bit if its instructions call for it. Once you’re through the finished surface, use the correct method for the material behind it. Vacuum out the dust and inspect the tile for cracks before installing the fastener.
The tile should remain intact, and the specified fastener should engage the required support. Stop if you hit a void, find an unexpected substrate, crack the tile, or can’t get proper fastener engagement.
For the Comfystyle system shown here, secure the fixed glass and support arm first, then anchor the lower pivot bracket. Fit the door’s pivot hardware, seat the lower pivot, and secure the upper connection. Install the closing-side wall jamb and magnetic strip before adjusting the door, then finish and seal it.
This route follows the project-supplied BT294 manual, series SDP08-22, R 1.1, in 22FXSD4870P08CBN-instruction.pdf. It describes this fixed-panel pivot arrangement, not every door sold as a pivot door. The letters below match the manual’s parts list; the step numbers belong to this article. Use the manual’s drawings for dimensions, gaskets, fasteners, and left- or right-hand orientation.
Follow the manual’s staged fitting and marking procedure for the wall connectors (A). Once the connectors are fastened to the specified support, set and secure the stationary glass (C) with a helper and the required protective layers. The wall connectors hold the fixed glass; they are not hinges for the moving door.
Fit the support arm (B, called the “Pull rod” in the manual), level it, and mark and complete its wall attachment in the prescribed order. Check that the fixed panel is plumb and stable before adding the moving door. Stop if a connector or support-arm attachment moves.
The manual’s steps 5-1 through 5-3 show the lower bracket of pivot assembly E fitted to the fixed glass to mark its base fixing. Remove the bracket as shown, drill the confirmed hole, install the specified anchor, and refit and fasten the bracket.
This fixing goes down into the bottom mounting surface; it is not a side-wall hinge fixing. Confirm that the shower base or curb can accept the specified fastening and that its waterproofing requirements can be met before drilling. If either is unclear, stop and ask the door and base manufacturers for an approved detail. Do not confuse this mounting surface with the separate threshold strip (M), which is fitted later.
With the moving glass (J) protected and supported, fit its pivot components as shown in the manual. The illustrated orientation uses F at the top and E at the bottom; the manual calls for reversing their arrangement for the opposite installation direction. Check the diagram and the actual parts before fastening.
With a helper controlling the glass, seat the lower pivot in its bracket and keep the door supported underneath as shown. Connect and secure the upper pivot assembly to the fixed glass. Do not release the door while either connection is incomplete, and do not use the handle to lift it. Confirm that the pivot connections are engaged and the fixed panel remains stable before checking movement.
Follow the manual’s steps 8–11 to locate, plumb, and fasten the closing-side wall jamb (G), then fit the magnetic strip (H) to the moving glass. These parts are installed before the adjustment in the next step; do not leave them until all alignment is finished.
Support the door before loosening any pivot clamping screws. In manual step 12, the moving glass is adjusted left or right at E and F so the door’s magnetic strip meets the strip on the wall jamb. Complete fastening as instructed and check the closing contact and swing without forcing the glass. If the door binds, a pivot connection moves, or the fixed panel shifts, stop and correct the cause before continuing.
Continue to steps 9 and 10 below for this model’s threshold strip, remaining seals, covers, handle, and silicone requirements. Jimmy’s bent-strip correction is a separate field note, not a required installation step.
This reference route covers a door carried by wall-mounted side hinges; it does not describe Jimmy’s pivot-door installation. Glass-to-glass side hinges need their own fixed-panel support and assembly sequence, so do not apply the wall-mounting step to them.
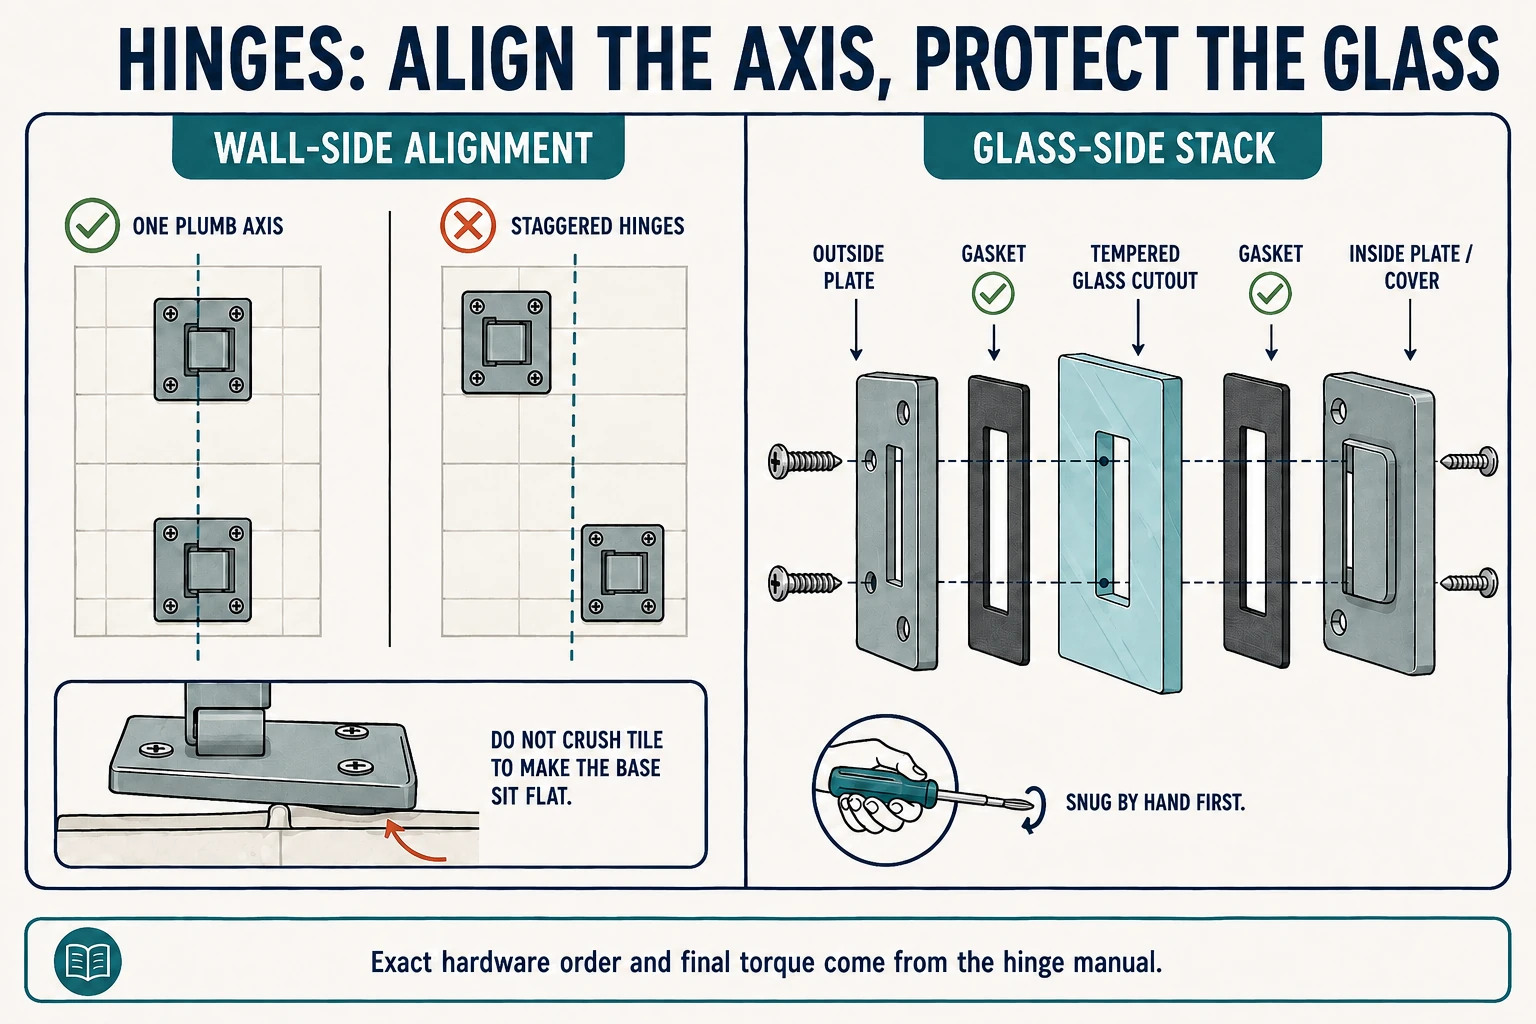
Place each hinge base on its confirmed mark with the specified gaskets, spacers, and fasteners. Snug the fasteners by hand while keeping the hinge line plumb. If the manual calls for later adjustment, don’t tighten away that adjustment now. An uneven tile surface is not a reason to crank down harder on a hinge.
Both hinges should sit on the same plumb axis without rocking. Stop if a fastener spins, a hinge moves, the tile fractures, or the hinge axes don’t line up.
Lay the panel on a padded surface. Match each hinge to its glass cutout and install every liner and gasket in the order shown. Bare metal must not touch the glass.
If the hinge needs adjustment later, center it as directed and leave the clamping screws just snug for now. Use hand tools unless the manufacturer says otherwise. The NGA manual warns against using a screw gun for final hinge-plate tightening.
Before lifting the panel, make sure each hinge sits square and every protective layer lies flat. If a part won’t seat cleanly or doesn’t match the cutout, don’t force it.
Place the approved setting blocks on the threshold. One person should control the panel with the suction cups while the other connects the hinges. Don’t lift by the handle, and don’t let a corner touch the curb. Keep the temporary support in place until all required hinge connections are engaged.
Once connected, the panel should sit steadily on the hinges with no hard contact between glass and tile, metal, or other glass. If the blocks shift or the team can’t hold the panel without forcing a hinge into place, lower it safely and reset.
Check the closing gap at the top, middle, and bottom. Then move the door slowly through the swing allowed by the manual. Fix curb contact, binding, or contact with nearby glass one adjustment at a time. Remove setting blocks only when the instructions tell you to.
Finish tightening by hand or to the stated torque. Test the door again after you add each seal. The final gap should be even, and the door should clear the threshold without dropping, slipping, binding, or moving the wall hardware.
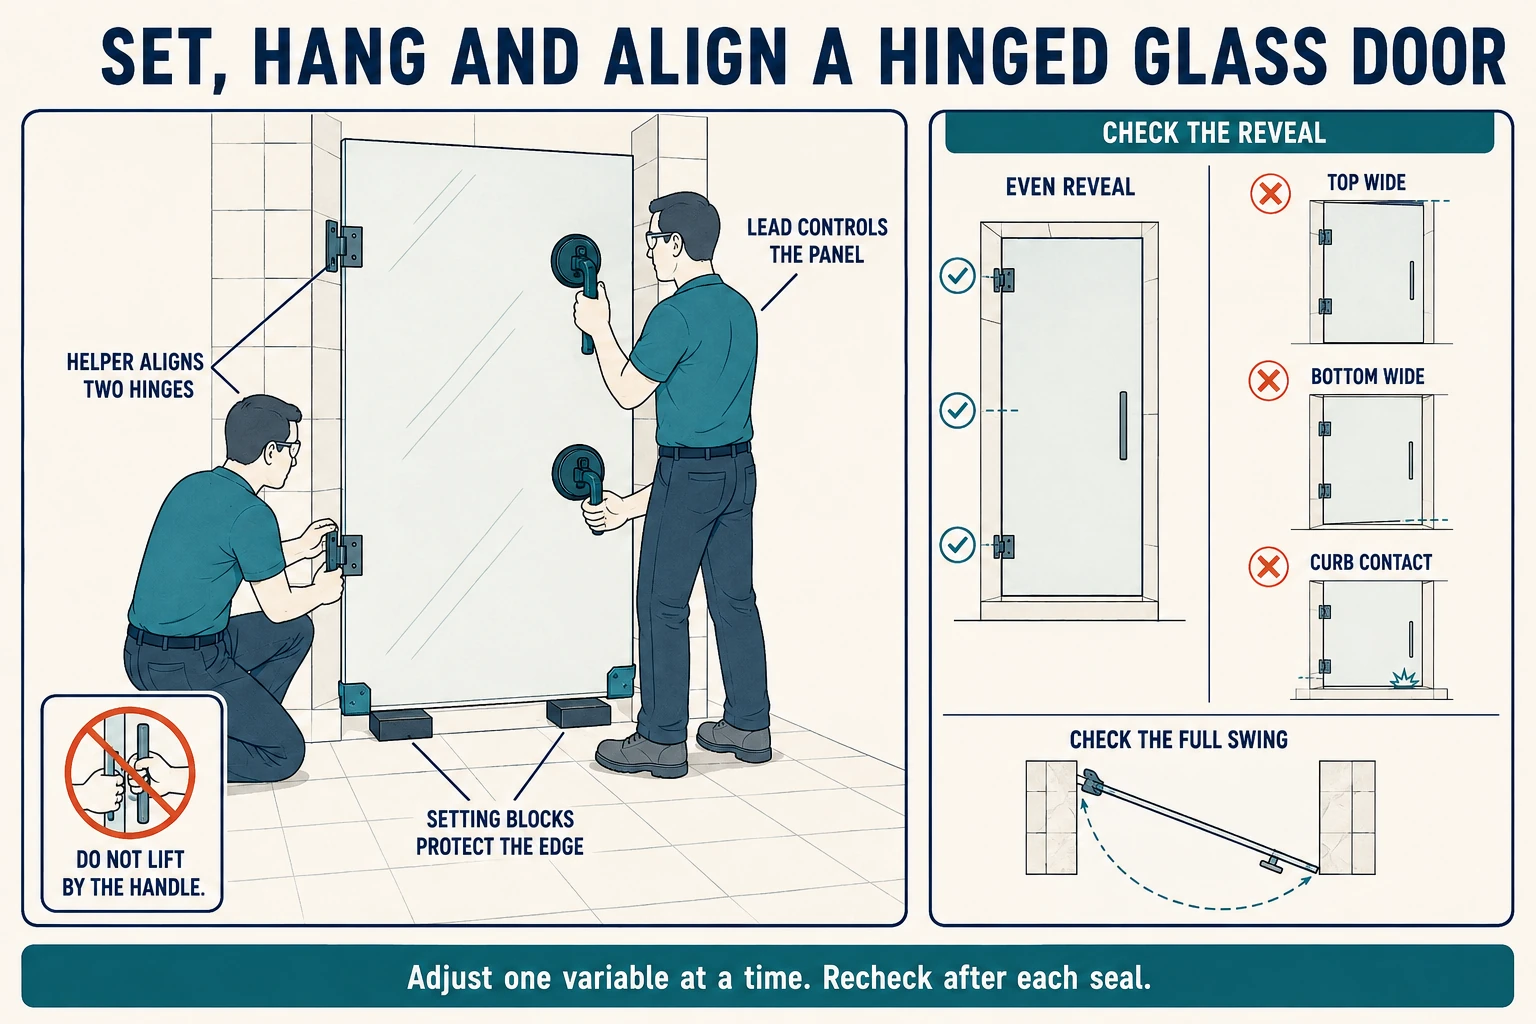
This is a reference route for another door system, not a description of Jimmy’s installation.
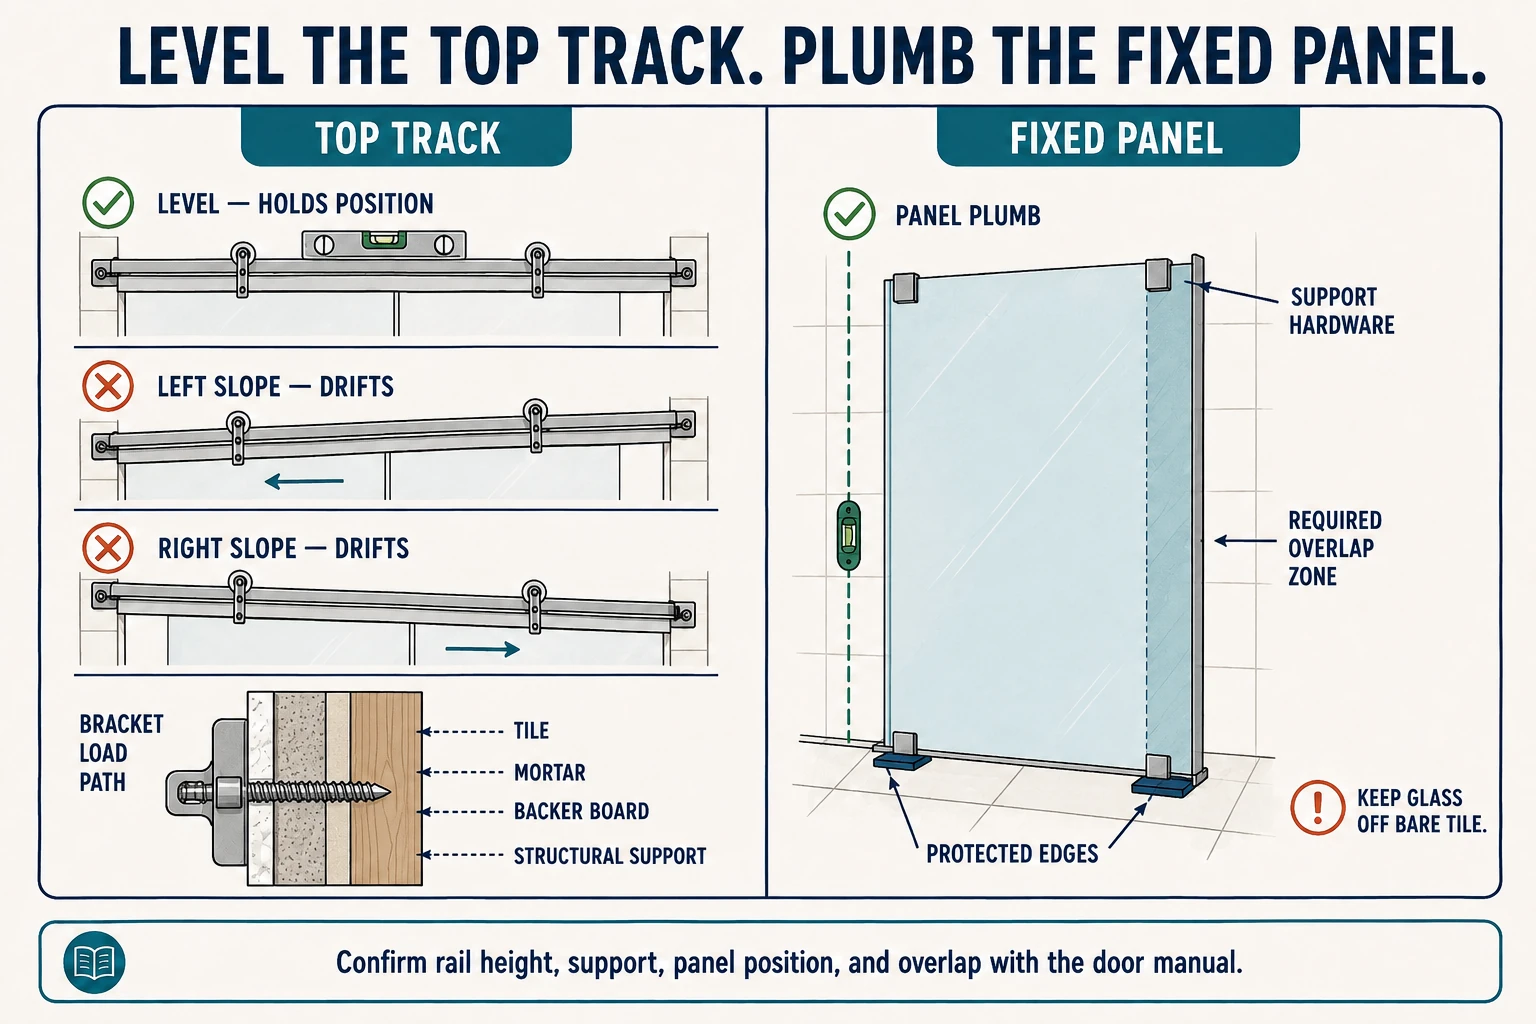
Many top-hung sliders follow this order: level the rail, install the fixed panel, hang the moving panel and rollers, then add the bottom guide and stops. Barn-style, bypass, and bottom-rolling doors may use another order, so your manual wins if it disagrees with this overview.
Model names matter here. Delta’s current Commix installation guidance says its top track must be installed into studs. It also tells installers to stop and contact support if the studs are missing or out of position, and it still calls for the supplied anchors when fastening into the studs. Those details apply to that system. Find the matching instructions for your own door instead of copying them.
Dry-fit the rail and brackets first. Cut the rail only if the manufacturer allows field cutting, and deburr the cut end. Fasten the brackets into the specified support, then check the rail across its full length with a level.
Don’t line the track up with a sloping curb or grout course. If the track slopes, the door may roll on its own. Move on only when the rail fits, sits level, and every bracket reaches the required structure.
Put the specified blocks and gaskets in place. With two people, set the fixed panel and attach its clamps, support bar, or channel in the order shown in the manual. Keep the glass away from bare tile and metal.
Check the panel for plumb in both directions. If the moving door needs to be test-hung before final fastening, leave the allowed adjustment available. The fixed panel should be stable and positioned to create the required overlap. Stop if it can’t be made plumb or if a clamp lands on an exposed glass edge instead of the specified face.
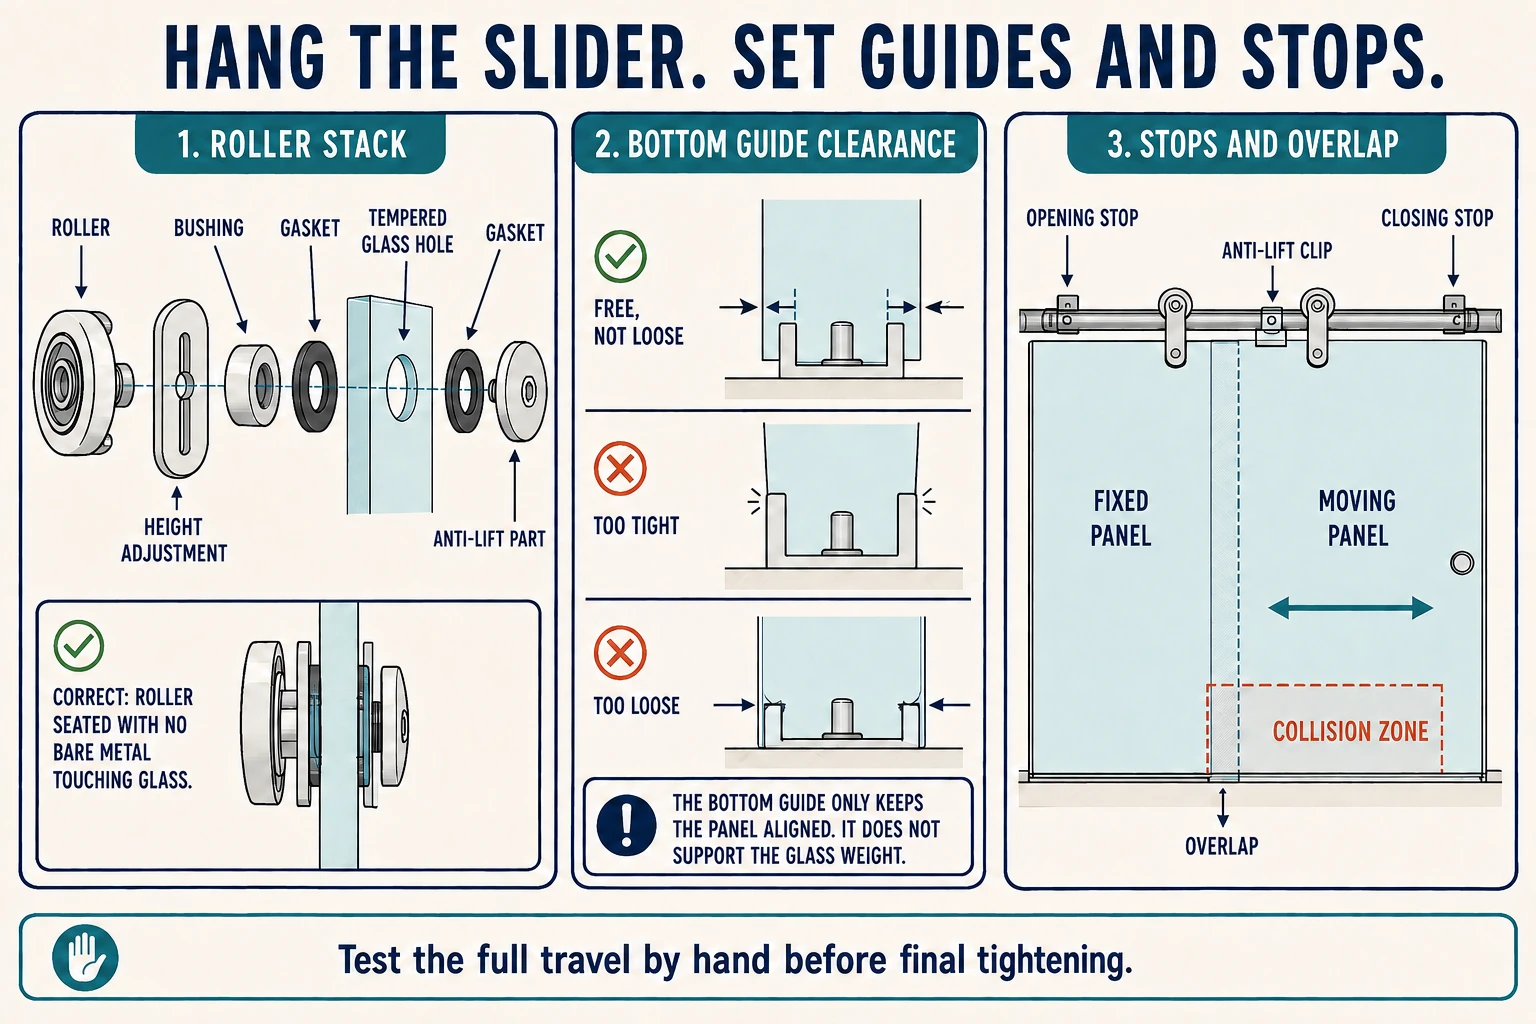
Assemble the rollers while the panel rests on a padded surface. Every bushing and gasket needs to go in the order shown. Set adjustable rollers to the starting position given in the manual.
Two people should lift the panel, engage the rollers, and keep control of the glass until the anti-lift parts are installed. Move the door only a short distance at first and watch each roller as it travels.
A roller sitting on top of the rail is not necessarily secured. It must be hooked, captured, or clipped exactly as shown in the instructions. Stop if a roller won’t seat, the door can come off the track, or the moving panel contacts another piece of glass.
Put the bottom guide at the manual’s reference point. It should limit sideways movement without squeezing the glass. Install every stop before sliding the door through its full travel.
If the door rolls by itself, check the rail level before changing anything else. If it drags, check the guide pressure and roller height separately. The finished door should move smoothly, stay in the guide, and stop before any collision. A guide must never bear against an exposed glass edge or sit outside its approved mounting area.
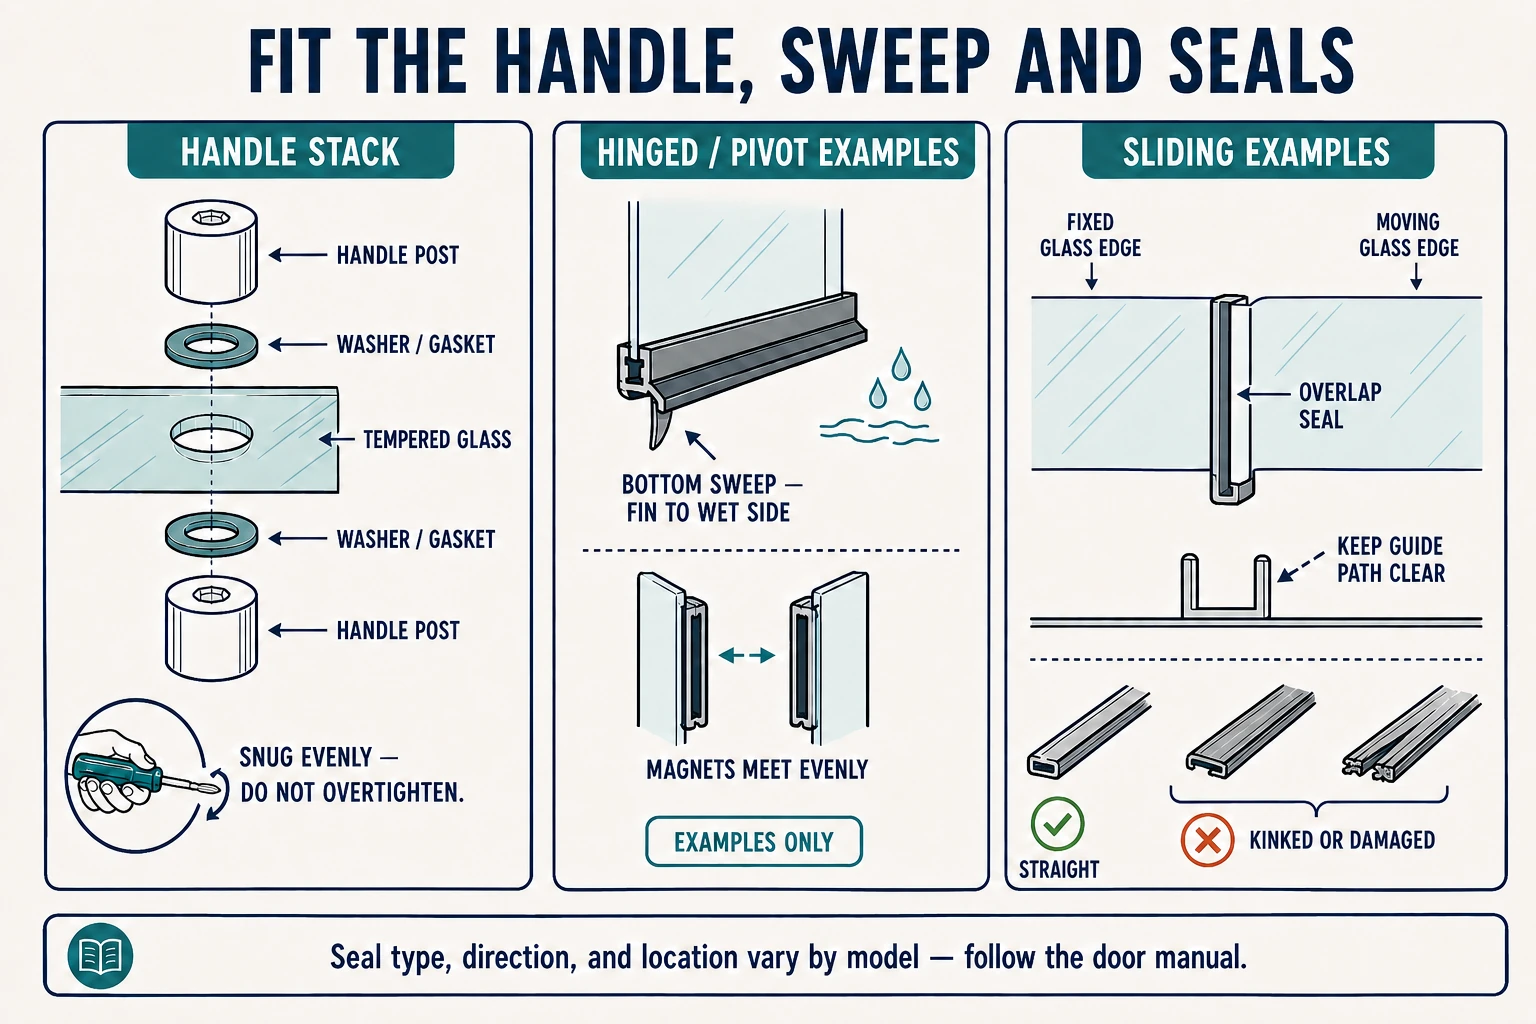
For the Comfystyle pivot case, the wall jamb and magnetic strip are already fitted in step 8A. The manual next specifies the separate threshold strip (M) and decorative covers (L), the fixed-glass anti-water strip (D) and door-bottom strip (K), then the pivot covers and handle (I). Follow its cutting and placement drawings for those parts; the threshold strip is not the lower pivot’s structural anchor.
For any system, install the handle with every supplied washer and gasket. Don’t use the handle to pull a crooked door into line. Fit and trim the bottom sweep and other seals in the model’s specified order; some closing seals must already be in place for alignment. Test the door after each piece goes on.
The seals should manage water without dragging on the glass or pushing the door out of alignment. On a sliding door, this is also a good time to check the bumpers, guides, stops, and anti-lift parts again.
A thick, reversed, or distorted seal won’t fix an uneven door. Get the glass geometry right first, then fit the seals.
How Jimmy handled the bent magnetic strip: He held the wall-mounted strip on its reference line and eased the bend out a little at a time as he installed each screw. After every screw, he checked the strip’s shape and its contact with the door before continuing. It worked on this metal profile, and the painted finish still looked clean when the job was done. He didn’t use the glass to force it straight. A kinked or cracked strip, damaged finish, or heavy resistance is a replacement issue rather than an alignment adjustment.
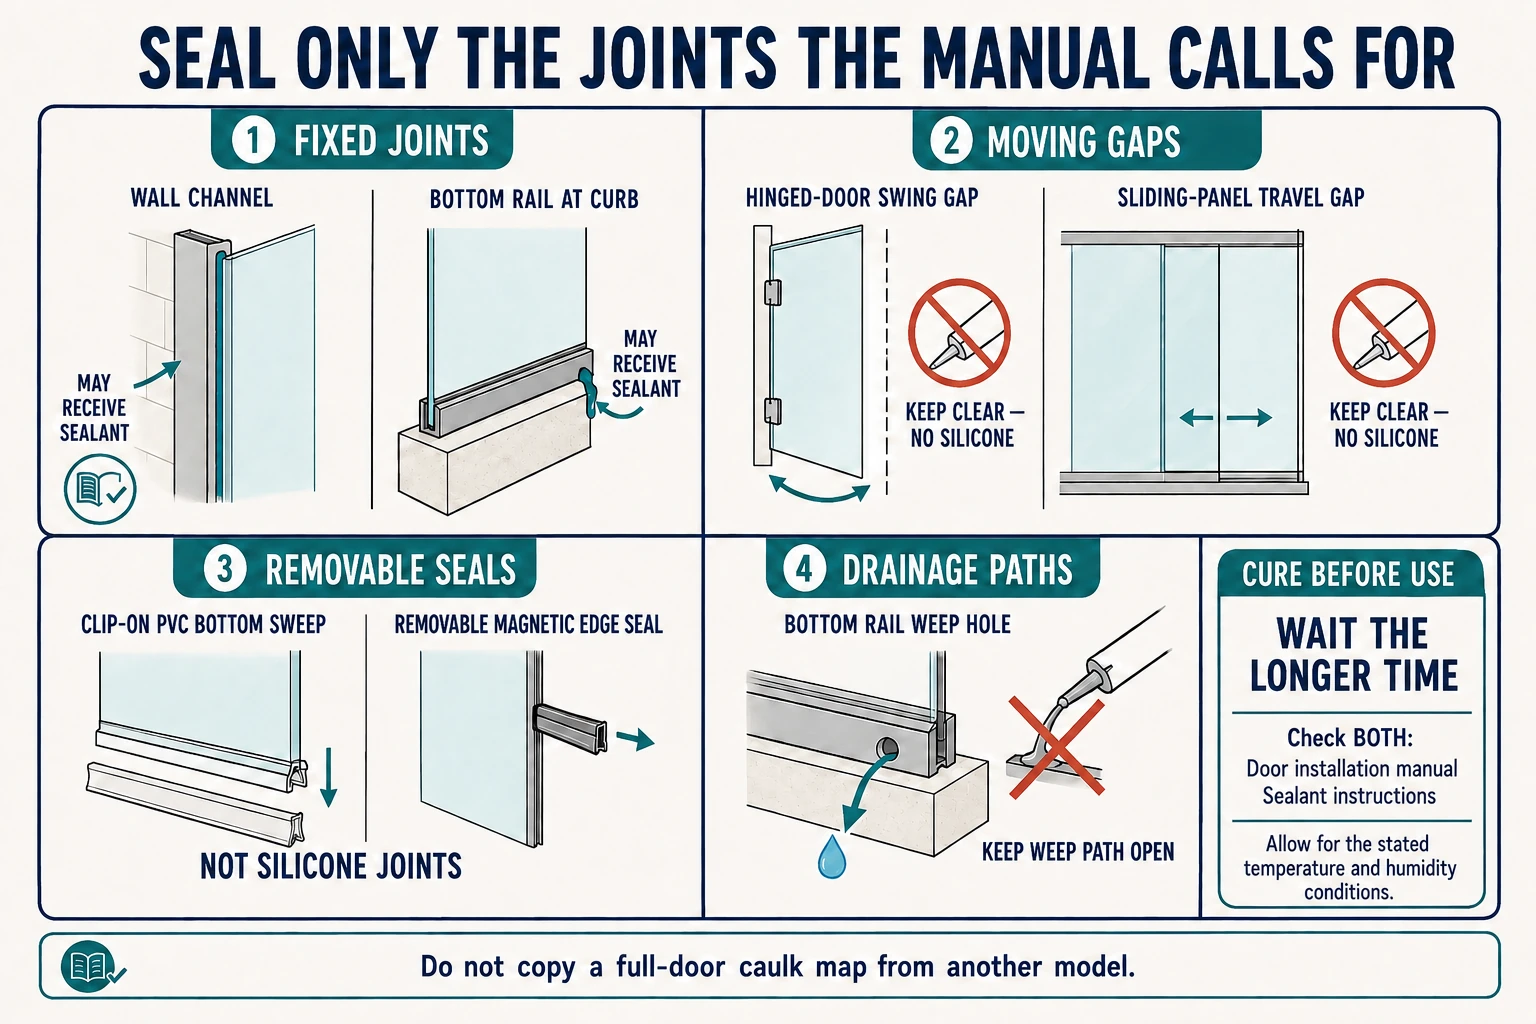
For the Comfystyle pivot model, manual steps 16–17 show the inside and outside sealing locations, including the fixed-glass perimeter, wall jamb, and threshold area. Follow those drawings rather than sealing every visible gap. The manual requires 24 hours for silicone to cure before shower use; if the selected sealant requires longer under the installation conditions, wait longer. The reported four-hour installation time should not be treated as the time until the shower is ready to use.
Don’t seal the enclosure until the glass is aligned and the door works properly. Clean the joints and choose a sealant approved for every material it will touch.
Apply a continuous bead only where the shower-door manual shows one. Some enclosures rely on open weep holes or another drainage path, and sealing those openings can create a new water problem. Tool the bead within the sealant’s working time, then leave the glass alone while it cures.
There is no single wait time that works for every product. The current GE Advanced Silicone 2 data sheet allows water exposure after 30 minutes only when the bead is no larger than 3/16 inch, the temperature is at least 65°F, and relative humidity is at least 50%. Otherwise, it calls for at least eight hours before water exposure and says not to touch or clean the sealant for 24 hours or until it is fully cured. If your door manual or sealant label requires more time, use that longer cure period. This is a timing example, not a general product recommendation: the same data sheet excludes use under shower-door tracks. Confirm that the chosen sealant is approved for the actual joint.
Before testing, check that the beads are continuous, the intended drainage paths are still open, and the enclosure has stayed dry for the full stated time.
Check the items that apply to your door system; a pivot door does not need sliding-door rollers or guides.
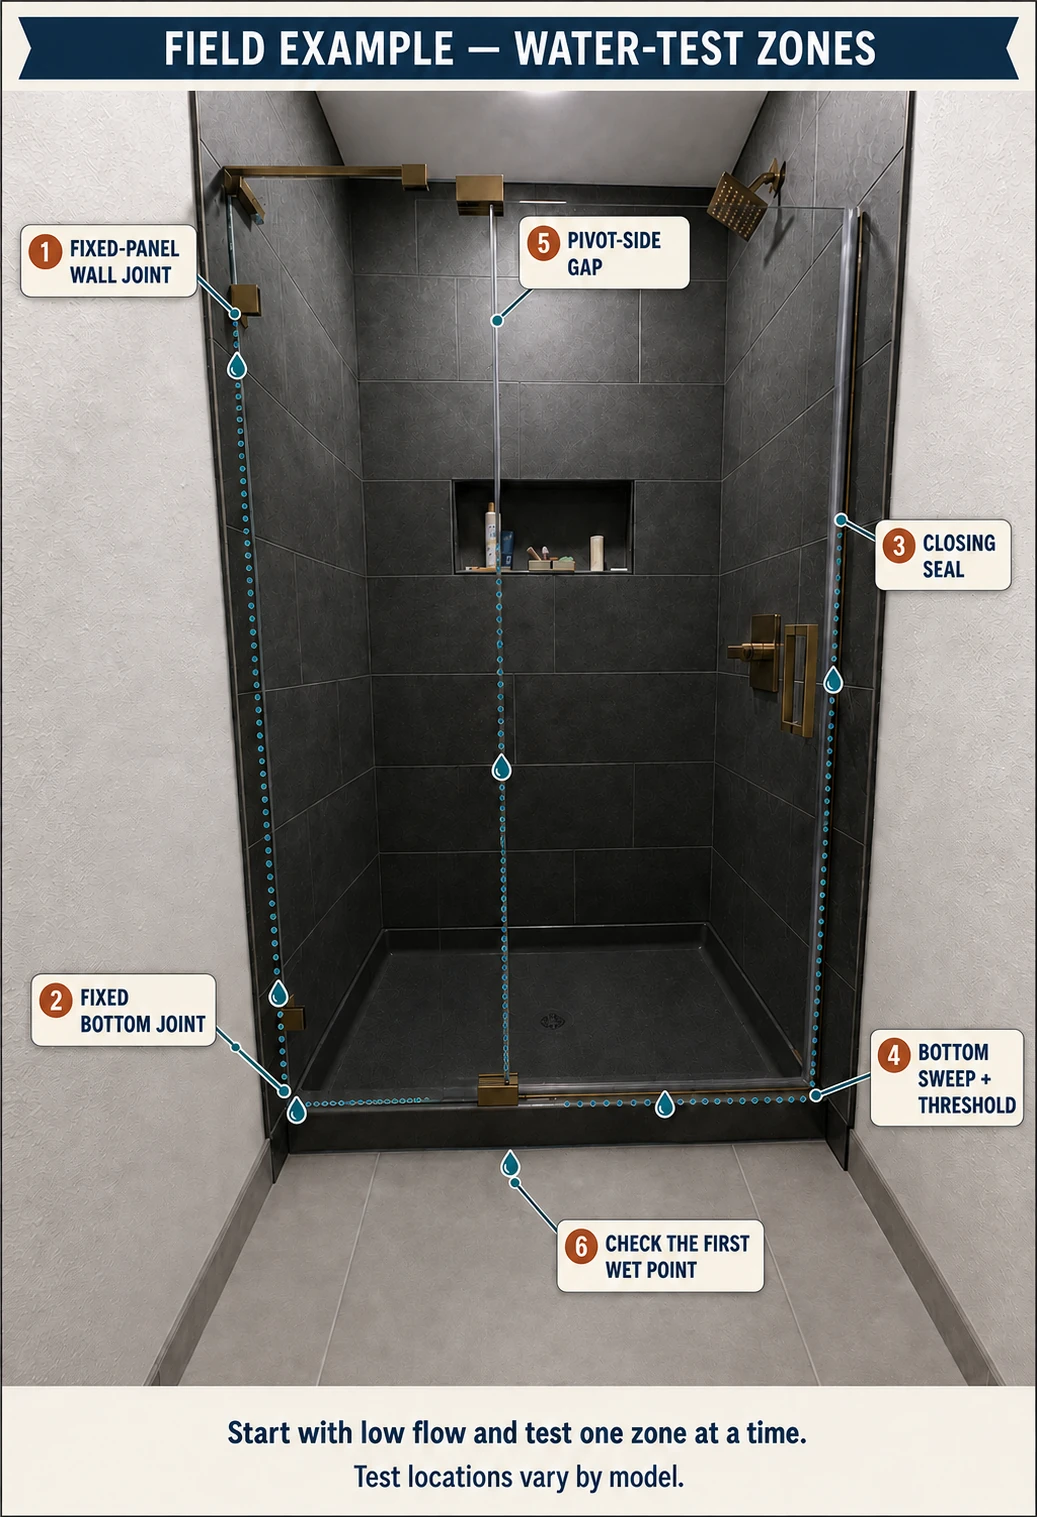
Use a low flow and work through the enclosure one area at a time:
Aim the water the way it would normally hit the enclosure during a shower. Blasting a high-pressure stream straight at an open frameless gap isn’t a useful test. Frameless doors don’t have the interlocking metal sections found on many framed doors.
Keep a dry cloth outside and wait after each section so a slow seep has time to show itself. Mark the first wet spot before moving on. If one area fails, follow the checks in the installation troubleshooting table instead of covering every joint with more sealant.
Support the glass before inspecting or adjusting any part that carries its weight.
| Symptom | Check first | Likely cause | Response |
|---|---|---|---|
| Hinged door sags | Hinges, gaskets, backing | Slip, poor seating, or moving support | Support the door; adjust by the manual. Stop if wall hardware moves. |
| Pivot case will not close evenly | Pivot alignment, fixed-panel stability, magnetic strips | Door position or closing parts out of alignment | Support the glass and follow manual step 12. Stop if the lower bracket or fixed panel moves. |
| Side-hinged door drifts | Hinge-axis plumb | Hinge line isn’t vertical | Recheck both hinges before changing seals. |
| Slider moves itself | Top-track level | Rail slopes | Re-level by the approved method. |
| Slider drags | Rollers and bottom guide | Uneven height or guide pressure | Inspect one component at a time. |
| Glass rubs curb | Door height and sweep | Panel too low or sweep misfitted | Correct height before altering the seal. |
| Closing gap varies | Top, middle, bottom reveal | A panel is out of plane | Find the wrong plane before adjusting. |
| Bottom leaks | Sweep and water direction | Open corner or misfitted sweep | Test bottom zones separately. |
| Wall leaks | Required sealant joint | Missing or failed bead | Remove and reseal as directed. |
| Tile cracks | Hole and substrate | Drilling damage, force, or void | Stop, support glass, and assess the wall. |
| Hardware loosens | Support and fastener | Load path has failed | Don’t keep tightening; correct the support. |
Stop the job if:
Never modify tempered glass to make a bad fit work. Contact the manufacturer, fabricator, or a qualified installer.
Yes, if the kit allows DIY installation, the opening fits, the wall support is verified, you have the right tools, and a capable helper is available. Call a professional for custom or oversized glass, unknown backing, damage, a poor fit, or any model that requires professional installation. Never cut or drill tempered glass.
Yes, as long as the tile can be drilled correctly and the fastener reaches the structure required by the door manufacturer. Tile is only the finished surface. It doesn’t prove that the wall can support the door.
Some systems require a stud or wood reinforcement. Others allow specific masonry or engineered fastening details. Use the hinge manufacturer’s requirement, and don’t assume the tile itself provides support.
Support the door before doing anything else. Then check the hinge seating, gaskets, clamping, alignment, wall fasteners, and backing. Stop using the door if a hinge or wall plate moves under load.
Not necessarily. In the Comfystyle case here, wall connectors hold the fixed panel, while the moving door turns on top-and-bottom pivots. Its sequence includes the fixed-panel support arm and an anchored lower pivot bracket before hanging the door. Use the pivot-door route and the exact manual, not the wall-mounted side-hinge sequence.
Check whether the top track is level. If it is, inspect the roller height, roller seating, and bottom-guide alignment. Keep the anti-lift parts installed while testing.
Use the time on the sealant label and in the shower-door manual. Skin-over time, full cure, and safe-for-water time are different, and they vary with the formula, bead depth, temperature, and humidity. The surface can feel dry while the sealant underneath is still curing. When the instructions give different times, wait for the longer one.
Check the glass alignment, seals, water direction, bottom corners, drainage paths, and required sealant joints. Wait for a full cure, then test one area at a time and repair the first confirmed water path.
A finished installation should do more than look properly aligned. The glass should remain clear of hard surfaces, the fixed panels and wall hardware should stay stable, the door should move without sagging, drifting, binding, or touching the curb, and all required drainage paths should remain open.
After the full sealant cure time has passed, water-test the enclosure one area at a time. If the glass touches another hard surface, any load-bearing hardware moves, or a leak remains unexplained, stop using the door and follow the manufacturer’s instructions or contact a qualified installer.
Before writing, we reviewed six installation-focused search intents to see what people were trying to solve. We then checked the safety and technical limits against the National Glass Association’s 2023 frameless shower manual, the CPSC safety-glazing standard, manufacturer installation material, and a current sealant technical data sheet.
The hands-on notes come from Jimmy, a Aurivedo installation partner. In May, he installed a self-purchased Comfystyle 48 x 70-inch frameless pivot shower door on tiled walls. Jimmy handled the installation, while two helpers briefly steadied the glass when needed. The job took about four hours, and the completed enclosure passed its water test without leaking.
The wall-mounted magnetic strip arrived bent, so Jimmy corrected it gradually while installing the screws. He also grouped fully checked drill points to reduce repeated handling. The two photos show the enclosure during installation and after completion; both are published with permission. Ronni from Aurivedo reviewed the finished guide.
Use these with the exact product and room conditions behind your decision.
Your response helps us make the next guide more useful.
Loading responses…
Continue with the next decision in your bathroom project.