
If your door pivots in a wall jamb, start with Route A. If the moving door sits beside supported fixed glass, start with Route B. Find what supports both pivots before picking a route. Direct wall, floor or ceiling pivots outside those assemblies use a different fastening sequence.
How to install a pivot shower door: the short version
- Measure the finished opening and check the full swing path.
- Find the pivot side and the parts that carry the weight.
- Dry-fit the wall jamb and threshold or fixed panel and its supports.
- Secure the supports and line up the pivot centers: Route A jamb or Route B axis.
- Hang the glass with a helper using Route A or Route B.
- Set clearance and closing contact: Route A closing side or Route B gap and seals.
- Seal the specified joints, allow the full cure time, and water-test by zone.
Keep the exact kit’s cut lengths, holes, anchors, clearances and sealant drawing beside the parts. The routes below explain the work and the checks that tell you when to continue.
Which pivot door do you have?
Lay out the parts and locate both pivots. Follow their connections to the parts that carry the door. The magnetic strip helps it close; it isn’t a supporting hinge.
| Your kit has | Follow | Establish this first |
|---|---|---|
| A pivot-side wall jamb, a closing profile, and perhaps a threshold | Route A | The jamb and any threshold that locates it |
| A moving door beside fixed glass, with clamps, a header, or a support bar | Route B | The fixed panel and its supports |
| Direct wall, floor, or ceiling pivots without either assembly | The kit’s drawings | Neither route below supplies that fastening sequence |
A frameless label tells you about the frame style, not where the pivots attach. For a door beside fixed glass, Route B starts with the supports. Trace the load through the actual hardware; the fixed pane doesn’t automatically carry the entire moving door.
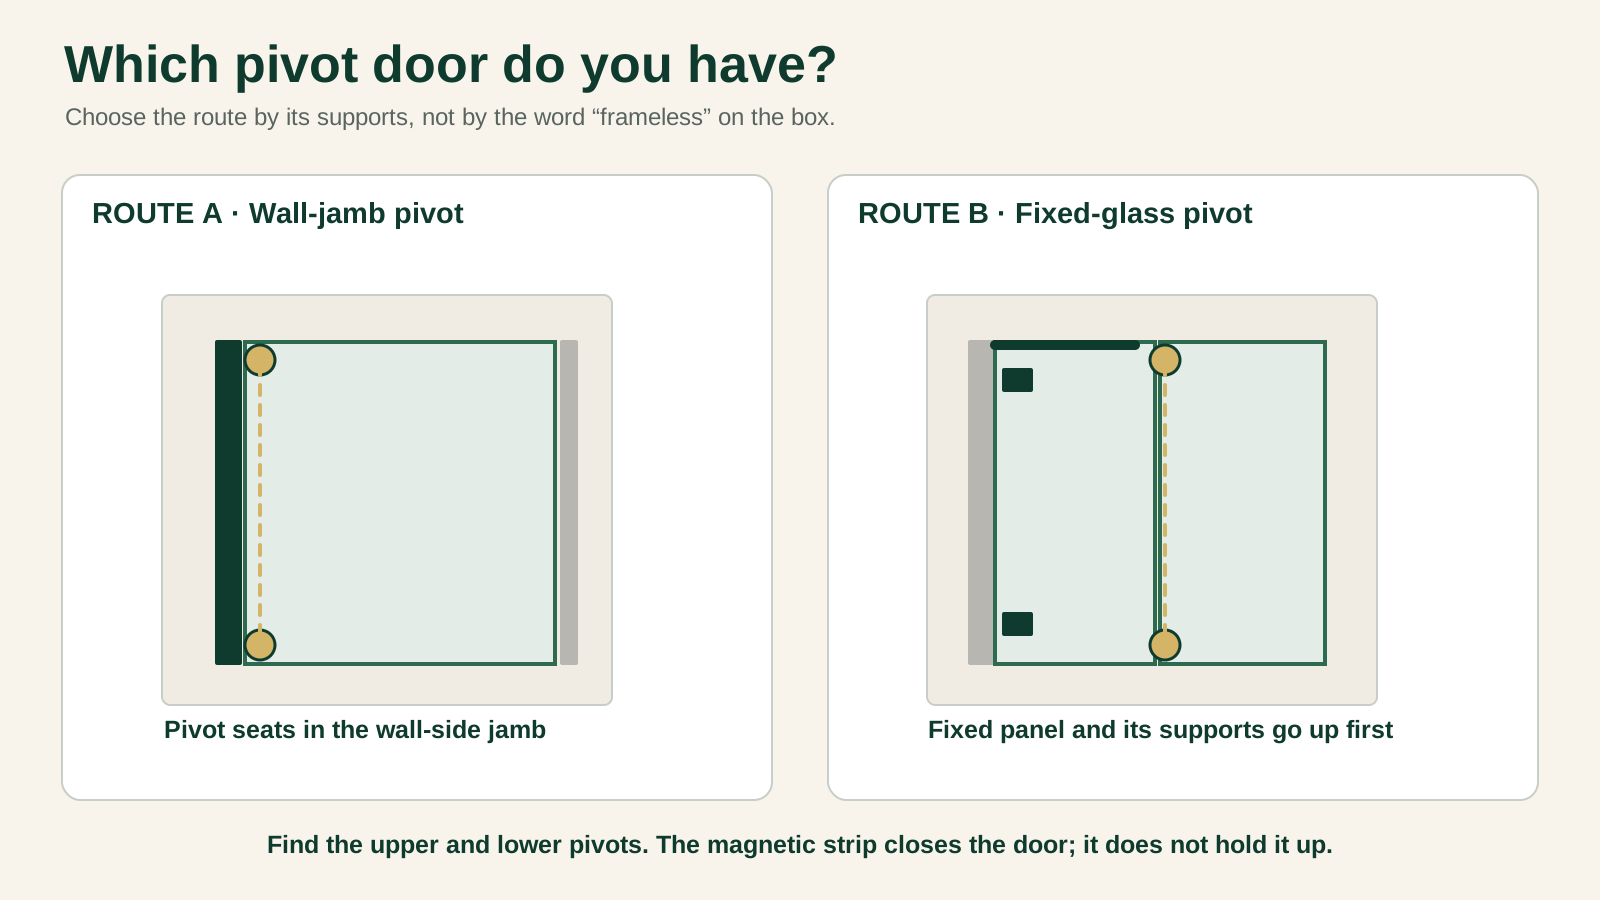
Tap a diagram to open it full size.
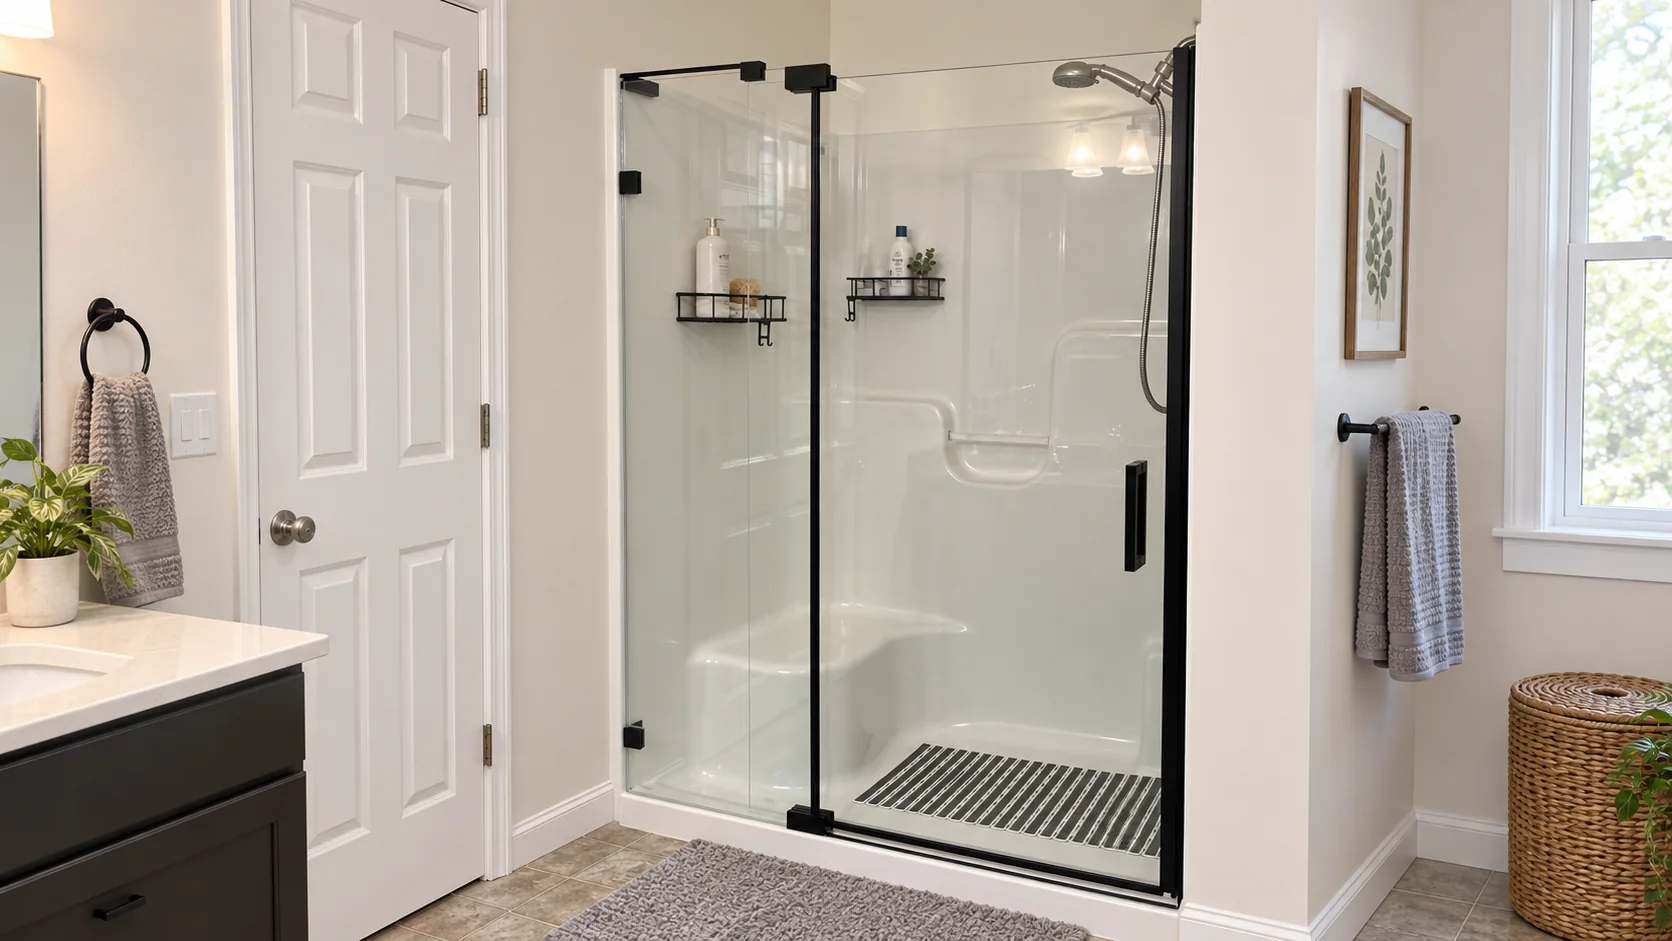
Cover illustration based on the supplied installation photo. The worked-example photo farther down is the actual installation with labels added.
Check the job before drilling
A packaged kit can be a reasonable DIY job when the opening fits, the supports are verified, the glass is sound and a second adult can control it. Plan at least half a day for two people, longer for a first installation, plus the full sealant cure. One documented pivot installation took about four hours of active work. That’s one crew’s result, not a promise on your calendar.
Record the finished width at the top, middle and bottom, check both walls for plumb, and find the base’s flat mounting area. Every required reading has to fit the kit’s range. Stud-to-stud or partly finished numbers need the rough-versus-finished opening check first. Picture the door moving past your toilet, vanity and towel bar through its full permitted swing. A door can fit the opening and still run out of room to open. The measuring guide and wall-plumb guide cover the readings.
Choose the pivot side before opening the hardware bags, then mark it on the carton. It’s the assembly equivalent of labeling your moving boxes: much easier now than halfway through the job. Match the left- or right-hand parts and the showerhead position. The Sterling example puts the pivot opposite the showerhead; that rule belongs to that kit.
Stage the tape measure, long level, pencil, painter’s tape, drill with the specified bits, screwdrivers or driver, hex keys, padded setting blocks, safety glasses, gloves and specified sealant. Setting blocks hold glass at the required height. Add a saw and file only for metal identified for field cutting. Never cut or drill tempered glass. Cover the drain, pad the floor and leave corner protectors on until the required installation step calls for their removal.
Stop before drilling if a dimension is out of range, an edge, hole or notch is chipped or cracked, a load-bearing part is missing, or its fastening support is unknown. Keep the glass safely staged while sorting parts. Kohler and Sterling both require two people and warn against damaged glass.
If the kit’s paperwork is missing, use the model number on the carton, label or receipt to retrieve the matching PDF. Delta’s pivot-door support page is one example. A similar-looking door won’t establish your hole locations.
Route A: install a wall-jamb pivot door
Use Route A when the moving panel pivots in a vertical wall jamb. The profile on the closing side is the strike jamb. It meets the door when you close it.
Watch the existing Route A footage on YouTube at 00:40: jamb level and hole marking, 01:00: drilling the marked wall, or 04:40: measuring and cutting the bottom aluminum. These clips show one wall-jamb kit, not the SDP08-22 installation.
1. Dry-fit the jambs and threshold
Set the metal parts in place without fastening them. When a threshold locates the jambs, cut that identified metal piece to its specified length, file the edge and dry-fit it first. A bottom water strip fitted near the end stays for that later step. The Sterling kit sets the threshold early; the kit in Aurivedo’s Route A video adds bottom aluminum late. Use the sequence that matches the job your bottom piece performs.
Before moving on: The locating parts seat fully and the planned opening remains within the kit range. Stop if a cut would remove a required feature or the dry-fit parts cannot seat.
2. Plumb and fasten the pivot-side jamb
Hold the jamb against the finished wall and mark plumb with a level. A grout line can look convincing and still lean, like a picture hung to match a crooked window frame. Locate the holes with the profile, then remove it for drilling unless the kit uses it as a drill guide. Verify what’s behind the wall and use the specified bit, anchors, screws and penetration seal. Recheck plumb after fastening.
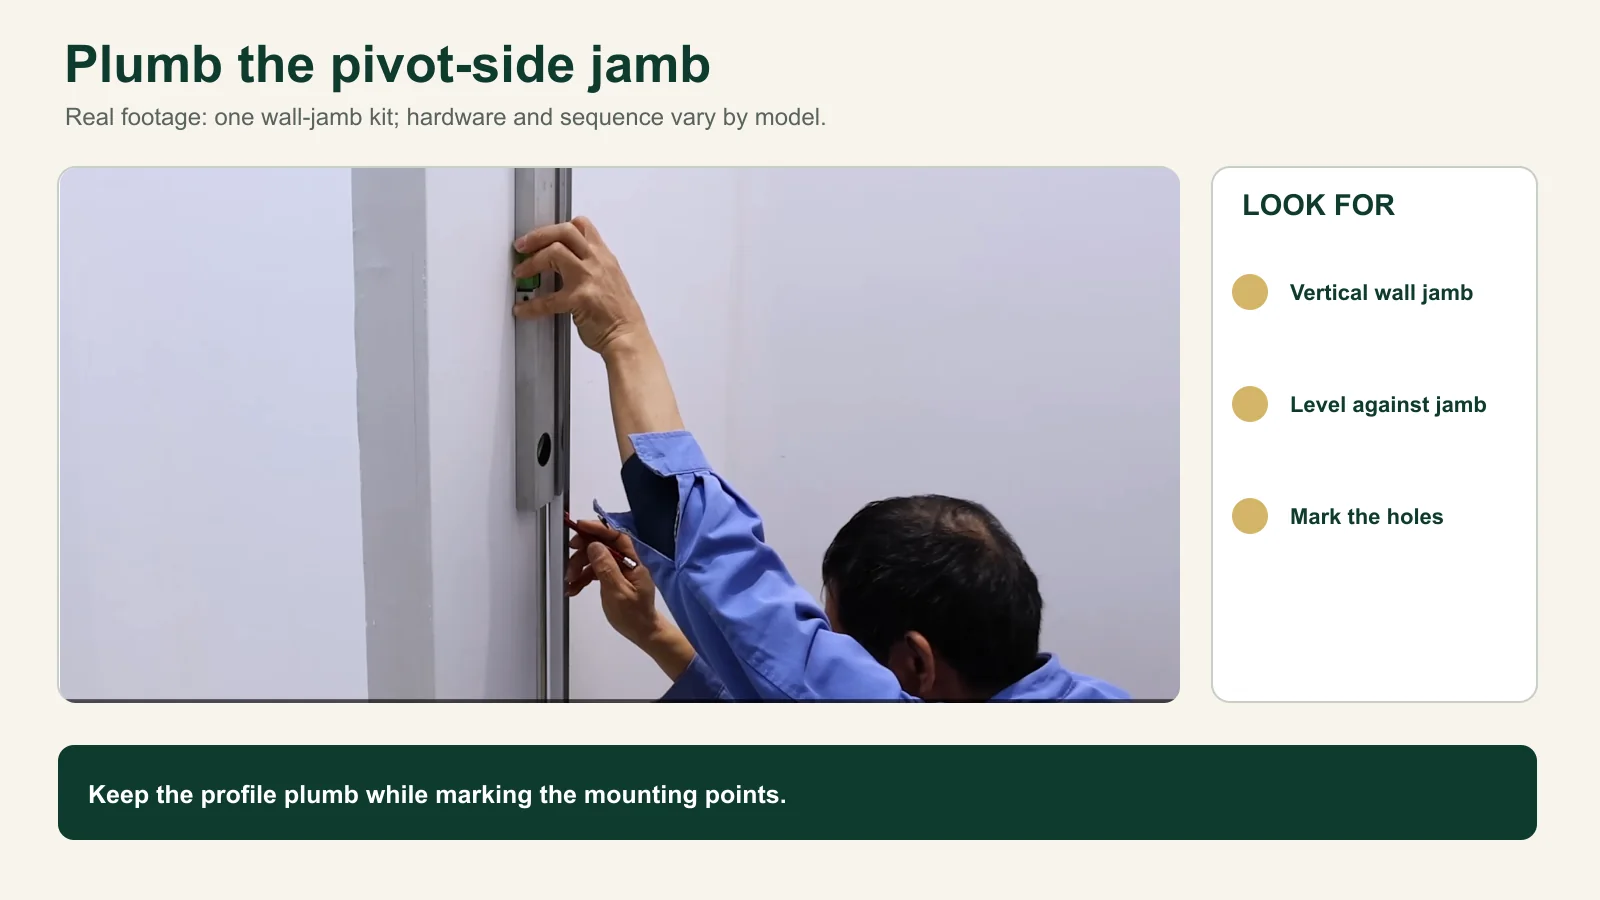
Frame from Aurivedo’s real Route A installation video, showing one kit’s jamb and marking step.
In the Route A footage, the installer levels the jamb and marks holes at about 00:40, then drills the marked wall at about 01:00. The useful sequence is line first, holes second. The footage doesn’t reveal hidden backing.
Before moving on: The fastened jamb remains plumb and secure. Correct movement or a lost plumb reference before adding glass.
3. Hang the moving panel
Match the top and bottom pivots to your chosen left- or right-hand drawing. Fit every supplied washer, bushing, liner, and bottom seal. Sterling’s instructions, for example, change the pivot pin orientation with the chosen side. Set a padded block under the closing end at the height shown for your kit.
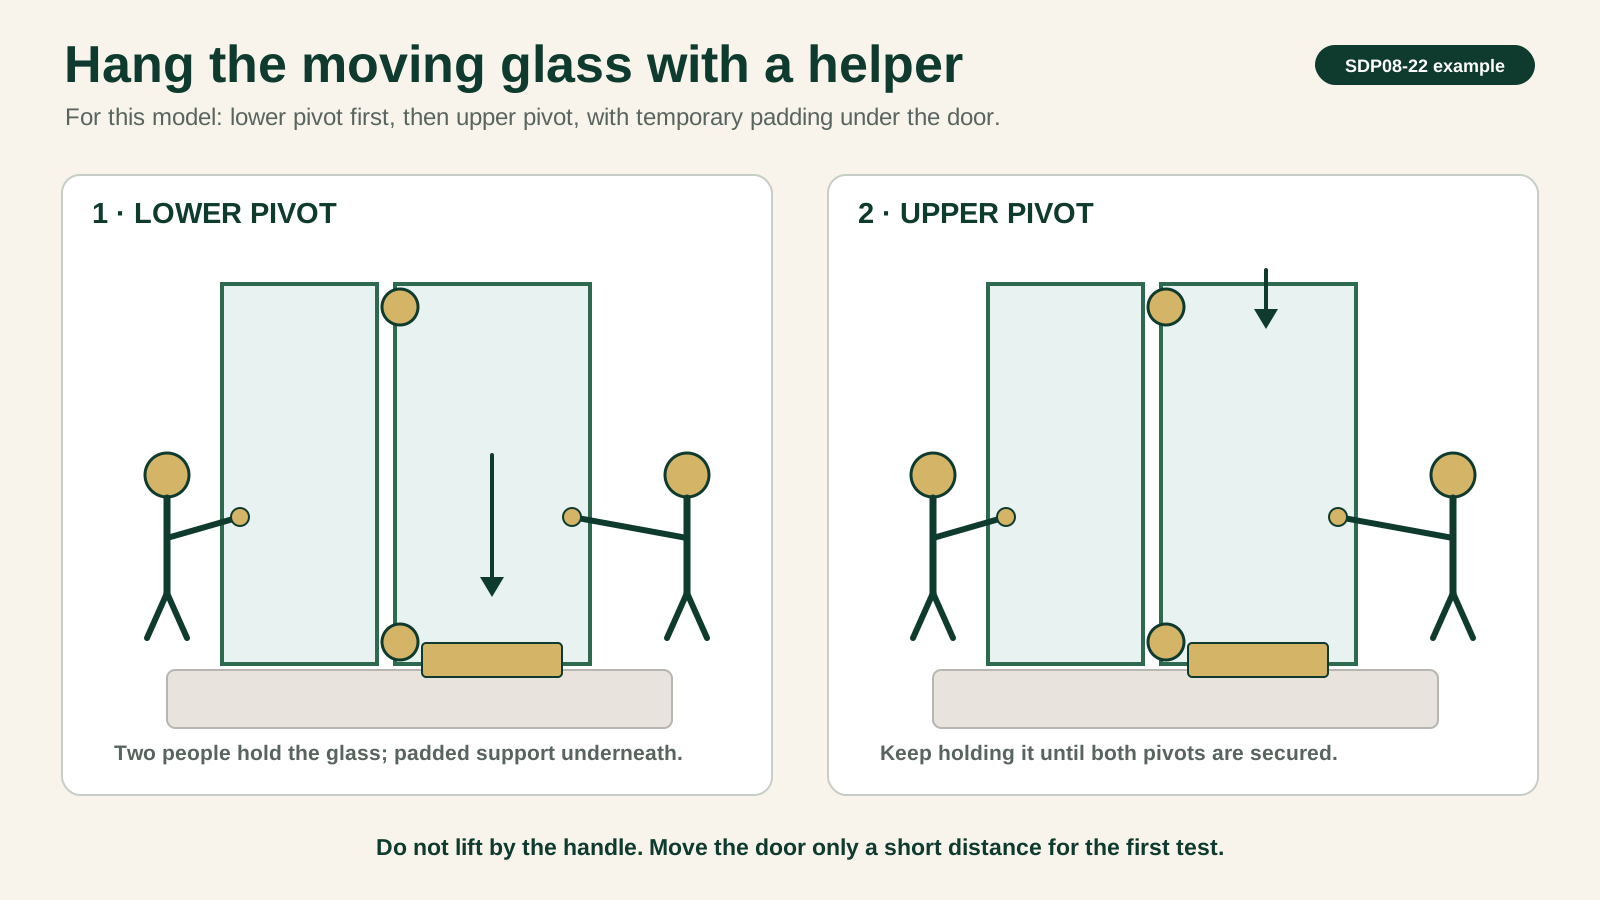
With a helper holding the glass, seat the lower connection and secure the upper one. Maintain support until both are complete, and never lift by the handle. Begin with only a few inches of movement. The pivot line should stay straight and the bottom edge should clear the threshold.
Before moving on: Both pivot connections are complete, the glass stays supported until then, and the bottom edge clears the threshold during the initial short swing.
4. Fit and adjust the closing side
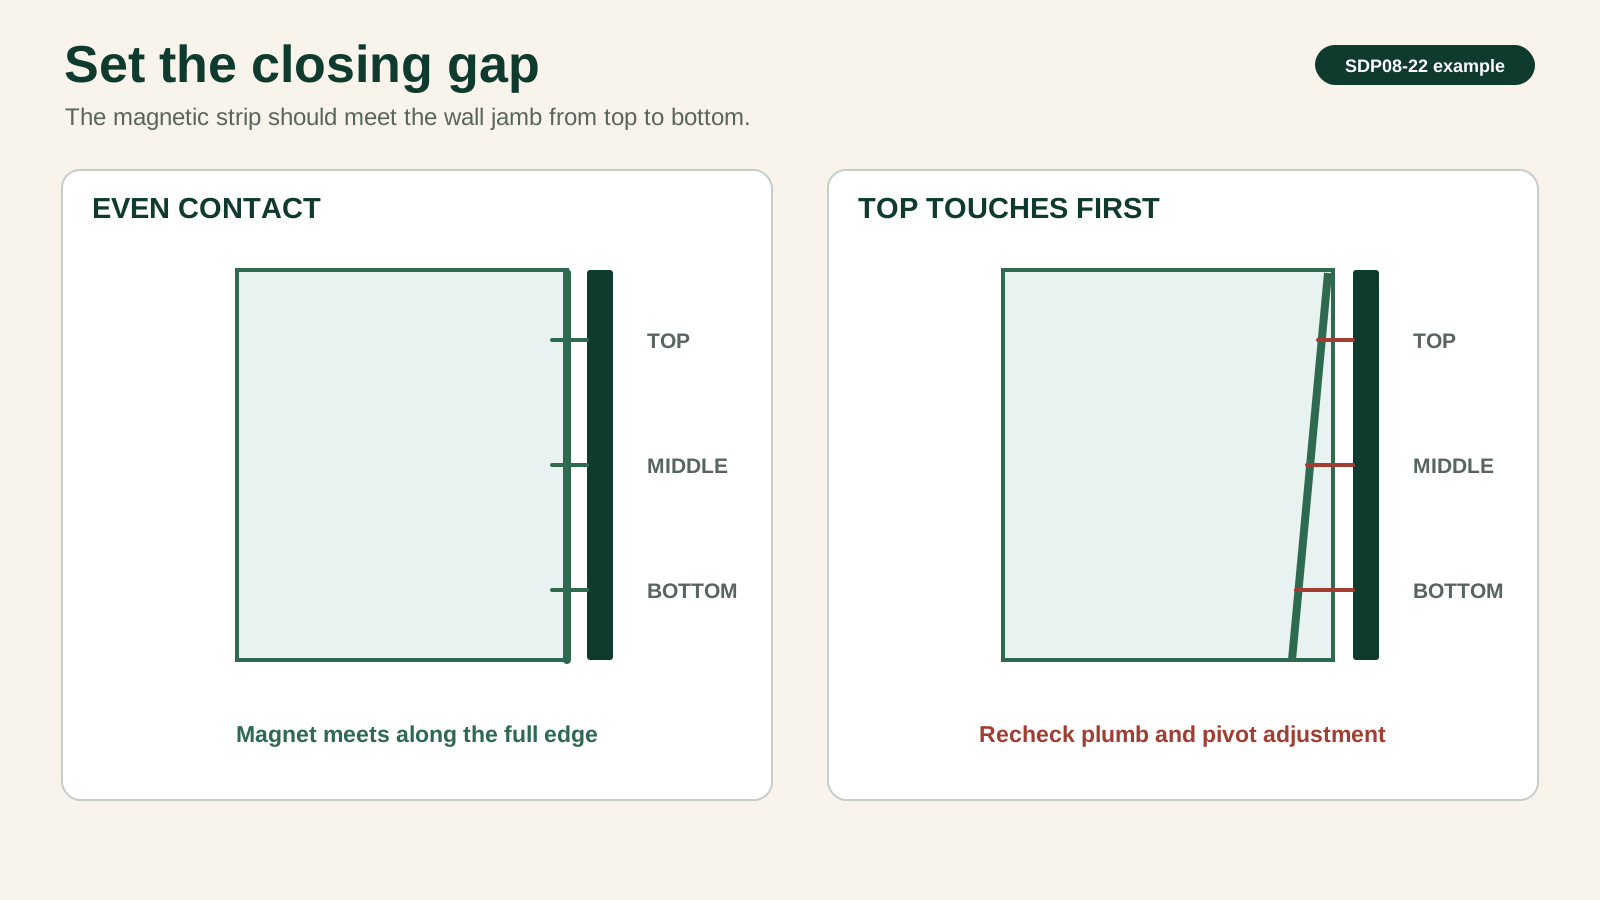
Fit the strike jamb or magnetic profile and close the door slowly. Compare contact at the top, middle and bottom. Suppose the magnet meets at the top while a gap stays at the bottom: recheck jamb plumb and its allowed adjustment. Pushing harder doesn’t make the jamb straighter. Keep adjusters within their marked limits. If final jamb-to-jamb screws lock the position, fit them after alignment with the door supported.
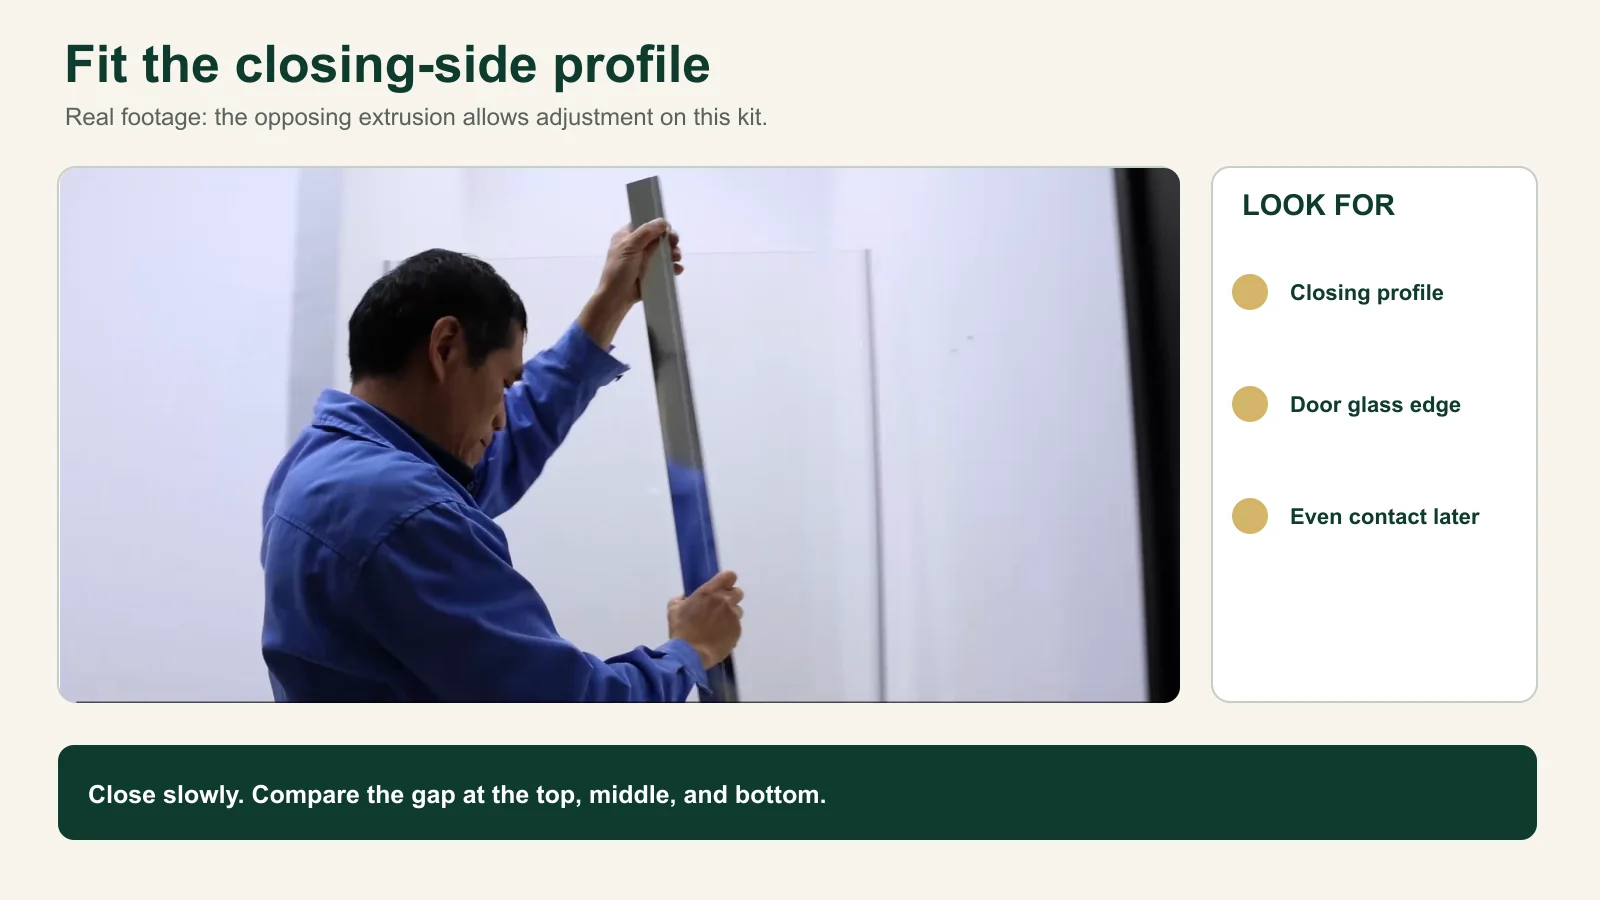
The opposing extrusion in Aurivedo’s filmed installation allows width and angle adjustment on that kit.
Before moving on: The top, middle and bottom close evenly within the adjustment limits. Do not force a magnetic profile or bend it into contact.
5. Fit the water-control parts
Install the sweep, magnetic seal, threshold, or water dam in the positions shown for your kit. Swing the door through its permitted travel; the sweep should contain water without dragging hard across the curb. On Delta’s Contemporary Pivot system, the bottom track sits on the flat base surface inside the raised lip, not on the lip. That placement belongs to that system.
At about 04:40, the Route A installer measures and cuts the bottom aluminum after the wall-side parts are in place. This footage shows that kit’s late-bottom-piece sequence. Its cut length doesn’t transfer to another kit.
Before moving on: The seals sit in their intended direction and the sweep does not drag hard over the curb during the permitted swing.
Route B: frameless pivot door with a fixed glass panel
Start with a firm supporting assembly before hanging the moving door. Think of adjusting a cabinet door: the cabinet itself has to stay put before fine-tuning the hinges makes sense. In a pivot kit, a lower pivot may bear on a sill or threshold while the upper one connects to a header. Trace both connections; the fixed glass may share the assembly without carrying the whole door’s weight.
1. Set and steady the fixed panel
Place the supplied blocks and seals, then set the fixed glass with a helper. Attach its wall, bottom and upper supports. Check plumb and gently check the connections for movement. A shifting panel or support means stop before hanging the door.
Before moving on: The panel is plumb and all its supports remain firm. Any movement means stop before hanging the moving glass.
2. Find the lower pivot seat
Locate the seat directly under the lower pivot and the structure beneath it before fastening either pivot. The Kohler example slides a bottom mount into the threshold beside the fixed-panel channel. Coastal Synthesis slides its pivot assemblies into a sill and header. Those layouts use different drilling and assembly orders.
Before moving on: Identify both the lower seat and the structure beneath it. An unidentified load path or unresolved base penetration means do not drill or hang the door at that point.
3. Fit the pivots on one vertical line
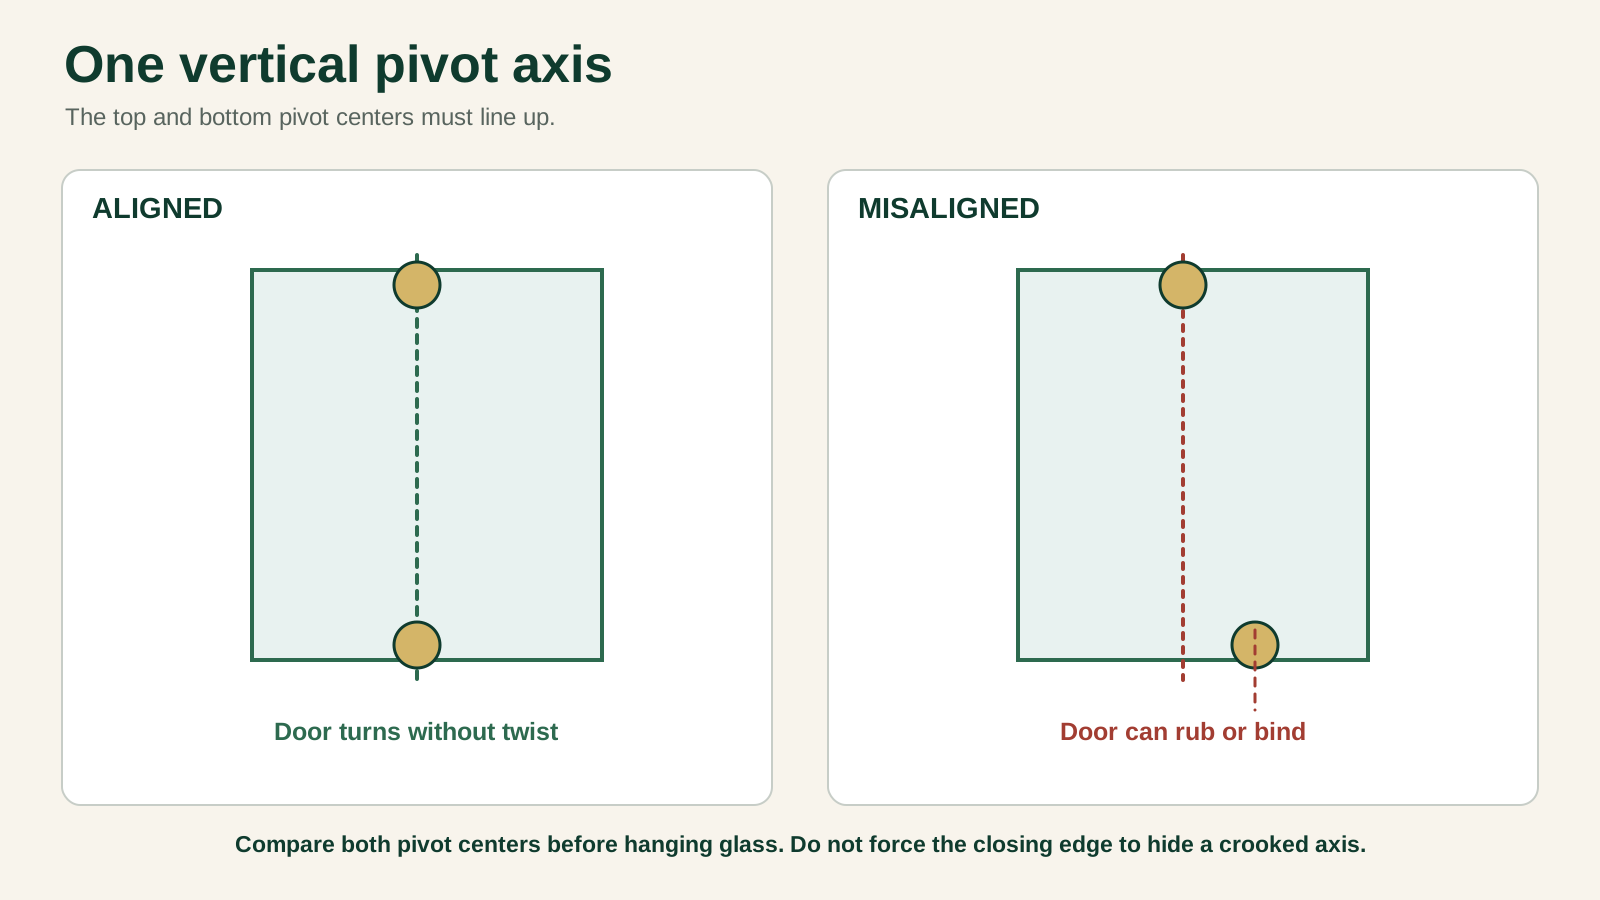
Fit the upper and lower hardware with every required gasket, bushing and glass liner. Keep metal off bare glass. The pivot centers need one vertical axis, much like the top and bottom hinges on a garden gate: mismatched centers make rotation bind and distort the closing gap. Check the reference line and hardware positions before hanging the door.
Before moving on: The upper and lower centers share one vertical axis, and every required glass liner is in place. Correct misalignment before testing the swing.
4. Hang the door with two people
Set padded support at the kit’s required height. One person controls the glass while the other engages both pivots. Keep it supported until both connections are secure, then test a short swing. If the fixed panel or a bracket moves with the door, stop and correct that connection.
Before moving on: Both pivots are secured, and a short supported swing does not move the fixed panel or brackets.
5. Set the gap and seals
Compare bottom clearance and the closing gap at the top, middle and bottom. Support the door before loosening an adjuster and change one point at a time. Fit the closing and bottom seals, then repeat the swing check. It should close without a shove.
Jimmy’s documented 48 × 70-inch installation was a separate job. He found a bent wall-mounted magnetic profile before the door was finished. The crew steadied the glass, aligned the hardware and water-tested by zone. Inspect long closing profiles before hanging glass; a damaged one can make sound pivots appear misaligned. Jimmy’s door was not the SDP08-22 example below.
Before moving on: The supported adjustments produce even closing contact and bottom clearance without a forced close. Stop at the allowed adjustment limit.
Worked example: SDP08-22 with a support bar
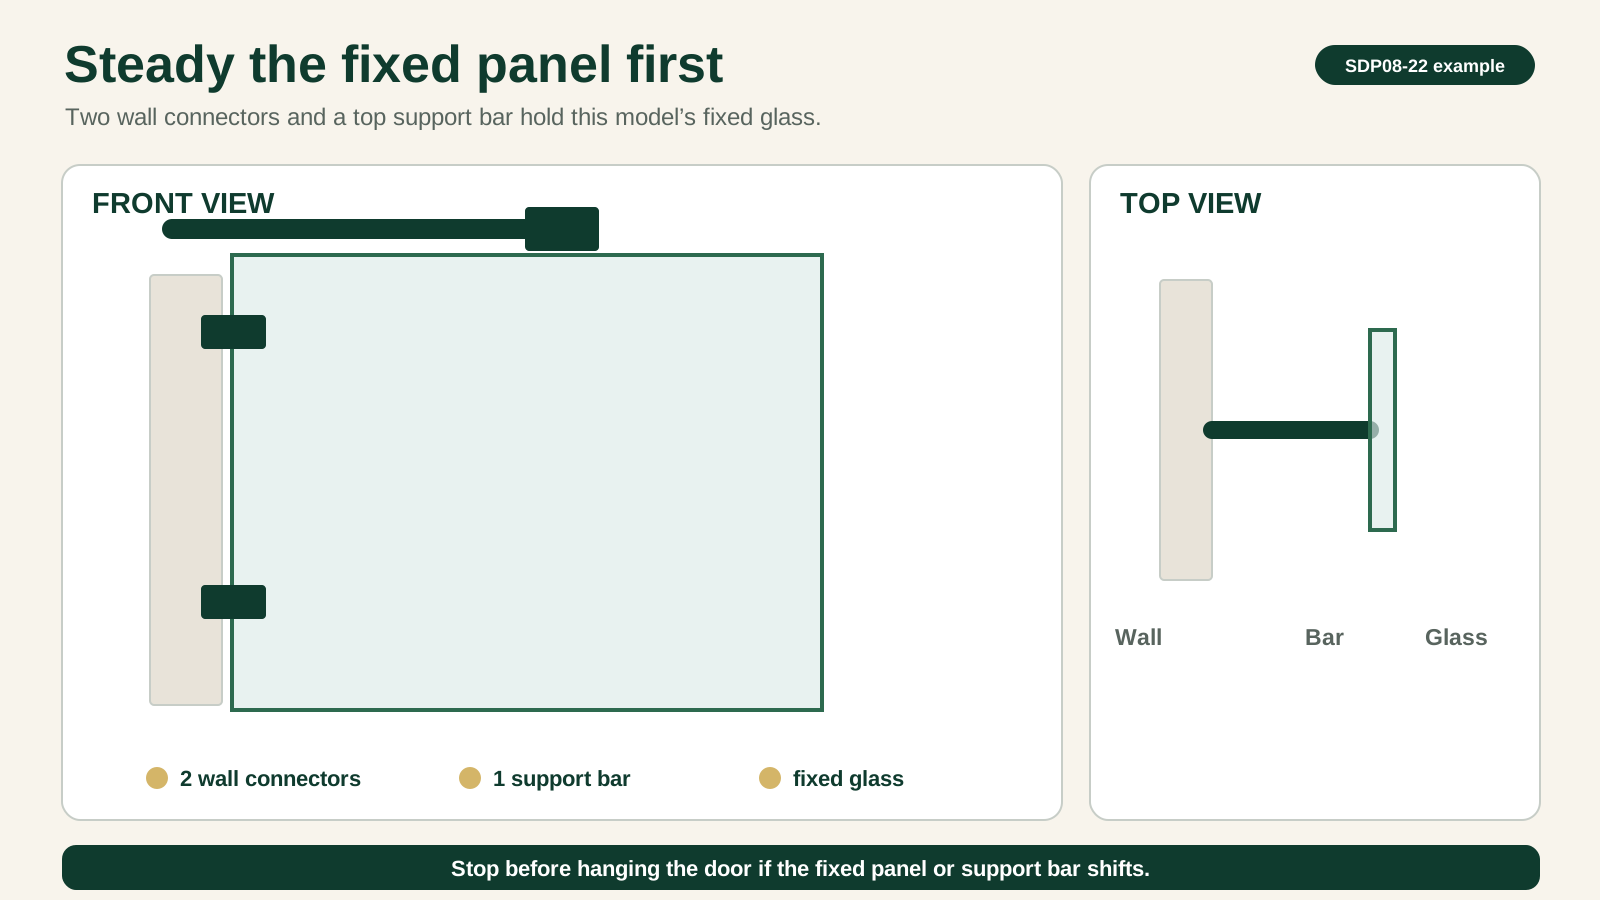
The supplied photos and SDP08-22 PDF show two wall connectors on the fixed glass, a short top support bar and pivots beside that glass. Keep its fasteners, positions and adjustment limits with this matched system. The Kohler and Coastal examples use different layouts.
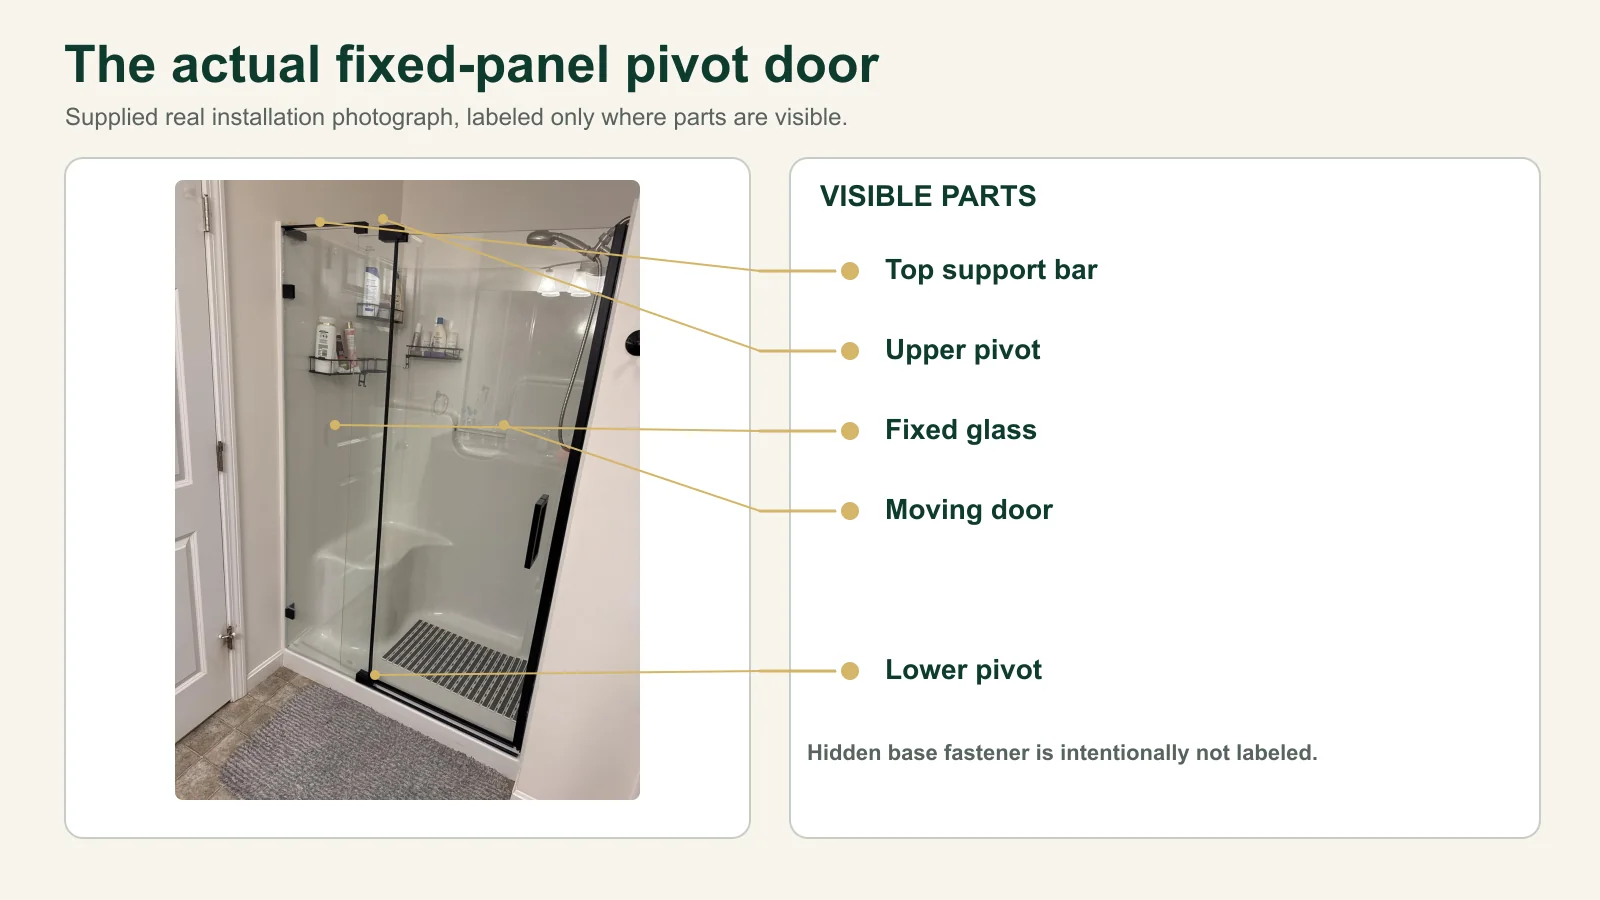
Aurivedo’s real installed-door photo. Labels point only to visible parts.
-
Set the fixed glass. Use the wall connectors to mark their locations, remove them from the glass, fasten them to the wall, then secure the panel. Protect its bottom edge on padding and check plumb.
-
Fit the support bar. The manual calls it a pull rod. Attach its glass end, square it to the wall, mark and fasten the wall end, then secure the glass connection. Check the bar and panel gently. If either shifts, stop before hanging the door.
-
Resolve the lower-pivot base connection before fastening it.
SDP08-22 hold point: lower pivot anchor waterproofing. Identify whether the bracket enters a molded base, a solid-surface base or a tiled curb, and locate that assembly’s waterproofing. Tile is not the waterproof layer; a curb hole may reach the liner beneath it.
The SDP08-22 drawings, PDF pp. 20 to 22 and 33 to 34 show the base anchor and perimeter caulk without a separate anchor-hole sealing detail. Pause this drilling step until the door and base makers confirm a compatible detail: whether a sealing gasket is used, and which sealing method and material suit the fastener and bracket footprint. Neither filling the hole nor bedding the load-bearing bracket in silicone is established for this assembly. A bead at the threshold edge does not seal the anchor beneath the bracket. Do not drill or load that unresolved connection.
Complete the base-drilling and loading operations below only after the attachment and sealing detail are resolved.
The lower bracket clamps to fixed glass and fastens into the shower base. Fit the door-side parts on padded glass. Match the E/F orientation to your chosen swing and line up both pivot centers.
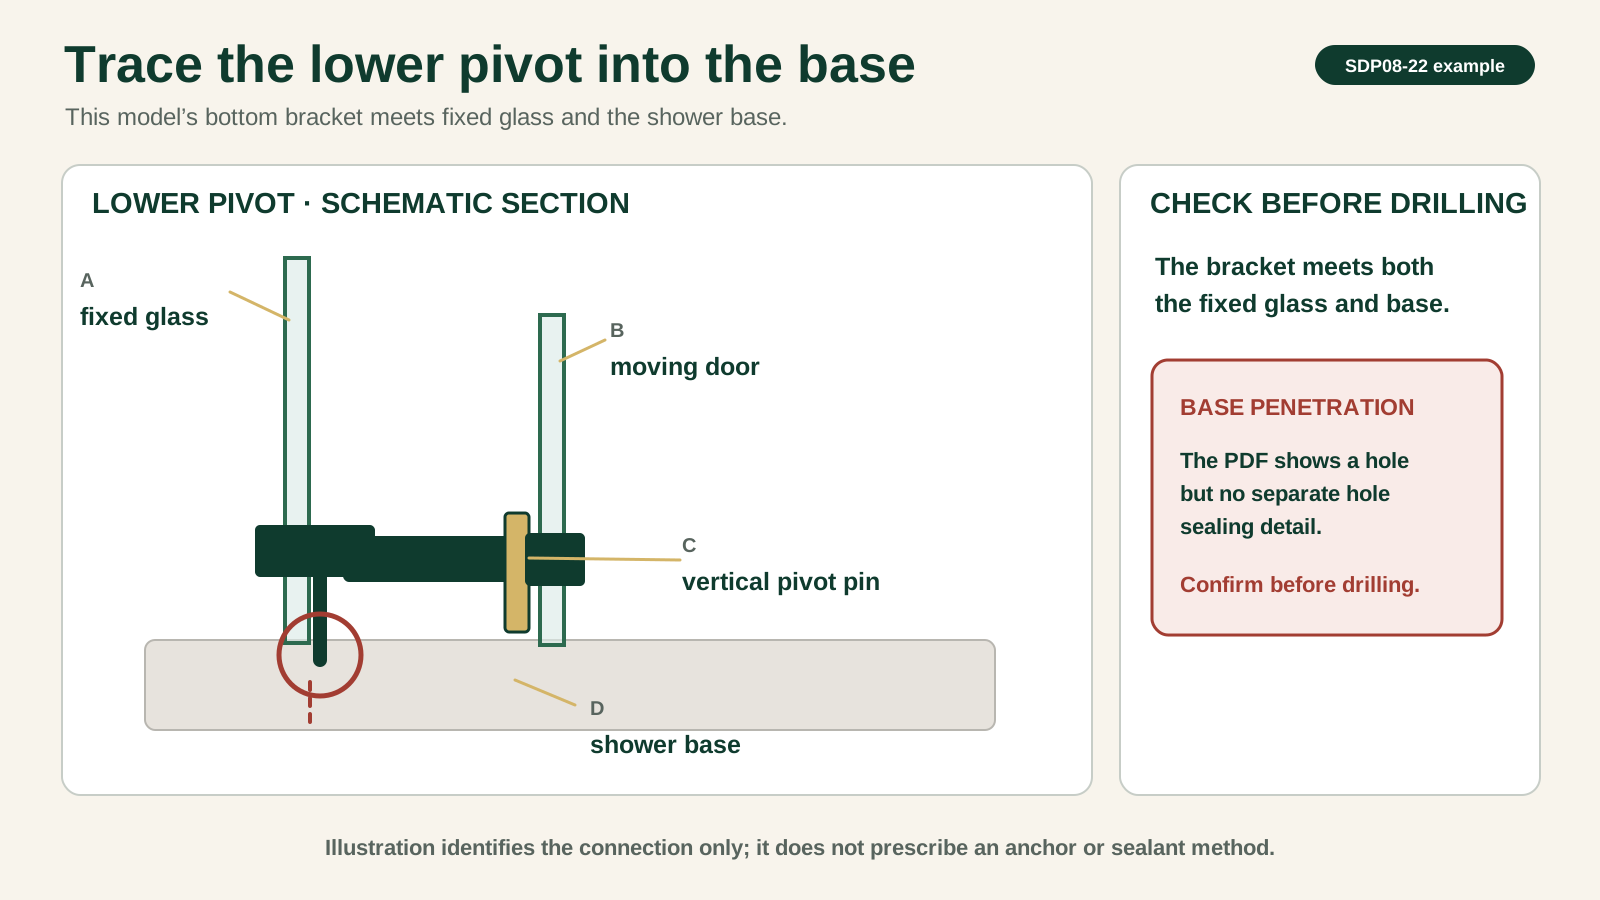
Open the base-connection drawing full size. Its unresolved field is explained at the hold point above.
-
Hang the door. Two people place its lower pivot into the bracket, rest the glass on firm Styrofoam padding, then engage the upper pivot. Make a short swing while watching the fixed panel, bar, and lower bracket. None should shift.
-
Fit the closing jamb and adjust. This model’s magnetic strip goes on after the door. Support the glass, loosen only the specified pivot adjusters, and set even magnetic contact from top to bottom. Re-secure the hardware and test again.
-
Fit the water-control parts. Add the threshold, fixed-panel water strip, bottom sweep, and handle in the manual’s order. Its final drawings mark the wall-jamb joints on both sides, the full outside threshold edge, and only one inside threshold segment. Keep sealant off the pivot and moving glass.
Align, seal, and test
Before caulking, cycle the door through its permitted swing. Check threshold clearance, even closing gaps and seal contact, while watching for movement in the brackets, fixed panel or wall jamb. Correct the alignment and supports first. Caulk cannot straighten a door.
Caulking advice varies because the doors use different water-control layouts. A kit may specify selected inside joints, outside frame edges or both. Kohler’s pivot instructions warn that sealing beyond the pictured areas can cause leaks. Mark and seal the joints for your kit, leaving drainage openings clear. Neither ‘always inside’ nor ‘always outside’ covers every door.
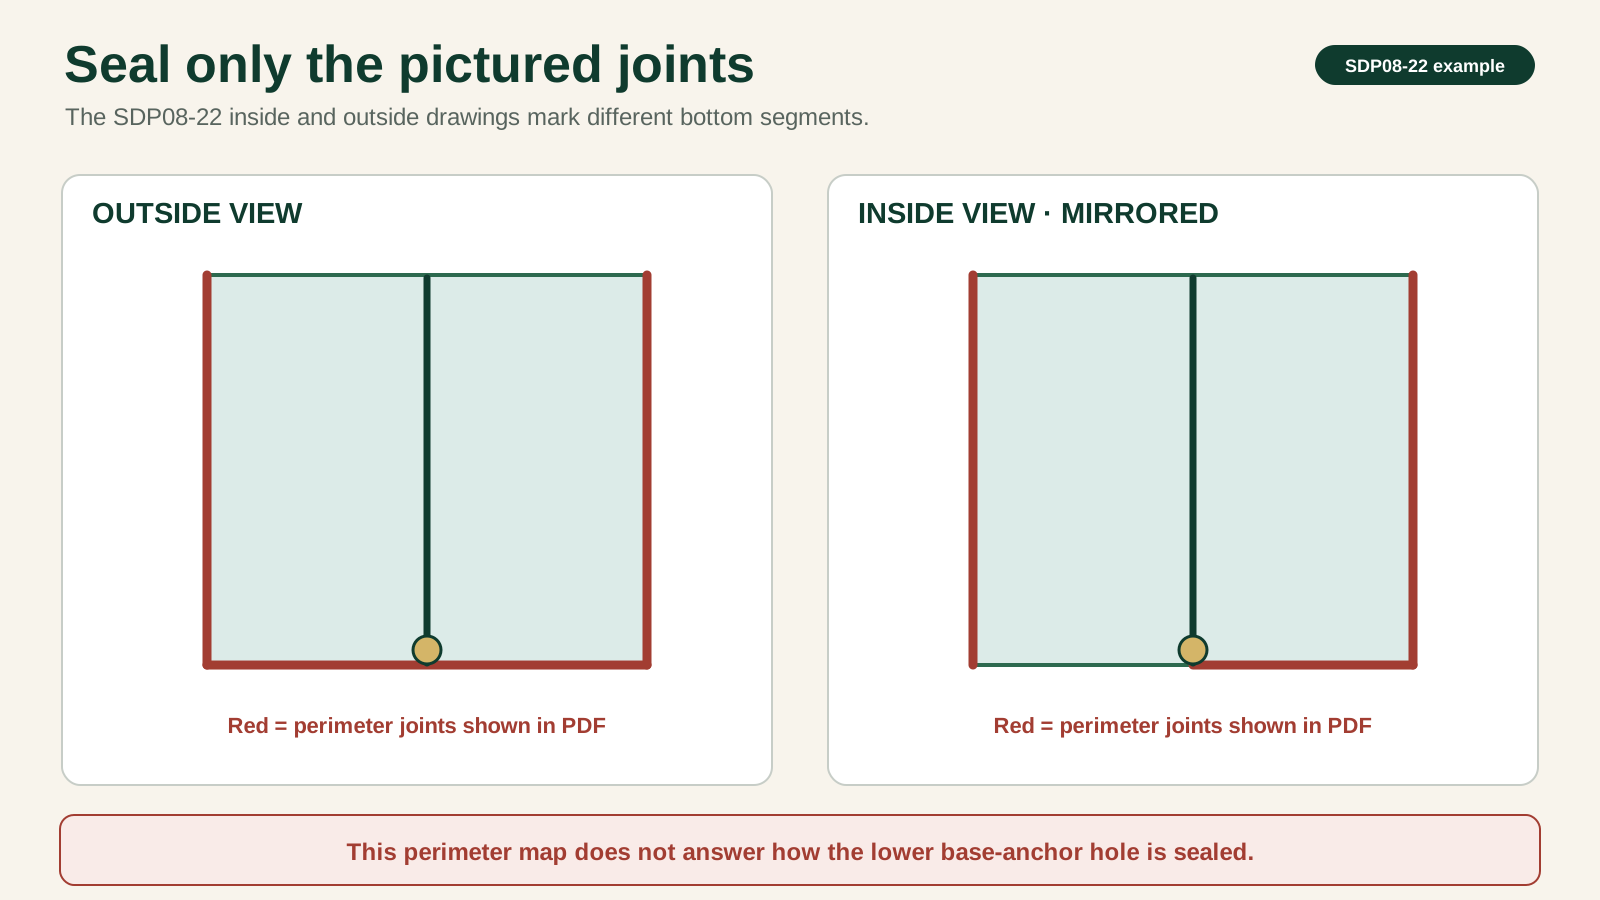
SDP08-22 perimeter sealant map only. Tap to view full size; the lower-anchor hold point above remains separate.
Use sealant approved for the door and adjoining surfaces. Wait for the longer of the door’s cure period and the sealant label’s water-exposure time. Then use a low stream to test the threshold, bottom sweep, pivot side and closing side separately. Find the first wet point outside. Spraying everything for five minutes makes the starting point harder to trace.
For the full testing method, see the frameless shower-door installation guide’s water-test section.
If the door doesn’t behave, check this first
| What you see | First place to look | Stop if… |
|---|---|---|
| Bottom edge scrapes the curb | Setting-block height, sweep fit, pivot height, and the curb’s highest point | Glass touches a hard surface or the required lift exceeds the hardware’s adjustment range |
| Closing gap is wide at one end | Pivot axis and wall-jamb plumb; then the strike profile’s allowed adjustment | A fixed panel, jamb, or bracket shifts while you test the door |
| Magnetic strip meets at the top but not the bottom | Strike-jamb position and whether both profiles are plumb | The profile would have to pass its indicator line or be bent to make contact |
| Door bounces back or won’t close | Seal orientation, sweep interference, and any shipping spacer or temporary block left in place | The glass must be pushed or twisted to latch |
| Water appears at the bottom | Find the first wet point: under a fixed threshold, at the sweep end, or beside the lower pivot | Water is coming from behind the mounting surface or a support connection is loose |
Check what the pivot-door screws do and how to assess closing gaps. The illustrated angle adjustment is specific to the identified hardware and does not lift the glass.
Support the panel for adjustments. If a door worked for months before dropping, start with the sagging-door diagnosis. An installation check and a repair for something that has moved are different jobs.
Frequently asked questions
Can I install a pivot shower door myself?
Yes, for a packaged kit that fits, with verified support, undamaged glass and hardware, and a capable helper for the panel. Custom heavy glass, unknown backing or an opening outside the fit range needs a different plan before drilling.
Which side should the pivot be on?
Check the showerhead position and the full swing space, then mark the chosen pivot side on the carton. Match it to the kit’s handed parts and water-control arrangement. Some kits are reversible; others have handed parts or a water-control arrangement that fixes the choice.
Can a pivot shower door open inward?
Only if the exact door permits inward travel. Delta EverEdge, for example, specifies a 90-degree outward swing. Choose a model with the swing your room needs before ordering. Removing a stop or reversing a seal doesn’t add approved travel.
How long before I can use the shower?
Wait for the longer of the door’s stated cure period and the sealant label’s water-exposure time. Cold, damp conditions and thick beads can extend curing. After the required wait, water-test one zone at a time.
How do I know the upper and lower pivots are aligned?
The centers need one vertical axis, with the supporting jamb or fixed panel plumb and secure. Check the reference lines and hardware positions before hanging, then make the initial short swing with the glass supported. Binding, an uneven gap or moving supports means stop and correct the cause.
What if the fixed glass or its support bar moves?
Stop before hanging the moving door. If it’s already hung, stop using it and support the glass before adjustments. Secure the fixed panel, bar, clamps and attachments. Seals and magnets cannot make up for a moving support.
What if the lower pivot needs a base hole but its sealing detail is missing?
Pause drilling and loading that connection until a compatible detail is confirmed for the exact door and base. The SDP08-22 hold point identifies the missing anchor-hole and bracket-footprint detail. A finished-door photo or perimeter caulk map cannot establish that hidden seal.
Why is my pivot door leaking at the bottom?
Find the first place water crosses the enclosure. A sweep gap, an unsealed designated joint, blocked drainage or poor contact at the strike seal each needs its own repair. Sealing every visible seam can trap water and hide the source.
How this guide was checked
Keep the three evidence sources separate
| Material in this guide | What it establishes |
|---|---|
| Aurivedo’s Route A video and labeled frames | The visible sequence for one wall-jamb kit, including its late bottom-aluminum step |
| SDP08-22 installed-door photo and matching PDF | Visible parts on that installed door and this model’s documented assembly; the photo does not verify hidden anchors or waterproofing |
| Jimmy’s separate 48 × 70-inch field example | Bent closing-profile, crew-support and zone-by-zone water-test observations on a different job |
Aurivedo’s installation video and installed-door photo sit alongside the named manufacturer sources in this guide. The frames show one wall-jamb kit; the labeled photo shows the finished SDP08-22 kit. Jimmy’s example is a separate installation. The wide cover is an edited illustration. Ronni provided the technical review underlying this guide, as confirmed by the publisher. Cuts, holes, hardware and sealing details remain specific to the selected kit.
Sources to check
Use these with the exact product and room conditions behind your decision.
- SDP08-22 series installation instructionsSupplied PDF 22FXSD4870P08CBN-instruction.pdf, 34 pages. Pages 20–24 show the pivot and hanging sequence; pages 33–34 show perimeter sealant. Shared publicly with permission from the file provider. The PDF does not separately detail the lower anchor-hole seal.
- Sterling Pivot Shower Door installation instructionsFile 1487427-2-C; wall-jamb and threshold order, handed pivot, setting block, and two-person handling.
- Kohler Pivot Shower Door installation instructionsFile 1632998-2-B; fixed-panel example, glass safety, and warning against sealing joints beyond those pictured.
- Coastal Synthesis inline-panel pivot instructionsOne sill-and-header pivot layout; installation order is specific to that product.
- Delta Contemporary Pivot supportModel-specific bottom-track placement and installation reference.
- Delta EverEdge Pivot supportModel-specific outward-swing example.
- Aurivedo's Route A installation footageFirst-party video of a real wall-jamb door installation. At about 00:40 the installer levels the jamb and marks holes before drilling; at about 04:40 he measures and cuts this kit's bottom aluminum. Two labeled frames are used; the sequence is specific to that kit.
- Schluter shower waterproofing guidanceExplains that tile coverings are not inherently waterproof and that shower curb or pan-liner penetrations require special attention. It does not supply an SDP08-22 anchor-sealing method.
- Aurivedo's installed-door photographFirst-party real installation photo used to identify visible parts on the finished SDP08-22 example. Hidden anchors and waterproofing cannot be verified from this photograph.
- Documented Aurivedo pivot installationJimmy's separate 48 × 70-inch job: bent magnetic profile, crew support, and a completed zone-by-zone water test.