To install a sliding shower door, first confirm the finished opening, wall support, curb, delivery route, and exact door system. Follow the model's order for cutting metal parts, drilling, hanging panels, installing guides and stops, adjusting overlap, and sealing. Use two adults for tempered glass, respect cure time, then water-test one zone at a time.
Key points
Confirm the finished opening, structural support, delivery route, and exact door system before ordering or drilling.
Use two capable adults and glass-rated handling equipment; never cut, drill, grind, or repair a damaged edge on tempered glass.
Install and adjust only the parts identified for the model, including every guide, stop, anti-lift component, and drainage path.
Seal only the listed joints, allow the full cure time, then water-test one zone at a time and trace the first repeatable wet point.
Start with the finished opening and solid mounting support. Then set the frame or rail, hang the glass, fit the guides and safety parts, and finish with adjustment, sealant and a water test. Framed bypass, semi-frameless top-hung and exposed-roller doors share those jobs. Their parts and assembly order differ, much like two flat-pack cabinets that look alike until you lay out the hardware.
Have two capable adults ready whenever you lift, position or hang glass. Bring in an installer for custom heavy glass, damaged panels, unknown support or an opening outside the model’s limits.
A packaged kit can be a reasonable DIY job if homeowner installation is allowed and every check below passes. If it requires a professional, the support is unknown or the glass is damaged, stop the DIY plan there.
Check
DIY may be reasonable
Stop and use a professional
Product
The manufacturer permits homeowner installation and provides complete instructions
The warranty or manual requires a qualified installer
Fit
The finished opening is inside the model’s stated width and plumb-adjustment range
The glass, rail, overlap, or opening is outside the allowed range
Support
The required backing, studs, or approved anchors are verified
You do not know what the wall hardware will attach to
Glass
Panels are undamaged and two people can move them safely
An edge is chipped, a corner is damaged, or the panel cannot be controlled safely
Drilling
The bit, fastener, hole location, and concealed services have been confirmed
The wall finish may hide a pipe, wire, waterproofing detail, or unsupported void
System
You can identify every guide, stop, bumper, and anti-lift safety retainer
Hardware is missing, unlabeled, incompatible, or different from the manual
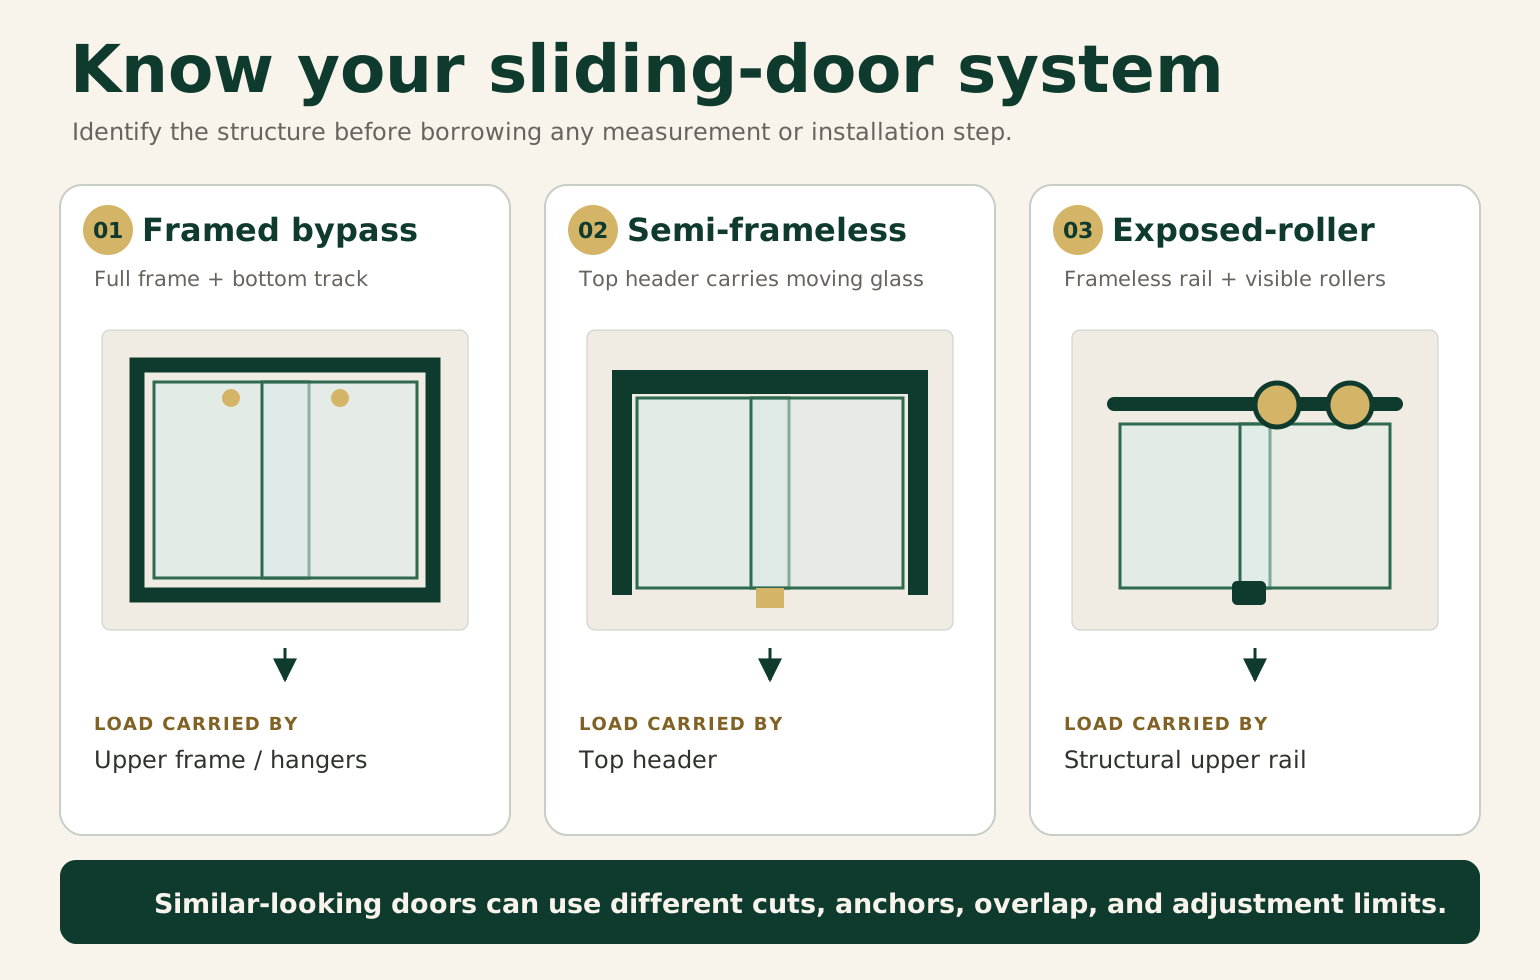
Identify which sliding shower door system you have
Look at what carries the moving glass. That tells you which route to take for the rail, panel installation and adjustment. A tutorial for a similar-looking door can still put the wrong parts in the wrong order.
System
How to recognize it
What carries the moving glass
Typical installation emphasis
Framed bypass
Two overlapping panels slide inside a full metal frame, usually with a bottom track
Upper frame and panel hangers or rollers
Square frame, correctly cut tracks, panel overlap, and drain direction
Semi-frameless top-hung
A header carries one or two moving panels; side profiles and a bottom guide control the opening
Large visible rollers travel along a round or rectangular upper rail; one panel is often fixed
Structural upper rail and roller assemblies
Verified backing, rail level, fixed-panel support, stops, and anti-lift hardware
Keep the selected model’s drawing and parts list with the hardware. Use its cut lengths, hole locations, fasteners, gaskets, panel order, overlap, adjustment limits, sealant joints and cure time. With those details beside you, the steps below tell you what to do and what a successful result looks like.
Sliding shower door installation steps at a glance
Use this as the job map. A kit that requires the moving panel before its fixed glass keeps that sequence; the numbered overview doesn’t reverse the kit’s assembly order.
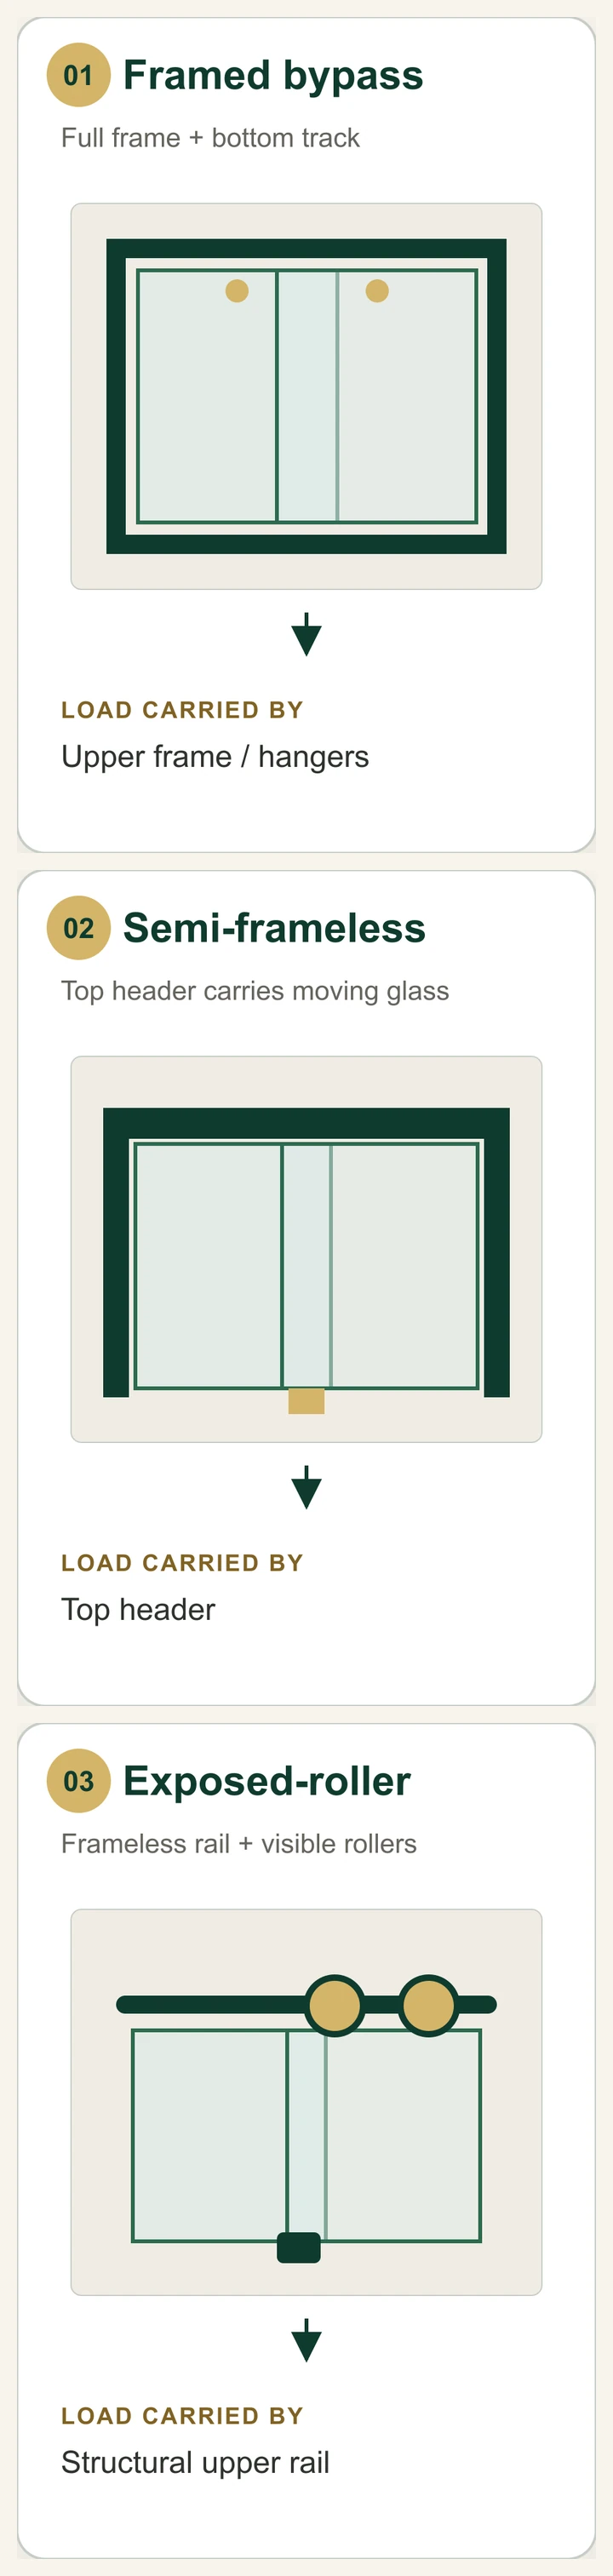
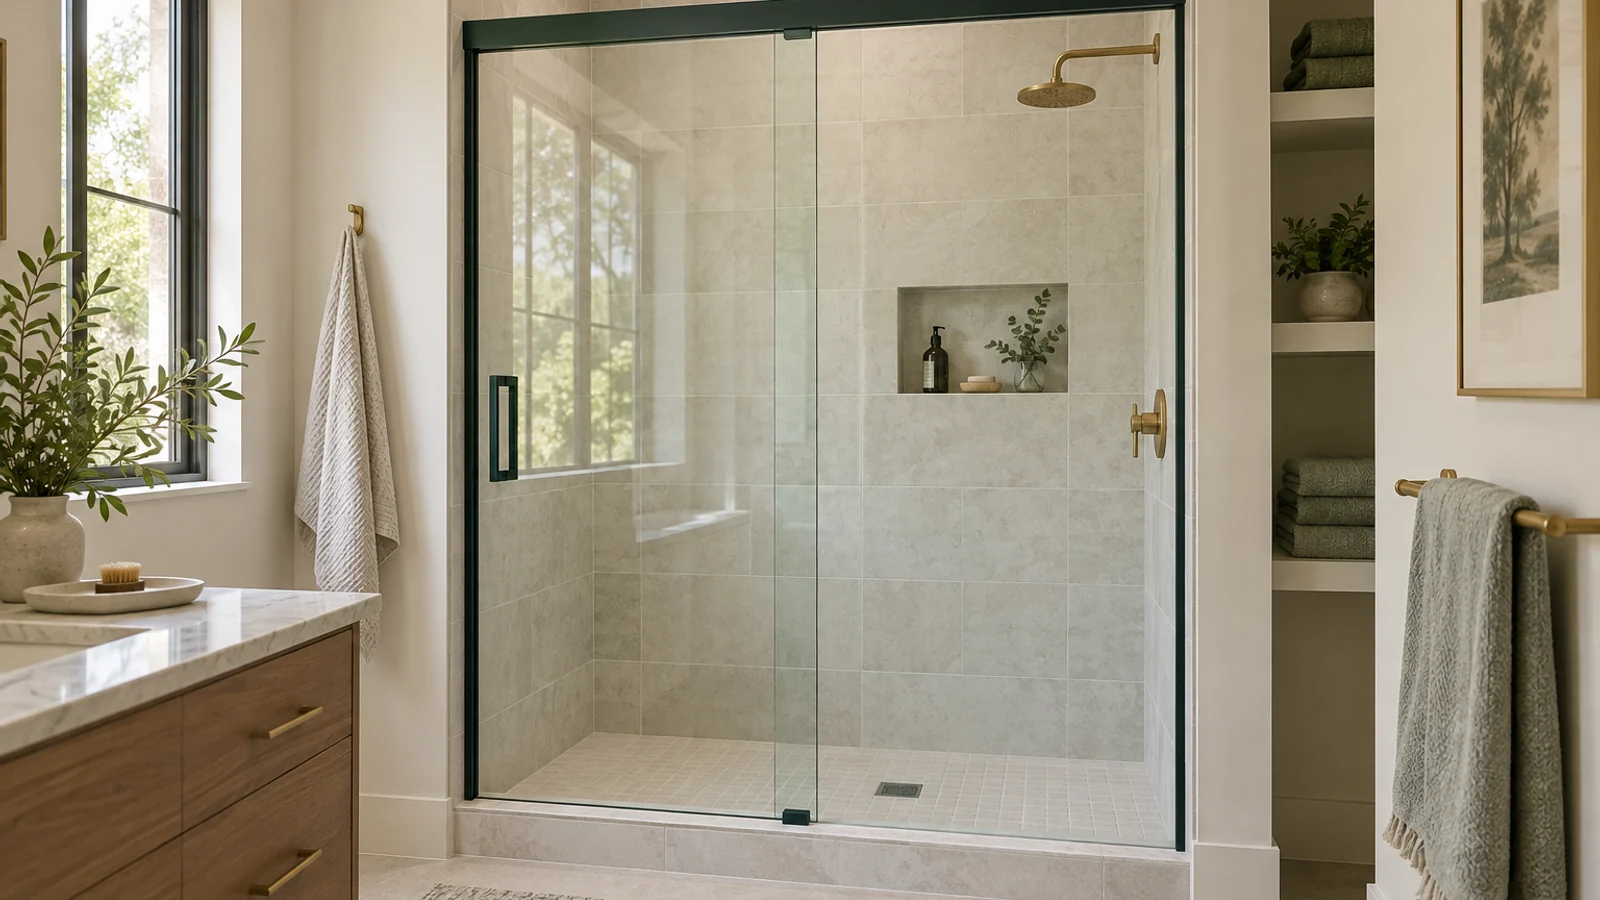
Identify the system first. Similar-looking doors can use different cuts, anchors, overlap, and adjustment limits.Illustrative finished installation. The exact header, guide, overlap, and seal details vary by model.
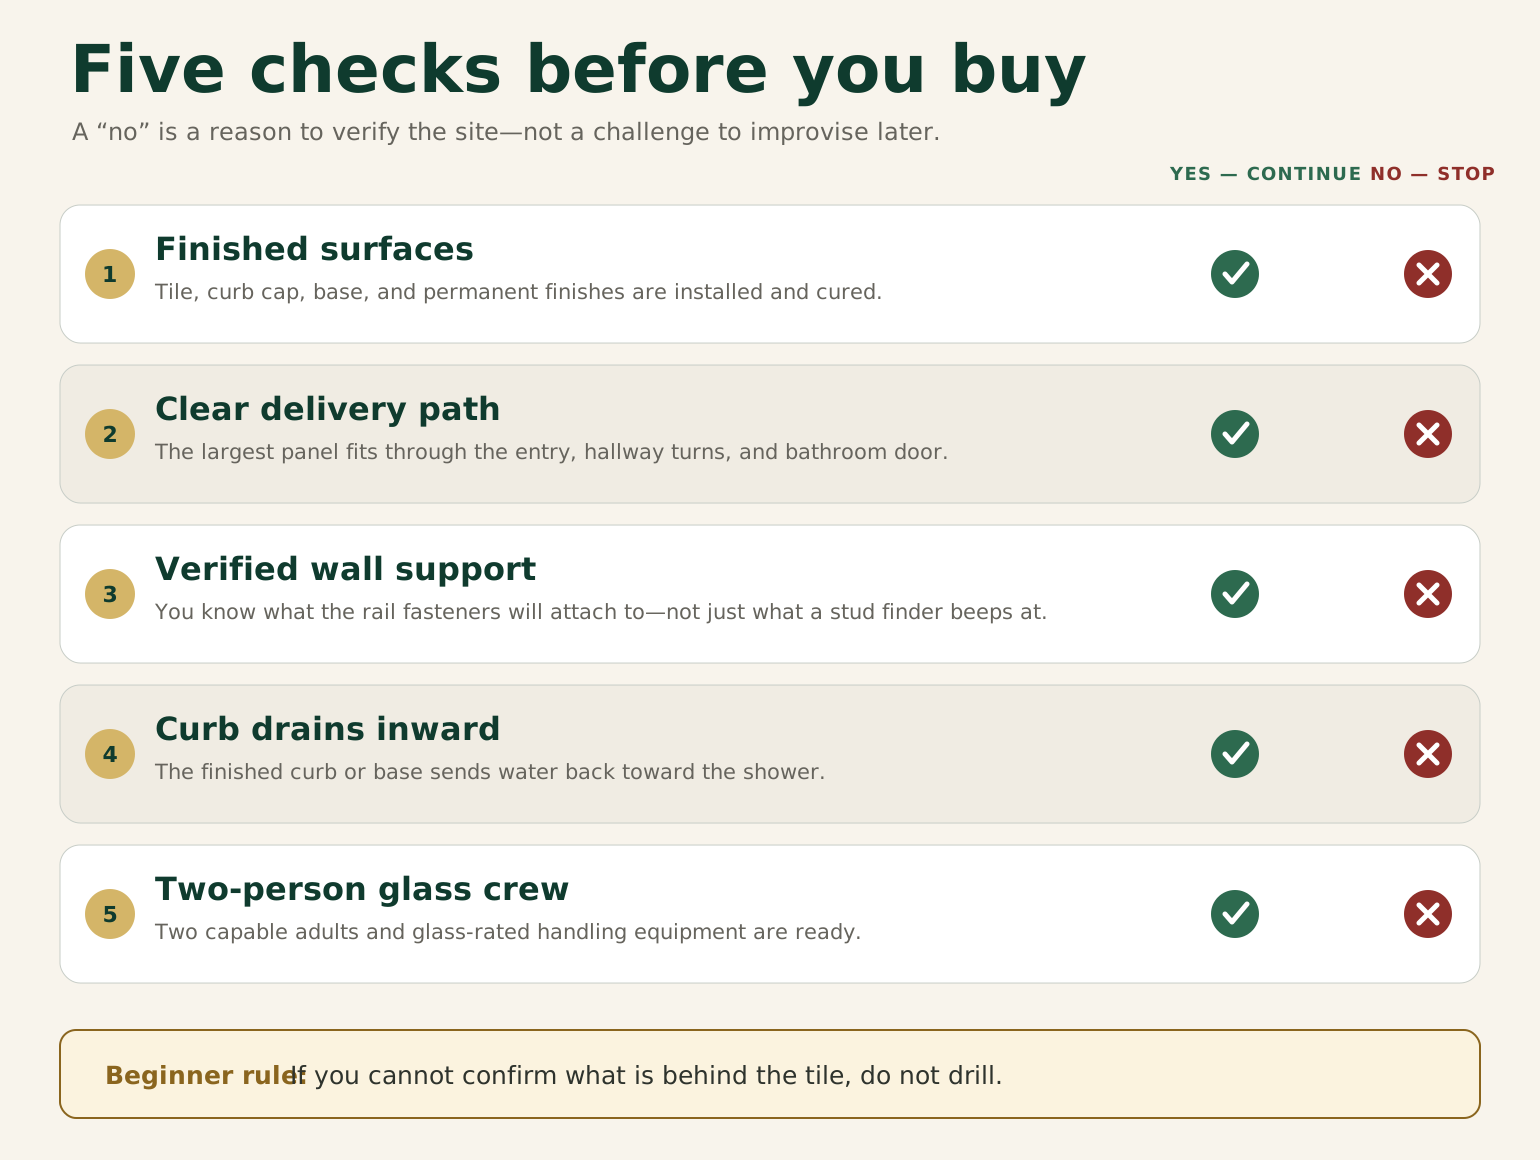
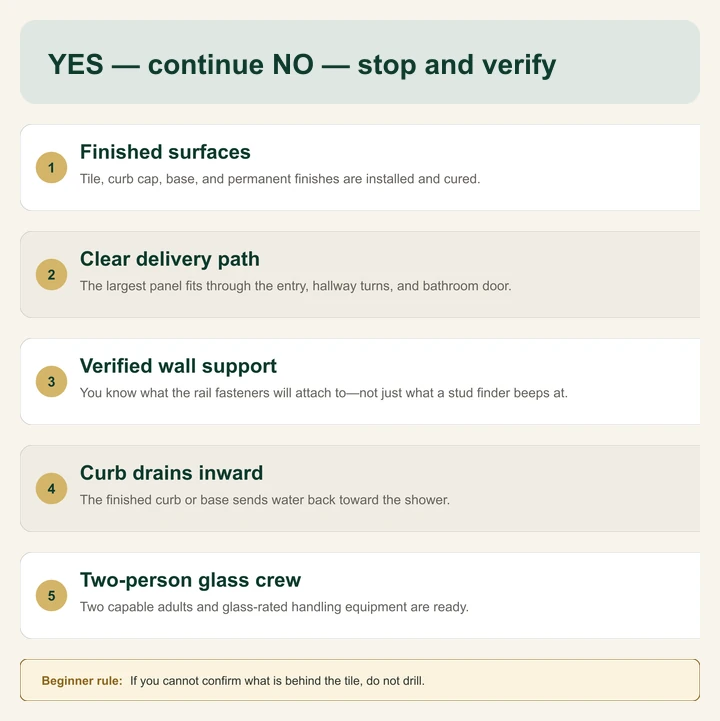
Run this pre-order check before buying the door
Measure between finished surfaces after the tile or acrylic walls, base, wall caps and curb cap are installed and stable. Let adhesive, mortar and grout cure first. Record widths at the top, middle and bottom, height on both sides, wall plumb and the usable flat curb or tub-ledge width. Keep the actual readings. Averaging three widths won’t make the narrow end wider or the wide end narrower. Each required reading has to pass the opening range and the separate adjustment limits.
Trace the route through the entry door, stairs, hallway turns and bathroom doorway. Think of carrying a sofa around a tight landing: clearing the first doorway doesn’t settle the last turn. Compare the clear widths and heights with the largest panel, its allowed carrying orientation and any packaging that must stay on. Plan a padded staging spot and a helper, too.
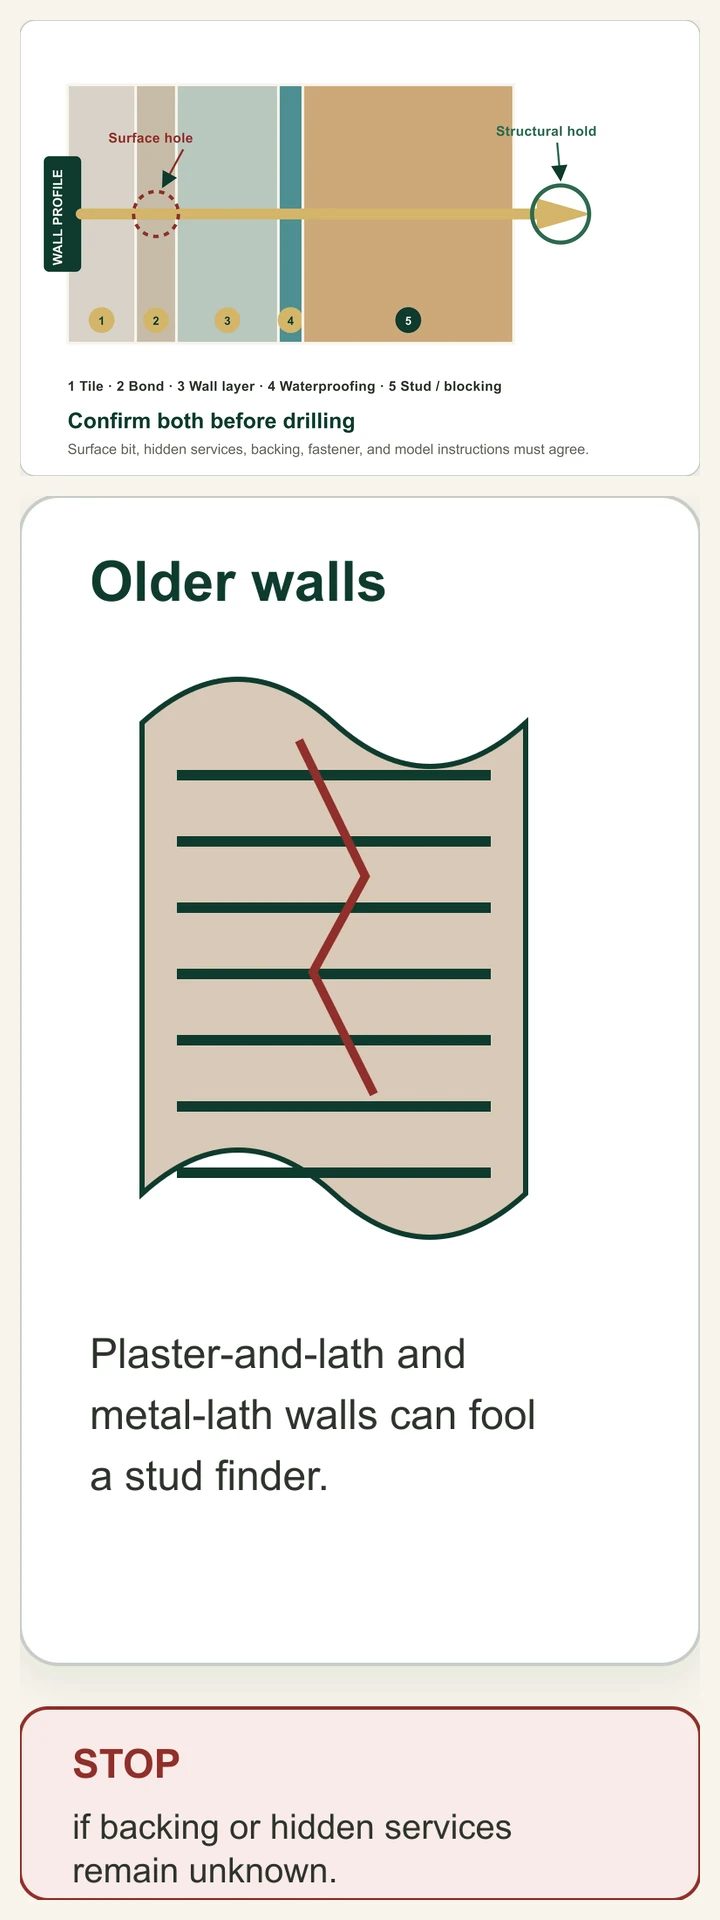
Locate support at each attachment height using construction plans, remodeling photos, suitable detection equipment or inspection from an accessible side. In older homes, double drywall, cement board, plaster and lath, and metal lath can confuse a stud finder. Cross-check the result. Tapping on tile gives you a clue, not proof of backing. Have an installer evaluate heavy glass with undocumented support before ordering it.
The curb or tub ledge needs to be stable, drain inward and provide enough flat surface for the track and guide. Check bonded marble, quartz or solid-surface caps where they meet the walls and receptor. Repair an outward slope, rocking cap or failed waterproofing joint before fitting the door. Confirm the closing side, showerhead position and usable entrance as part of that layout check.
One "no" means there is something to sort out before ordering.
The safety checkpoint before anything else
Tempered shower glass is strong across its face and vulnerable at its edges and corners. Never cut, drill, grind, sand, or try to polish a chipped edge on a tempered panel. Edge work belongs at the factory before tempering. If an edge, corner, hole, or notch is damaged, stop and arrange a replacement rather than attempting a repair. Keep factory corner protectors on until the manual tells you to remove them, set glass only on padded blocks, and keep metal tools and tile edges away from bare glass edges. Kohler’s current sliding-door instructions give the same core warnings: do not cut tempered glass, keep hard objects away from its edges, and leave corner protectors in place until installation.
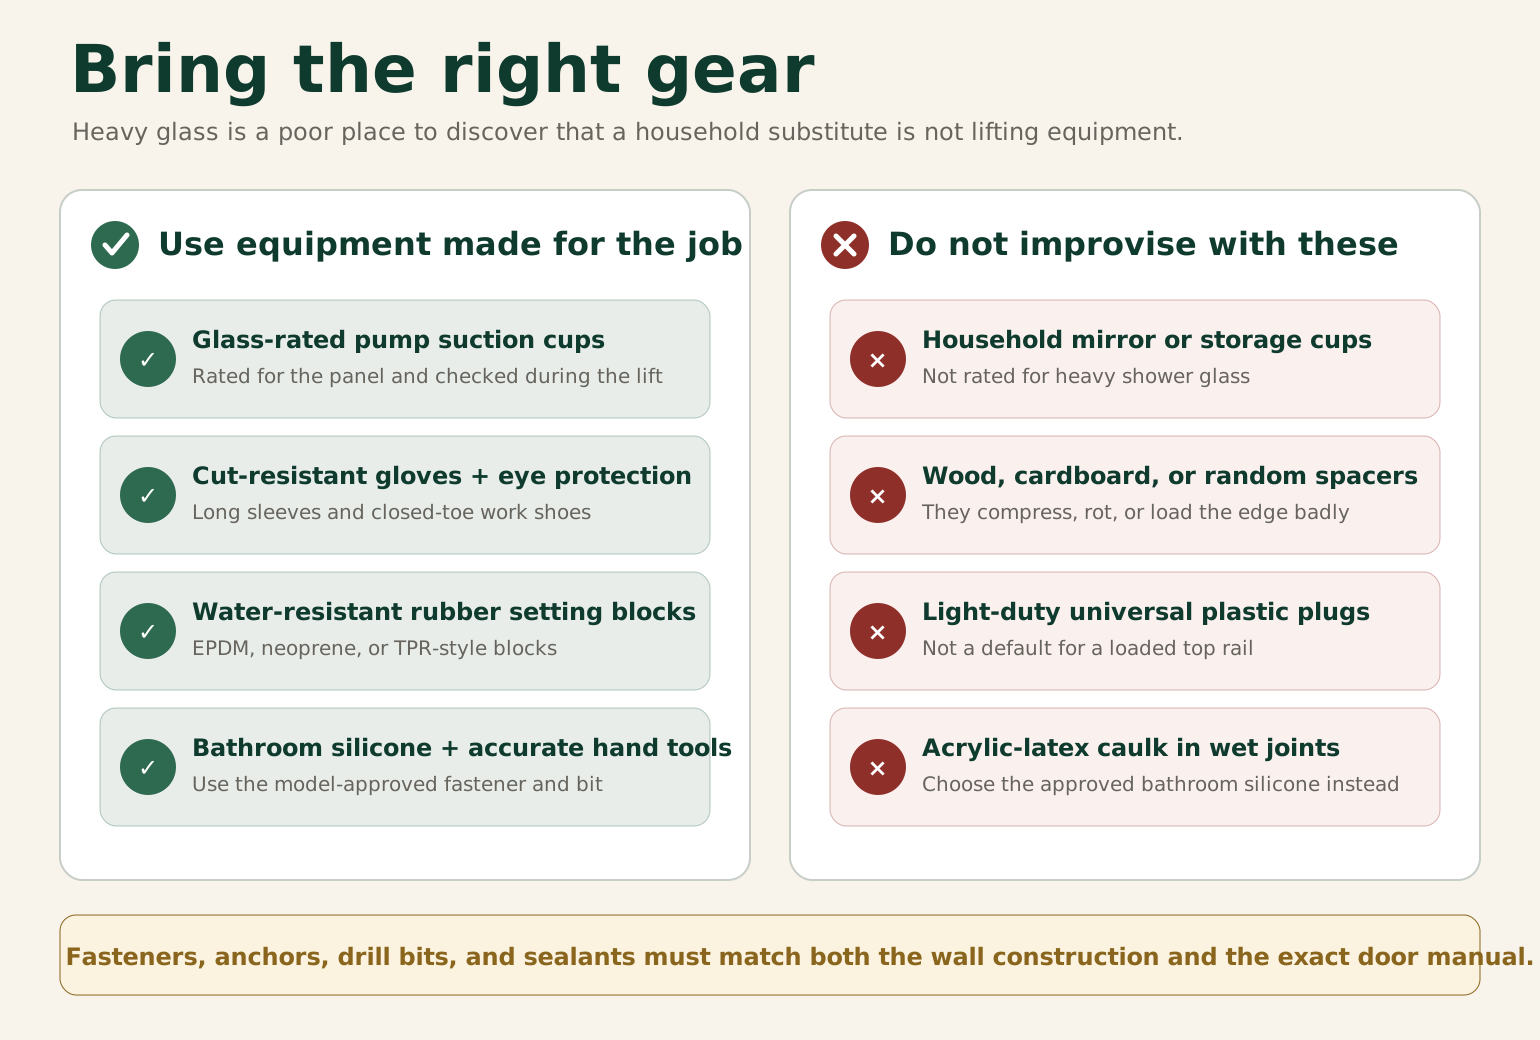
Use eye protection, cut-resistant gloves, long sleeves, closed-toe shoes, and glass-rated suction cups. Before attaching a cup, clean and dry both the glass and the rubber pad, inspect the pad for damage, and stay within the cup’s rated load and temperature range. Keep its vacuum indicator visible and check it throughout the lift; set the glass down immediately if the cup loses vacuum. Moisture, contamination, cold, and a damaged pad can reduce grip. These checks follow the operating limits in Wood’s Powr-Grip’s vacuum-cup instructions. Keep monitoring the cup throughout the lift; its grip needs to remain secure while you handle the panel.
Plan on two capable adults whenever a panel is lifted, positioned, or hung. Keep the glass supported throughout lifting, positioning and hanging.
Put the job on hold if you find a chipped edge, cracked glass, damaged roller hole, bent rail, missing safety part, or a component that does not match the parts list.
Gather the tools and stage the job
Stage these common tools and materials, together with any additional items required by your kit:
tape measure, pencil, and painter’s tape;
a reliable 4-foot level and a smaller level;
drill and only the bits approved for the wall material;
screwdrivers, hex keys, and wrenches that fit the supplied hardware;
a fine-tooth saw or other manufacturer-approved tool for cutting an adjustable metal track;
file and vacuum for deburring and cleaning a cut track;
shims or setting blocks (permanent load-bearing glass blocks) specified for the door, not scrap wood, cardboard, or a random tile spacer;
glass-rated suction cups;
manufacturer-approved, substrate-compatible, mildew-resistant 100% silicone bathroom sealant and a caulk gun; avoid ordinary acrylic latex caulk at wet shower-door joints unless the door manufacturer expressly approves it;
drop cloths, cardboard, or padded moving blankets;
eye protection, cut-resistant gloves, long sleeves, and closed-toe shoes.
Match fasteners, anchors and bits to the verified wall construction and the door's attachment requirements; use compatible sealant.
Clear the bathroom floor and protect the tub, curb, tile and fixtures. Set up a padded place for glass in its permitted resting orientation. Keep the labels attached and sort hardware into groups. Like getting the ingredients out before cooking, this is easier to do before your hands are occupied.
Match the laid-out parts to the model’s list: fixed and moving panels, inside and outside rollers, guides, left and right profiles, stops, retainers, seals, bumpers and fasteners. A left and right part can look almost identical until one refuses to seat. Keep each identified part with its matching step.
When replacing a seal or roller, start with the original part listed for that door. A third-party “universal” part may have a different profile, diameter, groove, or retention fit, so it can still work loose, bind, or leak.
Step 1: Inspect the glass, parts, and opening
Photograph the cartons before opening them, especially if they show punctures, crushed corners, or water damage. Unpack the glass on a protected surface and inspect the faces, edges, corners, holes, and notches under good light. A damaged panel must be replaced before installation.
Check rails and profiles for bends. Match fasteners, gaskets, rollers, guides, caps, stops, and seals to the illustrated parts list. If the package contains more than one fastener type, identify where each one belongs before drilling.
Recheck the finished opening and supports before fastening anything. A fit problem is easier to resolve while the glass is still safely staged.
Before moving on: Glass, metal parts and hardware are undamaged and complete, and the measured opening still fits.
Step 2: Confirm panel orientation and opening direction
Identify the fixed and moving panels, then their inside and outside faces. Match the handle, rollers, coatings, labels, seals and predrilled holes to that layout. Some treatments have a designated wet side, and some panels cannot be reversed.
Confirm the closing side and the panel arrangement relative to the showerhead. Use the selected model’s layout for those two decisions; there is no left-panel/right-panel rule that covers every system.
Lay the parts out in installation order. Check that the door’s final opening provides a practical entry and that the handle will not hit a wall, toilet, vanity, or towel bar.
Before moving on: The wet side, closing side and required panel order are identified, with a usable entrance and no handle collision.
Step 3: Establish level and plumb reference lines
Dry-fit the wall profiles, track or rail without fastening them. Establish the references with a level instead of tracing the wall or curb. Think of hanging a cabinet: copying a crooked neighboring line just gives you another crooked line. Locate each mark from the dimensions for the actual hardware.
For a framed bypass door, dry-fit the bottom track and side jambs as an assembly. For a top-hung or exposed-roller system, mark the rail centerline and support locations, then verify that the rail can be level across the opening while the glass maintains the required clearances.
An out-of-level rail can make a panel drift, close poorly or load one stop more heavily. Correct the rail alignment before hanging the glass.
Measure again after the dry fit. Painter’s tape over tile can make pencil marks easier to see, but every final hole center still needs to come from a measured reference.
Before moving on: The rail can sit level, the frame can stand plumb and every planned attachment reaches its required support.
For the wall readings, use the wall-plumb guide. Keep wall error separate from the level rail reference.
Step 4: Measure and cut the adjustable track or rail component
Cut only the metal part that the manual identifies as field-adjustable. Never cut tempered glass. Do not assume the track should equal the wall-to-wall measurement; many systems subtract space for jambs, caps, brackets, or expansion.
Measure twice, mark the waste side, and confirm the final dimension before cutting. Rechecking that mark is easier than replacing a rail cut too short. Support the metal so it cannot twist, make a square cut with the approved tool, then deburr and clean the cut end.
Use the cut formula and reference points for the specific component. A wall-to-wall reading may need deductions for jambs, caps or brackets; a formula from another door won’t establish those deductions.
Dry-fit the part after cutting. Confirm that caps, brackets, wall profiles, and fasteners still seat fully and that any weep holes (small drain openings that let water escape from the frame and must stay open) face the correct direction.
Before moving on: The cut part seats fully with its caps and brackets, and all factory holes, safety features and drainage openings remain intact.
Step 5: Mark and drill verified mounting points
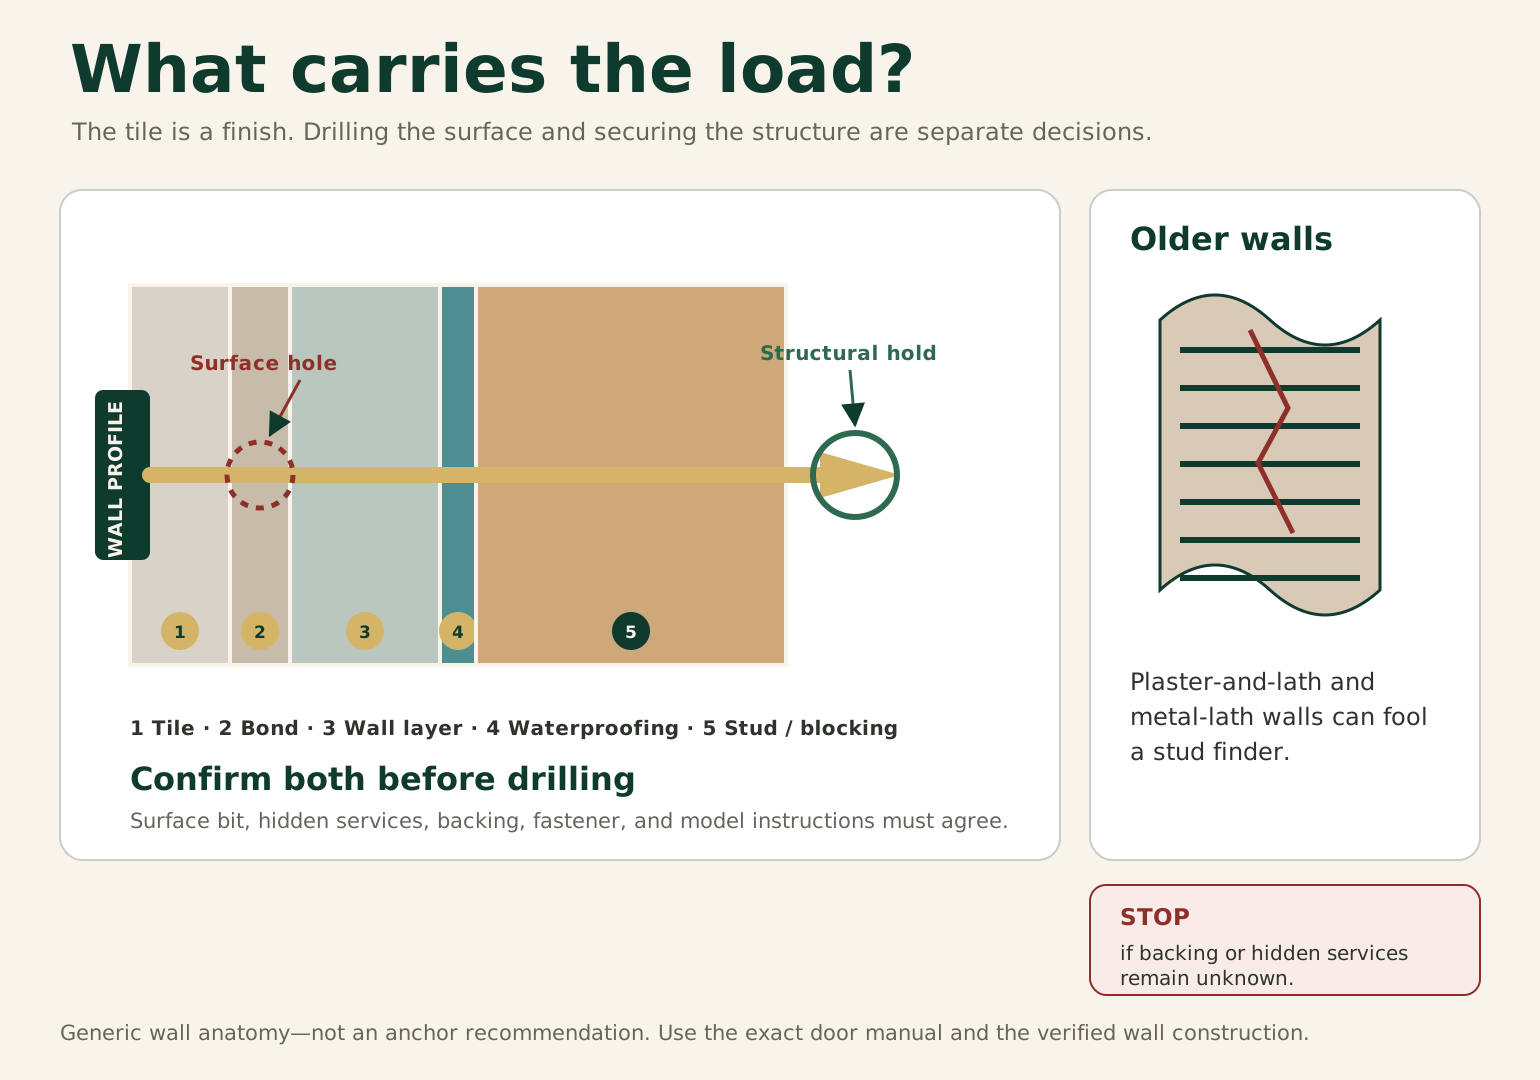
For every hole, identify the hardware position, finish and substrate, approved fastener, and concealed services behind the wall. Choose the bit after that check. It can make a hole in the tile; it cannot tell you whether suitable backing or a pipe sits behind it.
Generic wall anatomy, not an anchor recommendation. The tile is a finish; the verified backing carries the load.
The visible tile and the material behind it are separate drilling stages:
Common U.S. wall condition
Practical drilling rule
Structural warning
Ceramic or porcelain tile over wood framing
Use a bit and speed approved for the tile until the finish is penetrated, then use the bit required for the backing and fastener
The tile is a finish, not the load-bearing support; the fastener must reach the support required by the door
Tile over cement backer board (CBU)
Drill the tile with a tile-appropriate bit, then change to a carbide or masonry-type bit if the backer-board and fastener instructions call for it
CBU alone may not provide the structural backing required for a heavy rail or fixed-panel load point
Tile over concrete or masonry
Penetrate the tile without hammer action unless the tile and bit instructions expressly allow it; after the tile is cleared, use the concrete-drilling method allowed for the fastener and substrate
Confirm embedment, edge distance, and anchor type for that exact substrate
Tile over old plaster or lath
Expect brittle finish layers, hidden voids, and a higher chance of cracking or delamination
Do not treat a hollow-wall result as acceptable support for heavy frameless glass; use a professional unless the structural attachment is documented
Acrylic or fiberglass wall module
Drill and fasten only where the door and module instructions allow, using the required backing
Do not crush or deform the module while tightening the wall profile
Keep holes far enough from tile edges and glass edges to meet the product and substrate requirements. Start with the drill method recommended for the finish material. Do not use hammer mode unless the tile, bit manufacturer, and installation instructions permit it. Drill to the required depth without enlarging the hole through repeated wandering.
Keep each hole within the edge-distance requirements for the tile, substrate and hardware. If those requirements conflict, stop before drilling. Shift hardware only within its allowed adjustment positions.
Clean dust from each hole. If the waterproofing or manufacturer requires sealant in a penetration, apply the specified material and method before setting the fastener. The fastener provides the mechanical attachment. Sealant in a penetration does not replace structural support.
For structural rails and heavy frameless panels, fasteners must reach the required backing or substrate. A small ribbed plastic plug made for light wall fixtures is no substitute for a stud, blocking, or an engineered anchor rated for that substrate and load. An anchor labeled “for tile” may still be wrong for a moving glass door. Use the fastening detail shown for the door and the verified wall construction.
Prefabricated acrylic and fiberglass bases need their own check. Some doors call for a small pilot hole in an acrylic threshold and prohibit an anchor; others use a no-drill attachment. Drill only when both the door and base documents allow that location and method. Use low speed and no hammer mode. Conflicting drilling methods are a stop until a compatible written method is provided.
Before moving on: Each attachment uses the specified fastener in the verified substrate; stop for cracks, hidden services, moisture, voids or an incompatible curb penetration.
Step 6: Install the supporting frame, header, or structural rail
Install the supporting assembly for your system before continuing to its glass-installation sequence.
Framed bypass door
Set the bottom track in the orientation shown by the manual, usually with drain features facing the wet side. Install or dry-fit the wall jambs, bring them to plumb, and fasten them without distorting the profiles. Fit the top header only after the frame dimensions and panel overlap have been checked.
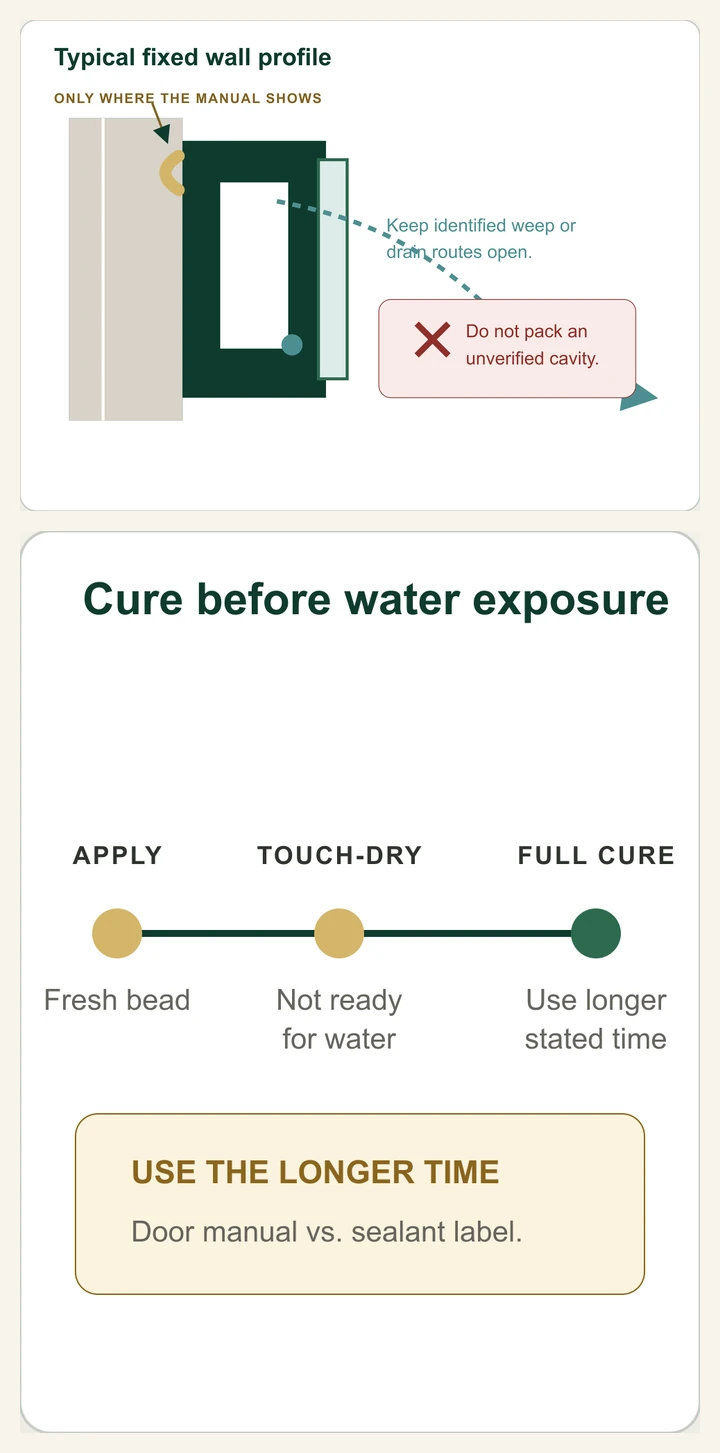
Do not fill every joint with sealant yet. Some framed tracks need open weep paths, and sealing the wrong side can trap water inside the frame.
Semi-frameless top-hung door
Install the wall profiles or brackets, then set the header level at the required height. Tighten fasteners gradually and recheck level as the assembly pulls against the walls. Confirm that the lower guide position still matches the glass path.
Frameless exposed-roller door
Install the structural rail brackets into verified support. Set the rail level, then tighten in stages while checking that the bracket faces remain aligned and the rail has not twisted. Install fixed-panel clamps, support bars, or bottom channels in the sequence shown by the manual.
The structural rail must attach to verified support. Stop here if that attachment cannot be established.
Before moving on: The supporting assembly stays level and secure as fasteners are tightened, without twisted profiles or moving brackets.
Step 7: Set the fixed panel and hang the moving glass
If your framed bypass door has two moving panels, use their inside/outside hanging order and skip the fixed-glass operation. A semi-frameless or exposed-roller kit with fixed glass needs its blocks, channel or clamps fitted at the kit’s required stage. The door’s frame style alone won’t tell you whether the fixed panel goes in first.
Use two people and glass-rated suction cups. Keep the panel vertical and prevent its edges from contacting tile, metal, the curb, or the floor. Remove corner protectors only when they interfere with the installation step and the manual directs you to do so.
For systems with a fixed panel, place the specified setting blocks or gaskets first. Set the panel into its channel, clamps, or brackets without forcing it. Check plumb and confirm the required gap at the wall, curb, and rail before tightening hardware.
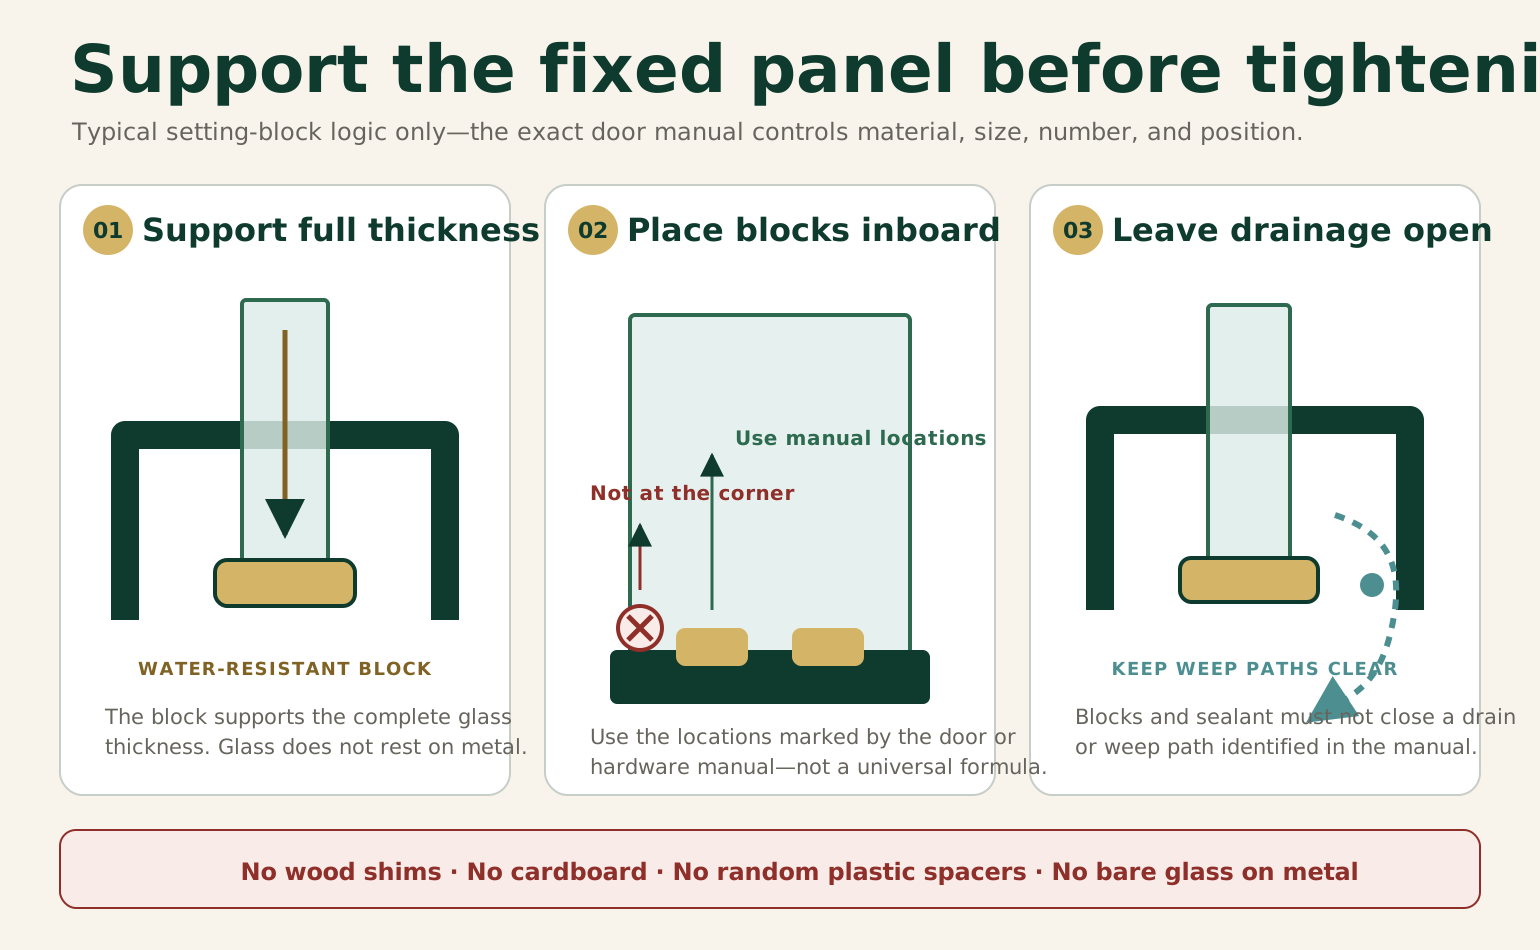
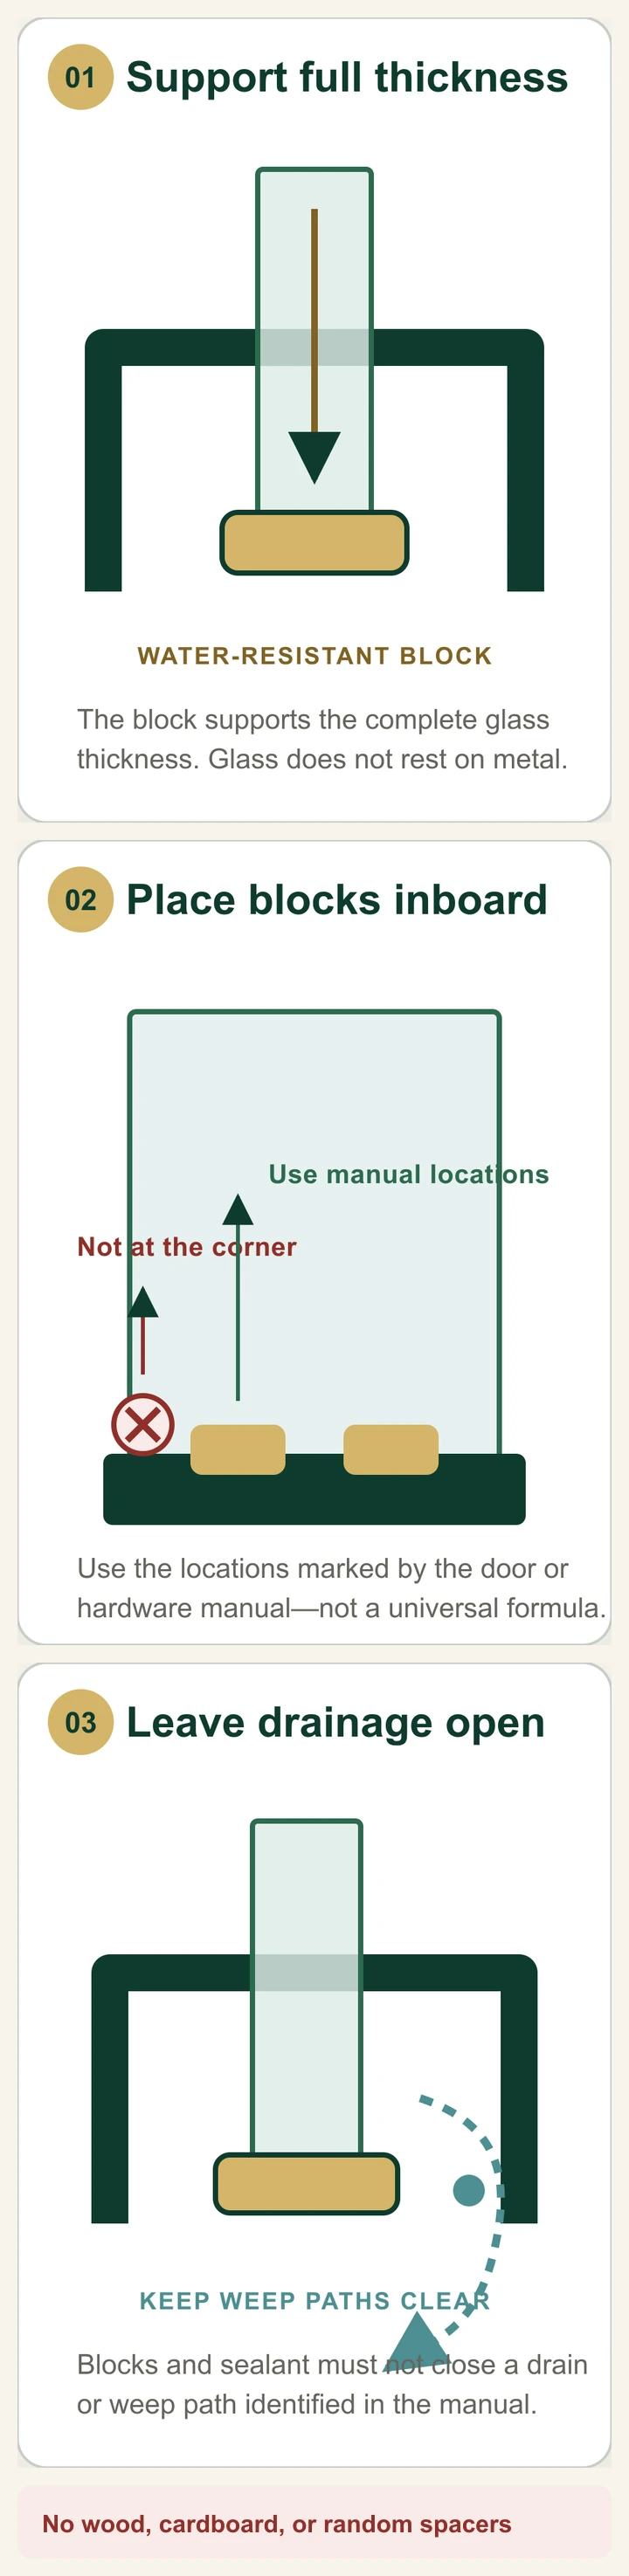
Permanent glass support uses approved water-resistant blocks in the specified material, size, number and positions.
A temporary tapered shim and a permanent glass setting block do different jobs. If the panel stays supported on blocks, use the supplied blocks or a manufacturer-approved, water-resistant rubber-based glazing material such as compatible neoprene, EPDM (a water-resistant synthetic rubber), silicone, or TPR. The block must support the full glass thickness without blocking drainage. Do not leave wood shims, cardboard, or improvised wedges under the glass, and do not let a thin generic plastic shim carry the entire permanent load unless the manual identifies it for that purpose.
Place blocks at the door system’s marked positions, inward from vulnerable glass corners and clear of holes, notches, clamps, and weep paths. NGA shower-installation guidance commonly positions temporary door-setting blocks a few inches in from each end. The enclosure’s specified block layout overrides the general quarter-point glazing rule.
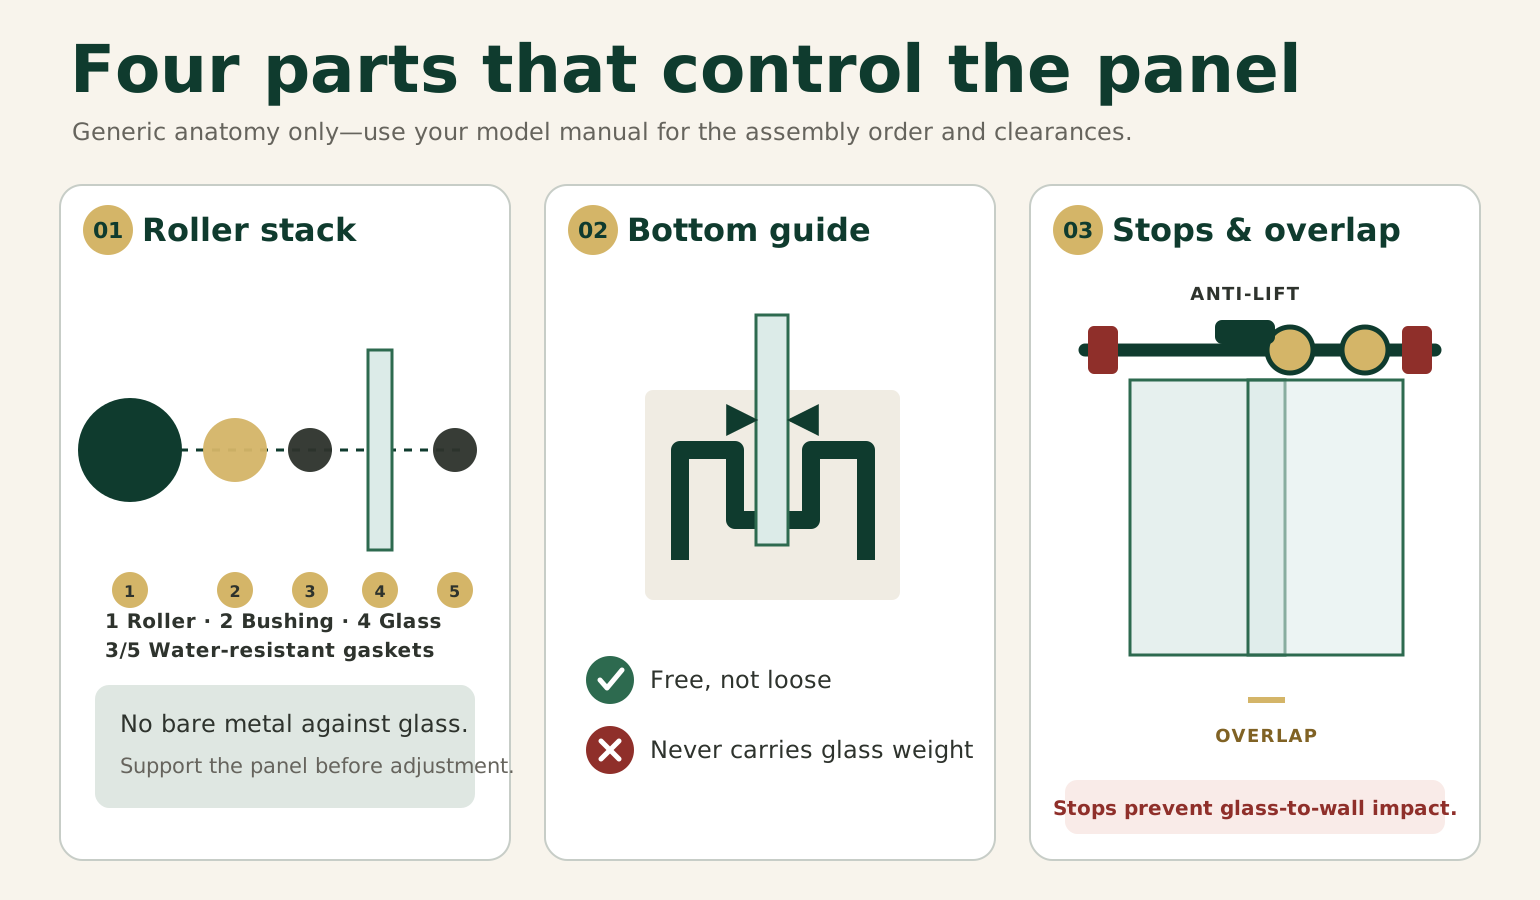
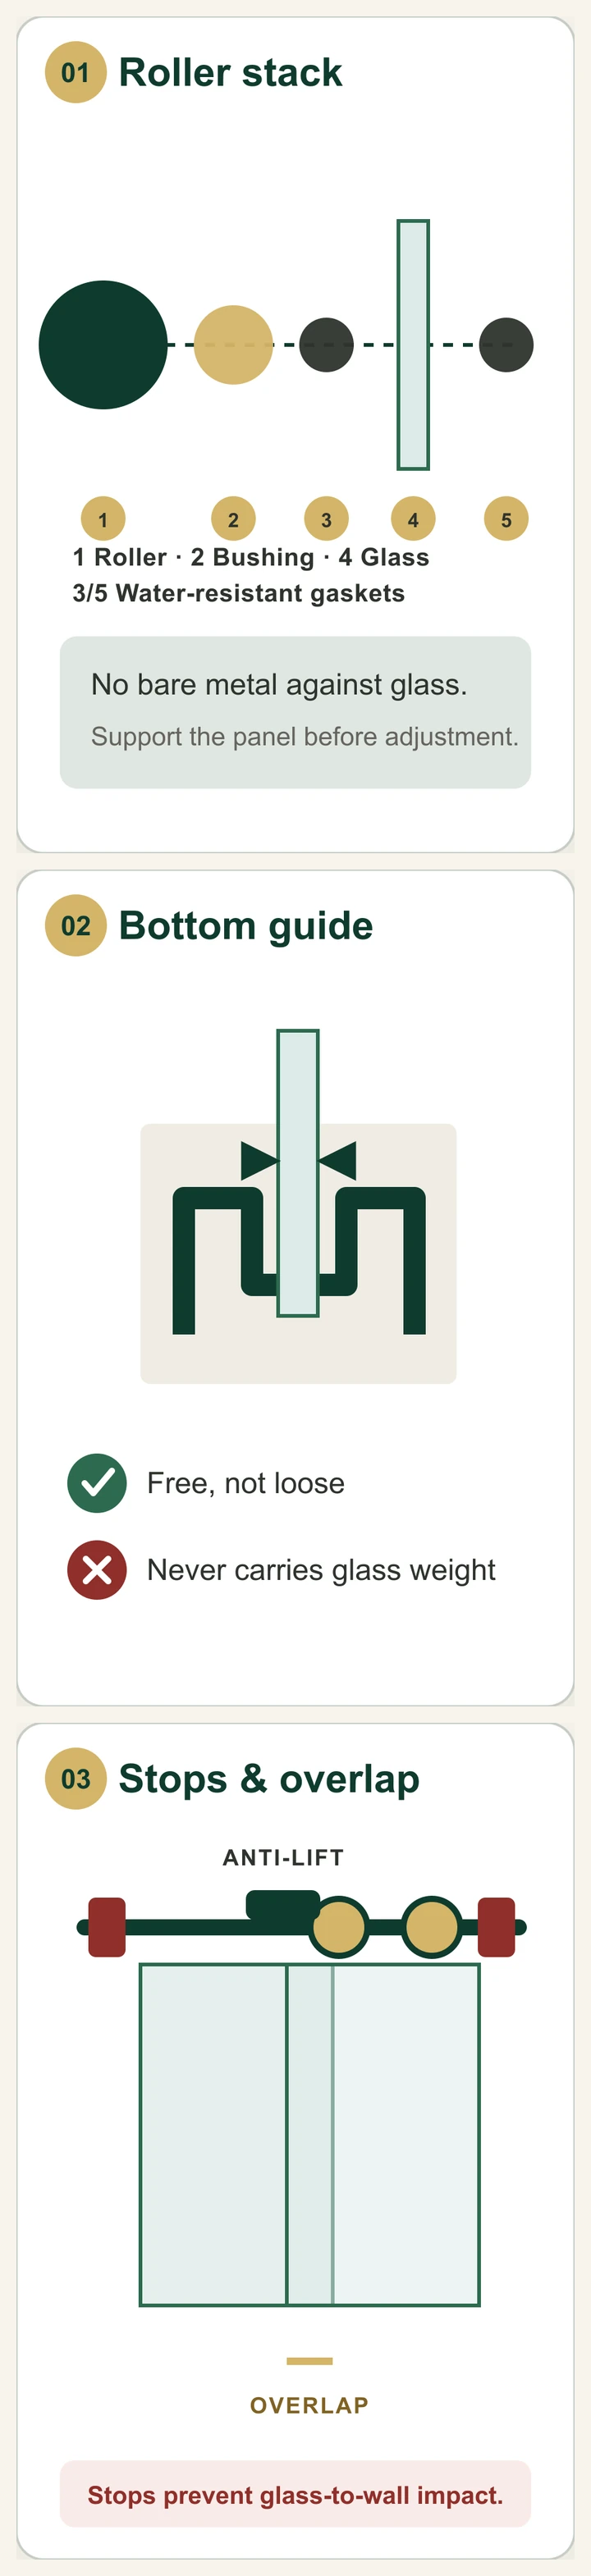
Prepare the moving panel on a padded surface. Install rollers, hangers, gaskets, and bushings in the order shown. Keep metal hardware from bearing directly against glass where a gasket or sleeve belongs. Use the specified torque or tightening method. Extra tightening can damage the glass or hardware.
Lift the moving panel onto the header or rail with a helper. Keep hands away from pinch points and support the panel until all required retainers are in place.
Before moving on: Each panel is seated, supported and retained, with no bare glass touching a hard surface. Do not release unsupported glass.
Step 8: Install guides, stops, anti-lift parts, seals, and handles
Generic anatomy. The actual hardware determines assembly order, gasket placement and clearances.
On a framed bypass door, check guide alignment against the bottom track and both panel paths. On a top-hung or exposed-roller system, align the lower guide with the glass path under the level header or rail.
Install the bottom guide so it controls the panel without pinching or scraping the glass. The guide must match the panel path established by the level rail above it. Position it from the established panel path rather than estimating by eye.
Set the travel stops at the marked locations. Check that the handle and glass edge cannot strike the wall, fixed panel, brackets, or frame at either end of travel. Install every anti-jump, anti-lift, or roller-retainer component before repeatedly cycling the door. A smooth slide does not prove that the panel is safely retained.
Anti-lift or anti-jump hardware keeps moving glass from lifting out of its track. Fit every required piece even if the door already slides smoothly.
Fit bumpers, vertical seals, overlap seals, sweeps, and handles in their correct orientation. Do not trim a seal until the door position and gap have been finalized.
Before moving on: Guides control the path, stops prevent collisions and every required anti-lift or retainer part is fitted before repeated cycling.
Step 9: Adjust panel height, overlap, gaps, and travel
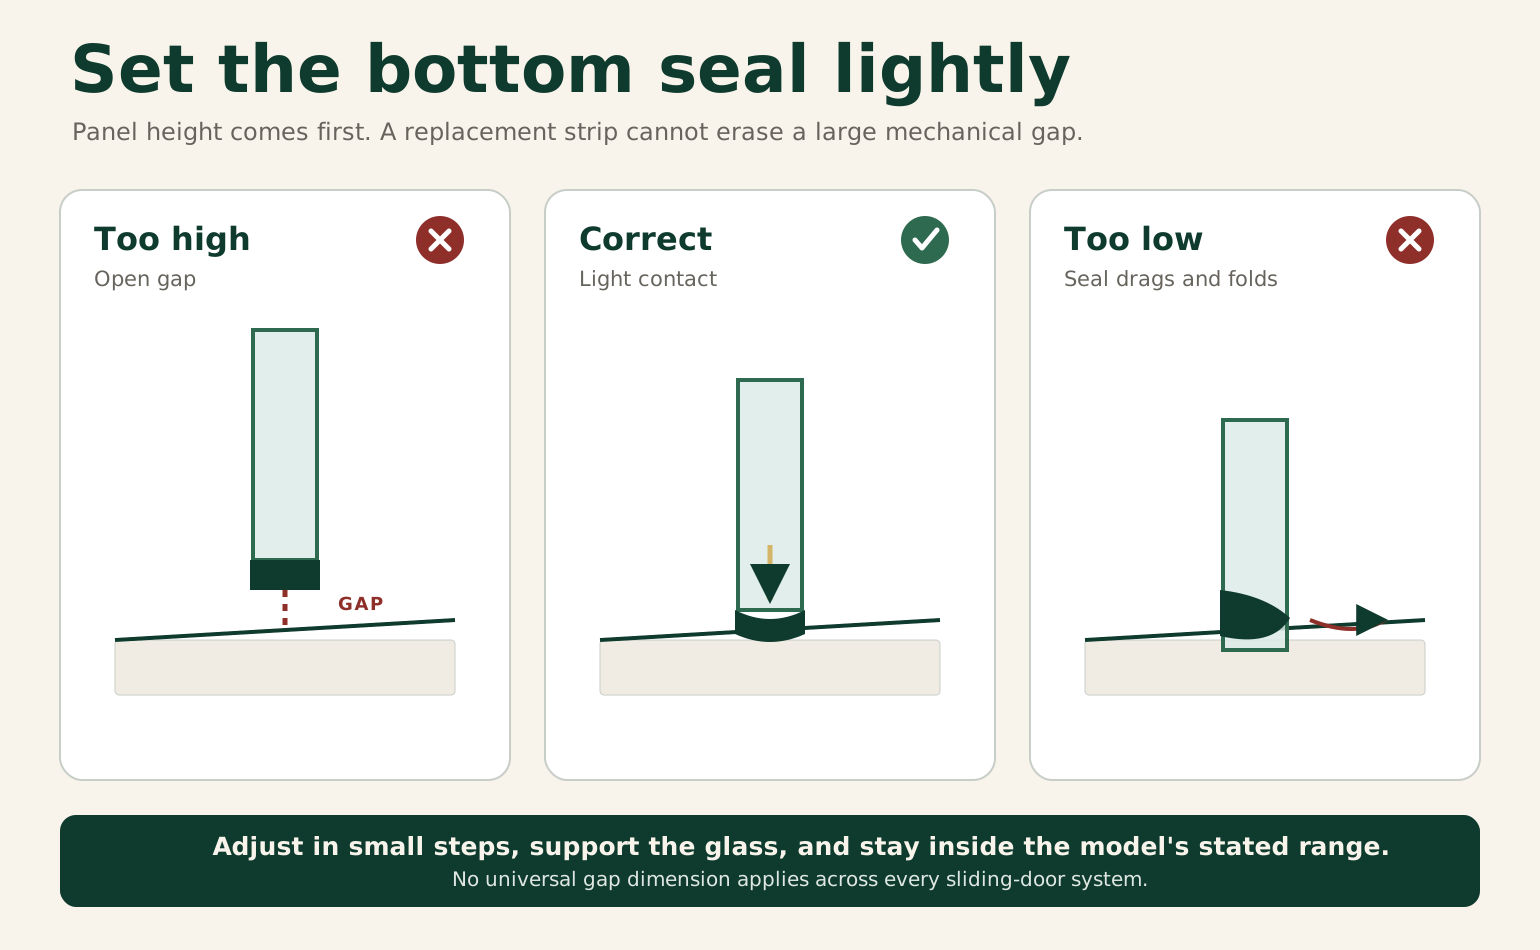
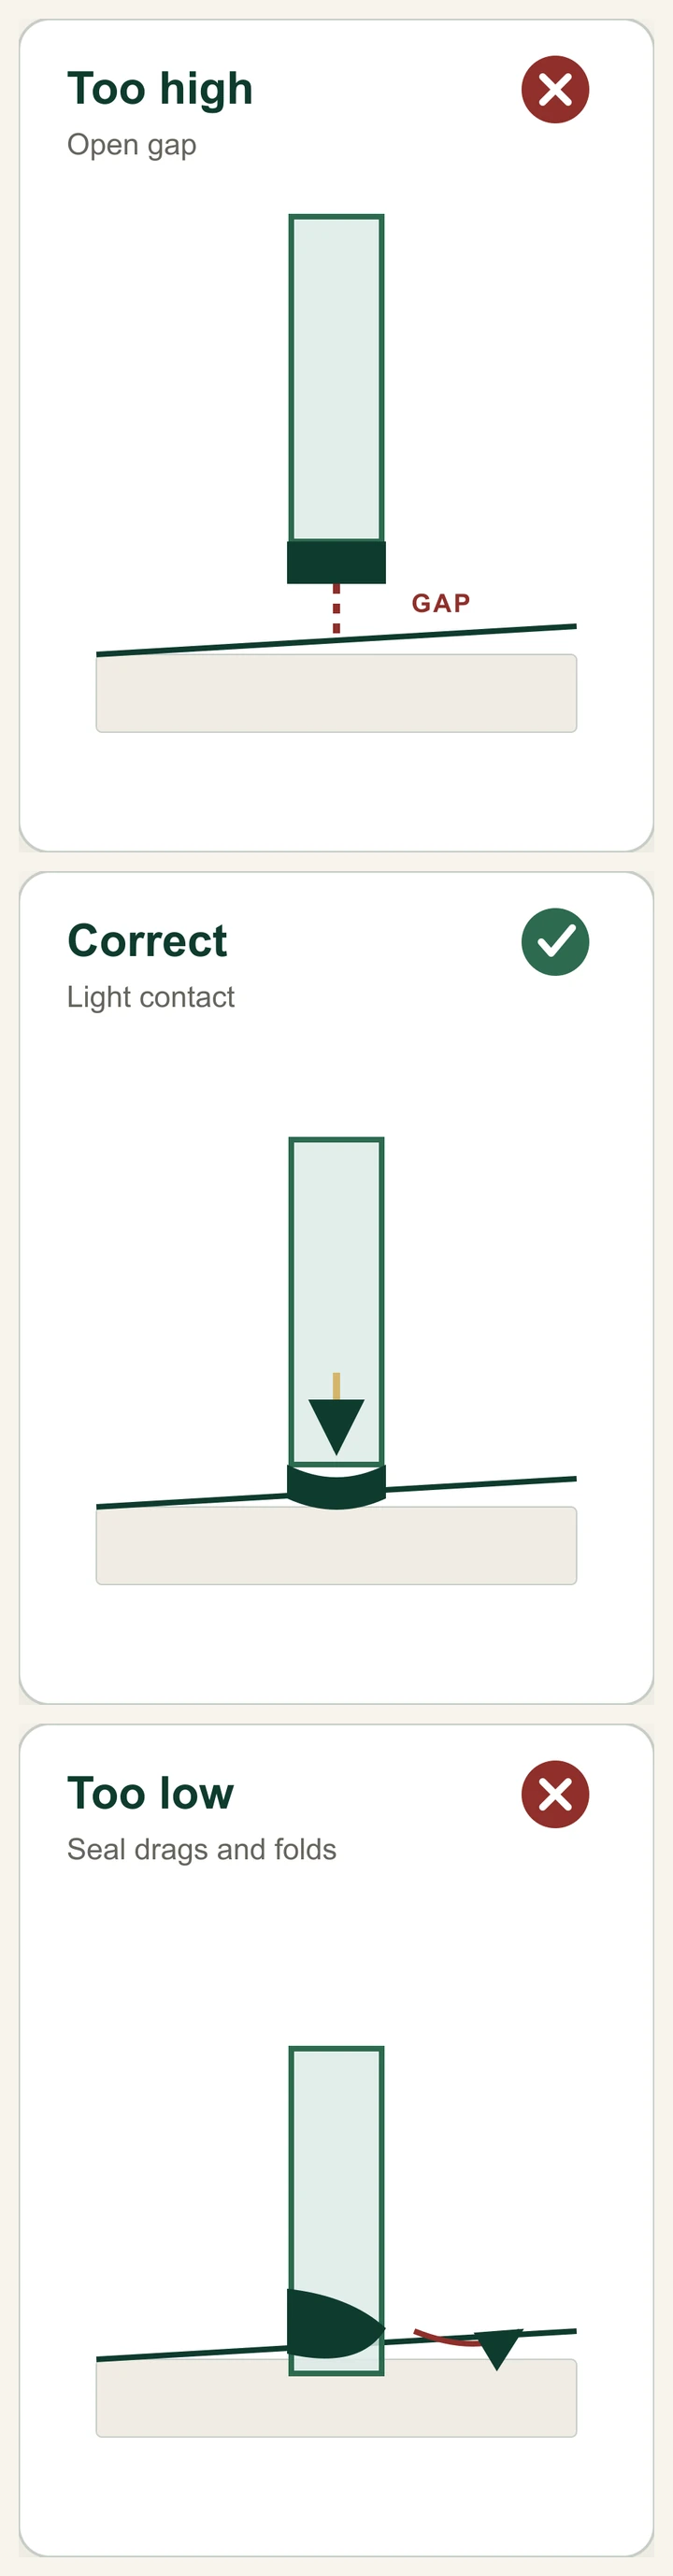
A bottom seal can manage its designed clearance; it cannot correct a panel outside the door's adjustment range.
Slide the door slowly through its full path. It should move without grinding, scraping, hopping, or drifting on its own. Check the closing edge, bottom clearance, panel overlap, and contact with bumpers or seals.
On framed bypass doors, check the hangers and clearances inside the frame. On top-hung doors, check the header against the lower-guide position. On exposed-roller doors, check roller seating, rail level, stops and anti-lift retention together. Stay within the adjustment the hardware provides.
Use only the model’s intended adjustment points. Depending on the system, those may include an eccentric cam (an offset adjustment cam used to raise or lower the moving panel), hanger screws, wall-profile slots, or guide positions. Make small changes, support the glass while adjusting load-bearing hardware, and tighten both sides evenly.
An eccentric cam has limited travel. Stay within the positions shown in the manual and stop at the stated limit or firm mechanical resistance. More force will not create more adjustment; it can damage the threads, clamp, or roller hardware.
Do not use roller adjustment to hide an opening that falls outside the product’s allowed range. Do not exceed slot limits or move a stop simply to gain more entry width. Those parts also keep the glass on its intended path.
A slotted bracket gives you limited movement. It won’t straighten a wall that leans beyond the door’s allowance. Compare the measured wall error with the adjustment range. A bracket at the end of its slot, a rail that twists while tightening, or a gap that keeps growing from top to bottom means the opening needs correction instead of more adjustment.
After adjustment, confirm that:
the rail remains level;
the fixed panel remains plumb;
the moving panel does not contact the curb, track, or fixed glass;
overlap matches the product requirement;
stops engage before glass or handles hit another surface;
anti-lift parts remain correctly spaced and secure;
all covers, caps, and retainers can be installed as designed.
The homeowner case below shows why a new bottom seal may still splash when the moving panel sits too high.
Before moving on: Travel is smooth, overlap and clearances meet the system limits, and the door does not drift. Recheck retention after adjustments.
Step 10: Seal the specified joints and respect the cure time
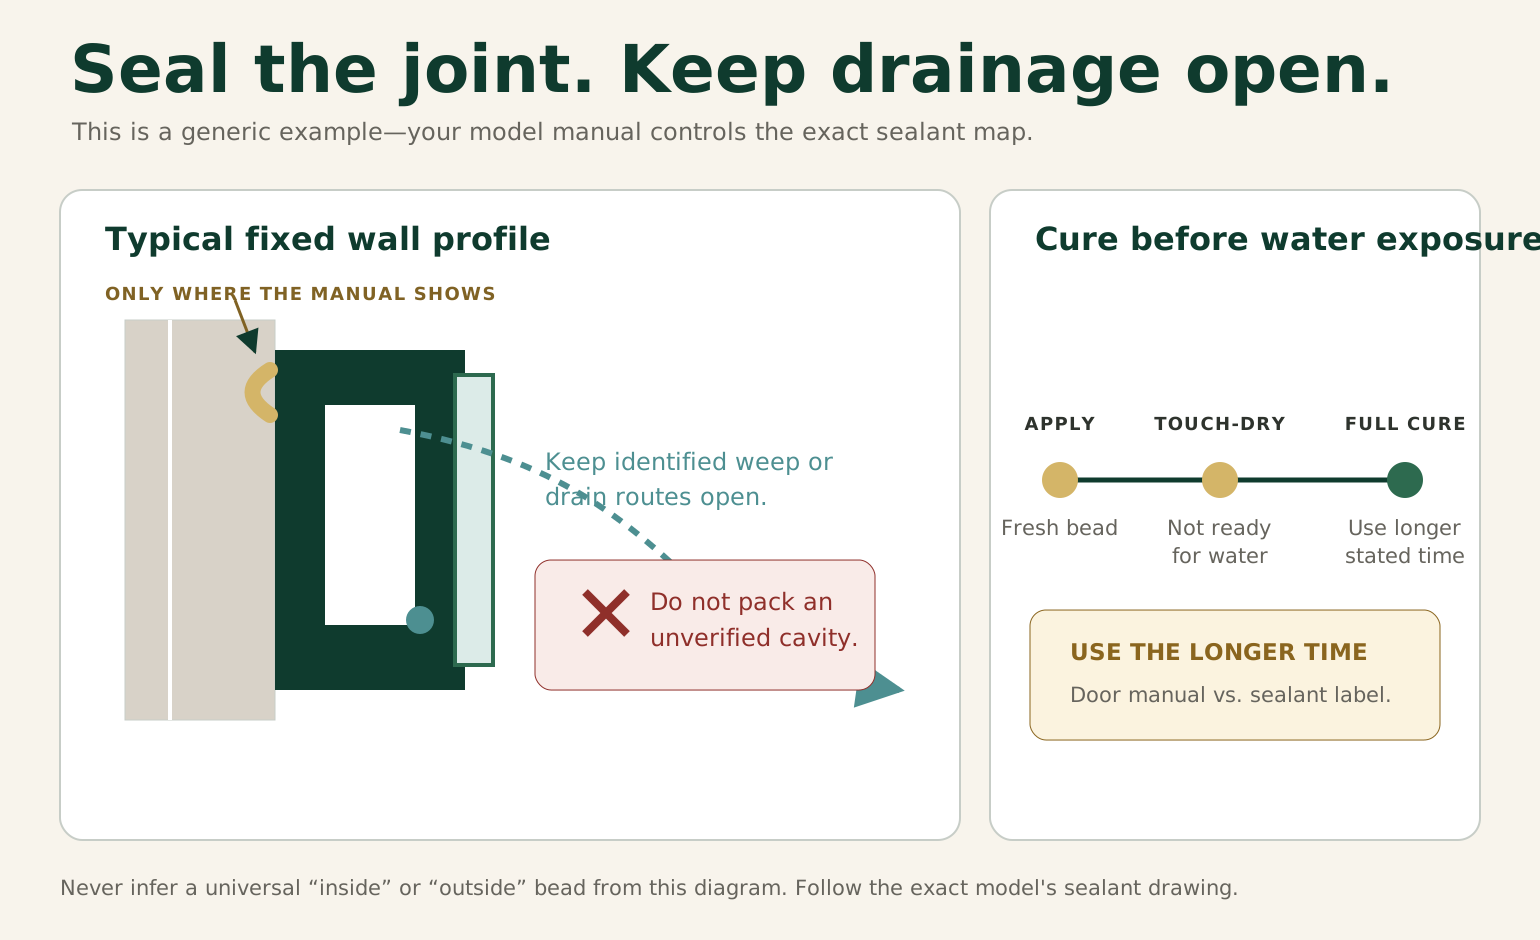
Use your door's sealant drawing, and keep every identified drain or weep opening clear.
Clean and dry the designated sealant joints, then apply a controlled bead only at those locations. Many systems are sealed on selected exterior seams so water can drain back into the shower; some use different details. The sealant steps in Kohler’s current sliding-door instructions are a useful example of why the marked joints matter. Sealing both sides by habit can block weep paths or trap water.
Before sealing the door, inspect the curb itself. A molded shower base has different joints from a marble, quartz, or solid-surface cap bonded on top of a curb. If a cap rocks, slopes outward, or has a cracked joint where it meets the wall, fix that shower-construction problem first. Door sealant can control water around the frame; it cannot rebuild a failed curb joint or waterproofing layer underneath.
Tool the bead without smearing silicone across moving parts, roller paths, guides, or drain openings. Remove masking tape before the sealant skins over.
Wait for the longer of the door manufacturer’s cure time and the sealant manufacturer’s water-exposure time. “Dry to the touch” does not mean ready for a shower. Keep the door still if the instructions require it.
Before moving on: Sealant is confined to the specified joints, drain paths remain open and the full required cure period has elapsed before water testing.
Final operation and water-test checklist
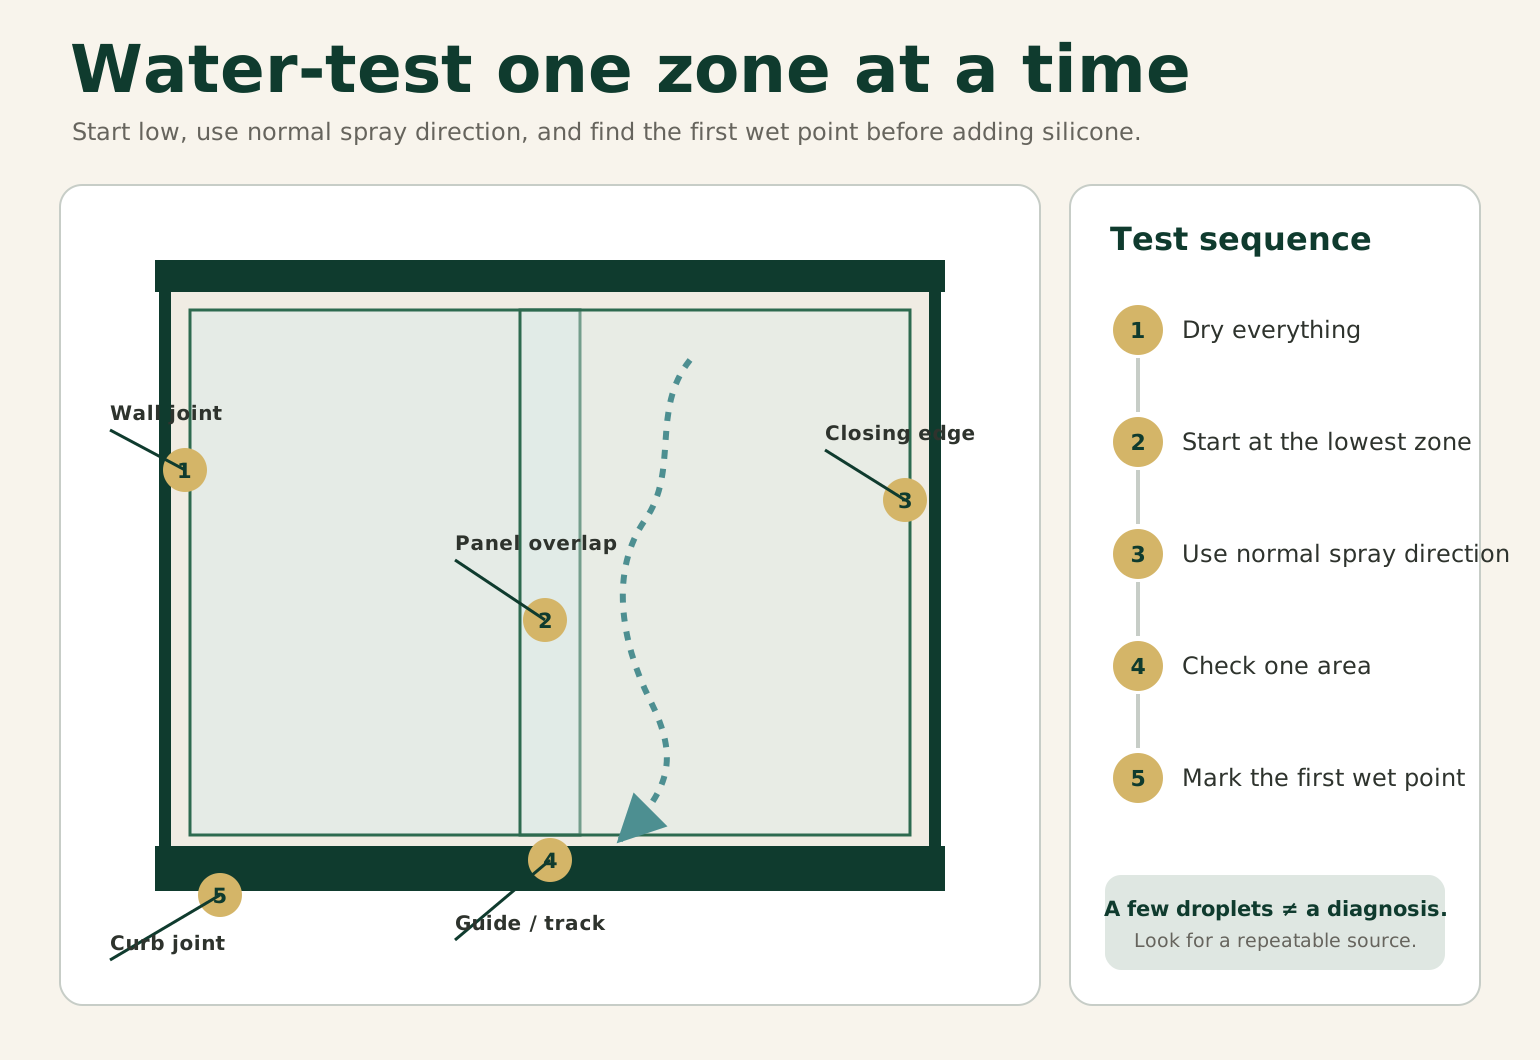
Start low, test one zone at a time, and mark the first repeatable wet point before adding silicone.
Complete the mechanical check before introducing water.
Cycle the door slowly at least five times.
Confirm smooth travel from fully open to fully closed.
Check that the panel does not drift when released at normal positions.
Confirm that stops, bumpers, guides, and anti-lift parts engage correctly.
Check that handles and glass edges clear walls, fixtures, and the fixed panel.
Recheck all accessible fasteners using the specified tightening method.
Confirm that seals remain seated and do not fold under the glass.
Verify that weep paths and drain openings remain clear.
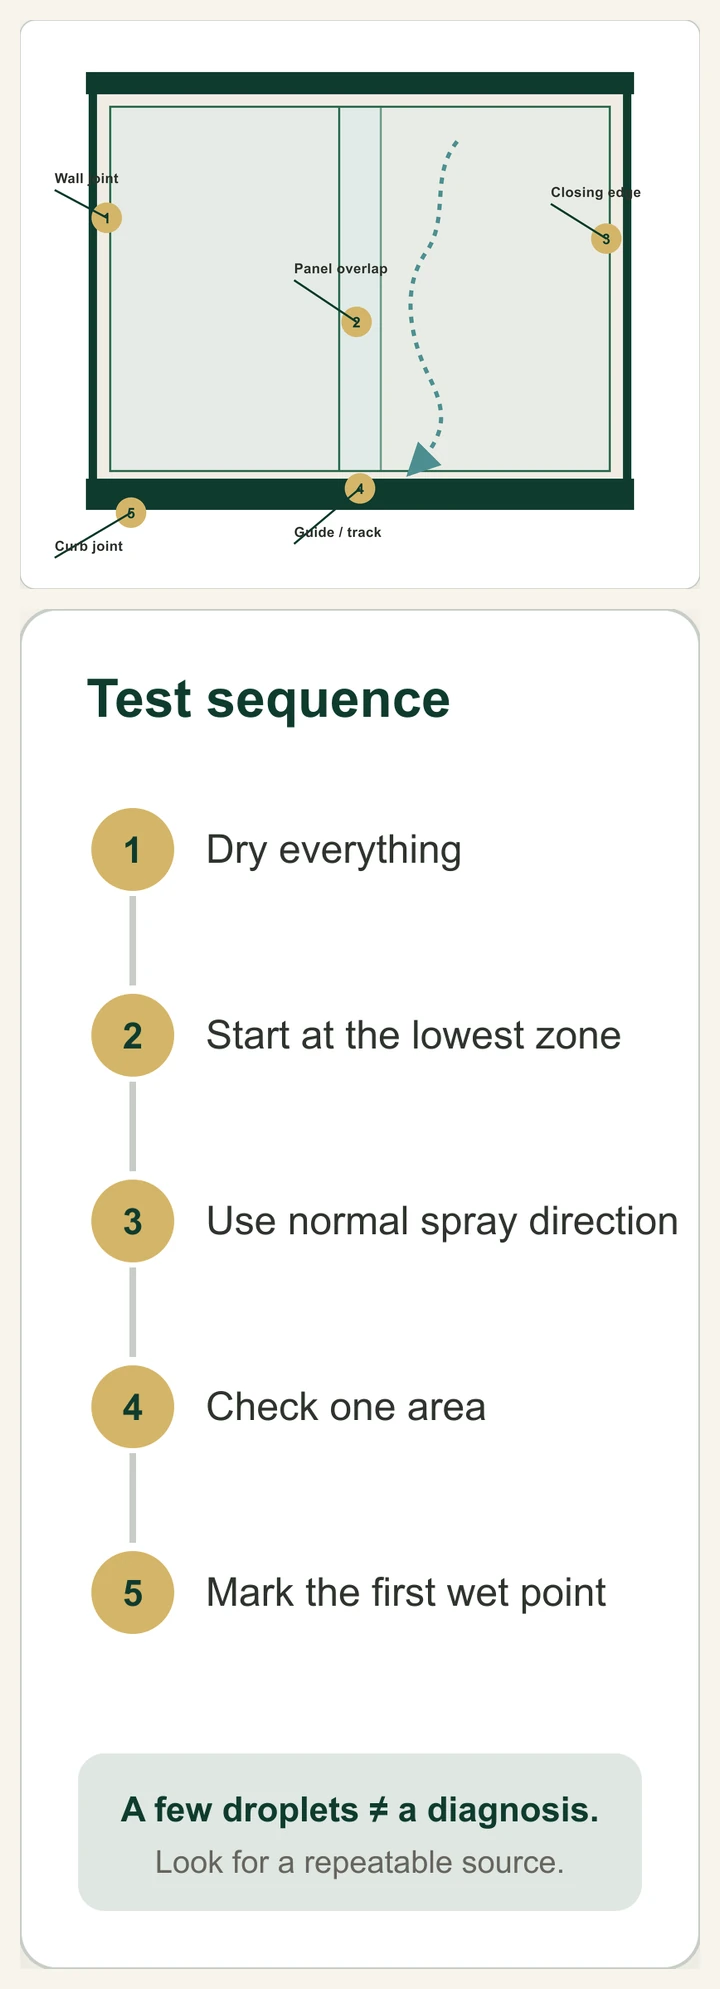
After the full cure period, test with controlled water rather than blasting every seam at once. Start low, keep spray directed as it would be during normal use, and check one zone at a time: fixed joints, wall profiles, the bottom guide or track, the panel overlap, and the closing edge.
Test with normal shower spray. Forcing water upward or directly into an overlap at close range can exceed what the enclosure is designed to contain.
A light mist or a few isolated splash droplets outside a frameless enclosure may be normal, depending on the layout and spray direction. A repeatable run of water, steady dripping from the same joint, or a growing puddle during normal use is a fault to investigate. Look for a repeatable source before choosing a repair.
If water appears, dry the area and identify its starting point before adding sealant. A leak can come from a reversed seal, insufficient overlap, a blocked weep path, an out-of-level rail, or a missing bead. More silicone will not fix the wrong cause.
Also look beyond the door. If water begins at the curb-to-wall joint, under a bonded curb cap, or where the curb meets the bathroom floor, the enclosure may be exposing a shower-construction leak rather than causing one.
Real-world case: New seals did not fix the splash-out
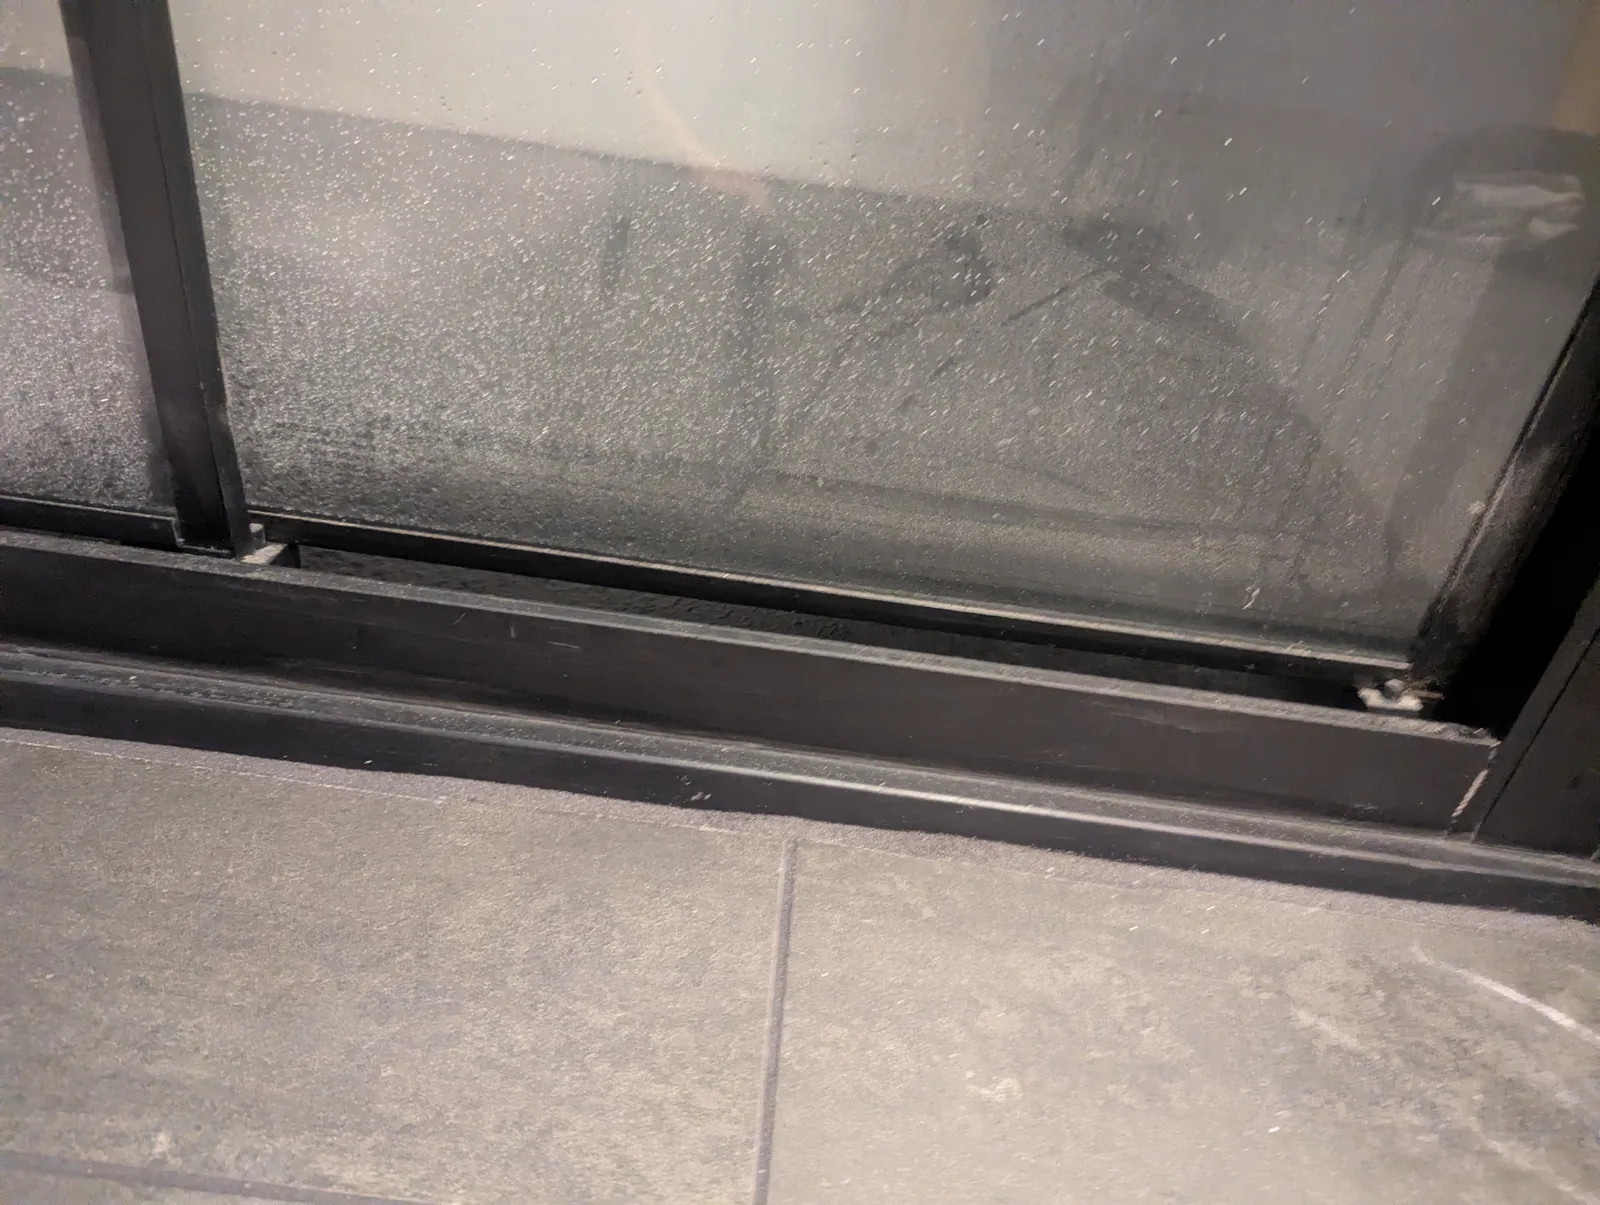
A homeowner shared a semi-frameless bypass-door problem with Aurivedo: the lower seal on the handle-side panel kept coming loose. A replacement strip looked seated correctly, but small wet spots still appeared on the floor after each shower.
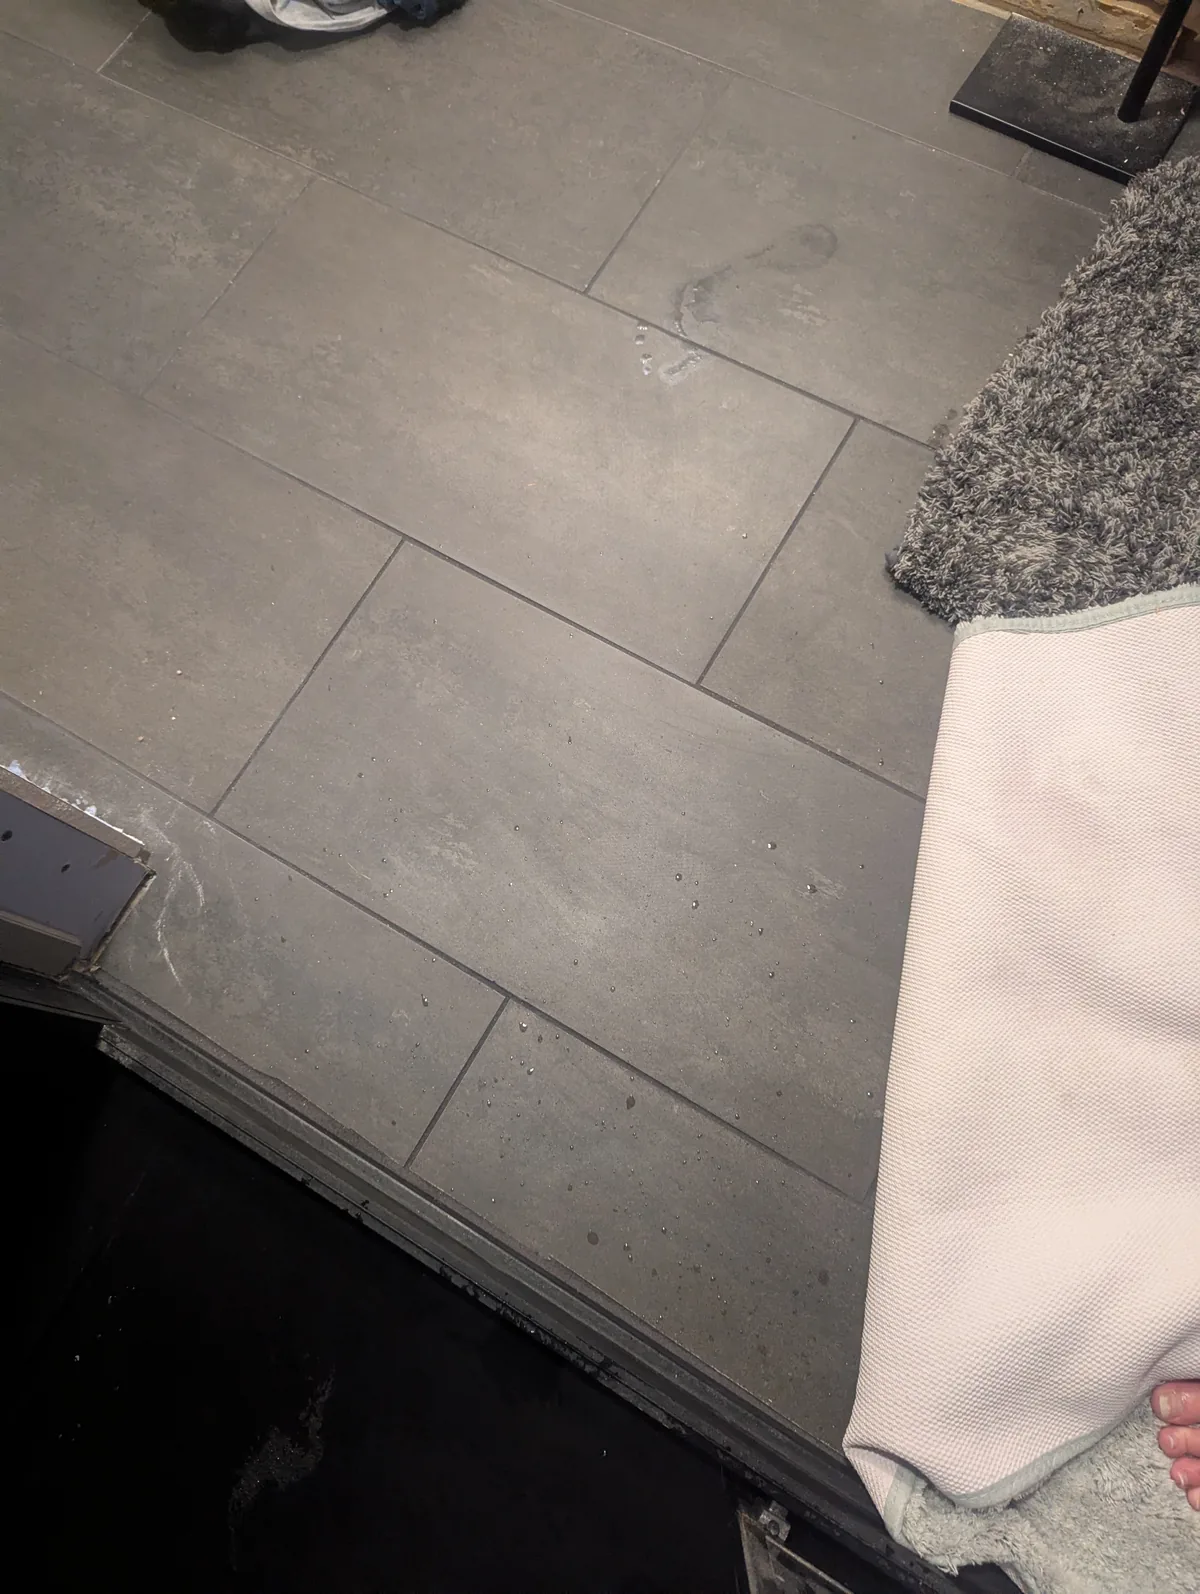
The scattered droplets were hard to spot without zooming in. There was no stream or growing puddle.
Figure 1. Faint splash marks repeatedly appeared on the floor tile outside the door. Zoom in to see them. The photo shows the symptom; the hardware adjustment, clearances, and seal condition locate the cause.
The seal was not the first thing to adjust
In this case, the homeowner traced the remaining splash-out to panel height. The eccentric top rollers had left the moving panel too high above the shower pan. A bottom seal works across its intended clearance. Like weatherstripping around an entry door, it can’t correct a door sitting in the wrong position.
The panel was lowered with small roller adjustments within the hardware’s intended range. For this door, the target was light contact between the seal and pan without scraping or dragging. After lowering the panel and reseating the seal, most of the under-door splashing stopped. That change supported the height diagnosis for this particular door.
Figure 2. Checking the clearance between the moving glass and the shower pan. The correct gap comes from the door instructions, not from measuring this photo.
Not every loose seal points to the rollers. The wrong seal profile, worn retention, reversed installation, an out-of-level rail, or a distorted pan can look similar. Check the door geometry before ordering another strip, and support the glass before adjusting load-bearing roller hardware.
The hollow header was a separate question
The homeowner had a separate question about mist entering the hollow top header: should the cavity be filled with silicone? No. Filling that unknown cavity was not an appropriate repair.
A hollow extrusion may contain cavities, joints and drainage routes. Seal only its designated joints and keep the identified drain openings clear. Filling an unknown cavity can obstruct drainage, trap moisture or redirect water.
If water actively runs from behind the header, a wall fastener moves, corrosion appears, or the manual does not show how the cavity is meant to drain, stop using the door and have the assembly inspected.
What this case teaches
A new seal cannot correct a moving panel that sits outside its intended height range.
Small, repeatable wet spots still have a source, even when they barely show in a photo.
Adjust eccentric rollers in small steps, support the glass, and stay inside the model’s stated limits.
Never fill a hollow frame or header cavity unless the product instructions tell you to.
Five common DIY mistakes to avoid
Blocking weep holes with tape or silicone. Mark drainage openings before sealing and keep them open through cleanup.
Cutting through a factory hole or safety feature. Confirm which end is waste and where the final cut lands before the saw touches the rail.
Installing a seal backward. Match the fin, bulb, or deflector direction to the manual and normal water flow.
Sealing every visible seam. Some interior joints and frame cavities must drain. Follow the sealant map instead of drawing a silicone outline around the entire door.
Removing all corner protectors during unpacking. Leave protection in place until a specific installation step requires access to that edge.
Common sliding shower door installation problems
Symptom
First check and next action
Door drifts
Check rail level first, then roller balance. Correct the alignment instead of using a stop to hold a drifting panel. Stop if the rail or support moves.
Panel scrapes the guide or curb
Find the contact point; check guide alignment, height and rail position. Never force glass against a hard surface.
Rollers grind, hop or feel rough
Stop cycling. Check seating, orientation, rail condition and debris. Correct the roller assembly; get technical help if it cannot be restored safely.
Glass or handle hits at the end
Check panel orientation, stop position and missing bumpers. Correct only within the allowed positions.
Soft-close no longer catches
On equipped doors, check visible position and latch indicators for looseness, mispositioning, failure to latch, wear or obstruction. Stop slamming the panel. An opened header or damaged assembly needs the manufacturer or installer.
New bottom seal still splashes
Check panel height, seal profile and direction, rail level and pan condition. Support the glass for listed roller adjustments; stop at their limit or if contact requires seal drag.
Seal keeps coming loose after height correction
Check the part number, cross-section, retention channel, direction, wear and contamination. Clean and reseat the specified part; replace a wrong or worn one rather than gluing on a universal strip.
Water escapes through overlap
Check overlap, missing or reversed seals and spray direction. Correct those causes before adding sealant.
Water collects in the track
Find blocked weep holes, a reversed track or a sealed drainage seam. Clear accessible drain paths; removal or reversal needs an installer.
Fixed glass moves
Stop using the door. Check clamps, channel, support bar and setting blocks with an installer; extra screw tightening is not the remedy.
Door binds after sealing
Check for silicone in the guide or track and an incorrectly trimmed or fitted seal. Remove only accessible excess; moving glass or load-bearing hardware needs an installer.
Correct roller adjustment still leaves drift or scraping
Recheck curb twist or level, wall plumb and opening distortion against the model limits. Correct the building condition; do not force more adjustment.
If the door previously worked but now drops, rubs, or shows an uneven closing gap, follow the sagging glass shower-door diagnostic guide before changing a load-bearing adjustment.
If a roller has come off its track, use the sliding shower-door reset steps to check the guide and anti-jump parts before rehanging the panel.
When to stop and call a professional
Stop the installation and use a qualified shower-door or glass installer when:
any glass edge, corner, hole, or notch is chipped or cracked;
the finished opening is outside the model’s width or plumb-adjustment range;
required wall backing, studs, anchors, or structural support cannot be verified;
the rail cannot be installed level at the required height;
a fastener location conflicts with plumbing, wiring, a tile edge, or a waterproofing detail;
the supplied glass, rail, or hardware does not match the manual or parts list;
the panel is too heavy or awkward for the available crew and equipment;
custom glass needs field decisions that are not documented by the fabricator;
a fixed panel moves, a roller will not seat, or an anti-lift part cannot be installed as designed;
adjustment would require exceeding a slot, loosening load-bearing hardware without support, or modifying tempered glass.
For custom heavy-glass enclosures, arrange an onsite evaluation before ordering, while the opening, support, access route, and glass specification can still be corrected.
Stopping before damage is part of a good installation. The expensive mistake is usually the one made after the job has already provided a clear warning.
Frequently asked questions
How long does it take to install a sliding shower door?
An experienced two-person crew may spend several hours on a packaged system. Wall repairs, tile drilling, track cuts and a more complicated kit can extend the job. Include sealant cure time in the schedule; putting the tools away doesn’t make the shower ready for water.
Can I install a sliding shower door by myself?
One person can stage light metal parts. Lifting, positioning and hanging tempered glass takes at least two capable adults unless the system specifies another handling method. The panels are heavy and slippery, and broken glass can cause injury.
Do you install the inside or outside sliding shower door first?
Use the hanging order for your exact system. Framed bypass, semi-frameless and exposed-roller doors assemble differently. Reversing the specified order can trap a panel or place its rollers and seals on the wrong side.
Should the bottom track be screwed into the shower curb?
Only if both the door’s attachment detail and the curb construction permit those fasteners. Some systems use a different bottom attachment. Establish the waterproofing detail, fastener and hole location before drilling the curb.
Where should silicone go on a sliding shower door?
Seal the joints designated for the door, often selected exterior seams around fixed frame parts. Keep weep holes, drainage routes, guides and moving tracks clear. Filling every visible seam can trap water.
Why does my sliding shower door move by itself?
Check the upper rail or header for level first, then check uneven roller adjustment. Either can cause drift. Correct the alignment; repositioning a safety stop doesn’t fix the cause.
Can I cut a sliding shower door track?
Yes, if that metal track or rail is identified for field cutting. Use its specific measurement and deduction. Never cut, drill, grind or modify tempered glass.
Can DIY installation affect the warranty or homeowners insurance?
Yes. DreamLine’s current warranty, for example, says work that departs from its installation requirements voids coverage. Homeowners insurance depends on the policy, cause of loss, and exclusions; the NAIC consumer guide explains where those terms appear. If coverage affects whether you proceed, obtain a written answer before installation. Keep the warranty, receipts, photos and installation records.
What should I keep for a warranty claim?
Keep the product manual, illustrated parts list, model and serial information, and proof of purchase. Photograph the completed door and its rollers, guides, retainers, stops, wall attachments and sealant joints. Manufacturers may request these records for a replacement part or warranty claim.
Before using the shower
Keep the manual, model number, spare parts, and installation photos together. Note the sealant used and the date it was applied. After the first few uses, check for loose handles, displaced seals, unusual roller noise, water at fixed joints, or movement in the fixed panel. Stop using the door if glass contacts metal or any structural part moves.
For routine care, clean the track and guides without abrasive tools, keep drain paths open, and use products approved for the glass coating and hardware finish. A five-minute check now is easier than learning why one roller has been complaining for three months.
For a pivot or side-hinged system, use the frameless installation guide. This article keeps the sliding-door workflow.
Where this guide comes from
Sam wrote this guide from recurring fit, installation, delivery, and after-sales questions in his bathroom-product work with U.S. homeowners. The workflow was then checked against U.S. safety-glazing requirements, glass-industry handling guidance, and manufacturer instructions for framed and frameless sliding systems.
The technical guidance was reviewed by Ronni, a Texas-based engineer with 25 years of experience, on September 19, 2026.
The troubleshooting section includes an anonymized homeowner case shared with Aurivedo, along with the original site photos. Its symptoms, adjustment, and result describe that door; they are not a universal clearance specification.
For a particular door, its current manual remains the source for dimensions, fasteners, drilling, hardware orientation, adjustment, and sealant placement.
Sources to check
Use these with the exact product and room conditions behind your decision.
Wood's Powr-Grip vacuum-cup instructionsLoad limits, clean and dry contact surfaces, vacuum indication, inspection, and operating conditions checked September 19, 2026.
GE Sealants application guideBathroom-sealant selection reference; final compatibility and cure time remain product- and substrate-specific.
Anonymized homeowner field case and original photosThe homeowner reported recurring seal-strip release and subtle splash-out. Lowering the moving panel within its hardware range and reseating the seal stopped most under-door splashing. Photo use was confirmed September 19, 2026; the case is not a universal clearance specification.
Ronni technical reviewRonni, a Texas-based engineer with 25 years of experience, completed technical review of the installation guidance on September 19, 2026.
Installing sliding shower doors
Sliding glass shower door installation
Shower door fit and adjustment
Shower door waterproofing
Have a question about your shower door?
Share your project stage, measurements, and the decision you need help with. Sam can reply by email. No subscription.