Why Is My Frameless Shower Door Leaking? Diagnose It by Location
A wet floor doesn't always mean a leaking door. Check when the water appears, find where it first gets out, and match the fix to the seal, joint, spray path, or shower base.
View guide imageAI-generated editorial illustration, not either customer's shower. Water beside the door does not establish the leak source.
Short answer
A few drops from a wet frameless door when you open it are normal. If water appears outside while the door stays closed, dry the area and find the first wet spot; then test the bottom seal, side joints, open top edge, or shower base one at a time. Stop using the shower if glass or its supports move.
Key points
If the floor gets wet only when you open the door, check for water carried out on the glass before repairing anything.
Find the first wet spot while the door is closed. The puddle may be nowhere near the source.
A wet line along the bottom and a single wet corner call for different tests.
Case 1 had a deformed lower seal with a visible gap; Case 2 had an uneven shower base. Replacing the failed part stopped each leak.
Floor wet only after you open the door? Watch the whole shower, including the moment you open it, before buying a sweep. The timing tells you whether water escaped with the door shut or came out on the wet door.
Dry everything outside. Wipe the glass edge, wall seam, raised shower curb, and floor. A fresh drop is easier to spot when yesterday’s water is gone.
Shower with the door closed. Use your usual water flow and showerhead angle. Keep an eye on the floor before you touch the handle.
Catch the first sign of water. Watch the door and curb while the shower runs, then watch again as you open the door. The first wet place outside is your starting clue; the puddle may be farther from the source.
Read the wet pattern. Is it one corner, a line along the whole bottom, or only the floor inside the door’s swing arc? Each sends you to a different check below.
Test one suspect at a time. Dry the outside again, wet just that area, and see whether the same spot gets wet twice. Changing several things at once only hides the cause.
Fix the path you found. Reseat or replace a failed seal, aim the spray away from a gap, or repair a confirmed fixed sealant joint along the line specified for that door. A base or curb problem needs the installer, not another bead on the glass.
Run the same test again. Close the door and repeat the same flow and spray angle. Check while it is shut and as it opens. If water returns, follow the stop rules and trace the first wet place again.
If the Floor Stays Dry Until You Open the Door
First, rule out ordinary runoff. MAAX says pivot doors can drip onto the floor as they open and close. Put a dry tissue in the door’s swing arc and check it before you open the door. If only a few drops fall from the wet glass afterward, squeegee the water back inside before opening. If you need a towel after every shower, check for water being carried out from one of these places:
Water pooled behind the curb. A low curb or one that does not drain inward can leave water at the inside edge. On some doors, the moving sweep drags that water out as the door opens. Watch the curb during the shower; if water runs over it while the door is still closed, you have already found a closed-door leak.
A short, worn, or warped bottom sweep. A gap at the strip can let water collect near the door bottom, and the strip may carry some of it out when the door moves. Check the strip with the door closed before buying another one.
A channel that holds water. Water can sit in a recessed threshold or track and spill when the door moves. Look inside the channel before opening; keep its intended drain open.
Spray aimed into the door gap. Water can build up along the inside edge and come out with the door. Aim the showerhead away from that gap and repeat the same closed-door and opening check.
Match the First Wet Place to a Check
First place you see water outside
Check first
First action
Only after the wet door swings open
Water carried out on the glass, especially inside the door’s swing arc
Make sure the floor stayed dry with the door closed; squeegee the glass inward before opening it.
Along most of the door bottom
The bottom sweep, the clear strip on the lower glass edge
Check whether it is loose, folded, damaged, or missing contact with the threshold; go to the bottom check.
At one bottom corner
The sweep end and the side or base above and beside it
Stop the test if water runs outward over the curb, the curb or a fixed panel or bracket shifts, glass touches glass, or an edge is chipped or cracked. A moving part or damaged glass needs repair before another shower. An outward-draining curb needs a base or curb inspection; a new sweep will not change its drainage.
The seven dots show where to watch with the door closed. Drips that appear only when you open it are a timing check, so they aren't numbered here.
The Case 1 photos also show the gap left by the deformed seal. The Case 2 photos show where water appeared, while the uneven-base diagnosis comes from the after-sales follow-up. Neither set records the first escaping drop or the finished repair. The diagrams and header image are illustrations. Z1–Z5 are the names we give the five test areas here; those labels aren’t printed in the older installation guide.
Jimmy, a Delaware shower-door installer with more than 10 years of experience, reviewed the guide on September 26, 2026. The publisher then clarified the causes in both case studies; those new details came from the after-sales record, not Jimmy’s own jobs.
Find the First Wet Point
The opening check above tells you whether water arrives with the door shut or only when it moves. Either way, the floor puddle may have started at a gap farther up.
Dry the outside, then put a tissue beside the suspected spot without wedging it into the door. Run the shower normally and watch for the first place that gets wet outside. Turn off the water and mark that spot with a small piece of tape. It tells you where to test next, not necessarily where the water started.
If the first pass is unclear, test one area at low flow:
Area
Wet this part
Watch outside
Z1
Fixed glass where it meets the wall
The outside wall-to-glass line
Z2
The base of the fixed glass or its bottom channel
The outside of that channel and curb
Z3
The closing side of the door
The closing seal and the floor below it
Z4
The bottom sweep and threshold, with the door shut
The full bottom edge, then each end
Z5
The pivot or hinge side; for a slider, the glass overlap
The side edge and lower corner
Illustration of the test sequence. Wet one zone inside at normal flow; watch outside, pause, dry, and record the first wet point before trying the next. For a sliding door, test the glass overlap in place of the pivot at Z5.
Pause and dry the outside between zones. Give a slow seep time to show up. Skip the high-pressure blast straight into an open gap; it can push water through a spot that stays dry in an ordinary shower. Our installation water test uses the same one-area-at-a-time approach.
Jot down the zone, the first wet spot, whether it happened twice, and what you changed. A note on your phone is fine. You’ll have something to compare after the repair, and something useful to show the installer if it still leaks.
Shower Door Leaking From the Bottom
Is the whole bottom edge wet, or just one corner? A long wet line under the moving door points to the sweep and its contact with the threshold. One wet corner calls for the corner test; water may have come down the side first.
Start with the pattern you can see: a wet line, one wet corner, or a dry door with water on the floor.
Close the door and look along the clear bottom sweep. It may have slid sideways, folded under, gone stiff, torn, or stopped touching the threshold. Any of those can open a path at Z4. Reseat a loose strip and test again. Replace a damaged one with the same seal style, sized for your measured glass thickness and the gap under the door. The channel should grip the glass; the fin should touch the threshold without dragging. ANZZI’s seal guide also calls for matching the channel to glass thickness. Our glass-thickness guide helps you check that measurement before you order.
Test Z4 with a cup. Close the door and dry the outside threshold. From inside, slowly pour a small cup of water along the sweep, one section at a time, while you watch a dry tissue outside. If water crosses under the sweep at the same spot twice, check that strip and its contact with the threshold. If the tissue stays dry, move on to the side, open top edge, and base before buying a strip. Mop up the water inside the threshold before you open the door. Otherwise, you’ll spill it out and make the test look positive. After any repair, test again with the shower running normally.
Next, put a little water on top of the curb. Which way does it go? If it runs toward the bathroom, replacing the sweep won’t help. The NGA manual, PDF p. 13 calls for a fall toward the drain of 1/8 to 1/4 inch over a 6-inch span. That’s a guideline for that span, not a universal 5-degree angle. You don’t need to measure the slope for this first check. The water should head back into the shower. If it runs out or sits on the curb until it spills, the curb or base needs work.
Raised-curb illustration, not to scale and not a drawing of Case 2. NGA's guideline is 1/8–1/4 inch of fall over a 6-inch span toward the shower drain (PDF p. 13).
Before buying another strip: Line up dry tissues along the outside of the threshold and keep the door closed. Water from under the base or curb, with a dry sweep line, points away from the door seal. Call the installer or base contractor. Do the same for water coming from behind the wall or running outward over the curb. If water appears while the shower is off and the surfaces are dry, have the base or plumbing checked.
Shower Door Leaking at the Bottom Corner
One wet corner doesn’t automatically mean a bad bottom sweep. Dry that corner and the side above it. Wet the side first, then the bottom, drying between tests. If the side tissue gets wet first, follow the side seal upward. If the side stays dry and Z4 wets the corner, look at the sweep end and the threshold there.
Look closely where the bottom seal, side seal, hinge or pivot fitting, and base meet. Several gaps are close together. A strip that’s come off the glass may need replacing. A gap that lets the door move or a channel drain needs to stay open.
Our customer cases had different causes and repairs. In Case 1, a deformed lower seal left a visible gap; a replacement stopped the leak. In Case 2, an uneven base caused the leak, and replacing the entire shower base stopped it. That’s why it’s worth testing the side and base before blaming the strip at the corner.
Before adding caulk: If a properly fitted new seal still leaves the corner wet, test the side and base separately. Keep silicone out of the moving gap. A Kohler pivot-door manual, PDF p. 3 warns that sealing beyond the locations it shows may cause a leak. Use the drawing for your installed door to find the exact line; the wrong bead can block a drain path.
Water on the Hinge Side
Close the door slowly and watch the gap. The side seal should meet its mate down the closing edge. Replace it if it’s torn or has pulled off, then retest Z5. If the gap widens toward the bottom or the door scrapes the curb, check whether the door has shifted. A new seal won’t correct its position.
On a pivot door, the top and bottom pivots must line up on one vertical axis. The NGA manual says so on PDF p. 25. Look at that alignment before touching hardware. If the closing gap has changed, use our sagging-door guide to find what moved.
Stop using the door if a hinge, bracket, wall plate, or fixed panel moves with it. Stop if the swinging glass touches the fixed panel as it closes; that contact can chip an edge.
Water at a Fixed Panel or Wall Joint
A fixed panel is the pane that doesn’t open. If a sealant bead at its wall or bottom joint has separated, water can get through. Dry the outside, wet Z1 or Z2 on its own, and watch the joint. Water running over it tells you little; water coming through or from behind it identifies the path.
Once you’ve confirmed that path, remove the failed bead and reseal only the line shown for your door. The installation drawing matters here because a channel can return water on one side and drain through an opening on the other. The Kohler pivot manual, PDF p. 3 warns that extra sealant can cause a leak. Let the new bead cure for its stated water-exposure time before retesting.
These gaps have different jobs. Check the drawing for your door before sealing one; Kohler warns that extra sealant beyond its pictured locations may cause leaking.
If the glass-to-wall gap changes sharply from top to bottom, check the wall and panel alignment. Our wall-plumb guide shows how. If a new enclosure never fit the finished opening, the rough-versus-finished-opening guide will help you document the mismatch for the installer.
Stop if the fixed panel shifts. A bead of silicone cannot make a moving support safe.
Water Between Glass Panels or at the Closing Side
For a swing door, close it normally and look down the closing edge. The side seal should meet along the gap. If water gets out only when the door is partly open, close it fully and retest. Replace a torn or displaced seal if Z3 repeats the leak.
For a slider, look at the overlap between the panes and the lower guide. The NGA manual, PDF p. 21 notes that gaps there can let water out. Point the shower spray away from the opening and retest. If the panels have left their track or guide, use the sliding shower-door off-track diagnosis. If the door is still on track but the panes no longer overlap properly, the sliding-door installation guide’s adjustment steps show what to check before the installer resets them.
Leave the moving overlap open. Stop using a sliding door if glass touches glass, a panel leaves its guide, or an anti-lift part is missing.
Water Appears Only When the Shower Is On
Keep the door closed and watch the side gap, bottom edge, and open top edge while the shower runs. On a door without a top frame, spray can go over the glass and land well beyond it. Aim the showerhead away from the door and try again. If that stops the water, adjust the spray. Then test it in the position you actually use. If water still clears the top, the spray position or enclosure layout needs changing.
01 · Watch the door areaDoes water cross a gap or the open top edge?
If it crosses a joint, test Z1–Z5. If it goes over the top, check spray height. If neither happens, look beyond the door.
02 · Change the spray angleDoes the leak change?
If yes, spray direction is involved. If no, keep checking the base, wall, valve, and plumbing.
What if the door joints, top edge, and curb stay dry, but the floor, wall, or room below gets wet? Look beyond the door. Check accessible showerhead and valve connections for visible water. Water coming from behind a surface calls for a base, wall, or plumbing inspection. Case 2’s wet spot was beside the lower rail, but its cause was an uneven shower base; replacing the entire base stopped the leak.
Stop using the shower if water comes from a wall cavity, behind trim, or through the ceiling below. Find that source before running another door test.
New Door Leaking After Installation or an Older Door That Started Leaking
Think back to when the floor first got wet. That tells you where to start looking.
When the leak began
Check first
What the result means
On the first shower after installation
Check whether the sealant had time to cure, whether seals are seated, whether the door closes evenly, where fixed joints were sealed, where spray lands, and whether the curb drains inward.
Photograph the first wet spot and send the installer your test before anyone changes hardware. A new door can also sit over a faulty base.
After years of dry floors
Look for a torn, stiff, short, or displaced sweep or side seal, a separated fixed-joint bead, or a closing gap that has changed.
Replace the part that fails your test. Age doesn’t rule out a base problem.
For a new installation, take photos before anyone removes a part. Show the installer the closed-door position and the wet spot you found.
First Fixes That Match the Confirmed Leak Path
Confirmed path
First fix
Retest
Spray reaches an exposed door gap during ordinary use
Redirect the showerhead or have the enclosure layout assessed if normal use still sends water through the gap.
Same door position and normal flow.
Spray or splash goes over the open top edge
Redirect the showerhead and retest during ordinary use; if the layout still sends water over the glass, have the enclosure layout assessed.
Watch the top outside edge with the same flow and door position.
A bottom or side seal has failed
Replace or reseat the matching seal for the measured glass and gap. For a confirmed bottom-strip fault, follow the bottom sweep replacement steps.
Same water zone and same closing position.
A specified fixed joint has opened
Reseal that joint as drawn for the installed door; leave moving and drainage gaps clear.
Only after the sealant’s full required water-exposure time.
The door has sagged or a support moves
Stop the leak repair and correct the structural or alignment problem first.
Test the door only after it is secure.
A base or curb problem is confirmed
Have the base or curb repaired by the responsible installer. Case 2’s uneven base required replacement.
Repeat the normal shower test after the construction repair.
Make one change, then retest. Change the sweep, move the showerhead, and add caulk all at once, and you won’t know which one mattered. If it still leaks, you’ve made the path harder to trace.
When to Stop and Call the Installer
The fixed panel, hinge, bracket, or wall plate moves; glass is chipped or cracked; or a hinged door touches fixed glass as it closes. Stop using it.
Water appears behind the wall, under the base, or in the ceiling below. Stop using the shower until the source is repaired.
The curb sends water toward the bathroom. A seal cannot correct that drainage direction; call the installer or base contractor.
A repair requires new holes, altered glass cuts, or releasing load-bearing hardware. Those locations and loads are specific to the substrate, glass, and hardware, so have the installer work from that system’s drawing.
A caulk repair would cross a moving seam or close an unknown drainage opening. Stop and identify the intended sealant line first; the wrong bead can redirect water outside.
Two Customer Leak Cases: Similar Bottom Areas, Different Repairs
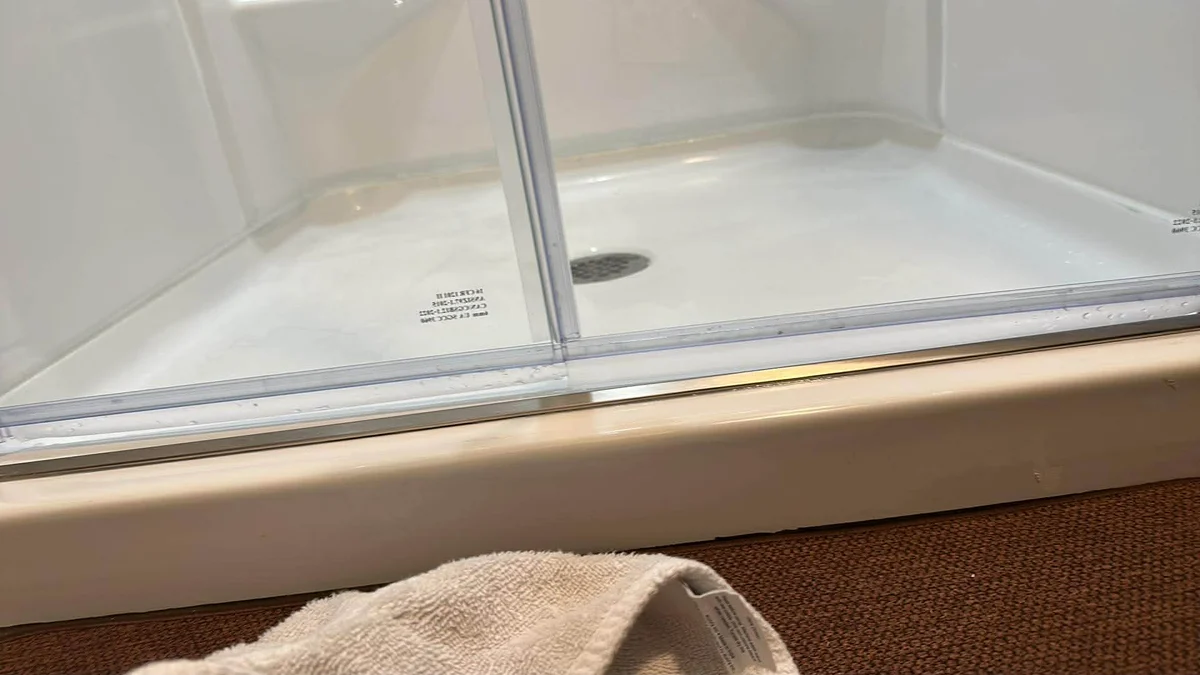
These photos show two different showers and were supplied with customer permission. Case 1’s lower seal was deformed and left a visible gap; replacing it stopped the leak. Case 2’s shower base was uneven; replacing the entire base stopped that leak. The owner confirmed the causes and outcomes from after-sales follow-up. The photos show the seal gap in Case 1 and the wet area in Case 2; they don’t show the first drop escaping or the finished repairs. Neither case gives you a part number or dimension for your shower.
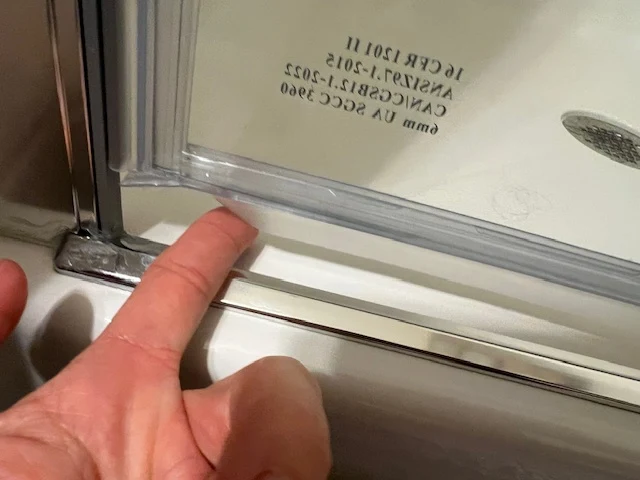
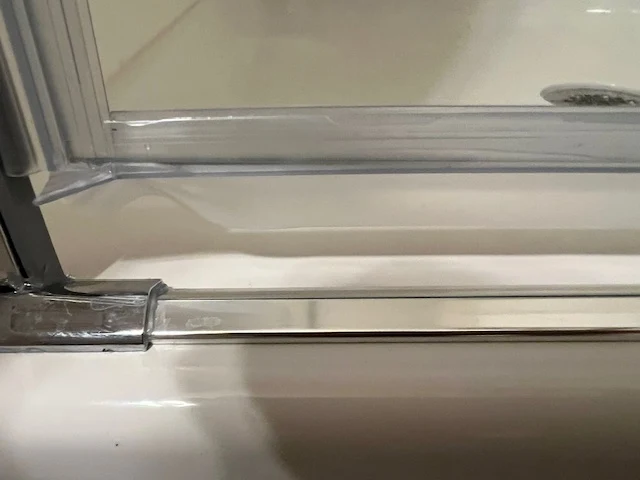
Case 1 · photo showsDeformed seal, visible gapAfter-sales result: replacing the seal stopped the leak.
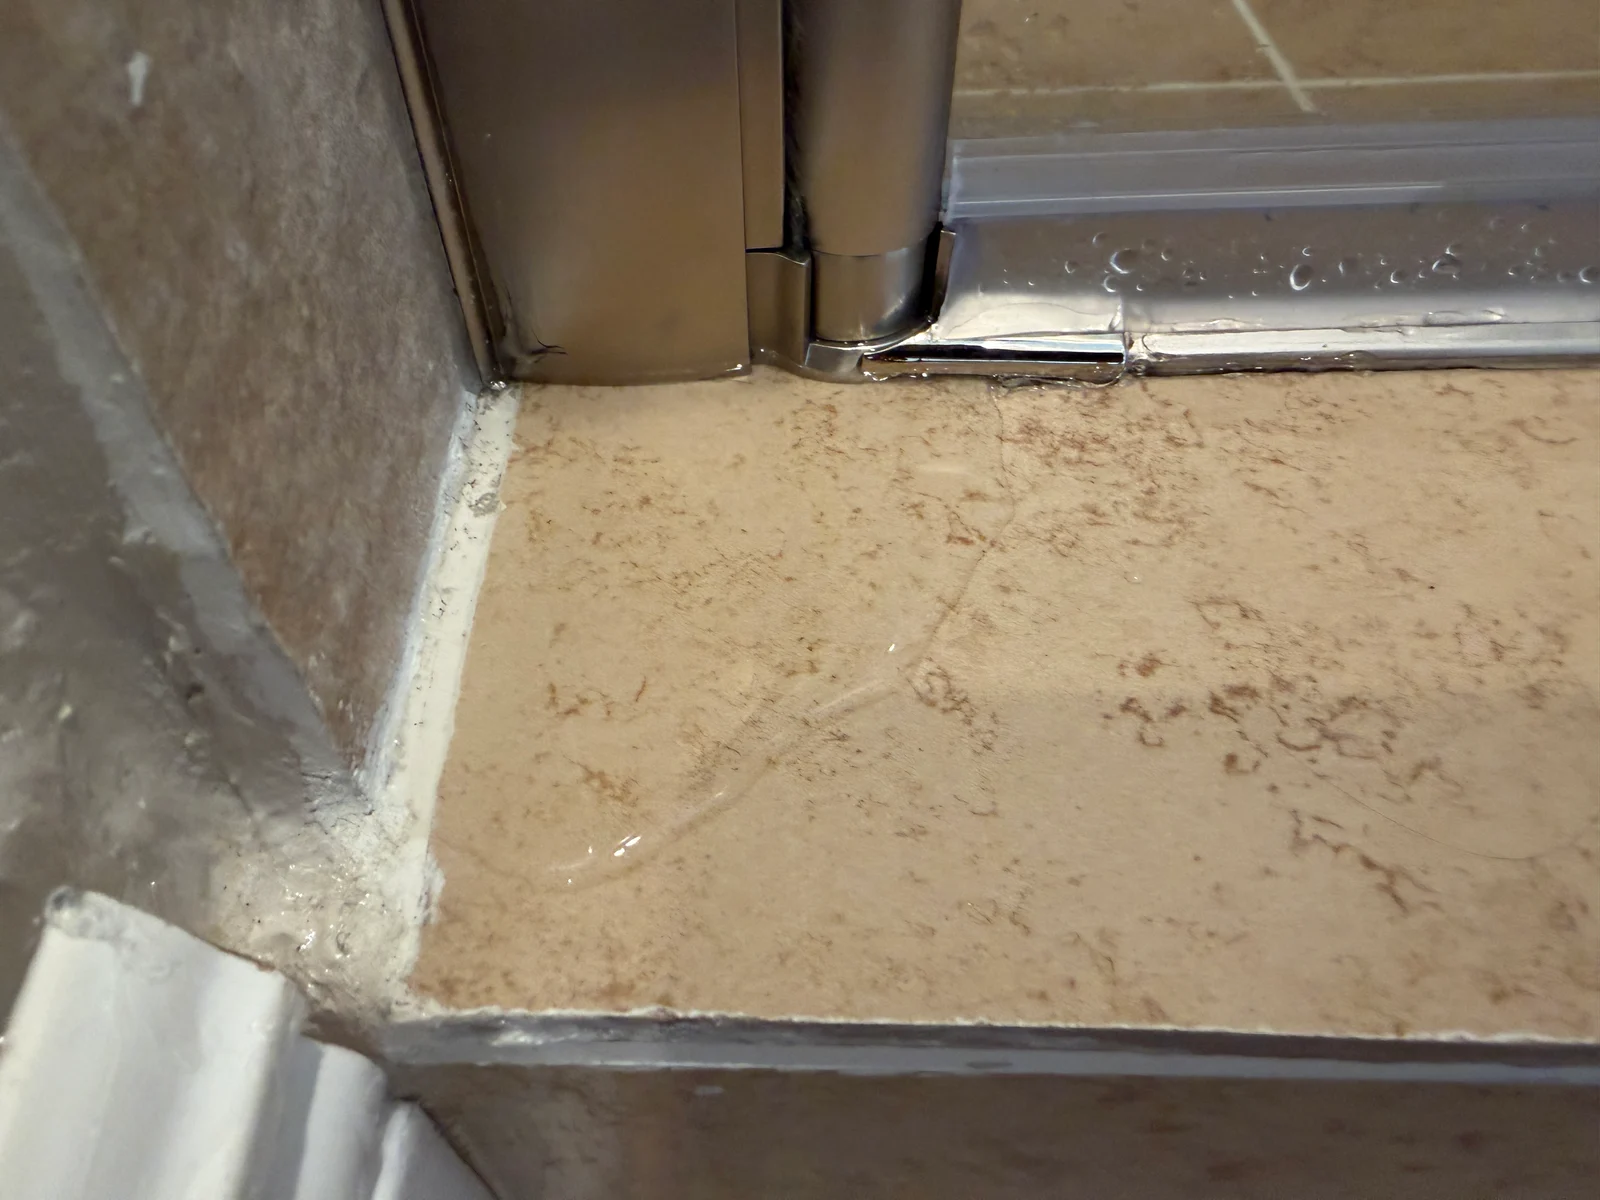
Case 2 · photo showsWater by the lower railConfirmed cause: uneven base. Replacing the entire base stopped the leak.
Case 1 shows the gap left by a deformed lower seal. Case 2 shows water near the rail; the uneven-base diagnosis comes from the after-sales follow-up. Replacing the seal and the entire base, respectively, stopped the leaks.
Case 1: A deformed seal left a gap
The clear lower seal bends away at the corner, leaving a visible opening beside the metal fitting.
The deformed strip left a gap at the fitting, and water escaped there. Replacing the strip stopped this leak. On your door, find the same kind of opening and run the Z4 cup test before buying a replacement; then retest after fitting it.
Case 2: An uneven shower base caused the leak
Water showed up beside the lower rail. The confirmed cause was an uneven shower base, but the photo alone cannot measure its slope or pinpoint the water's route.
The shower base was uneven, and that was the cause of the leak. Replacing the entire base stopped it. The wet spot beside the rail did not mean the rail was the failed part. We don’t have a slope measurement or a photo of the precise path the water took, so don’t copy a dimension or assume your own base fails in the same place.
If your floor gets wet near the rail, line up dry tissues along the outside threshold and keep the door closed during a normal shower. Water coming from under the base or curb, with a dry sweep line, calls for a base or curb inspection. The Case 2 photos don’t document this tissue test; it’s a way to check your own shower.
If the First Fix Did Not Work
What you still see
Check next
Stop when
The same corner is wet after a new bottom seal
Dry it, then test the hinge side, fixed side, and base separately.
The panel moves, or water emerges from the base or wall.
Water sits in a channel after extra caulk was added
Find the system’s intended drain and sealant lines; remove the wrong bead only as part of a proper repair.
The channel has been blocked or the fixed panel moves.
The floor gets wet but tissue around the door stays dry
Watch the base, wall, valve, and showerhead connection.
Water appears behind a surface or below the room.
The door leaks only when it does not fully close
Check the closing seal and whether the gap has changed.
The glass hits another surface or support hardware moves.
A new door leaked on its first shower
Check cure time, seal seating, alignment, and base drainage.
The next step requires removing glass, redrilling, or opening the base.
Frequently Asked Questions
shower door leaking only when shower is on
Watch the closed door, including its open top edge. If moving the showerhead stops water crossing a gap or splashing over the glass, adjust the spray. If the door and curb stay dry but the floor still gets wet, check the base, wall, valve, and plumbing.
shower door leaking after replacing bottom sweep
A new sweep helps only if water was crossing beneath the old one. Check that it grips the measured glass thickness, faces the right way, and meets the threshold without folding. If one corner is still wet, test the side and base separately. Case 2 had an uneven base, and replacing the entire shower base stopped its leak.
new shower door leaking after installation
Run the shower normally with the door closed and mark the first wet spot. Check seal seating, door alignment, curb drainage, and the specified fixed-joint sealant lines after the required cure time. Send the installer photos and your one-area-at-a-time test before anyone changes load-bearing hardware.
shower door leaking between glass panels
On a swing door, check the closing seal. On a slider, check the glass overlap and where the normal spray lands. The NGA manual, PDF p. 21, says sliding-door gaps can let water out. Leave moving gaps open; correct the spray direction or have a misaligned panel reset.
how to stop shower door from leaking
Dry the outside, find the first wet spot with the door closed, and test one area at a time. Fix the path you reproduced, then retest with the same flow and door position. Stop if glass moves or water comes from under the base or behind a wall. Silicone won’t diagnose the source for you.
Before You Call It Fixed: Five Things Must Agree
Location: You found where water first appeared outside.
Test: One test area made that same spot wet again under normal shower conditions.
Cause: The failed seal, fixed joint, alignment, spray path, or base fits that result.
Repair: You fixed that cause without plugging a moving gap or drain.
Result: The spot stays dry with the same door position, flow, and spray angle.
If the spot comes back, keep the photos and test notes for the installer. Find the first wet point again before adding another bead of caulk.
Sources to check
Use these with the exact product and room conditions behind your decision.
MAAX shower door FAQManufacturer FAQ says pivot doors can drip onto the bathroom floor as they open and close. It gives no amount threshold; the few-drips check in this guide is a practical screening observation, not a manufacturer limit. Checked 2026-09-25.
Kohler pivot shower door installation instructionsDocument 1632998-2-B, PDF p. 3: sealing outside the pictured locations may cause leaking. This warning is specific to that door system. Checked 2026-09-25.
ANZZI bottom-seal guideManufacturer guidance to match a replacement seal channel to measured glass thickness. Used for part-selection context, not as a universal seal profile. Checked 2026-09-25.
Aurivedo installation water testThe existing installation guide tests five enclosure areas, then pauses, dries, and records the first outside wet spot. The Z1-Z5 labels in this article name those five areas; the older guide does not display those labels. Checked 2026-09-25.
Customer Case 1, authorized after-sales photographs and follow-upThree customer-authorized photos show the deformed lower seal and a gap beside the metal fitting. The user confirmed that this seal deformation caused the leak and replacing the seal stopped it. No first-drop video or after-repair test image was supplied. Cause clarified 2026-09-26.
Customer Case 2, authorized after-sales photographs and follow-upTwo customer-authorized photos show water near the lower rail and stone threshold. The user confirmed the shower base was uneven and caused the leak; replacing the entire base stopped it. The photos do not measure the unevenness or show an after-repair test. Cause clarified 2026-09-26.
Aurivedo original leak-diagnosis illustrationsOriginal explanatory diagrams for seven observation locations, Z1-Z5 testing, bottom-wet decisions, raised-curb flow, and joint types. The top-edge observation, cup-pour isolation test, and outside-threshold tissue test are diagnostic methods, not records of either customer installation. Checked 2026-09-25.
Aurivedo editorial hero illustrationAI-generated illustrative bathroom scene for the article header. It is not a customer or installer photo and does not identify a leak cause. Checked 2026-09-25.
Jimmy full-article technical reviewJimmy, a Delaware shower-door installer with more than 10 years of experience, reviewed the complete diagnostic guide and confirmed it was complete and technically sound on September 26, 2026. The publisher clarified the two case causes afterward; those added case details have not yet been separately confirmed by Jimmy.
Frameless shower door leaking
Shower door leaking at bottom
Shower door leaking at bottom corner
Shower door leak diagnosis
Have a question about your shower door?
Share your project stage, measurements, and the decision you need help with. Sam can reply by email. No subscription.