
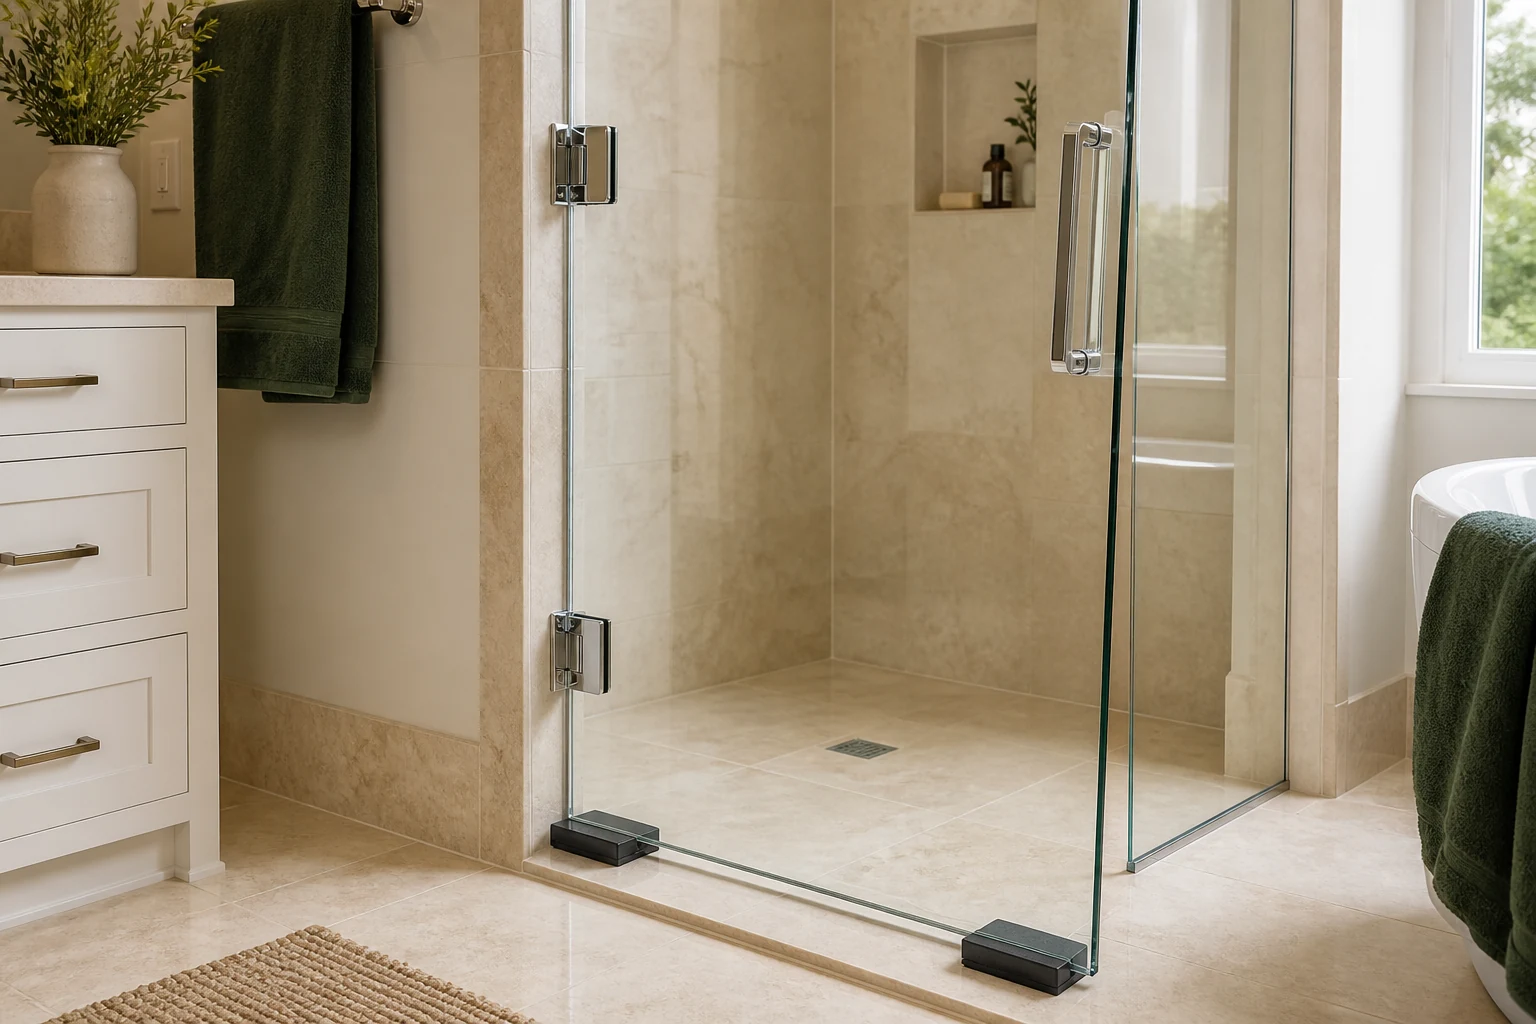
The short answer
Start with the part that moved. Support the door, have a second person steady it, and lift the lower handle-side corner by about 1 to 2 mm while watching the hardware.
- If the glass moves inside a side-mounted clamp, inspect the gaskets and reset the glass in the clamp.
- If the glass and clamp move together but the hinge joint has play, service or replace the hinge.
- If the wall plate or fixed panel moves, stop and repair the structural support.
- If the door runs on pivots or rollers, use the height or position adjuster identified for that hardware.
Resist the urge to loosen the nearest hinge screw. A displaced bottom sweep, debris on the threshold, a loose bottom pivot, or movement elsewhere in the enclosure can look like a sagging door. Stop using the door if the glass is chipped or cracked.
Check in this order
Work through these checks before turning a screw:
- Rule out a false sag. Check the curb or threshold, wall profile, fixed panel, bottom sweep, magnetic seal, and the spot where the door rubs. Some shower curbs slope toward the wet side for drainage, so compare the enclosure with its original layout rather than assuming every surface should be perfectly level.
- Identify the load-bearing hardware. Two or three hinges down the side indicate a side-hinged door. A pivot at the top and another at the bottom indicate a pivot door. A panel that travels along a track is a sliding door. Use the matching section below.
- Inspect the glass and gaskets. Look closely at the edges, corners, hinge holes, and cutouts. Stop using the door if you find a chip or crack.
- Do a controlled lift test. Place a load-bearing block under the door and have another person steady it. Lift the lower handle-side corner by about 1 to 2 mm while watching the clamp, hinge joint, bottom pivot, and wall plate. Follow the movement to its source.
- Use the adjustment built into the hardware. Adjust rollers on a sliding door. On a pivot door, inspect the bottom pivot, cam, and both pivot clamps. On a side-hinged door, check the hinge joint for play. Loosen a glass clamp only after you see the glass move relative to the clamp.
- Check capacity and wall support. Estimate the glass weight before the first adjustment. If the door sags again, compare its weight and width with the hinge rating and make sure the wall screws enter structural backing.
Identify the door type
Similar-looking shower doors can carry their weight in very different ways. If you are still identifying the enclosure, compare the common layouts in our frameless shower-door guide.
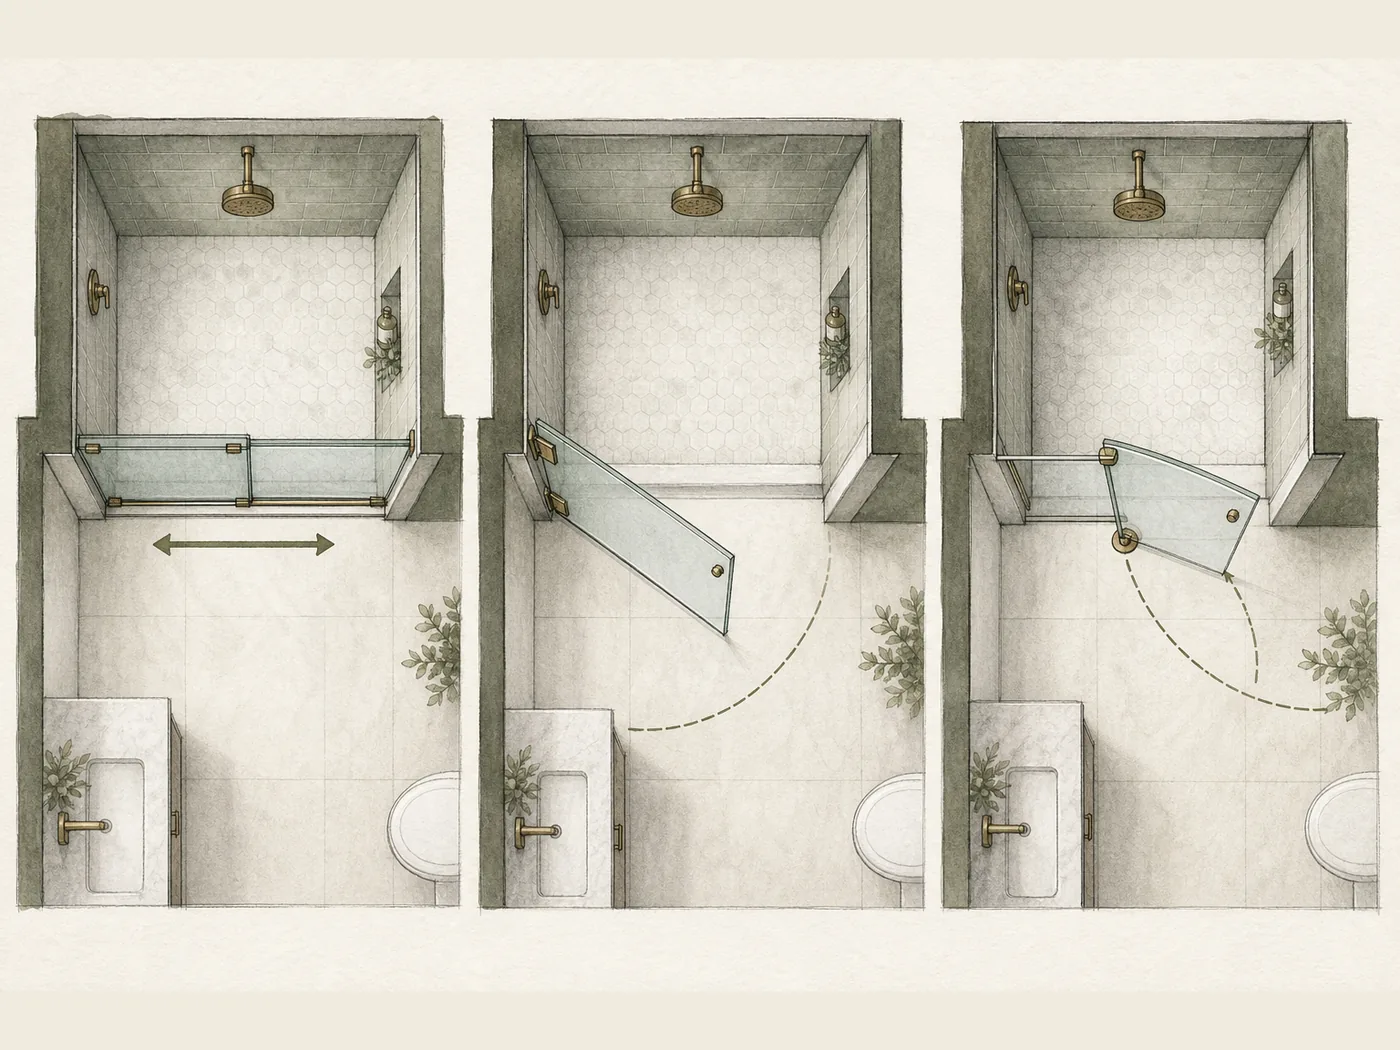
Frameless doors with side-mounted clamp hinges
These doors have exposed glass edges and two or three hinges along one side. The hinges connect the moving panel to a wall or another piece of glass. Gaskets sit between the glass and the metal clamp plates.
Support the door, place matching tape marks across the glass-to-clamp joint, and lift the handle-side corner slightly. If the tape marks separate, inspect the gaskets and reset the glass in the clamp. If the glass and clamp move together, look for play in the hinge joint or wall plate.
If your door has this layout, use the clamp-adjustment steps later in the guide.
An Allen screw does not automatically control height. A screw may set the closing angle, lock the rest position, hold a cover, or clamp the glass. Look at the parts it joins. Screws that pull a plate against the glass are usually clamp screws. Small screws in the moving joint often control the closing angle or rest position.
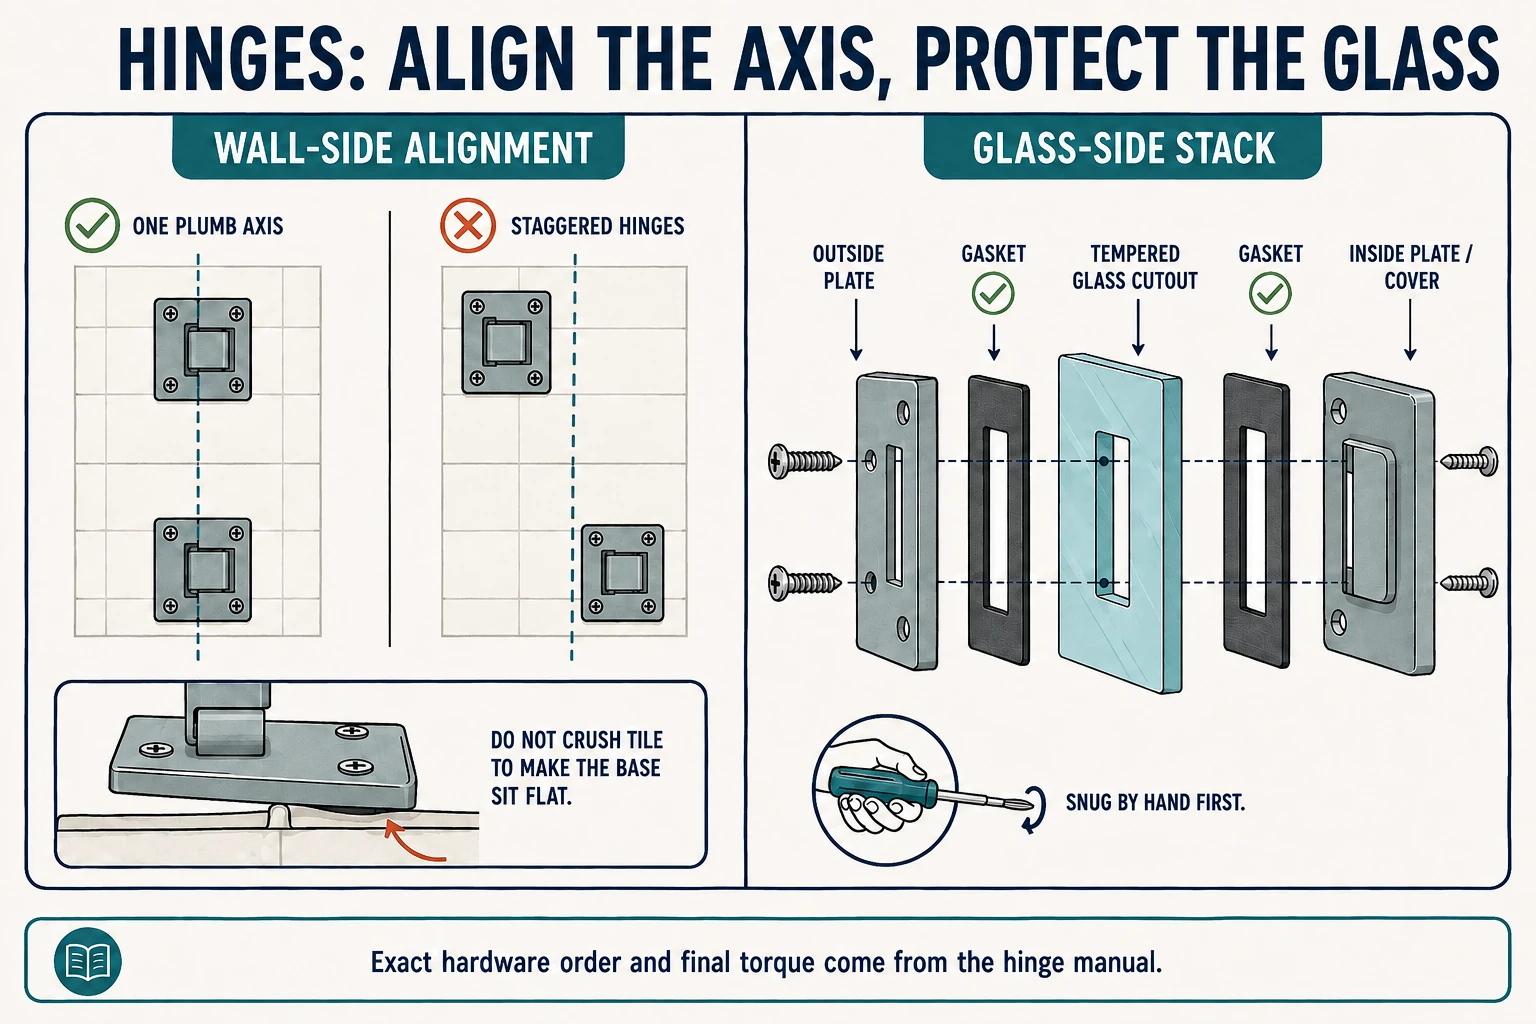
Frameless doors with top and bottom pivots
For a closer look at screw identification and closing gaps, use the pivot shower door adjustment guide. Its illustrated angle-adjustment example does not lift the glass.
These doors carry their load at the top and bottom. At the bottom you may see a pivot seat, bottom clamp, or cam. A top clamp or bracket keeps the upper pivot in position. Treat this hardware as its own system.
- Support the lower handle-side corner and check that the bottom pin sits fully in the pivot seat.
- Move the door through a short arc. Watch for a binding, reversed, or loose cam at the bottom. A door that stops at the wrong angle without changing height usually has a closing-position problem.
- Compare the position of the top and bottom pivot clamps against the glass edge. Unequal positions can indicate that the panel has shifted in a clamp.
- If the bottom pivot has a marked height or position adjuster, support the door and adjust it first. Some systems instead require the top or bottom clamp to slide after its set screws are loosened.
- When the door is aligned, confirm that the two pivots share the same axis. The door should move freely through its full swing without the bottom clamp striking the curb or sweep.
One Kohler pivot door uses a cam in the bottom pivot seat to control engagement and closing behavior, while panel alignment is adjusted at the top or bottom clamp. Another Kohler design calls for both clamps to be checked together. Inspect the bottom pivot first, but do not assume it controls height. See the first Kohler pivot door manual. See the second Kohler pivot door manual.
If a newly installed pivot door has never swung cleanly, check the installation guide’s pivot-axis and support checks before treating the problem as wear or sagging. A support that moves under the door is an installation problem to correct first.
Framed and semi-frameless doors
Look for a metal frame around the door or a vertical profile against the wall. Set the wall profile plumb first, then inspect the pivot bracket or the adjuster inside the profile. Frame-connection screws usually hold the assembly together. Loosening the whole frame to correct a crooked door often creates a second alignment problem.
Sliding shower doors
Clean the track first, then inspect the rollers, eccentric cams, and anti-jump parts. Raising both rollers changes the overall height. Adjusting one side rotates the panel to correct an uneven vertical gap.
If the panel has left the track or keeps jumping out, use the sliding shower-door off-track diagnosis to find the fault and restore its retainers before adjusting height.
Roller designs vary. Symphony instructions for certain sliding doors use top roller screws to change panel height and vertical alignment. See Symphony’s roller adjustment guide.
On one CRL sliding system, the center bolt is loosened before a roller cam is turned through a height range of about 1/8 inch, or 3 mm. Other cams do different jobs. See the CRL Essence instructions.
Cams and lifting hinges on swing doors
Some swing-door hinges have a self-centering cam or a lifting mechanism. These parts can change how the door rises, falls, or returns to the closed position. Their functions differ.
For example, Bohle lists a lifting mechanism and a separate rest-position adjustment on its Arta FM hinge. The adjustment screws on the specified DreamLine UNIDOOR hinge change the closing angle. Check the hinge design before treating a cam or Allen screw as a height control. See Bohle’s Arta FM hinge information. See DreamLine’s hinge instructions.
Three useful numbers
1. Estimate the weight of the glass
Flat glass has a density of about 2,500 kg/m³. For a quick field calculation, use:
Glass weight in kg = width in m x height in m x thickness in mm x 2.5
A panel measuring 900 x 1,900 x 10 mm weighs about:
0.9 x 1.9 x 10 x 2.5 = 42.75 kg
That figure does not include the handle or other hardware attached to the door. When checking a hinge, compare the door with its maximum weight, maximum width, and permitted glass thickness. See the flat-glass density used by the National Glass Association.
2. Use 6 to 16 mm as a first check for bottom clearance
For residential frameless doors, treat 6 to 16 mm between the bare glass edge and the curb as a first check. The required space changes with the bottom sweep, pivot, or lifting hinge. One DreamLine UNIDOOR model, for example, specifies 5/8 inch, or 16 mm, beneath the glass. See the clearance for that model.
If the model is unknown, aim for three results: the door clears the enclosure through its full travel, the bottom sweep still seals, and the glass cannot touch tile or metal.
3. Investigate when the top-to-bottom gap changes by about 3 mm
Measure the same vertical gap at the top and bottom. A difference of about 3 mm is usually easy to see and is enough to start checking the door for plumb. Deal with it promptly if the difference approaches 5 mm or the door has started rubbing or leaking.
Treat 3 to 5 mm as an inspection trigger, not an installation tolerance. The finished gap still needs to fit the magnetic or flexible seal and keep the glass clear throughout the full swing.
Find the part that moved
The wear mark tells you where the door rubs, but not which part moved. Watch the hardware while the door is supported.
| What you see | What to check next |
|---|---|
| The lower handle-side corner sits lower than before | Glass movement inside the hinge clamps |
| The glass looks square but the bottom sweep drags | The sweep, curb, buildup, and intended curb slope |
| A gasket has shifted or become more exposed | Movement between the glass, gasket, and clamp |
| A pivot door stops at the wrong angle or will not return to center | Bottom cam position, cam wear, and pivot alignment |
| The hinge joint moves before the glass or wall plate | Wear in the hinge pin, knuckle, or internal mechanism |
| A hinge base pulls away from the wall | Wall fasteners and structural backing |
| The door and fixed panel move together | Fixed-panel supports and connections |
| A chip or crack appears at an edge, corner, hole, or hinge cutout | Stop using the door and arrange an inspection |
| The hardware has a marked height adjuster | Use it before loosening a glass clamp |
| The door sags again after adjustment | Hinge capacity, gaskets, wall support, or movement elsewhere in the enclosure |
If a gasket looks different, use tape marks and the lift test to see whether the glass has moved inside the clamp. If the curb is sloped, check whether it drains toward the wet side as intended.
Before changing anything, photograph the whole enclosure, both sides of every hinge, the bottom pivot if present, and the rubbing point. These photos provide a before-and-after record and can help a hardware supplier identify the parts.
If the door already touches another glass panel, stop cycling it to demonstrate the problem.
Before loosening any screws
Look for a model number on the purchase record, glass marking, inside face of a hinge, back of a cover, or frame label. If the paper instructions are gone, search the brand and model for a PDF. Clear photos of both hinge faces, the screw positions, and the whole door will often be enough for a hardware supplier to identify the system. If the wall support or original assembly is also in question, compare it with the preparation and mounting checks in our frameless shower-door installation guide.
The job may require:
- A correctly sized hand screwdriver or Allen key
- A level and tape measure
- Non-marking blocks or shims rated to carry the door
- Rated glass suction lifters when the handling method calls for them
- The protective and glass-handling equipment required for the work
A tool that almost fits will round out a screw head.
Set up the support before releasing clamp pressure. A towel can protect a finish, but a folded towel cannot hold a heavy door at a precise height. Suction lifters help an experienced person control clean, dry glass. Stable blocks or another load-bearing support must carry the weight.
Glass edges need care. DreamLine warns that edges and corners are vulnerable and advises against handling heavy glass alone. Holes and cutouts also concentrate stress, so inspect the glass around each hinge cutout as well as the exposed perimeter. Stop if you find a chip, crack, or unstable attachment. Read DreamLine’s glass-handling warnings. Read the National Glass Association’s guidance on holes and point-supported glass.
How to reset glass in a clamp hinge
Use this procedure after the lift test shows that the glass has moved inside the clamps of a side-hinged frameless door. Use the pivot or sliding-door sections above for those systems.
Step 1: Establish the reference lines
Record the rubbing point and measure the relevant gaps without forcing the door closed. Check the fixed panel and wall profile for plumb. Compare the curb with the slope the enclosure needs for drainage.
Look at the relationship between the glass and each hinge plate. Is one plate sitting differently against the glass? Has the top edge of the door dropped relative to the fixed panel?
Take photos or place removable tape marks on suitable surfaces. Do not scratch marks into the glass.
These measurements keep you from moving a correctly hung door to compensate for a displaced seal or loose support.
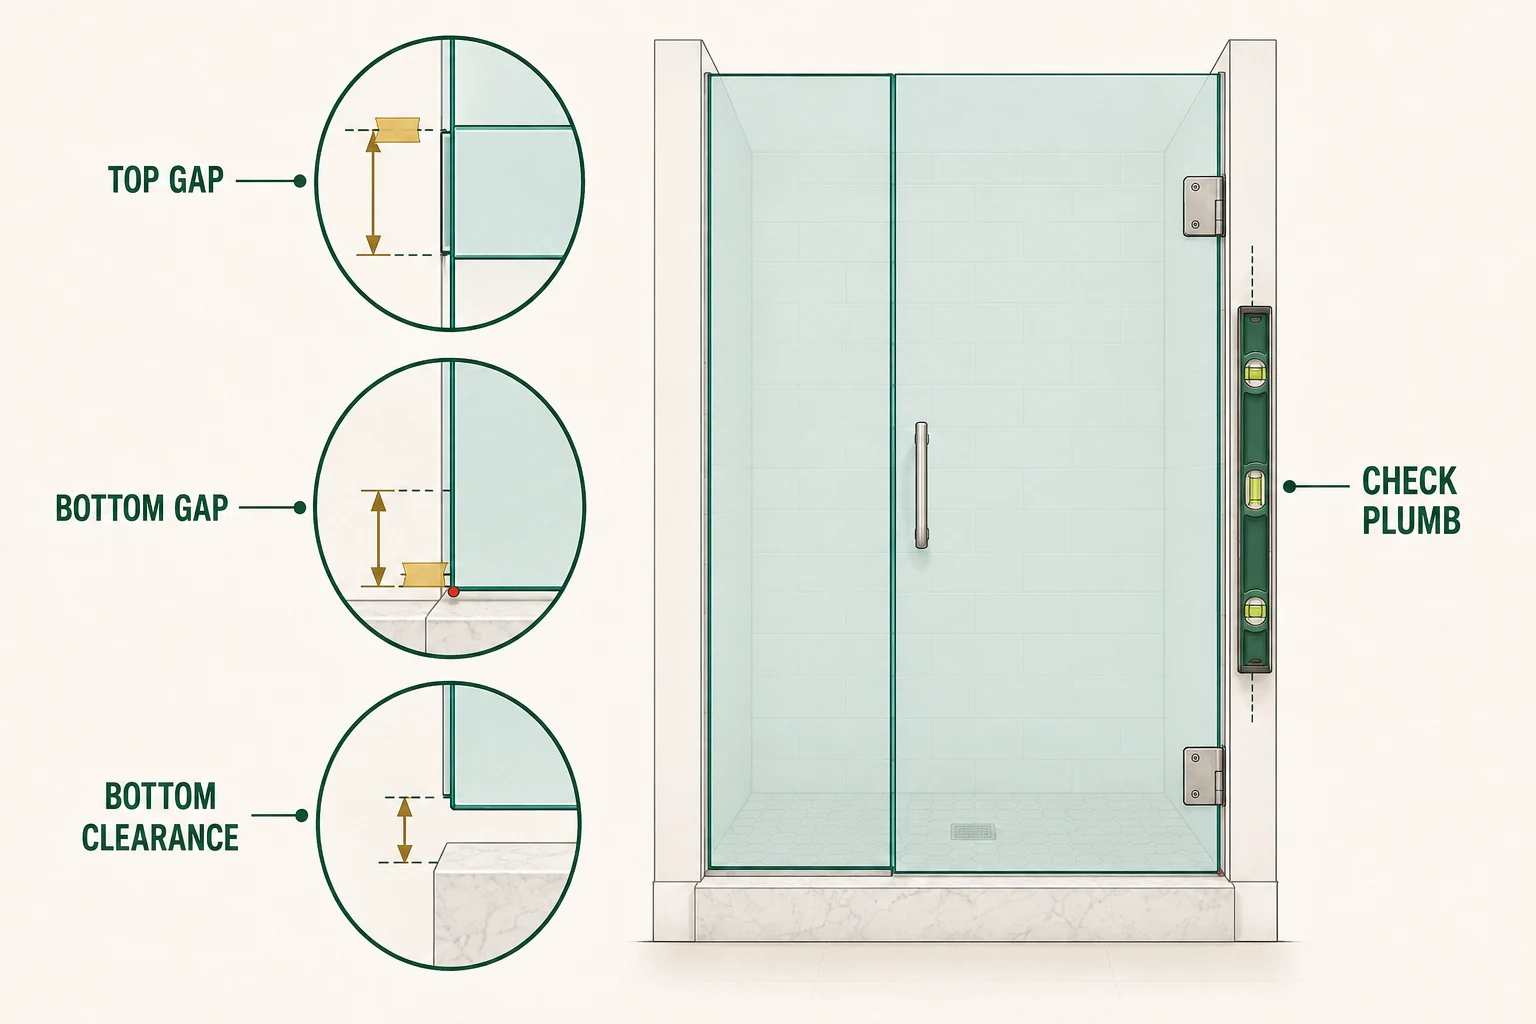
Step 2: Locate the play
Support the door. Place tape across the glass-to-clamp joint and across the hinge-to-wall joint. Have a second person steady the panel, then lift the lower handle-side corner by about 1 to 2 mm. Watch the tape marks, hinge joint, bottom pivot if present, and fixed panel.
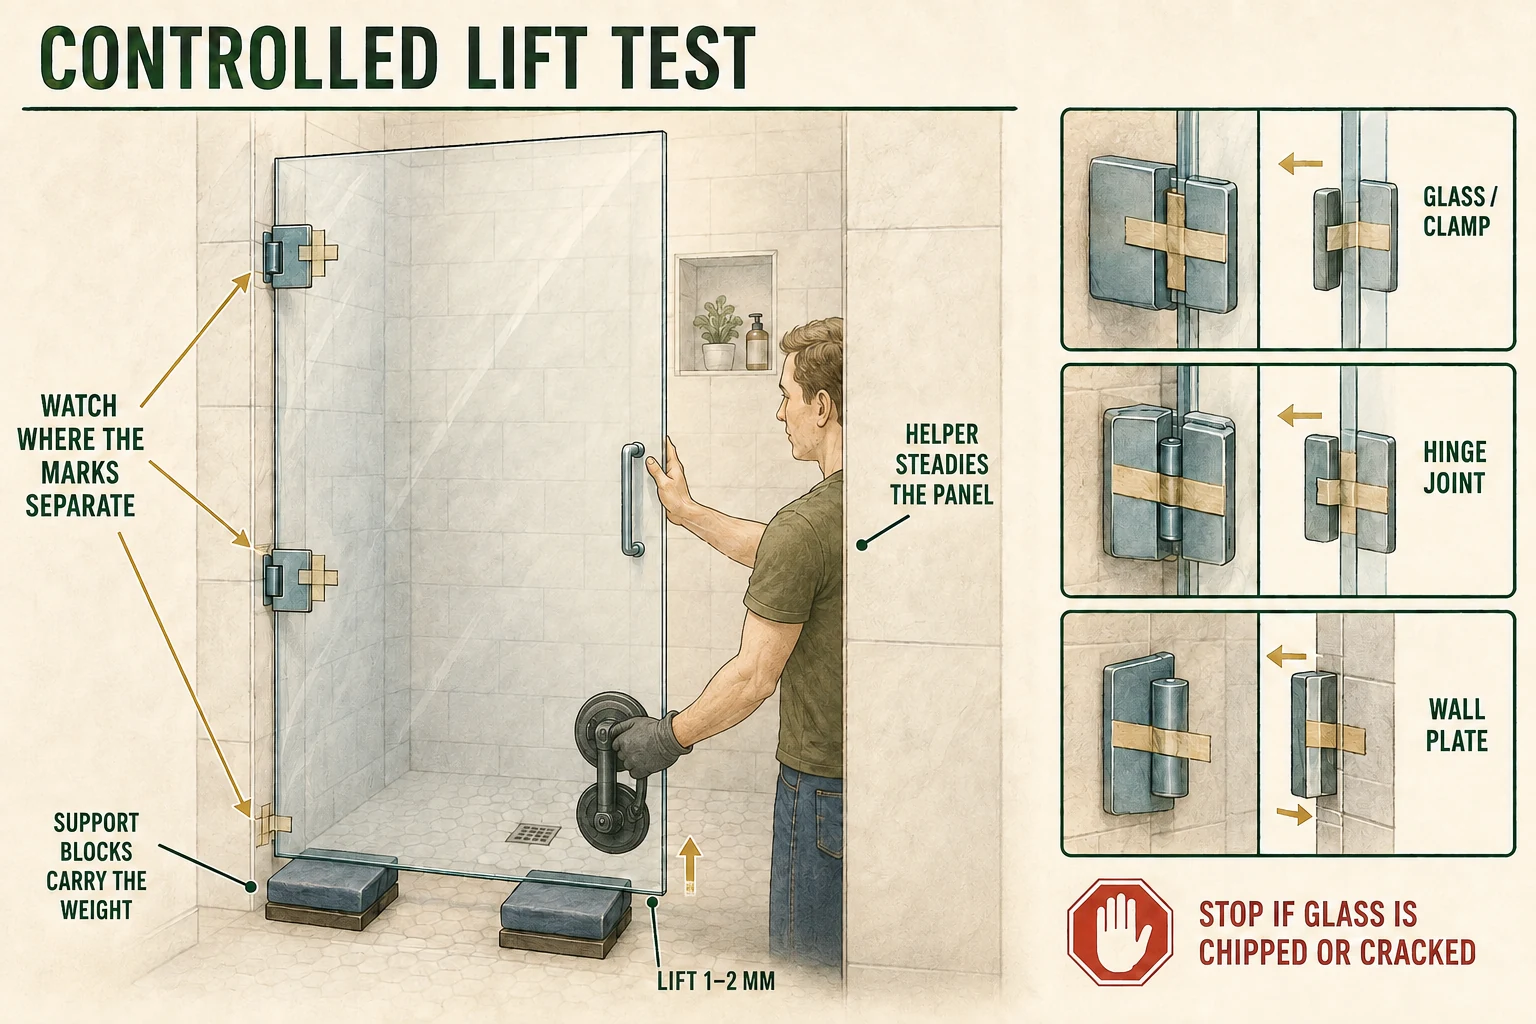
- Tape shifts between the glass and clamp: inspect the gaskets and clamp pressure. The glass may have slipped.
- Glass and clamp move together while the hinge joint shows play: inspect the pin, cam, or hinge body.
- The hinge and door pull the wall plate with them: inspect the wall fasteners and structural backing.
- Movement or binding occurs only at the bottom of a pivot door: inspect the pivot seat, cam, and bottom clamp.
What matters is where one part moves relative to another. Play felt at the handle does not prove that the clamp is loose.
Inspect the glass around every edge, hole, and cutout. Stop if you find a chip, crack, folded gasket, or direct glass-to-metal contact.
Step 3: Identify each screw
The hinge may have:
- Clamp screws that pull plates and gaskets against the glass
- Wall-mounting screws that attach the hinge to structural backing
- Closing-angle screws that set the resting position
- Height screws or eccentric adjusters on hardware designed for vertical adjustment
- Rest-position or lifting controls on certain hinges
- Small screws that hold a cover
The DreamLine UNIDOOR shows why screw function matters: its specified hinge adjustment changes the closing angle, not the height of a sagging corner. See the UNIDOOR hinge adjustment instructions.
Trace what each screw joins and compare it with the hinge diagram. Remove a cover through its intended notch or direction. Do not pry an unfamiliar plate next to the glass.
Step 4: Use a built-in height adjuster first
If the hardware has a height screw, eccentric roller, or another vertical adjuster, support the door and use that part before disturbing a glass clamp. Make small changes and lock the adjuster again when finished.
A cam’s shape does not tell you its job. Depending on the hardware, it may change roller height, lift the door during travel, add friction, or return the door to center. A rest-position screw usually changes where a swing door stops and may have no effect on height.
If an adjuster reaches its limit, stop turning. Extra force will not create more travel.
Step 5: Support the door before releasing a clamp
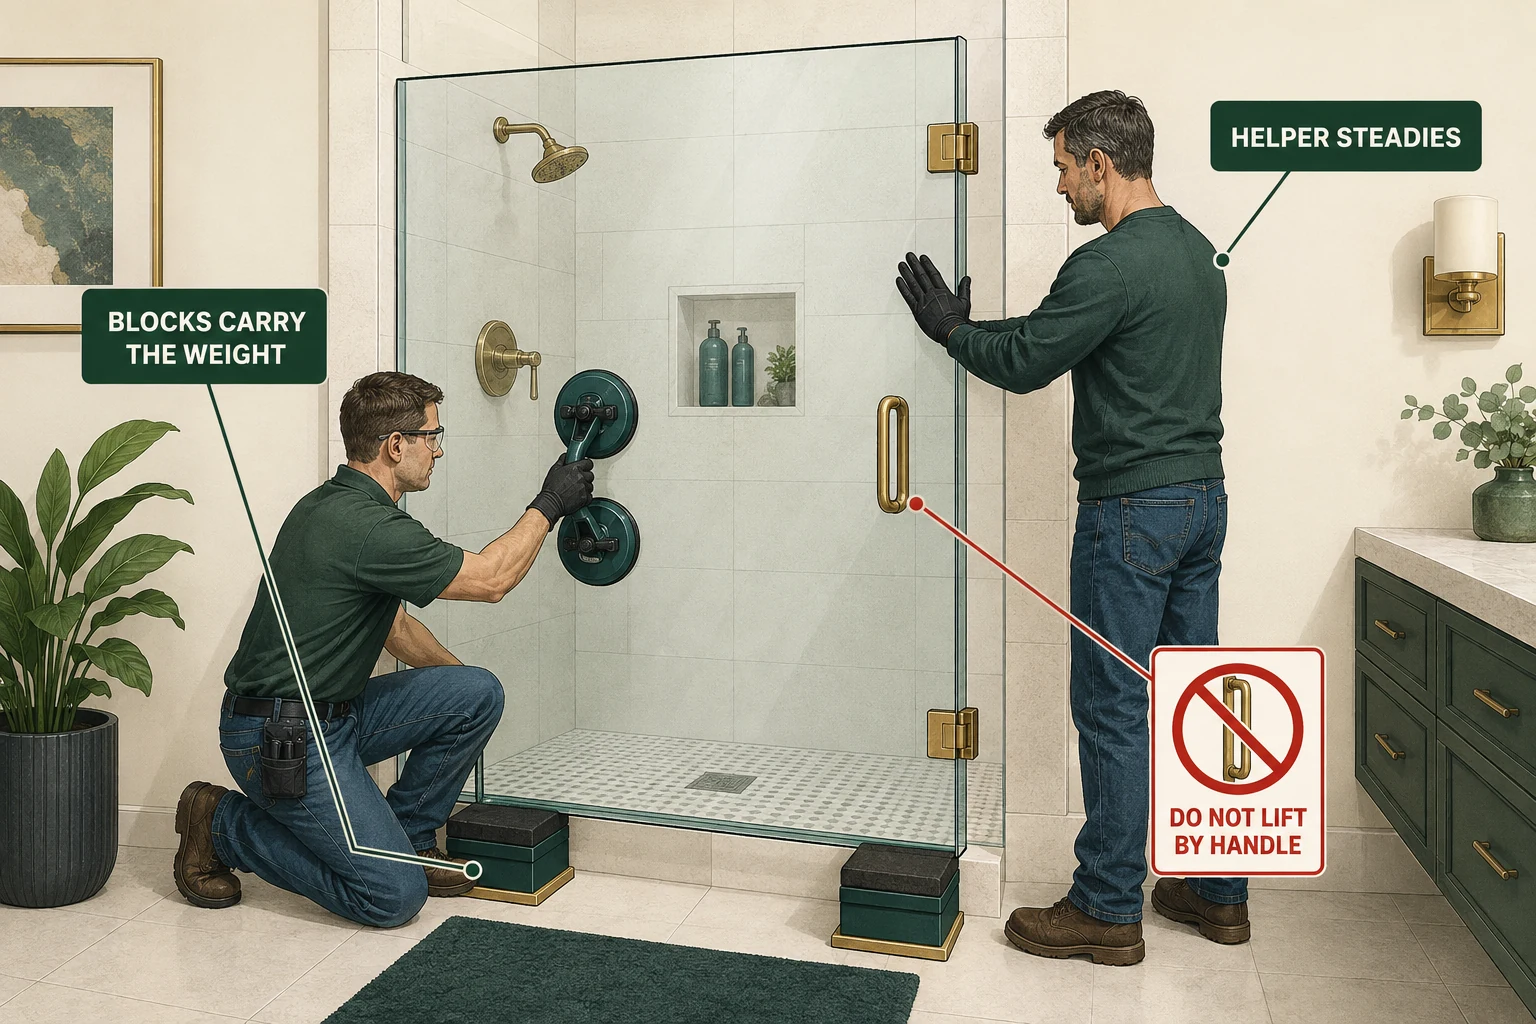
Move the door to a position where it can be supported and reached safely. The support must carry the door without placing concentrated pressure on an exposed glass edge.
Set stable, non-marking blocks under an approved support area. Rated suction lifters can help control the panel, but the blocks should carry its weight. Arrange a second person before starting. No one should be holding the glass while also searching for a tool or moving a block.
Do not lift from the handle. If you cannot support the panel securely, leave the clamps tight.
Step 6: Release the clamp pressure
With the door supported, release only enough clamp pressure to let the glass move.
Some clamps keep one fastener snug as a pivot while another is loosened. Others require several plate screws to be backed off evenly. There is no safe universal rule such as “loosen only the lower screw” or “turn every screw half a turn.”
Stop if a screw is seized, spins without tightening, or has a damaged head. The same applies if the glass moves suddenly or a gasket folds out of place. Replace a damaged or permanently deformed gasket with the correct part. A thicker scrap of rubber can change the fit and load on the glass.
Step 7: Set the glass and tighten in stages
Move the supported glass within the available clamp range. Watch the bottom clearance and closing-side gap as you work.
Because the hinge is the pivot point, a small shift there can move the opposite corner much farther. Work slowly and keep the glass clear of tile, metal, and adjacent panels.
Use the 6 to 16 mm range as an initial check, then test the sweep and the full door travel. Matching the top edge of an adjacent panel by eye can leave the bottom sweep too high or the hinge-side gap too tight.
If the door cannot reach a usable position within the available adjustment, inspect the installation and hardware again.
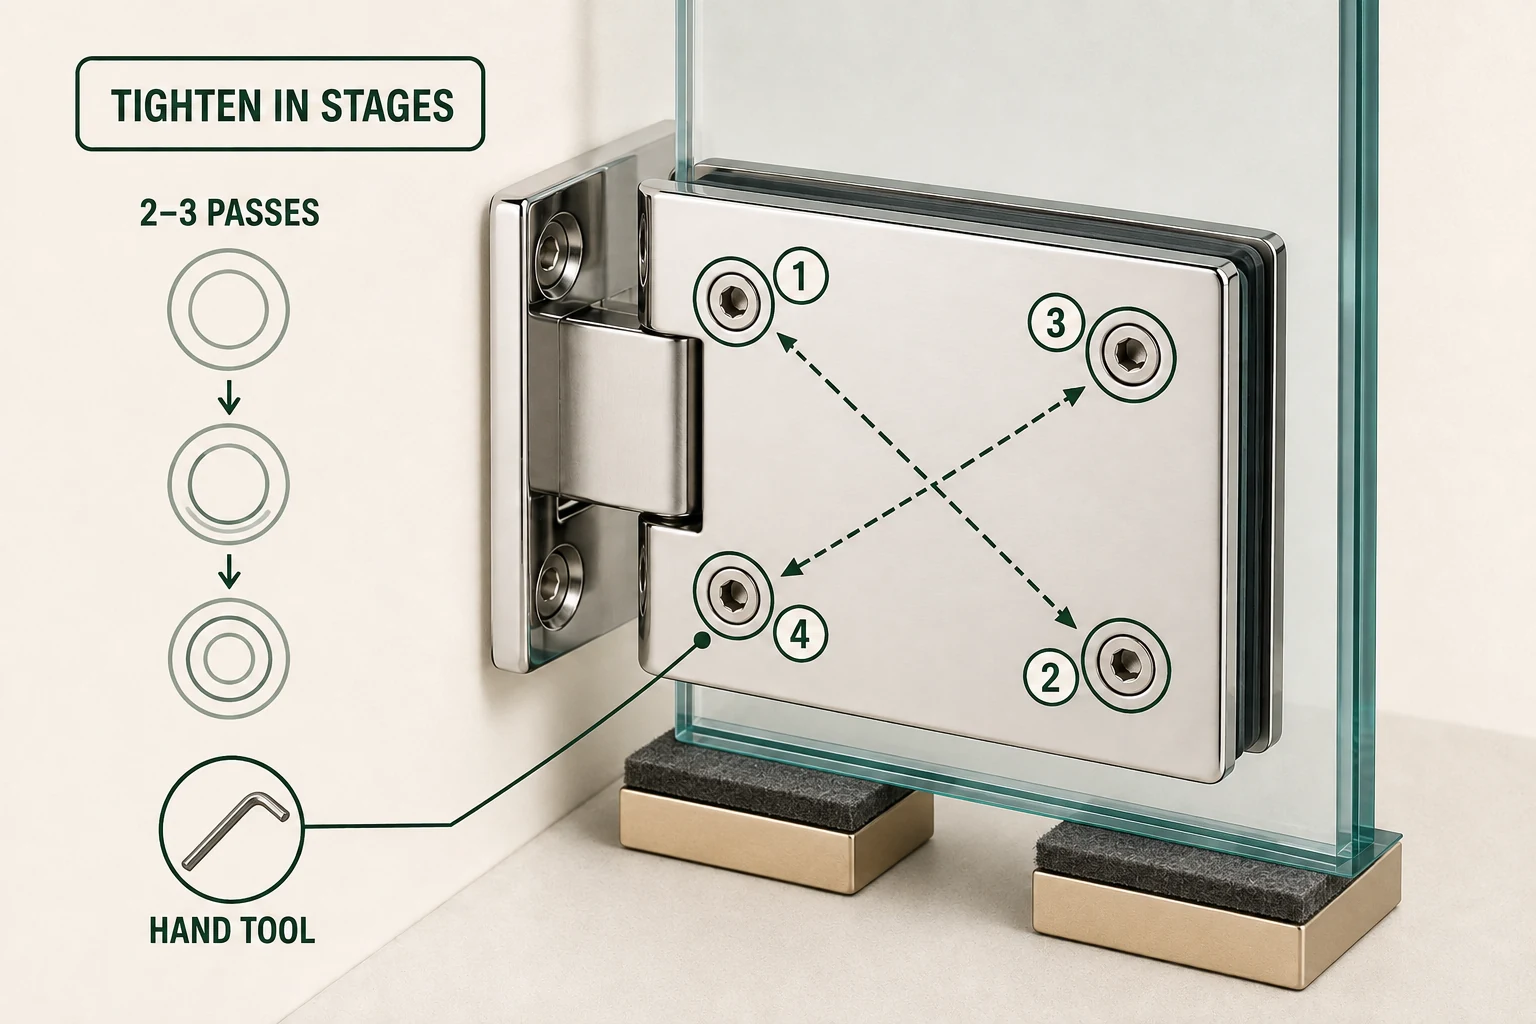
Hold the corrected position while tightening the clamp screws. On a plate with several screws, alternate across the plate and bring the pressure up in two or three passes. Do not fully tighten one screw while the others remain loose. Use the specified torque when you can find it.
Use a hand tool that fits the clamp screws exactly. If the hardware instructions call for a powered driver, use the stated bit and a low-speed torque-limited setting. Do not substitute an impact driver. Extra torque will not repair a worn gasket or damaged clamp.
Remove the temporary support and move the door slowly through its full travel. Watch the original rubbing point and the rest of the opening. If it catches, stop before contact and locate the remaining movement.
Inspect the sealant at wall profiles, mounting penetrations, and bottom channels. Repair separated sealant only where the enclosure calls for it, then allow the full cure time. Keep drainage and weep paths open.
If the door keeps sagging
If the door drops again after a few uses, retest the joints instead of repeating the same adjustment. Hinge wear, inadequate capacity, a loose wall mount, movement in a fixed panel, the wrong gasket, and uneven clamp pressure can all produce the same symptom.
Field case: the door had been used as a handhold
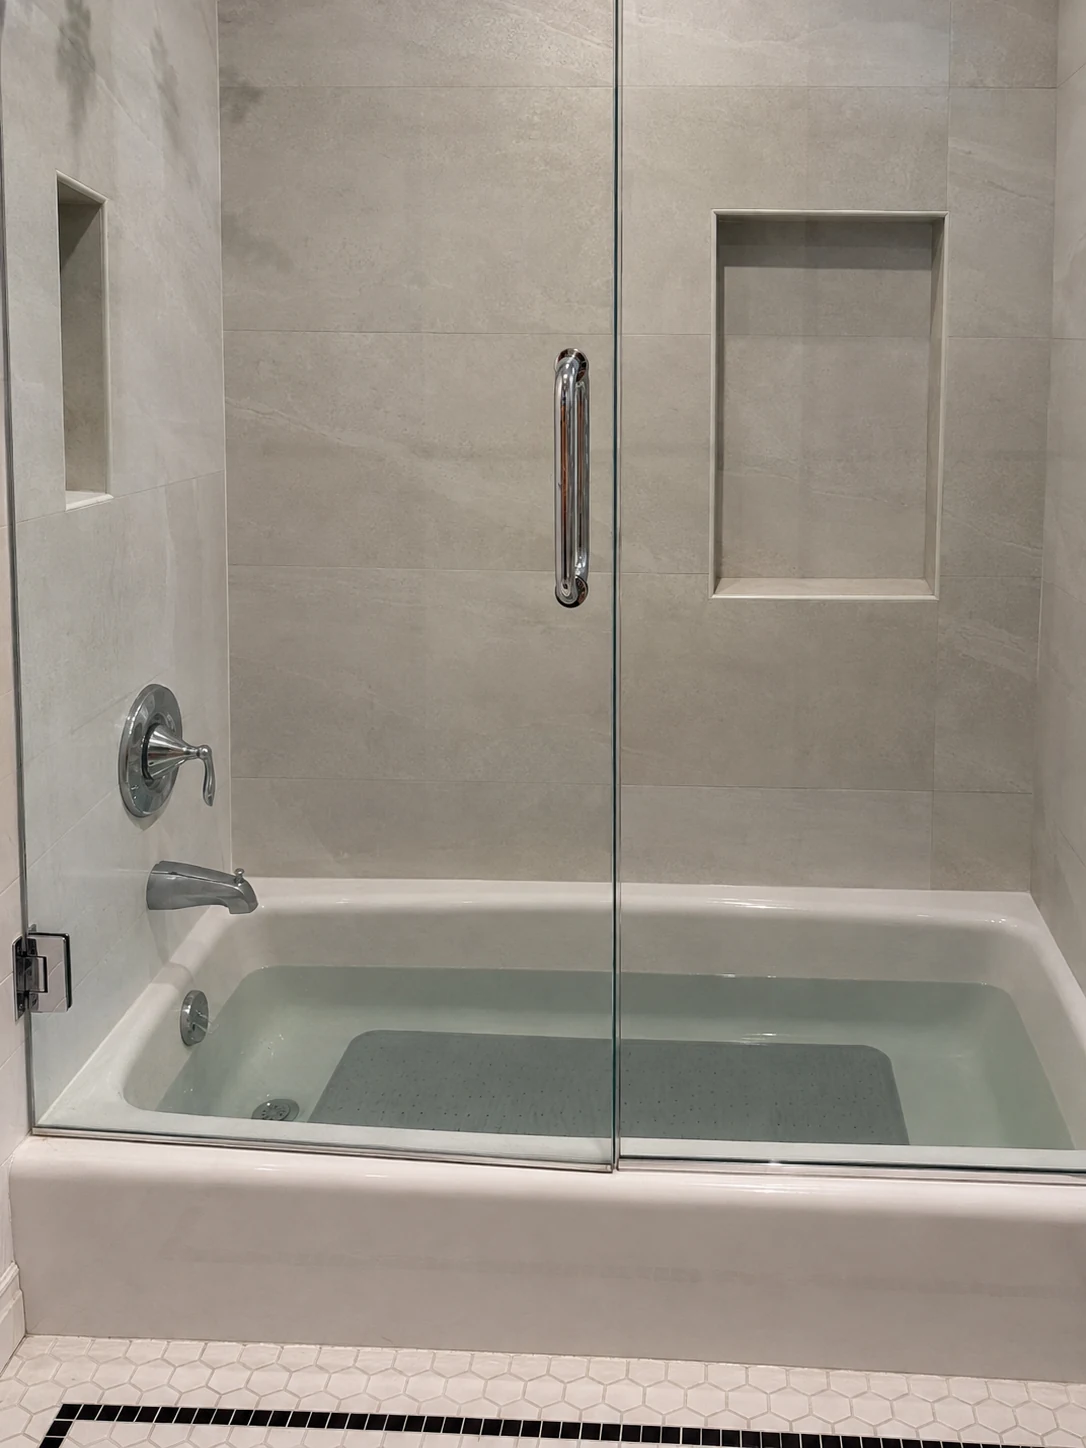
In one customer case we reviewed, a child had been using the glass door for support while stepping in and out of the tub. The extra load on the handle side pulled the glass down inside the wall-mounted hinge clamps. With the door closed and its weight carried by firm padded shims, a helper steadied the panel while the hinge plates were loosened. Pieces of 600-grit or finer abrasive paper were placed between the existing rubber gaskets and the glass, then the screws were tightened evenly. Two months after the repair, the customer had not reported another problem. Jimmy reviewed the procedure, and Ronni completed the technical review. This repair was specific to that hinge and gasket combination; damaged or incorrectly sized gaskets still need replacement.
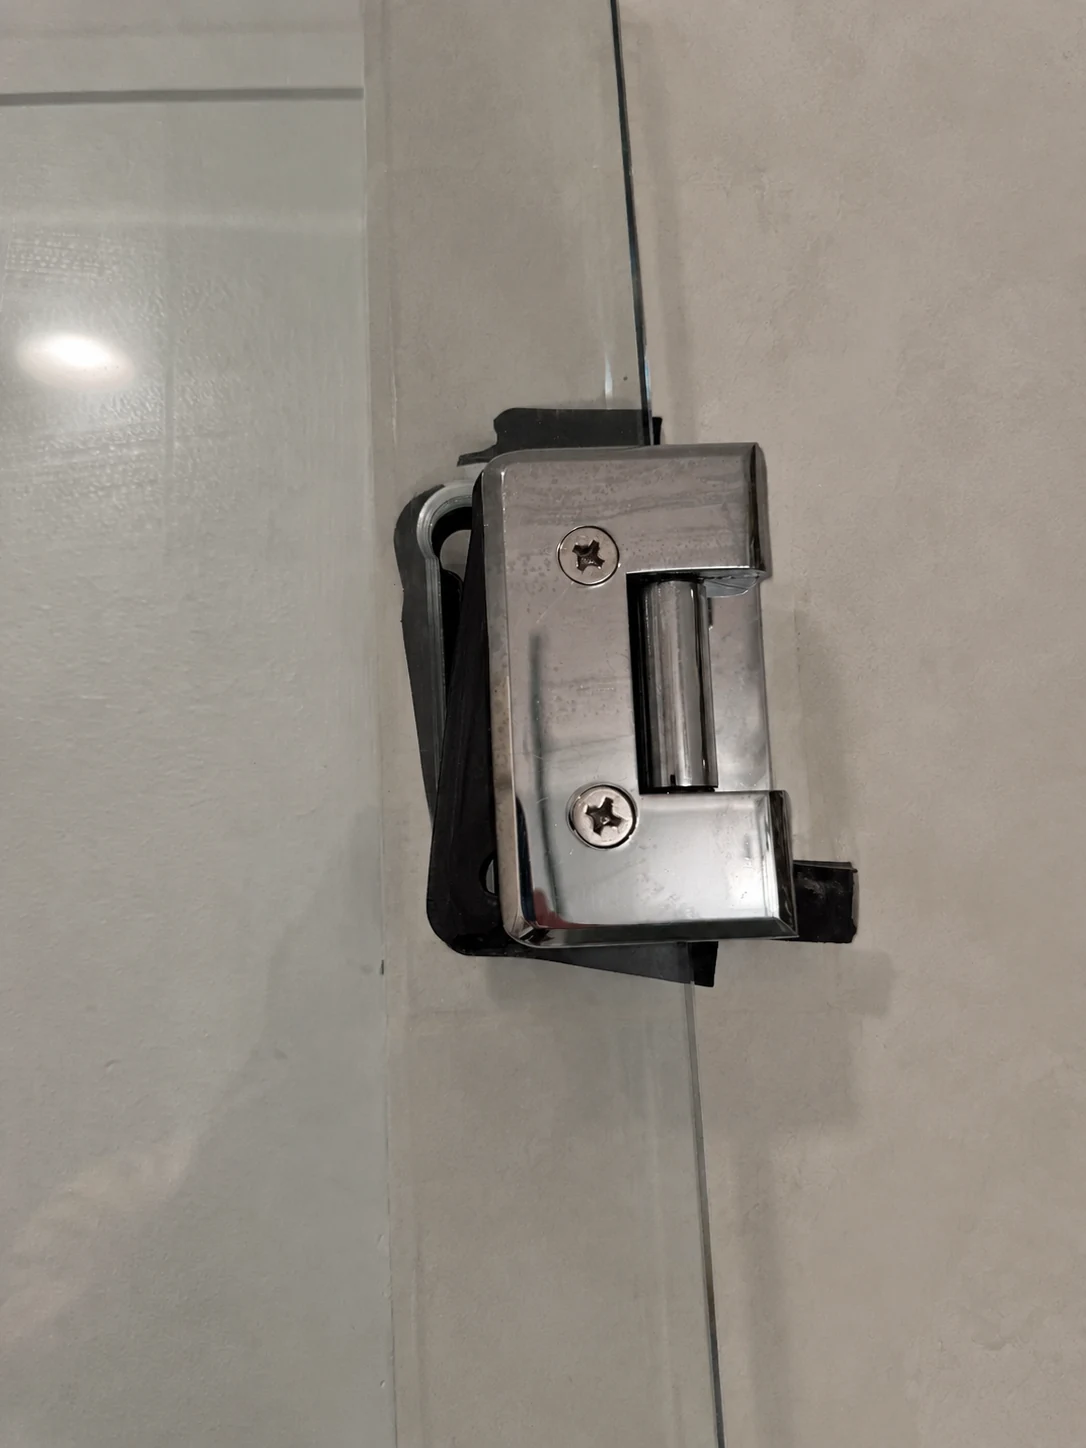
Check the hinge joint
Support the door while a second person applies a small load at the handle side. Watch the pin, knuckle, cam, and hinge body. Alignment cannot remove play inside the mechanism.
Replace serviceable internal parts through the manufacturer’s repair procedure. Otherwise, fit a compatible hinge with the correct load rating or have an installer assess it.
Check hinge count and capacity
Estimate the glass weight with the formula above, then find the hinge rating. Check all four limits:
- Maximum door weight with two or three hinges
- Maximum door width
- Permitted glass thickness
- Wall, glass, or pivot mounting arrangement
Door width matters as much as weight because the load on the hinges rises as the panel gets wider.
For example, the CRL Geneva 337 is rated for about 36.3 kg and a 711 mm door width with two hinges. Three hinges raise those limits to about 54.4 kg and 813 mm. A 900 x 1,900 x 10 mm panel weighs about 42.75 kg, so it exceeds both two-hinge limits for that model. See the CRL Geneva 337 ratings.
Do not add a third hinge by drilling the existing panel. Holes and cutouts in tempered glass must be made before tempering. A supplier can match replacement hardware to the existing glass size and fabrication. See the National Glass Association’s fabrication guidance.
Check the gaskets
A gasket may be worn, displaced, or wrong for the glass and hinge combination. Replace it with the correct part. A thicker gasket does not automatically improve grip and may load the glass incorrectly.
Use the approved cleaning method for the hinge. Advice about stripping coatings, adding adhesive, or using solvent on one system may damage another.
Check the clamp plates and screws
A damaged plate or fastener may no longer hold the glass. Repeated overtightening can make the damage worse. Hardware that cannot hold its position after correct assembly needs repair or replacement. Once you know which layer failed, use our shower door repair-or-replace cost guide to compare a parts repair, glass-only replacement, and a complete new system on the same scope.
Check the wall mount and fixed panel
Remove the decorative cover and watch the wall plate during the controlled lift test. Look for movement against the tile, screws that move with the plate, or sealant that keeps splitting around the edge. Stop adjusting the door if the wall plate moves.
Check construction photos, installation records, or detectable framing to see whether the long screws enter a stud, wood blocking, or another structural base required by the door. Tile is a finish, not structural support. An ordinary hollow-wall anchor does not replace required wood backing.
DreamLine’s wall-mounted UNIDOOR hinges require double studs or 2 x 6 inch wood blocking, with the screws driven into that wood. See DreamLine’s wall reinforcement requirements.
If a screw spins, the plate separates from the wall, or the backing cannot be confirmed, the fixing needs to be opened and rebuilt. Raising the glass again will only hide the problem for a while.
Check parts fitted during an earlier repair
Replacement hinges and gaskets must match the glass thickness, hole or cutout pattern, door size, and load. Similar-looking hinges are not necessarily interchangeable.
Check the result
Move the door slowly through a complete opening and closing cycle. The glass should clear the enclosure throughout its travel.
Inspect the seals next. A folded bottom sweep or misaligned magnetic strip can make a correctly positioned door rub or leak. Once the panel position is correct, use the bottom sweep replacement guide to match and replace a damaged strip.
Measure the same gaps you recorded before the adjustment. The vertical gaps do not need to look identical if the product design says otherwise, but the seals must fit and the glass must stay clear. If you need a repeatable way to record the opening, use the measurement points in our shower-door measuring guide.
After any sealant has cured, test the enclosure under normal shower flow. A direct jet aimed at an exposed joint from the wrong direction is not a useful leak test.
If the door now moves and closes correctly but the floor still gets wet, use the leak-by-location guide to find where water first escapes.
Check the door again after several uses. Record where and when it moves if the sag returns.
Scope and stop signs
This guide covers hardware identification, fault finding, and the usual order of adjustment. Screw functions, turning direction, torque, and final clearance vary by product. Use the model’s technical sheet when you can identify it.
Stop the repair and call a glass shower installer if:
- The glass has a chip or crack at an edge, corner, hole, or cutout
- You cannot support the door or would have to lift it alone
- The wall plate, fixed panel, or bottom pivot seat moves with the door
- A screw is seized, stripped, broken, or will not tighten
- The hinges are undersized or the wall lacks the required structural support
- The door keeps dropping after adjustment
Before the visit, take a full photo of the enclosure, both sides of each hinge, the bottom pivot if present, the rubbing point, and any displaced gasket. Include the model number and a short record of earlier adjustments.
Frequently asked questions
Which screw adjusts a frameless shower door?
Start with the door type. On a sliding door, inspect the roller adjusters. On a pivot door, inspect the bottom pivot, cam, and both pivot clamps. On a side-hinged door, use tape marks and the lift test. Loosen the clamp screws only when the glass moves relative to the clamp. Wall screws and small screws in the moving hinge joint usually serve other functions.
Does turning a screw clockwise raise the door?
Only if that mechanism was designed to work that way. A roller screw may raise a panel clockwise, while another screw may tighten a clamp or lock a closing angle. Trace what the screw connects before turning it.
Does every cam adjust door height?
No. A cam may change roller height, lift the door during travel, hold an angle, or return the door to center. Use it for height only when the hardware diagram marks that function.
Should hinge-plate screws be tightened diagonally?
On a plate with several screws, two or three alternating or diagonal passes help spread clamp pressure. A published tightening sequence or torque value takes priority.
What if there are no visible adjustment screws?
Check the inside face of the hinge, bottom pivot seat, roller cover, and back of any decorative cap for a mark or release notch. Search the brand or marking with “shower door hinge” to find a diagram. A hardware supplier can often identify the system from photos of both sides, the screw layout, and the whole door. Do not pry a cover next to the glass if it has no obvious release point.
How much clearance should a shower door have?
With no model information, use 6 to 16 mm as an initial check from the bare bottom edge of the glass to the curb. A top-to-bottom gap difference of about 3 mm is enough to start investigating. The finished door still needs to clear the enclosure through its full travel, seal at the bottom, and keep the glass away from tile and metal.
Can I adjust a heavy glass shower door alone?
No. Do not release a clamp or lift heavy glass without a second person, stable load-bearing blocks, and suitable handling equipment.
Sources to check
Use these with the exact product and room conditions behind your decision.
- Kohler pivot-door installation instructionsModel-specific reference for a bottom pivot seat and cam, top and bottom clamps, alignment, and supported adjustment.
- Kohler pivot-door technical manualA second pivot-door design used to confirm that clamp and cam functions vary by model.
- Symphony sliding-door adjustment guideManufacturer example of roller-based panel-height and vertical-alignment adjustment.
- CRL Essence shower-door instructionsManufacturer example of an eccentric roller cam with approximately 1/8-inch adjustment.
- Bohle Arta FM hinge informationManufacturer reference distinguishing a lift-and-lower mechanism from closed-position adjustment.
- DreamLine UNIDOOR installation manualModel-specific reference for wall reinforcement, glass handling, shims, gasket compression, bottom clearance, and closing-angle adjustment.
- National Glass Association glass-property guidanceIndustry reference for the approximate 2,500 kg/m³ density used in the glass-weight calculation.
- National Glass Association point-supported glazing guidanceIndustry reference for stress and damage considerations around holes and notches.
- National Glass Association tempering guidanceIndustry reference explaining that cutting, drilling, notching, and other fabrication must take place before heat treatment.
- CRL Geneva 337 hinge specificationsManufacturer ratings for glass thickness, maximum door weight, maximum door width, and two- or three-hinge configurations.
- Customer hinge-clamp repairCustomer-supplied photos are published with permission. The field repair used 600-grit or finer abrasive paper between the existing gasket and glass; two months later, the customer had not reported another problem. Jimmy reviewed the procedure, and Ronni completed the technical review. This is not a manufacturer-issued procedure.