
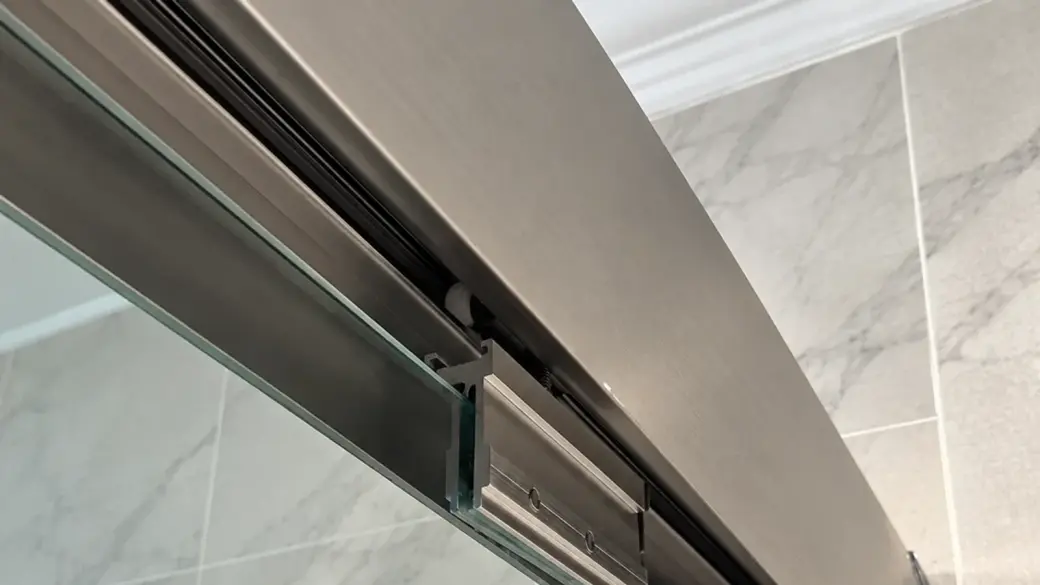
Stop here if the glass or support is damaged
If the glass and its supports are sound, work through the checks below with a helper. Hold the panel itself when supporting it; the handle is not a lifting point.
Start with the problem you can see:
- The panel has left its track or bottom guide: identify the door type, then use the matching reset steps.
- You have put it back, but it keeps coming off: start with the diagnosis table.
- The panel is correctly engaged but grinds or sticks: use the shower door track repair guide.
Which sliding shower door do you have?
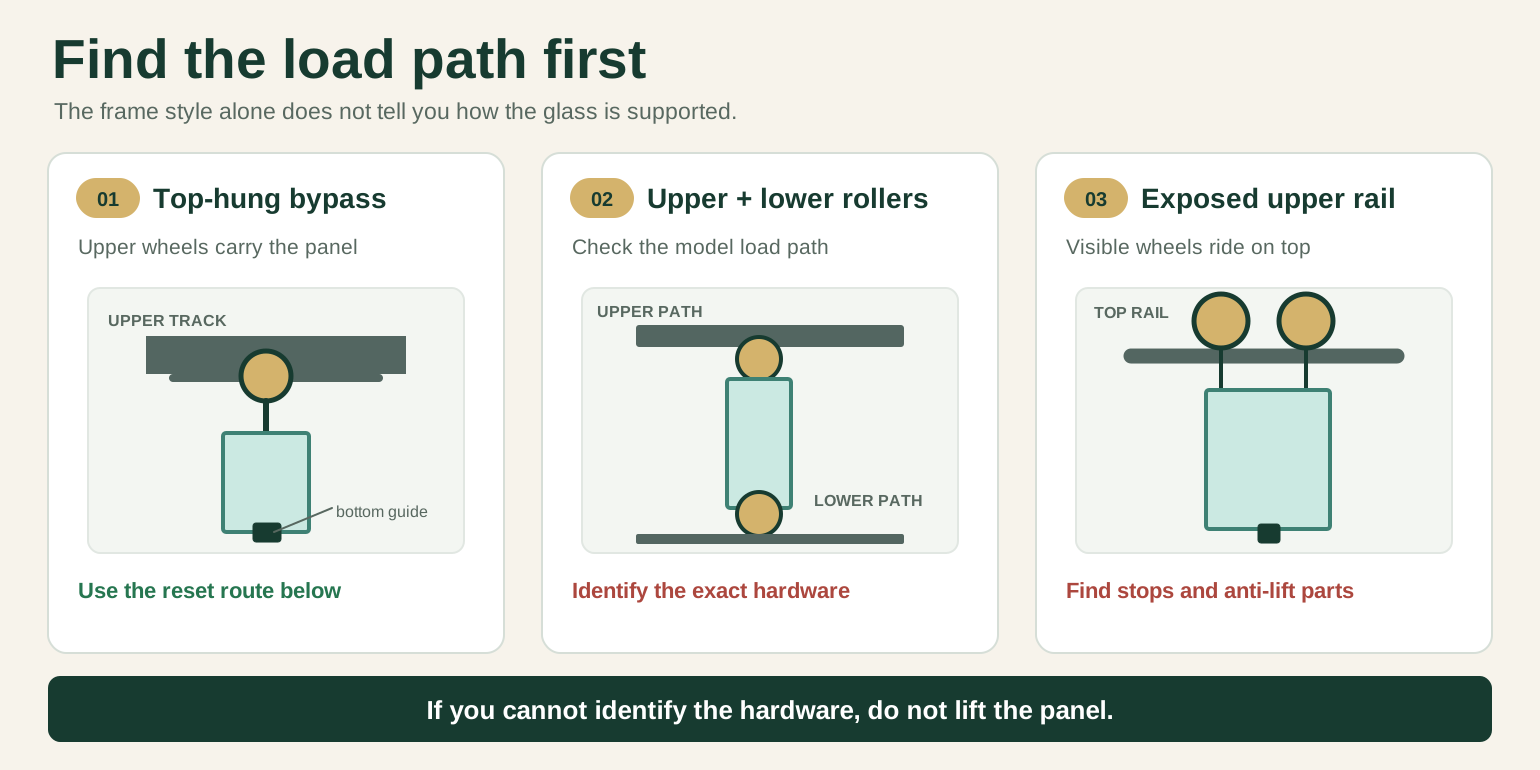
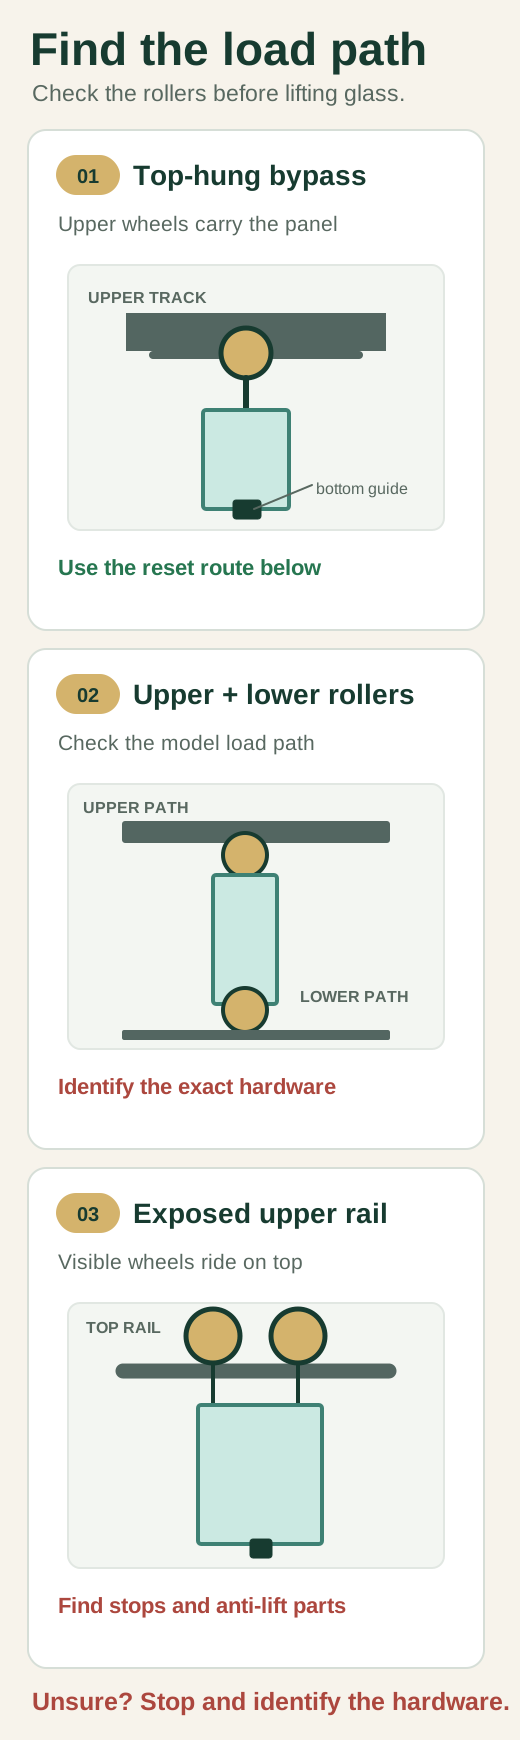
Look for the parts carrying the glass. A framed or frameless label describes the appearance; you still need to identify the rollers, rail, and guide that support or control this panel.
| What you can see | Where the weight goes | What to do next |
|---|---|---|
| Wheels run inside the upper header; a small guide controls the bottom edge | Upper track | Identify the loose panel, follow its model’s sequence to engage the rollers and guide, then restore the retainers and test the full travel. |
| You see wheels at the lower rail, with or without another set above | Check the model’s load path | Find which wheels carry the glass and where its anti-lift parts sit. The upper-header steps below are for a different setup. |
| Exposed wheels ride on a visible rail above the glass | Exposed top rail | Inspect the rail stops and anti-lift hardware. This enclosed-header lift-out route does not fit an exposed rail. |
| You cannot tell what carries the panel | Unknown | Photograph the upper wheels, lower hardware, and both track ends; match those parts before lifting. |
A lower wheel may guide or retain the panel without carrying its weight. The reset below is for a door whose upper wheels carry the glass while a center guide controls the bottom.
On this setup, the bottom guide works like a lane divider: it keeps the panel on its path while the upper rollers carry the weight. If you describe the door as “off the bottom track,” the bottom may have slipped out of that guide even though the upper wheels are still seated. For example, imagine the bottom edge swaying while the top stays in place. Check the guide as well as the upper rollers, with the glass supported, before choosing a reset route.
How to put a sliding shower door back on track (top-hung bypass)
For this two-panel, top-hung bypass setup, have your helper and flashlight ready. Set out a screwdriver that fits the retaining hardware and a padded resting place in case the panel has to come down. Cover the drain to keep small parts out of it.
Before lifting anything, find the loose panel’s upper groove and matching bottom-guide leg. The inside and outside panels have separate paths. Leave the sound panel alone.
Step 1: Hold the panel steady
Have your helper support the glass while you inspect its top and bottom. Keep bare edges away from the curb, tile, and metal tools. Stop if you cannot hold the panel steady without twisting it or risking a drop.
Step 2: Find what keeps the panel from lifting out
Find the header retainer, any anti-jump clip near the roller, and the center guide at the bottom. Photograph them before releasing anything so you have a record of where each part belongs. With your helper supporting the glass, release the retainer that blocks the panel’s exit path. Leave the roller fastener and glass clamp alone.
On the Kohler Levity example, the header retainer covers the rollers, and the outside rollers have anti-jump clips. You will put these parts back in Step 5. If you cannot identify how the retainer releases, do not pry against the glass.
Step 3: Clear the track and inspect the wheel
Clear loose grit from the roller groove, then inspect the wheel’s rolling edge, axle, fastener, and the groove itself. Damage to the wheel or track can make the panel come off again. Look past a dirty roller cap to the parts that touch the track.
Replace the wheel with a matched part if it has a missing chunk, wobbles on its axle, or still cannot turn freely after cleaning. If the rail is bent or its mount is loose, have that support repaired before trying another reset.
Step 4: Seat the loose panel on its own track and guide
First identify which panel you are holding. The Kohler Levity instructions give the inside and outside panels different grooves, guide legs, and installation sequences:
| Levity panel | Header groove and bottom-guide leg | Sequence in the cited instructions |
|---|---|---|
| Inside panel | Lower header groove and inside guide leg | From inside the shower, lift the panel over the guide into the lower header groove, then confirm that its bottom channel engages the inside guide leg. |
| Outside panel | Upper header groove and outside guide leg | Engage the outside guide leg first, then lift the panel onto the upper header groove. |
The diagrams below show those Levity paths. If your hardware differs, use the instructions for your model. With your helper carrying the glass, follow the matching path and keep supporting the panel until both rollers and the bottom guide are secure. Check the contact points directly: a panel can look straight while a roller is still resting on the groove’s lip.
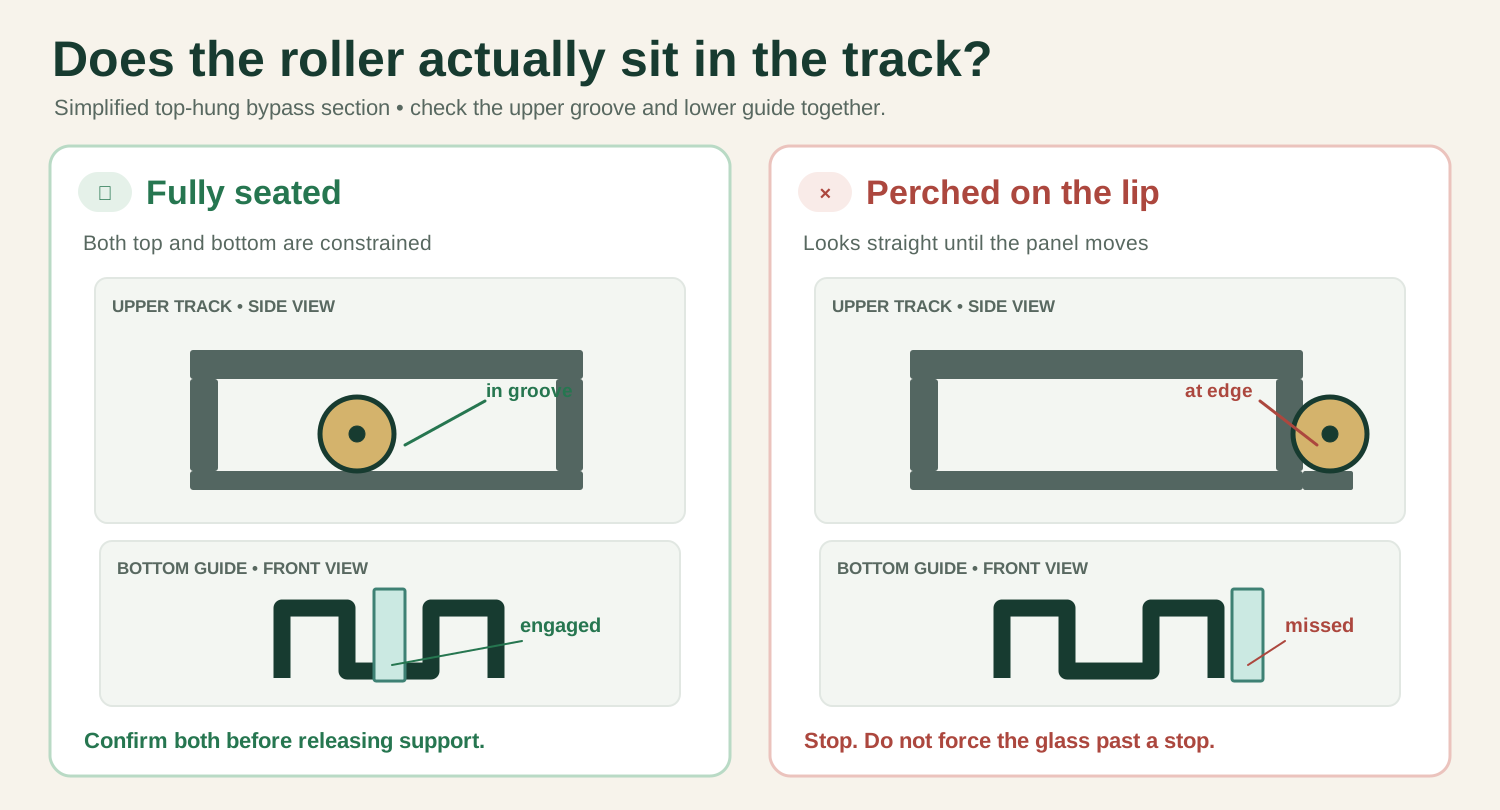
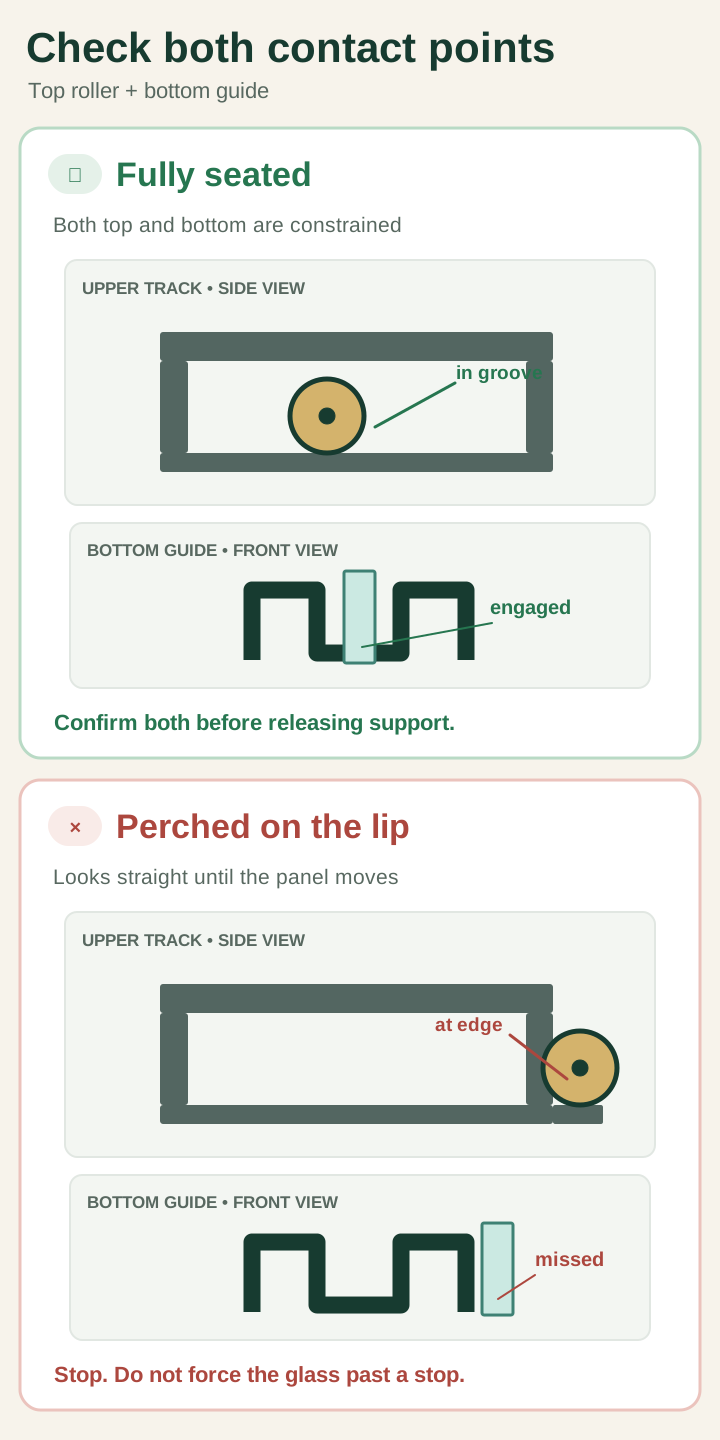
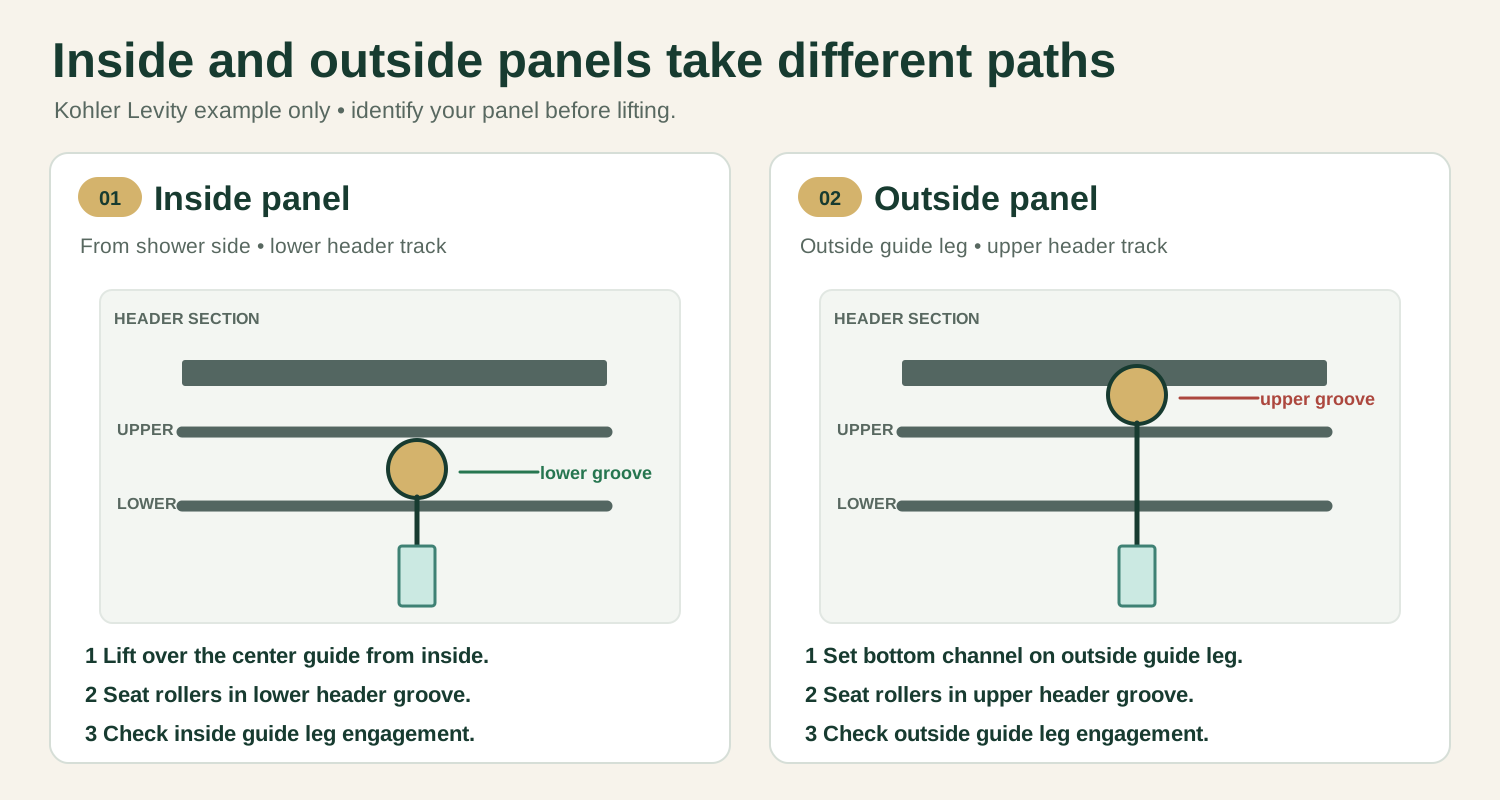
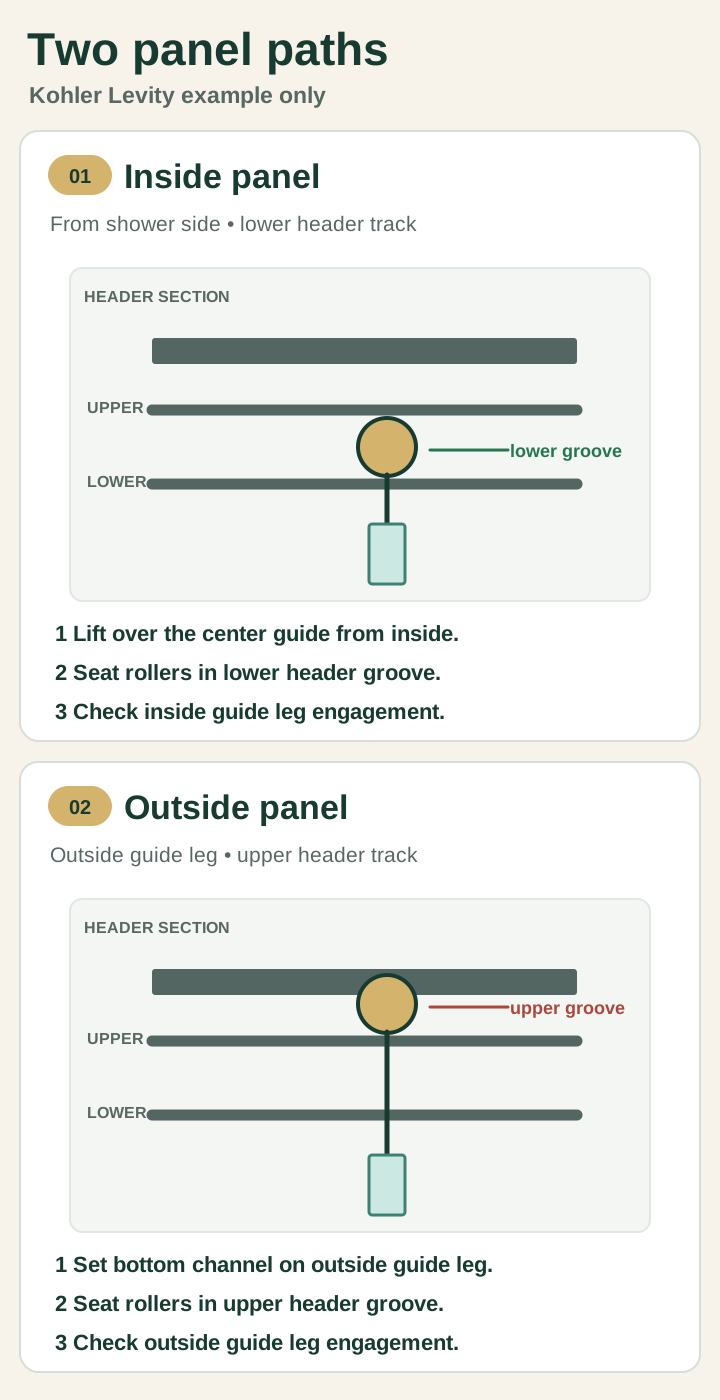
If the roller seats only when the bottom misses the guide, stop and back out. Check the guide position and your choice of groove. Do not force the glass past a stop.
Step 5: Put the retaining parts back
Put the retainer and every anti-jump or anti-lift part back in its specified position. Check the fasteners and confirm that the bottom guide still captures the panel. Restore all required clips before testing, even if the door seems to roll smoothly without them.
Step 6: Test every inch of travel
Keep a hand ready to steady the panel as you slide it slowly from end to end. Watch both wheels stay in their grooves and the bottom channel stay around its guide. The stops must halt travel before the glass or handle can strike a wall. Close the door and check the gap against the jamb from top to bottom.
Stop if you hear a hard click, see a wheel climbing, feel a new bind, or cannot refit a retainer. Keep the door out of service and use the diagnosis below to find the cause.
Why does my sliding shower door keep coming off track?
Imagine putting the door back on Saturday, only to have it jump out again on Sunday. Another round of rehanging leaves the cause untouched. Look for a roller perched on the lip, a missing retainer, or a guide or track that has moved. Where and how it happens will help you choose the next check.
| What you see | Check this first | The call |
|---|---|---|
| It comes off again soon after rehanging | Are both rollers fully in their grooves? Is the retainer or anti-jump part back? | Correct the seating or replace the missing, matched safety part. Do not keep rehanging it. |
| It hops at the same spot every time | Look at that point on the rail for grit, a dent, or a loose joint | Clean grit. A bent or loose load-bearing rail needs repair before use. |
| It grinds or takes a hard push all the way across | Check the wheel’s rolling edge and whether the bottom guide is rubbing | Replace a failed wheel; correct a rubbing guide or replace it if damaged. Find the fault before considering lubricant. |
| It gets harder to push, then stops near one end; the panel hangs unsteadily | Check the upper glass hanger and its fasteners as well as the roller path | Secure a sound but loose hanger before buying a wheel; stop if the panel cannot be held steady. |
| The panel sways at the bottom | Check whether the glass is still captured by the guide | Re-engage a sound guide or install its matched replacement. |
| It stops short of the closing jamb | Find the exact contact point: guide, stop, seal, or frame | Fix the obstruction you can see. Do not move a safety stop to gain a few inches. |
| It reaches the jamb, then rolls open | Check header and threshold level; watch whether the panel drifts the same way elsewhere | Correct the support/alignment issue before adjusting a roller. |
If the rollers are seated correctly and the guide and retaining hardware are secure, but the door keeps jumping at the same spot, follow the track inspection and repair steps. Check that spot for buildup, a damaged channel, or a loose connection. Keep the door out of service if the load-bearing rail is bent or loose.
Why won’t my sliding shower door close or stay closed?
Picture two doors: one stops before it reaches the jamb; the other closes, then rolls back open. Follow the matching row above. For a door that rolls open, Delta’s closing FAQ starts with a level check. Do that before ordering wheels.
Why is my sliding shower door hard to slide?
Notice whether it drags across the whole opening or catches near one end, then follow that row in the table. A wheel, pinching guide, or loose hanger may be responsible. For a panel that stays correctly engaged, the track repair guide covers cleaning and rail checks. Jack’s case below is a useful example of why to check the hanger before buying a wheel.
Field case: the door that stopped halfway
Jack, in the Miami area (name and location anonymized), had a door that suddenly became hard to push. It stopped altogether when moved toward one side, and the panel no longer hung steadily. He spotted a screw on the upper glass bracket but could not work out how to reach it with the door in place. He could see the screw; getting a screwdriver to it was the problem.
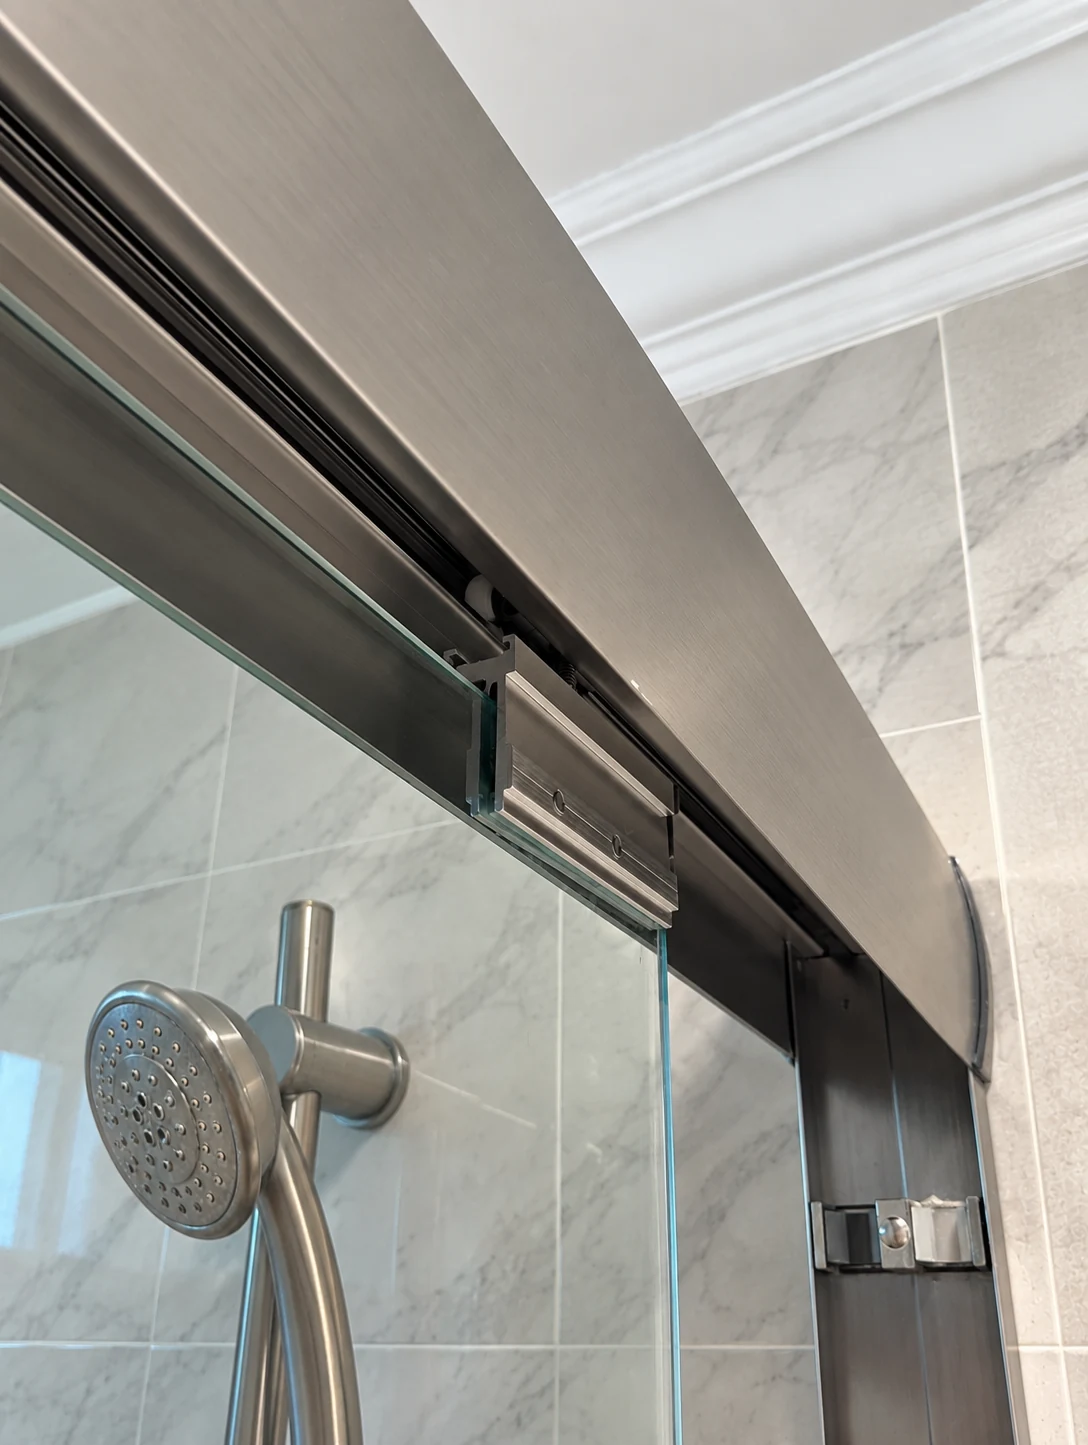
Ronni removed the bottom anti-sway block to free the panel’s lower edge and ease the binding at the roller and track. With the glass supported, he took the panel down and retightened the screw at the upper glass bracket. He reinstalled the panel and put the bottom block back. The door slid smoothly again.
This repair needed attention to a fastener; Ronni did not have to replace a wheel. If your door binds at one end and the hanger looks loose, check that hanger and its fasteners before shopping for rollers. The bottom block came out to give Ronni access and went back before the door returned to use. Jack’s photo documents the visible hanger and screws, not the removal motion.
Where is the roller adjustment screw?
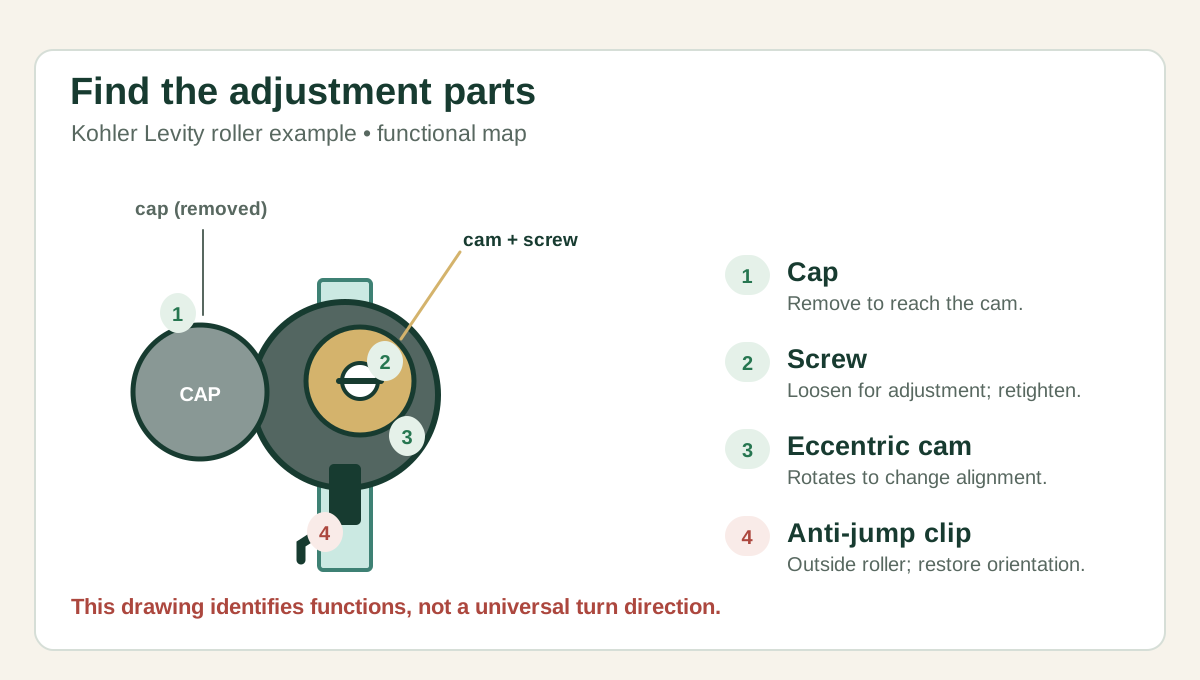
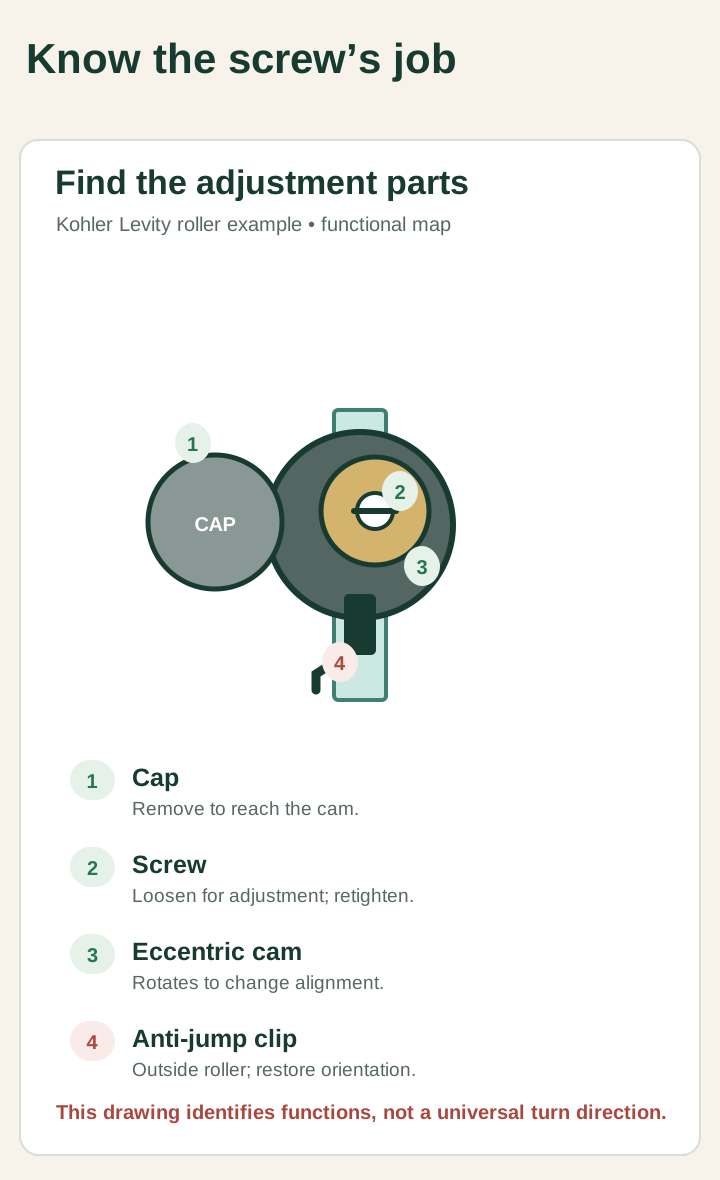
On Kohler Levity hardware, the cap covers a screw and an eccentric cam. The screw secures the roller; the cam changes the panel’s position. Remove the cap, loosen the screw, rotate the cam, retighten the screw, and replace the cap. Turning both cams changes the panel’s height; turning one changes its angle.
Support the panel and mark the cam’s starting position so you can return to it. Adjust a little at a time, then secure the screw and check the gap at the jamb. Cam adjustment can correct a panel rubbing the guide or missing the bumper. A bent rail needs its own repair.
Watch the panel as you turn the cam instead of relying on a universal “clockwise raises it” rule. If the gap gets worse, return to your mark and adjust the other way. Jack’s bracket photo does not establish that his door uses this cam setup. Our sliding-door installation guide’s adjustment section covers the larger alignment job.
When to replace a sliding shower door roller or bottom guide
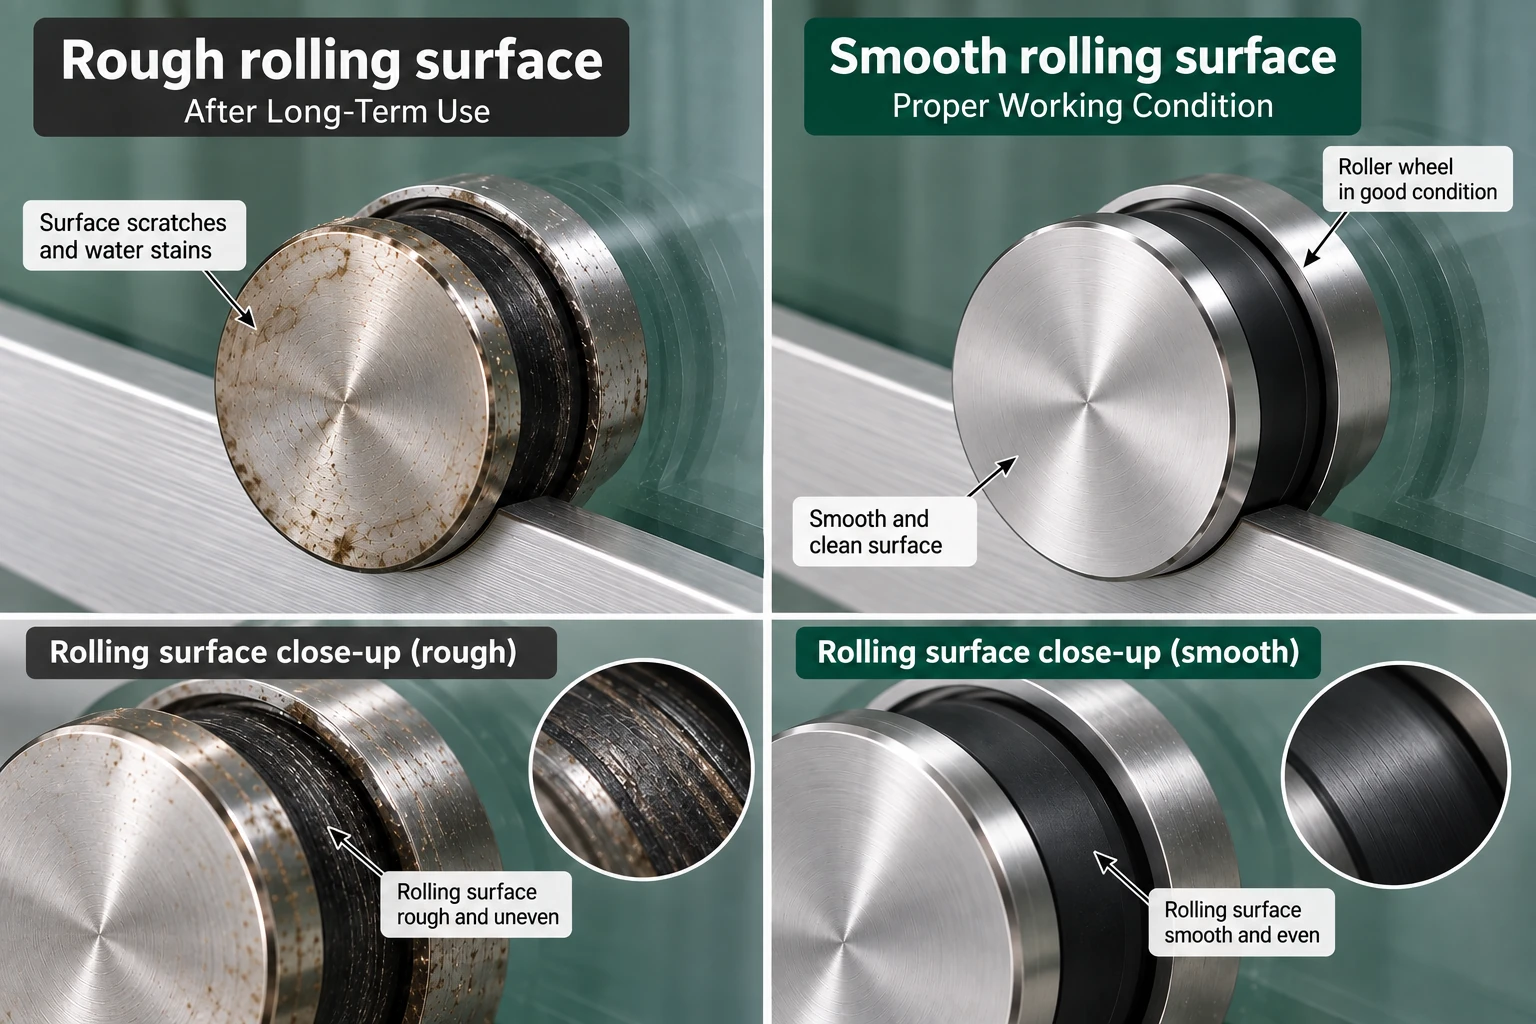
Replace a wheel if its rolling edge is chipped or badly worn, it will not turn freely, or its axle and fastener no longer hold it securely. A bottom guide needs replacement if it is broken, cannot capture the panel in the intended channel, or is too worn to stay fixed. If the guide is sound but has shifted, restore its original position and repair the attachment. For an adhesive guide, that includes repairing the failed bond.
Treat the cap like a car’s hubcap: its appearance tells you little about the surface doing the rolling. Stains on the metal cap are cosmetic. Inspect the tread and axle, then watch how the panel travels. Clean a dirty guide; replace a cracked one.
If you can read the old part number, start there. Before ordering, compare:
- The door model, inside or outside panel, and glass thickness.
- The mounting-hole spacing and shape.
- The wheel diameter, running profile, and groove it fits.
- The axle or cam arrangement and anti-jump hardware.
- The bottom-guide channel width and attachment.
Bring the old part and measurements to the seller. Our sliding-door hardware overview names the parts. Shopping by wheel diameter alone is like buying shoes by length and ignoring the width. You have checked one dimension, but the rest still has to fit.
Do not drill or reshape tempered glass to fit a new roller. If the holes or mounting arrangement do not match, choose the correct part.
If correctly matched replacement rollers are fitted and the door still sticks, check the rail and bottom guide before buying more wheels. Our shower door track repair guide covers buildup, guide contact, separate straightedge and level checks, and when to consider a matched replacement rail.
When to stop DIY and consider a new door
Repair makes sense when the glass, header, frame, and mounts are sound and you can replace the failed part with a compatible one. If the rest of the enclosure checks out, spend the money on the part that failed.
Stop using the enclosure if the glass is cracked or edge-damaged, a load-bearing track is bent, the header or wall support moves, the frame is badly corroded, or the right retaining part cannot be obtained. If a correctly seated door still jumps out after its guide and safety hardware have been checked, get a shower-door installer to inspect the whole support path. Our repair-versus-replacement guide explains when a part, one glass panel, or the full enclosure is the right scope. If you decide to change the opening style, compare the entry and clearance tradeoffs in sliding versus hinged shower doors.
If the door stays on track but hangs low or leans, start with the sliding-door section of the sagging guide. Inspect its alignment before treating it as a derailment.
Mistakes that make an off-track door worse
- Lifting by the handle. Hold the panel itself with help.
- Trying to catch or rehang a heavy panel alone.
- Prying a retainer before finding how it releases.
- Letting go because the roller appears to sit on the rail.
- Cycling the door without the bottom guide or anti-jump part restored.
- Loosening a load-bearing screw without supporting the glass.
- Buying a “universal” roller by appearance, without checking holes and the panel position.
- Spraying lubricant into a damaged track and calling the noise fixed.
Before you use the shower again
After rehanging or repairing the door, check its full range of movement:
- The glass edges, corners, and roller holes are undamaged.
- Both rollers stay in the correct grooves through the full travel.
- The bottom channel remains engaged with its guide without pinching.
- The retainer, anti-jump parts, stops, and their fasteners are in place.
- The header and wall attachments do not move with the panel.
- The door closes against its intended bumper or jamb and does not roll away.
- Nothing hard strikes a glass edge at either end of travel.
Keep the shower out of service if any check fails. A smooth trip across the middle of the opening does not tell you whether the panel stays captured at both ends, so finish the full-travel test before using it.
If the repaired door moves and closes correctly but water escapes between the panels, use the sliding-panel overlap check in the leak guide to trace the water path. Leave a sound, correctly adjusted roller alone.
Frequently asked questions
Can I put a sliding shower door back on track by myself?
Do not lift or rehang a glass panel alone. A second capable adult should support the panel while you check its rollers, guide, and retaining hardware. If the panel is hanging loose or cannot be held steadily, stop and call a shower-door installer.
Why does my sliding shower door keep coming off track?
A repeat derailment usually means the first reset did not fix the cause. Check whether the rollers are fully seated, the anti-jump or retaining hardware is back in place, and the bottom guide still controls the panel. Then look for a damaged roller or track. Do not keep rehanging a door that jumps again.
Why won’t my sliding shower door close or stay closed?
If it cannot reach the closed position, find the exact point of contact: the guide, a stop, a seal, or the frame. If it closes but rolls back open, check the header and threshold for level before adjusting rollers. Those are different faults and need different fixes.
Do I need new rollers or a new bottom guide?
Replace the part that has failed. A rough, loose, cracked, or damaged roller needs a matched replacement; a broken or misplaced guide needs correction or a matched guide. Dirt on a roller cap is not proof that the wheel is worn. Match the door model, panel position, holes, glass thickness, wheel profile, and guide channel before ordering.
Sources to check
Use these with the exact product and room conditions behind your decision.
- Kohler Levity sliding bath and shower door installation instructionsFile 1218906-2-D, especially steps 17 through 23 and 28, parts identification, safety warnings, and troubleshooting. Shows distinct inside and outside panel paths, center-guide engagement, retainer coverage, anti-jump clips, and cam adjustment. Checked September 28, 2026.
- Kohler Levity roller installation and adjustmentManufacturer guidance on inside and outside roller positions, adjustment cams, and anti-jump clip orientation. Checked September 28, 2026.
- Kohler alternate sliding-door installation instructionsFile 1475288-2, an example with a different roller and anti-jump arrangement. Used to check that the Levity hanging sequence is not universal. Checked September 28, 2026.
- Delta Shower Doors closing troubleshootingManufacturer guidance for a door that rolls open after being shut, including a level check. Checked September 28, 2026.
- Anonymized customer repair caseCustomer feedback, a user-provided summary of Ronni's repair, and a supplied photograph shared with permission. Jack is a pseudonym and the Miami-area location is generalized for privacy. The account confirms smooth movement after reassembly; no longer-term follow-up was supplied. The exact panel-removal motion has not been independently verified.