
Your shower is watering the bathroom floor, and the bath mat is working overtime. If water escapes beneath the closed door, shower door sweep replacement can fix a torn or bent bottom strip. First, make sure that strip is where the water gets out.
A removable clip or an accessible insert is a manageable DIY job when the glass is secure. You can usually leave the door hanging while you replace the strip.
Find the leak, measure the fit, then use the replacement steps for your attachment. Finish by opening and closing the door and testing with water. A dry floor is the goal; a brand-new strip alone doesn’t prove the job is done.
Quick answer: can you do this yourself?
✅ Yes, for an accessible plastic clip or soft insert: The glass must be secure. Glued strips and screw-held rails take more prep.
Time: Budget about 10 minutes to identify the part and 15 to 30 minutes to fit a simple matching clip. Ordering and adhesive cure time are extra. Other attachments take longer.
Tools: Flashlight, tape measure, clean towels and calipers for glass thickness. Use sharp shears for suitable soft strips or a fine-tooth hand saw for a rigid channel.
Part price: Listed bottom-strip examples cost $9.45 to $41.98, checked October 10, 2026. Your exact part and checkout total may differ.
⛔ Chipped, cracked or loose glass: Stop using the door and leave its supports alone. A new sweep cannot repair damaged glass. Keep tools away from the glass edge.
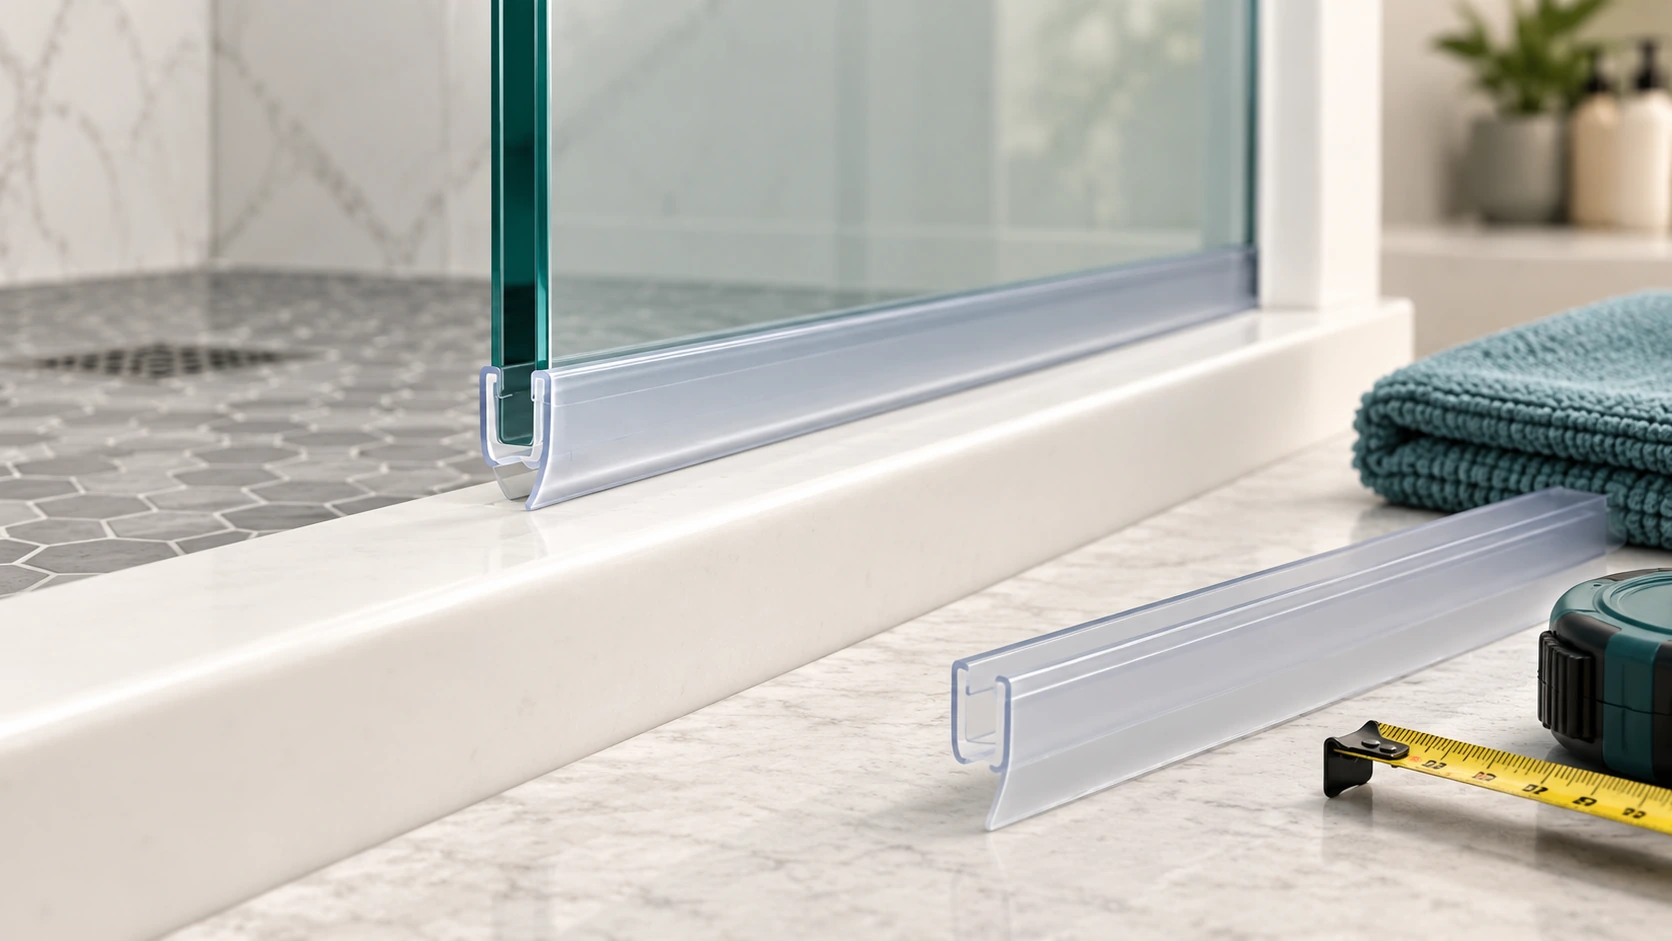
Three parts you’ll see below
| Term | Plain English |
|---|---|
| Sweep | The plastic or rubber strip along the door bottom. |
| Fin | The soft lip hanging from the strip. It wipes or redirects water. |
| Threshold / curb | The raised stone, tile or metal edge beneath the shower door. |
Make sure the bottom sweep is causing the leak
A torn strip is an obvious suspect. Still, watch the water before buying anything. Water running along a joint can end up beneath the door and make an innocent sweep look guilty.
Find the first wet spot
Dry the outside and close the door. Use gentle water flow aimed downward at one short section. For a swinging door, move from the hinge side toward the closing side. For a slider, work from one end to the other. Watch where the first drop appears outside.
Keep the spray out of the gap itself. Blasting a seam tests your aim more than the sweep. Once you’ve found the wet spot, repeat the check under normal shower use. If the leak starts elsewhere, use the leak-by-location guide.
Look along the curb, too. A low spot, recessed grout line, chip or curb-to-wall joint can carry water outside. If water follows that route before reaching the strip, fix the surface or joint. A longer fin won’t fill a channel in the curb.
| What you see | Decision | What to do next |
|---|---|---|
| Water crosses a torn or bent bottom strip | ✅ Replace the strip | Identify the attachment and measure the fit. |
| Water starts at a fixed joint | 🔧 Check that joint | Repair the water path you found. |
| The door gap has changed or is uneven | 🔧 Check the door and curb | Check panel position and curb shape before adjusting. |
| Water follows a curb recess or seam | 🔧 Check the curb | Deal with that recess or seam. |
| Chipped, cracked or loose glass | ⛔ Stop using the door | Leave glass supports and fasteners alone. |
A panel that’s out of its track or loose on its supports has a mechanical problem. Get the panel secure before doing anything with the sweep.
Look for tears, folds and a bent soft edge
Replace a missing or torn strip, or one that stays folded and lets water past. Yellowing alone doesn’t tell you it has failed. Think of a windshield wiper: its color matters less than whether the edge still does its job. Check the shape and how the door moves.
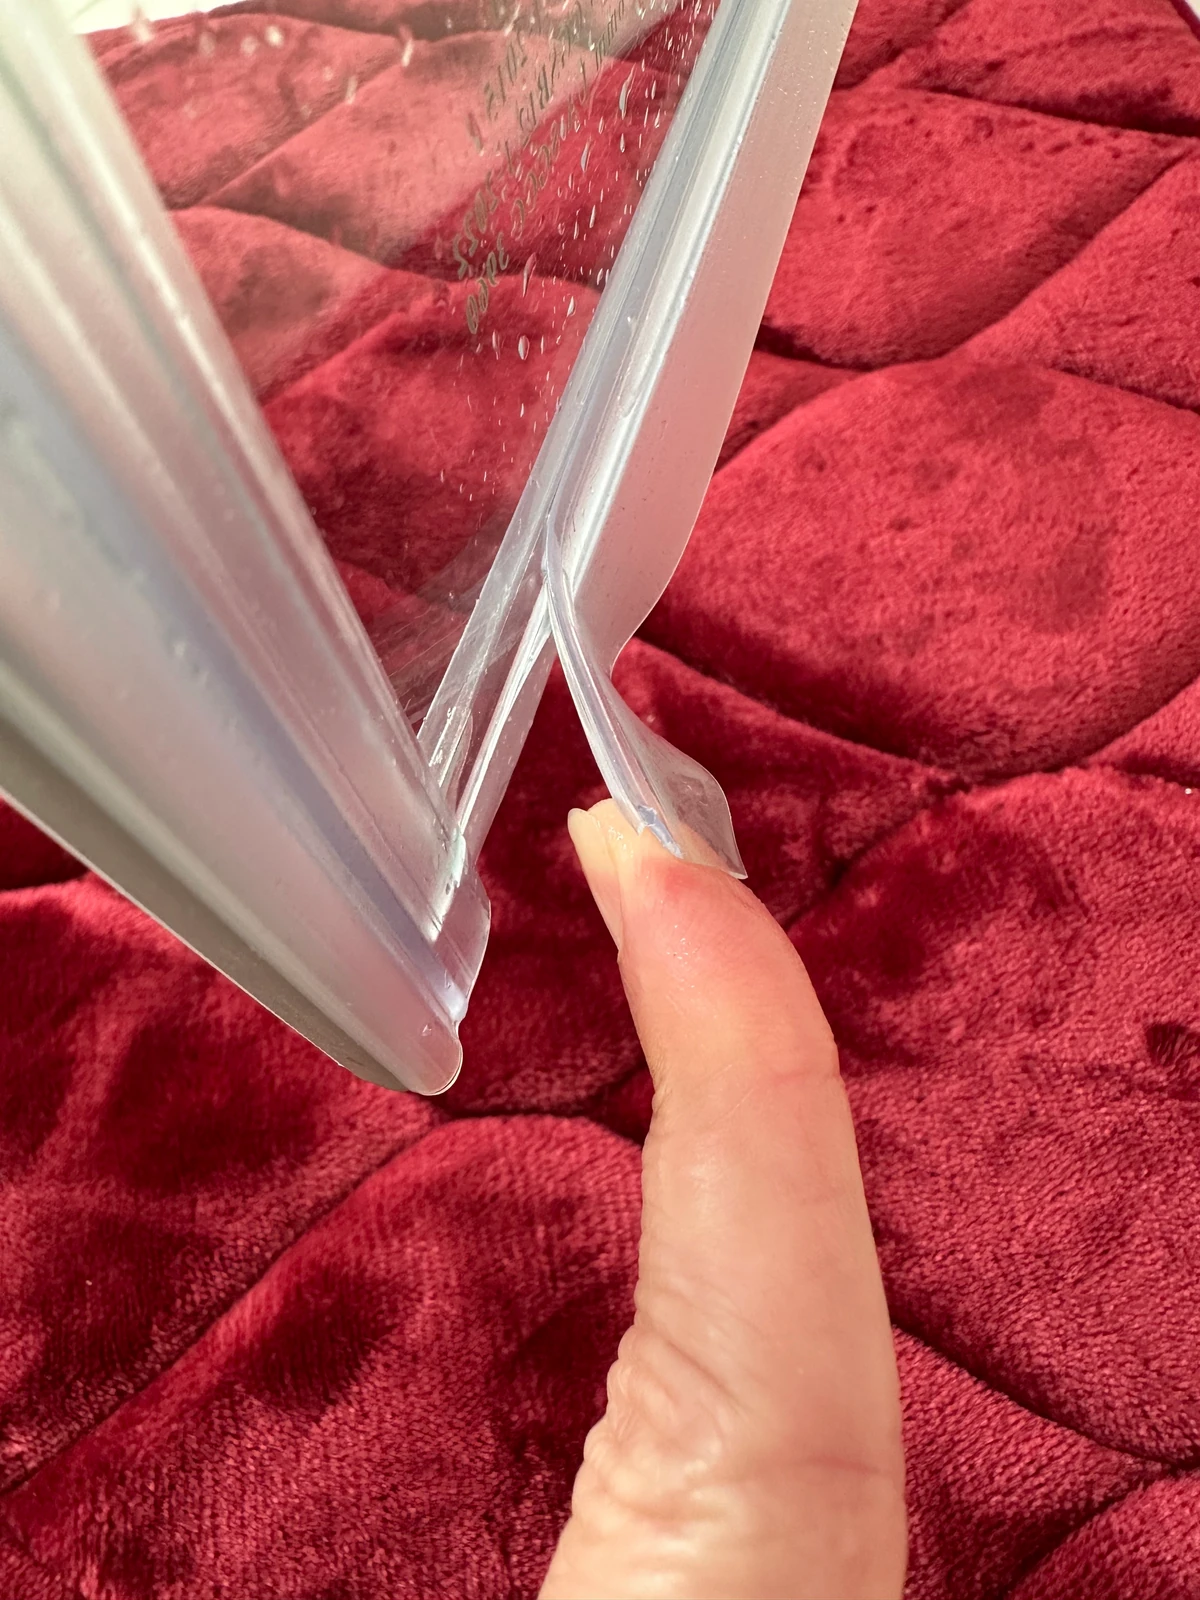
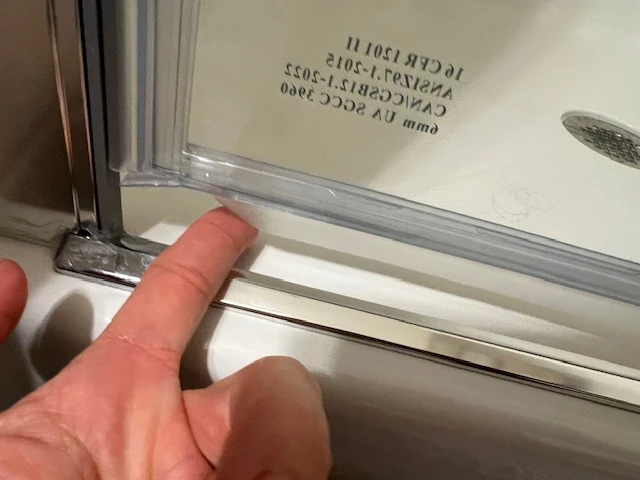
About these customer cases: The site owner supplied these two customer after-sales cases. The photos show the strips before replacement; the repair results come from customer follow-up.
Customer case 1: a bent strip and a bottom leak. This customer photo came with a report of water leaking beneath the door. The customer said a matching replacement stopped it, without adjusting the door height or recaulking.
Customer case 2: the strip was already deformed at installation. A second customer reported leakage with the deformed strip in place. Replacing the strip stopped the leak. A strip can need replacement even when it’s new.
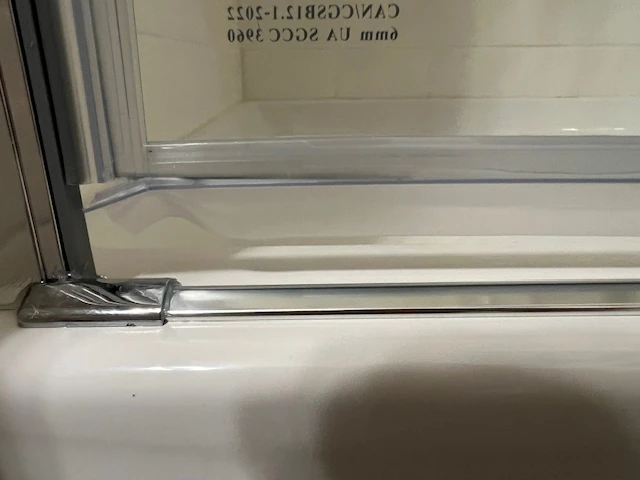
Check a new strip as carefully as an old one. Compare the soft edge with the shape it should have when fitted, then test that spot for leakage. Before ordering, match your door’s attachment, glass thickness and bottom gap.
Match the replacement to your door
For shower door sweep replacement, match what grips the door and what reaches the curb. Two clear strips can look alike in a shopping photo and fit very differently. Keep your measurements and a photo of the strip’s end together.
Look at the end, like the cut end of a loaf of bread. That view shows the shape hidden along the strip. A groove is a narrow slot. An insert is the soft strip inside it. A carrier is the rigid rail that holds the strip.
Which attachment do you have?
A plastic clip wraps around bare glass. A groove insert has a head held inside a metal slot. A bonded strip sticks to the glass with adhesive. Screws hold some carriers in place, but the soft insert inside may come out separately. Find the part that actually needs to move.
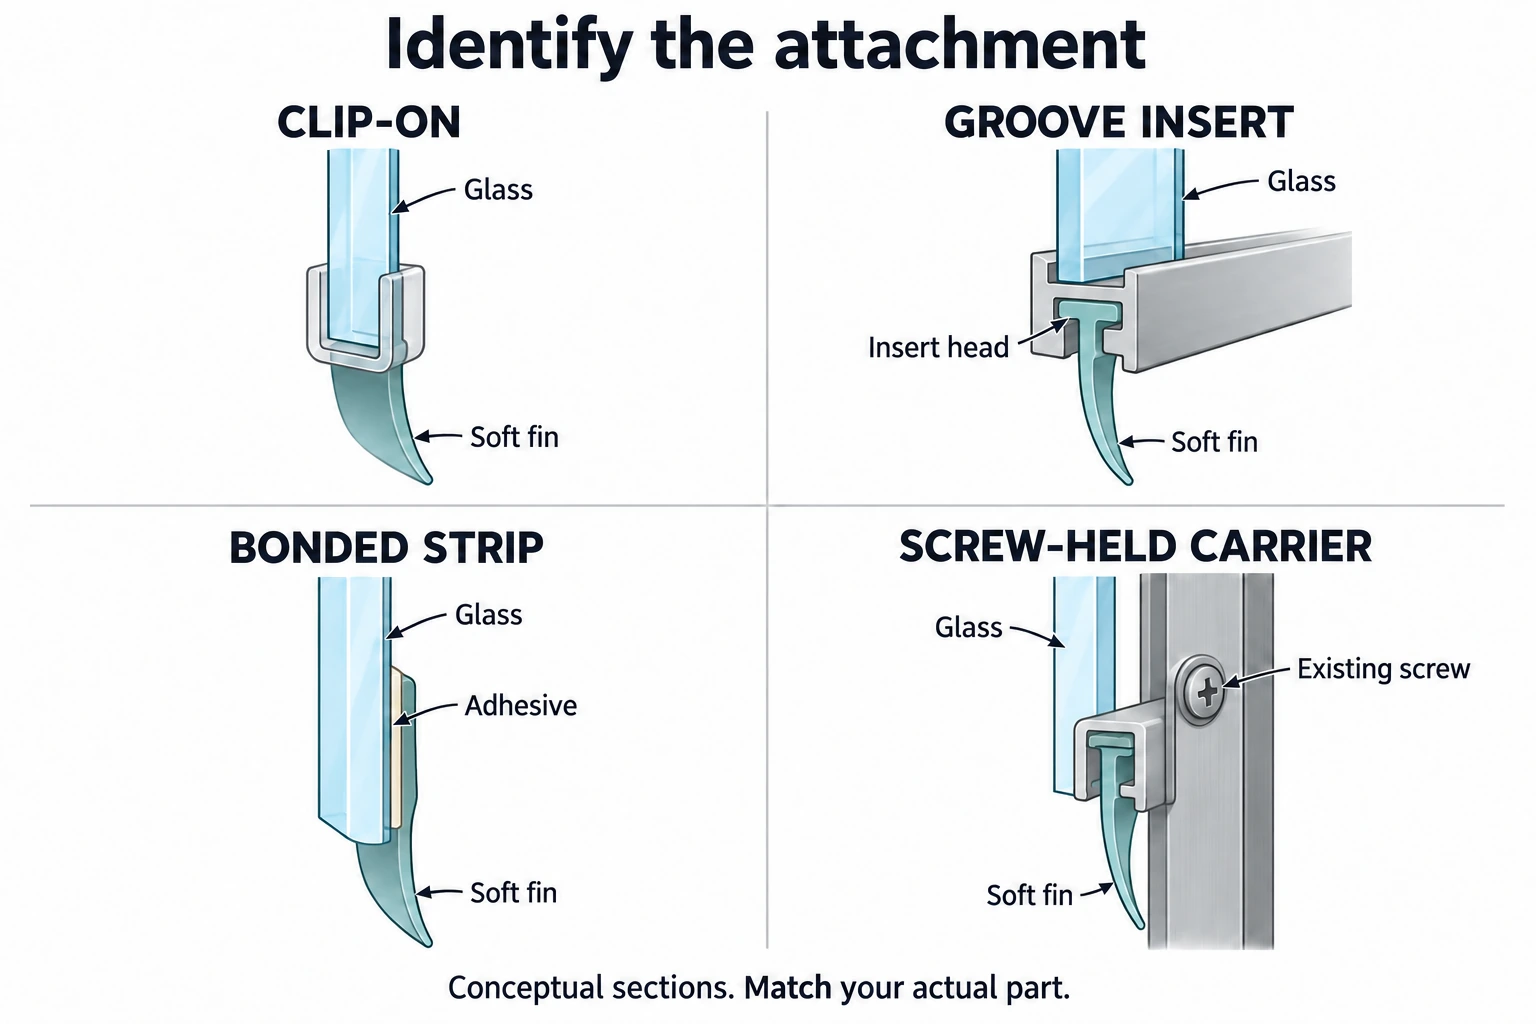
The jamb is the upright side of the opening. Jamb seals and side seals belong there; this job is about the bottom sweep. Stores also use the broader word “seal.” A drip rail can include a rigid carrier and an insert. Magnetic side-seal parts need their own matching.
What size shower door sweep do I need?
For a removable glass-mounted strip, photograph its end before taking it off. Use the removal steps below, then clean the exposed glass edge and curb. Close the door and measure from bare glass to the curb. The old flattened lip shouldn’t be part of the measurement.
Leave a bonded strip or blocked carrier in place until you can release it without prying against the glass. Take a bare-glass gap reading once it’s safely off. Measuring to a squashed fin or trapped dirt makes the gap look smaller than it is.
Measure the closed-door gap at both ends and the center. Record the finished strip length, too. Glass thickness, groove size and fin reach are separate numbers; one cannot stand in for another.
| Write down | Why you need it |
|---|---|
| Actual glass thickness | The clip must grip the pane without force. |
| Insert head size and shape | The head must fit the metal slot. |
| Gap at both ends and center | The fin must handle the smallest and largest gaps. |
| Fin’s working reach | How far the fitted soft lip extends below the glass. |
| Stock length and finished length | The strip must be long enough before you cut. |
| Clearance or overlap at each end | Ends must clear hardware and meet neighboring seals correctly. |
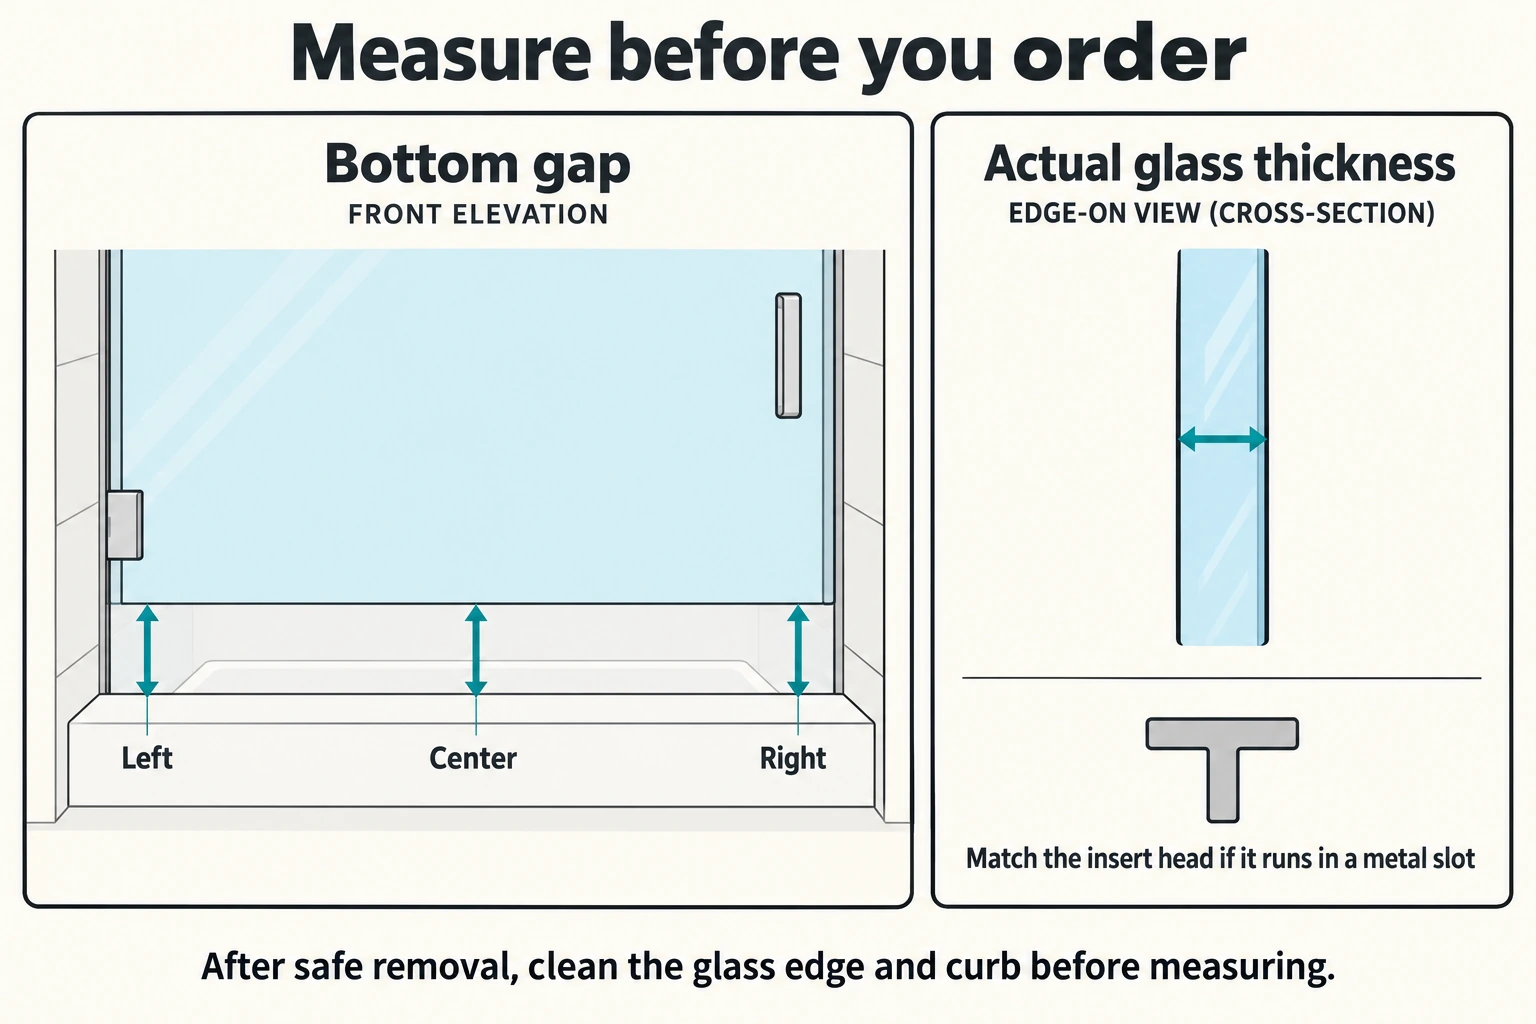
For example, Prime-Line M 6258 wraps around 3/8-inch glass. M 6211 has a 5/32-inch T-shaped head that slides into a metal groove. Both are clear bottom strips, but they attach differently. Match the end shape and the gap the replacement can cover.
Measure the exposed glass edge with calipers and compare it with the clip’s supported thickness range. The nominal size on a label isn’t the measurement of your pane. If the clip hangs loose or needs to be forced on, it’s the wrong fit.
No calipers? Borrow or get a pair before ordering a glass clip. A ruler or photo won’t confirm a close clip fit. Measure the actual pane once, and you have a useful number instead of another strip that nearly fits.
The fin’s working reach is how far its soft lip hangs below the glass once fitted. For a wiping fin, the lip should lightly touch the curb at the largest gap and flex at the smallest. Think of a squeegee brushing a surface. It should wipe, without lifting the door. The rigid carrier must stay clear of the curb.
Some real size examples: CRL P880WS/P120WS uses a 1/4-inch gap, Cambridge, page 3 uses 3/8 inch, and UNIDOOR Style A, printed page 14 uses 5/8 inch. That gives you a sense of scale, from 1/4 to 5/8 inch. Buy for your measured gap and replacement profile.
🔧 Measured more than 1 inch? Check again. Close the door, measure from bare glass and check the panel height and curb shape. Don’t jump straight to an extra-long fin.
Check the version and both ends before you cut
An exact replacement must match the door version, too. Delta SDR7482233 fits only the April 2023 Wilder Pivot system. A familiar brand name doesn’t make two versions interchangeable.
No model number? Build the match from your measurements: attachment shape, glass or groove size, gap range and finished length. Check how each old end meets the side seals and hardware. Buy a profile that matches all of those details. A listing that gives only a length leaves too much unanswered.
Cut length has real exceptions. Canyon, step 1 uses door width plus 3/8 inch, with the extra length at the handle side. That’s a sliding-door detail for this model. UNIDOOR Style A, printed page 18 uses the glass width. Copying the Canyon cut onto an unrelated door can leave an end sticking out where it catches.
✅ Keep the overlap; clear the hardware. Check both ends before making the final cut. Preserve the overlap that joins neighboring seals, and leave room for the door to move past the jamb. UNIDOOR, printed page 23 uses an inside-only notch at the closing-side overlap. Keep that notch with the matching UNIDOOR profile.
Pick your route below. First note whether the door swings or slides. Then look at the strip’s end without pulling it. You’re identifying the small replaceable part, so keep the hardware holding the glass in place.
| What you can see | Where to go |
|---|---|
| A U-shaped plastic clip around bare glass | ✅ Clip-on: ease it off and fit the new one |
| A soft strip’s head inside a metal slot | ✅ Groove insert: find the open exit |
| A strip glued to the glass | 🔧 Bonded: remove the old adhesive first |
| A metal carrier held by screws | 🔧 Screw-mounted carrier: identify the replaceable part |
A screwed-on carrier can also hold a slide-out insert. If the insert is all that’s worn, leave the carrier attached. Can’t see what holds the strip? Look at its end and where it meets the glass or rail. Identify that connection before pulling or undoing screws.
Replace the sweep using the right attachment route
Leave the door hanging for an accessible clip-on replacement. You need to move the strip, while the hinges, rollers and other glass supports stay put.
Ease off a clip or slide out an insert
Keep tools pointed away from the glass edge, and never pry a clip against the pane. DreamLine warns that a concentrated hit at an edge or corner can shatter tempered glass. A screwdriver makes a poor lever here; the glass takes the force.
Grip the removable clip itself. Ease it downward without twisting the pane. IDEAL’s tutorial starts at one end and pulls the old clip straight down. Work gently. If the glass moves or the clip needs a hard pull, stop and check what’s holding it.
For a groove insert, find the open end of the metal slot. Slide the soft strip along that slot to its exit. If the end is blocked, leave the insert in place until the exit is accessible; don’t pry it through the glass side. Damaged glass must stay out of use. Keep cutting tools off the installed pane.
If access truly requires removing the panel, plan stable, padded support and rated glass-handling equipment before releasing any support hardware. A heavy pane must not be moved alone. Keep the door installed whenever the strip is reachable. Taking down a glass door adds a much bigger job to a small repair.
Replace a glued strip or screw-held drip rail
Decide whether the soft insert or the whole carrier needs replacing before touching screws. SWISCO 10-326 combines aluminum and vinyl and uses the original fasteners. Keep those fasteners for the replacement.
| Attachment | The job |
|---|---|
| Glass clip | Ease off the old clip and press on the one that fits your glass. |
| Groove insert | Slide the insert through the slot’s open exit and feed in the replacement. |
| Bonded strip | Remove old adhesive and start with a clean, dry bonding surface. |
| Screw-mounted carrier | Match the carrier to the existing holes and keep the original fasteners. |
With a glued strip, old adhesive is the time-consuming part. Remove the residue from the bonding area before fitting the replacement. 3M’s tape guidance separates residue removal from final surface prep. Getting the old strip off doesn’t finish the cleaning.
Budget more prep time than for a clip-on strip. Have the replacement and fresh compatible adhesive ready. Throw out a strip that’s stretched or torn, and remove the old adhesive. It won’t become a fresh bond just because you press harder.
Choose the adhesive remover and cleaner for the actual adhesive, glass coating and nearby metal finish. There is no single solvent that suits every combination. Keep the existing hole pattern for a replacement carrier; don’t drill new holes in tempered glass.
On frosted or patterned glass, check the face the adhesive will touch. Tape needs enough surface contact to hold; 3M explains how roughness and adhesive thickness affect that contact. Choose a strip and adhesive rated for that surface and wet use. Leave the glass texture alone; don’t sand tempered glass.
Clean, cut and fit the new strip
Clean the contact area with a product that suits the glass coating and metal finish. Sterling’s care guidance uses diluted mild detergent and prohibits alcohol and solvents on its metal finishes. For a glued strip, also complete the fresh adhesive’s surface prep before bonding.
Mark the finished length and lay the loose strip on a stable work surface, away from the glass. Sharp shears suit flexible strips that can be cut that way. Use a fine-tooth hand saw for a rigid PVC channel. Keep the strip supported as you cut.
A utility knife can trim soft fins or score suitable PVC profiles. SIMBA’s cutting guide warns against forcing a knife through a hard channel. If the blade needs a wrestling match, use the saw.
Smooth raised burrs lightly with fine-grit sandpaper, then wipe off the dust. Sand the loose strip’s cut end only; leave its gripping surfaces intact. Try the end in place and check that it clears the curb without catching or folding before seating the whole strip.
Point an angled water deflector toward the shower interior. It works like a small gutter that sends runoff back inside. Canyon step 1 shows this inward direction. A downward wiping fin hangs down and brushes the curb. Keep those shapes distinct, and copy the old strip’s direction only if it was fitted correctly.
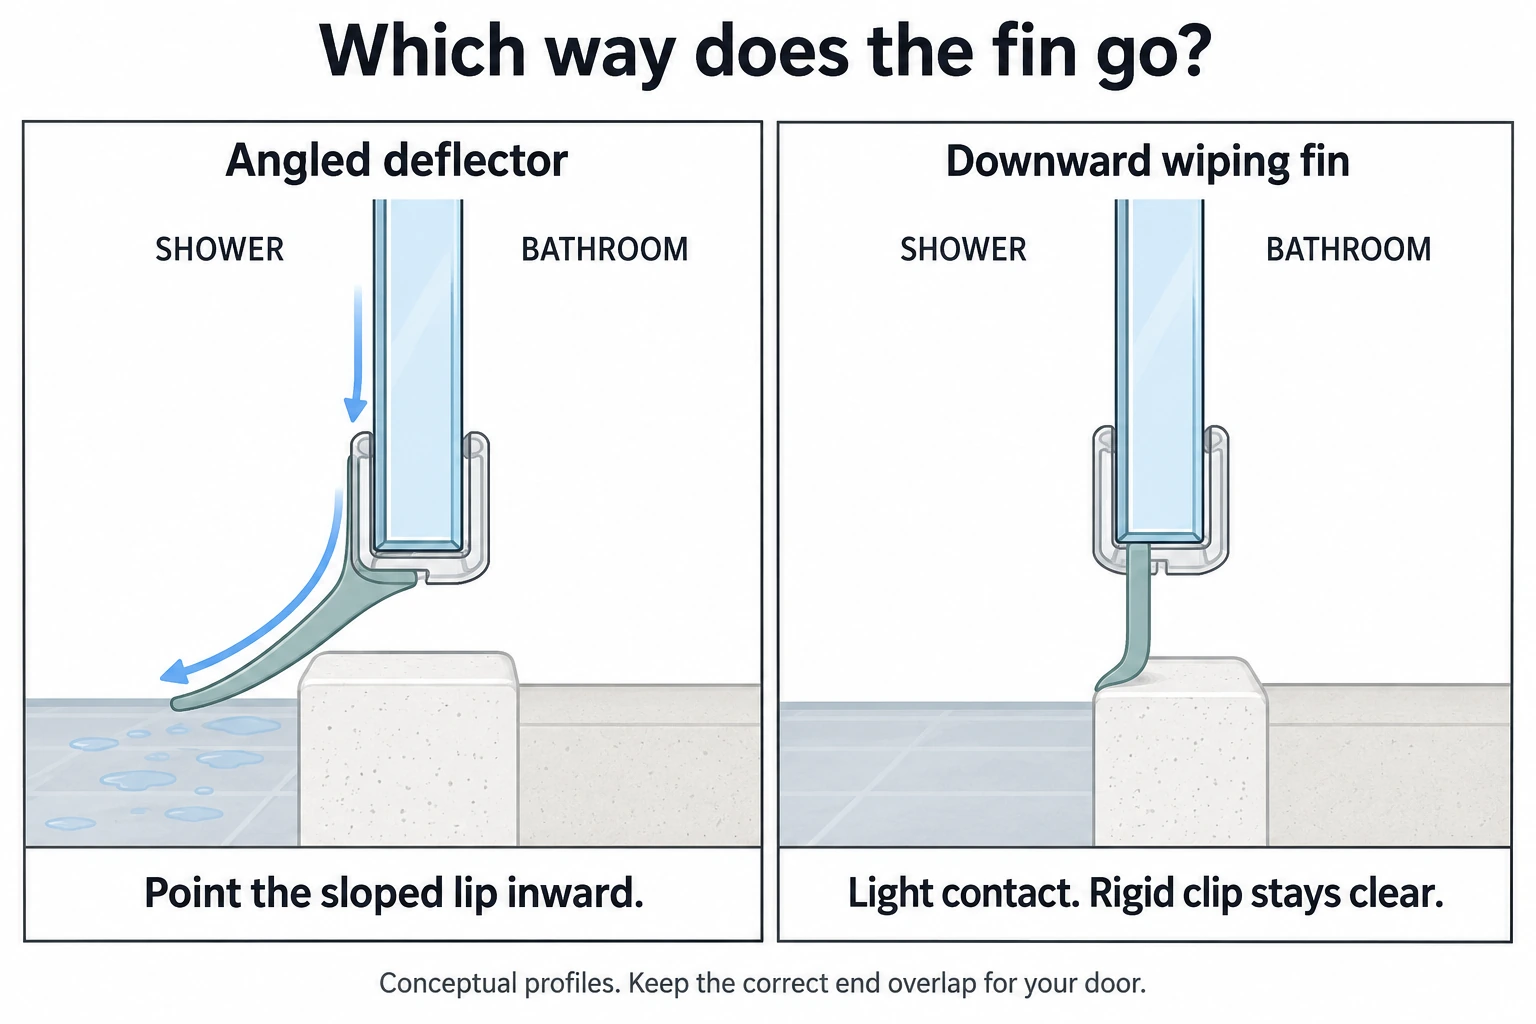
Finish any required end notch or overlap before seating the strip. Press a clip onto the matching glass, or feed an insert along its groove. Check both ends against nearby hardware as you go. The strip should seat without twisting the glass.
Fix a wrong clip size before adding glue. For M 6258, silicone inside the U-channel is allowed if it slips. Use that option only on the matching part, in the stated amount and location. Let it cure before testing. Silicone leaves more residue to clean at the next replacement.
Fit other pressure-fit strips without glue unless that specific part uses adhesive to help hold it in place. DreamLine’s warranty excludes alterations and repairs that depart from its installation instructions. Prime-Line’s silicone option doesn’t carry over to a DreamLine door. The warranty issue is an unapproved change; silicone touching glass by itself isn’t the issue.
Check the door movement, then test for leaks
Open and close the door before turning on the water. The new clip and fin take up space beneath the glass. A strip can grip perfectly and still catch the curb.
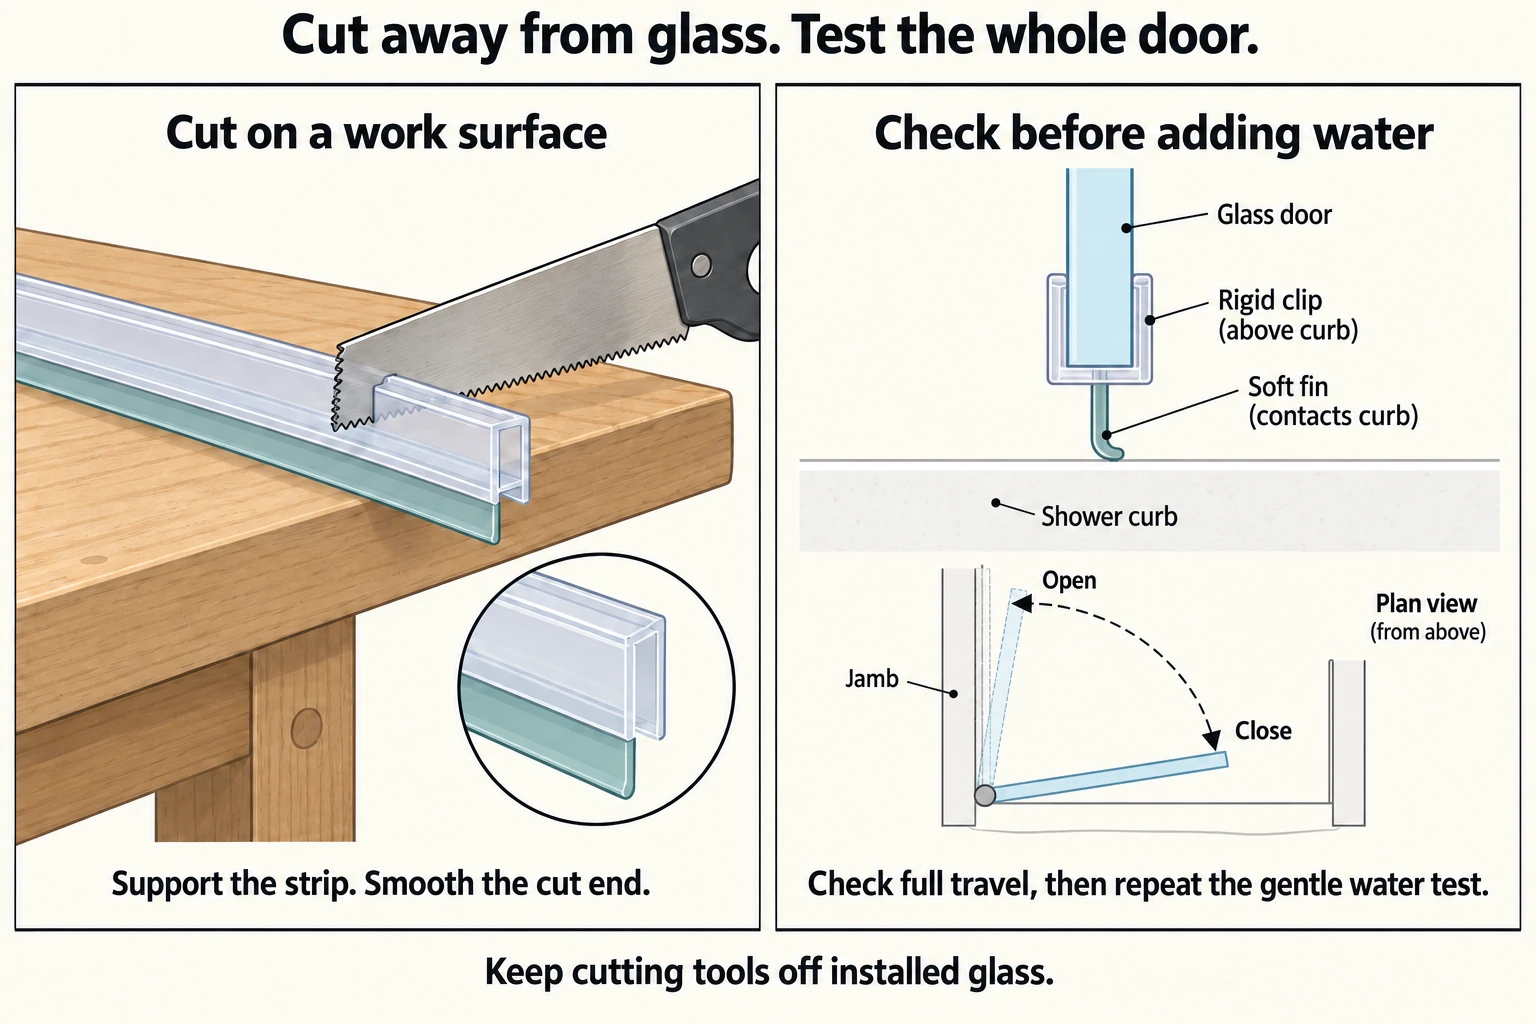
Move the door through its full travel
Move the door slowly from fully closed to fully open and back. The rigid clip must clear the curb, and both ends must clear the jamb and hardware. On a swinging door, watch the hinge-side closing gap. Stop if the strip lifts the panel, folds hard or keeps the door from closing normally.
Wait for any adhesive to cure, then dry the outside. Repeat the gentle water check along short sections and note the first wet spot. Follow with normal shower use. If water returns, recheck the hinge-side end and the overlap at the closing side.
| Check | A passing result |
|---|---|
| Rigid clip through the full travel | Clears the curb; the panel stays at its normal height. |
| Hinge and closing ends | Clear the jamb and retain the needed overlap. |
| Soft fin | Light contact without a heavy fold or drag. |
| Gentle water check | No water crossing the repaired strip; trace any curb or joint leak separately. |
| Normal shower use | The same leak stays stopped. |
If the sweep fits but the door still moves badly, check the track, guides or hinges. Sort out the movement before running another water test.
Why does the new sweep keep falling off?
Watch when it comes loose. Does the bottom fin catch the curb and pull the strip off, or does the attachment simply lose its grip? SIMBA separates a dragged-off bottom strip from a vertical strip slipping down. Those need different fixes.
Check the glass thickness or insert head, full seating, fin direction and dirt on the contact surfaces. Then check whether adhesive is part of that replacement’s fitting method. Adding a deeper fin can worsen drag. More rubber under the door doesn’t help when the space is already too tight.
An overlong fin can fold or drag when the door opens. Try both directions of movement. Keep a deeper profile only if it covers the gap and still lets the door move freely.
Double-fin strips can add friction, too. The door should still move and close without force. Two fins can’t make an unsuitable gap the right size.
Still leaking? Check the door height and curb
Recheck the strip’s grip, direction, cut length and overlap first. If the gap has changed, check the panel position. Use the sagging-door guide for a panel that has dropped.
🔧 One end has a bigger gap? Check why. Compare the panel position and curb shape. If both are correct and the gap is still uneven, choose a bottom profile that covers the full measured range. The soft lip must reach the wide end without binding at the narrow end.
In a customer-reported sliding-door case shared with Aurivedo, a new strip looked seated, but small wet spots returned after showers. The panel sat too high above the pan. Lowering it within the hardware’s adjustment range and reseating the strip stopped most of the splashing.
A new sweep can’t change the height of the glass above it. Check the gap before buying another strip. Any roller or hinge height adjustment stays within the hardware’s adjustment range, with the glass supported while fasteners are loosened.
Conclusion
Shower door sweep replacement fixes a leak when the strip is the problem and the new one fits. Match the attachment and gap, keep the ends clear, then test the door through its full travel and under normal water flow. If water comes through a separate joint, repair that joint.
Frequently asked questions
What size bottom sweep do I need?
Measure the actual glass thickness or insert head, the bottom gap at both ends and the center, and the finished length. Record any end overlap or notch. Pick a fin that reaches the largest gap and flexes through the smallest without lifting the door.
How do I tell a clip-on sweep from a groove insert?
Look at the end. A clip wraps around bare glass like a U. An insert has a head held in a metal slot. The metal rail may stay in place while you replace just the soft insert. Match that end shape before ordering.
Why does my new sweep come off when I open the door?
Watch for a fin catching the curb and pulling the strip loose. Also check whether the clip or insert head fits and is fully seated. Fix the grip or interference first. Add adhesive only when that specific replacement uses or allows it.
When is the door or curb the real problem?
Check them when the gap has changed, the rigid carrier hits the curb, or water follows a low spot or separate joint. A new strip won’t move the glass or fill a damaged curb. Fix the part that’s letting the water out.
About the sources: Manufacturer documents supply the model-specific dimensions and fitting details. Commercial repair guides provide additional cutting and maintenance tips. The time allowances above are planning estimates, not timed Aurivedo tests.
Sources to check
Use these with the exact product and room conditions behind your decision.
- Prime-Line M 6258 instructions3/8-inch glass and the specific U-channel silicone option; this is not permission to glue every pressure-fit strip.
- DreamLine UNIDOOR Style A manual, version 3 revision 2, December 2021Printed pages 14, 18 and 23 correspond to PDF pages 16, 20 and 25: gap, cut length and closing-side notch.
- Arizona Shower Door Canyon instructionsStep 1 gives the model-specific added length and inward deflector direction.
- Delta SDR7482233 replacement sealsThe listing limits this part to the April 2023 Wilder Pivot system.
- CRL gap and clearance sheetP880WS and P120WS suggested gaps are examples for those profiles, not a universal fit rule.
- 3M VHB application guidanceGeneral surface preparation and adhesive-residue removal; not a wet-area or coated-glass compatibility approval for a specific sweep.
- DreamLine limited warrantyAlteration, repair and cleaning restrictions. Use the terms applicable to the product purchase.
- IDEAL bottom-strip listings and commercial repair guidesPrice examples checked October 10, 2026. IDEAL, SWISCO and SIMBA links in the text are commercial references; fitting time is an editorial estimate.