

The checks below help you diagnose a door that sits too low. There isn’t one screw-turning method that lifts every pivot door. Glass-clamping screws grip the panel, mounting screws secure the hardware, and angle screws set the closing position. If you can’t see a screw, look for a concealed fastener before deciding which hardware you have.
| What you can identify | What to do |
|---|---|
| The hardware identified in the screw diagram, with small front and rear base-plate angle screws | For a closing-position problem, use the model-specific angle steps. They do not raise the glass. |
| Only glass-clamping or mounting screws, or an unidentified mechanism | Start with sagging diagnosis. These screws are not a verified lift route. Read the no-adjuster FAQ. |
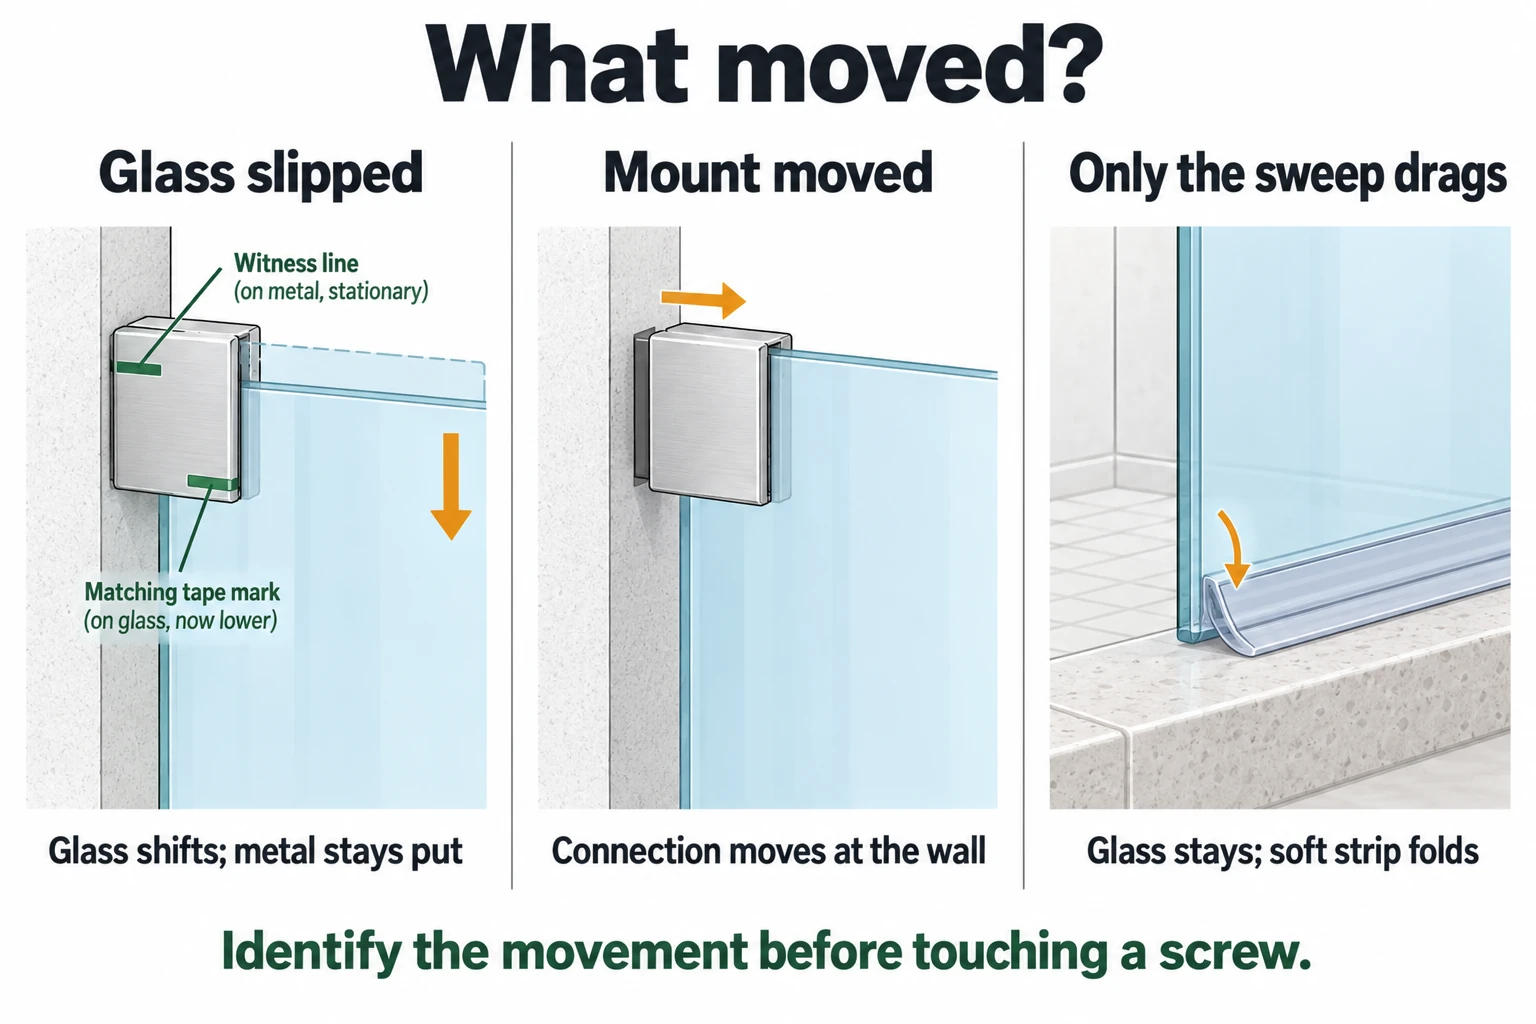
Three diagnostic patterns: glass slipping in a clamp, a moving wall connection, and a folded sweep.
Section 1: Check the door and gather your tools
Find what’s rubbing: the glass, the hardware, or the sweep (the soft strip below the door). If the glass hasn’t moved and only the strip folds, replace the dragging or deformed bottom sweep. Raising the door won’t fix a problem confined to that strip.
Stop using the door if the glass is chipped or cracked, a pivot pin is pulling out, or a mount moves against the wall. Keep hard tools away from glass edges. Repair these faults before making any fine adjustments. 1
Gather a spirit level, ruler or tape measure, painter’s tape, a marker, and a hand screwdriver or hex key that fits the fastener. You’ll also need stable supports with glass-safe contact surfaces and a helper. The supports take the weight while your helper keeps the panel steady.
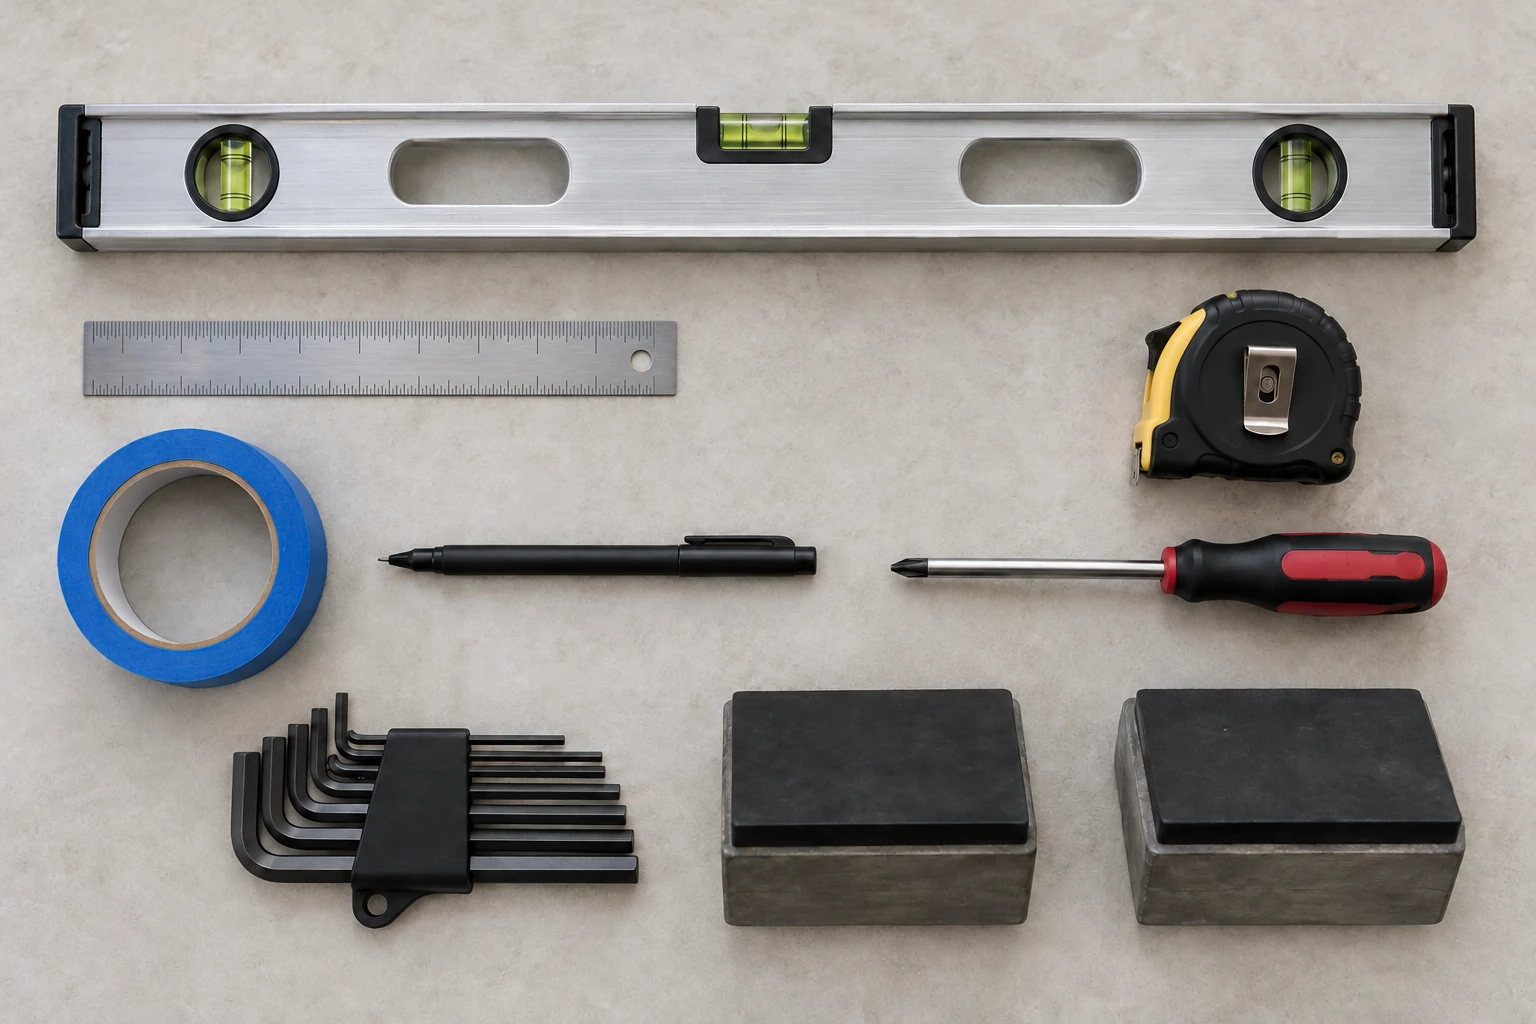
Example tool layout: spirit level, ruler, tape measure, marking tape and pen, manual screwdriver, hex keys, and padded support blocks.
A 24-inch spirit level is a useful starting size. Rest it against a straight surface where it can sit flat. A ruler is easier for small gaps; a tape measure works for longer distances. The screwdriver tip or hex key should fit fully without wobbling. Match the tool to the screw, rather than shopping by the door’s brand.
Support the glass before loosening a bracket. One panel can weigh 60-100 lb. Don’t try to hold that weight by hand. Use stable, glass-safe supports arranged for the door, with a helper to steady it. A towel protects the finish, but it won’t carry the load. 4
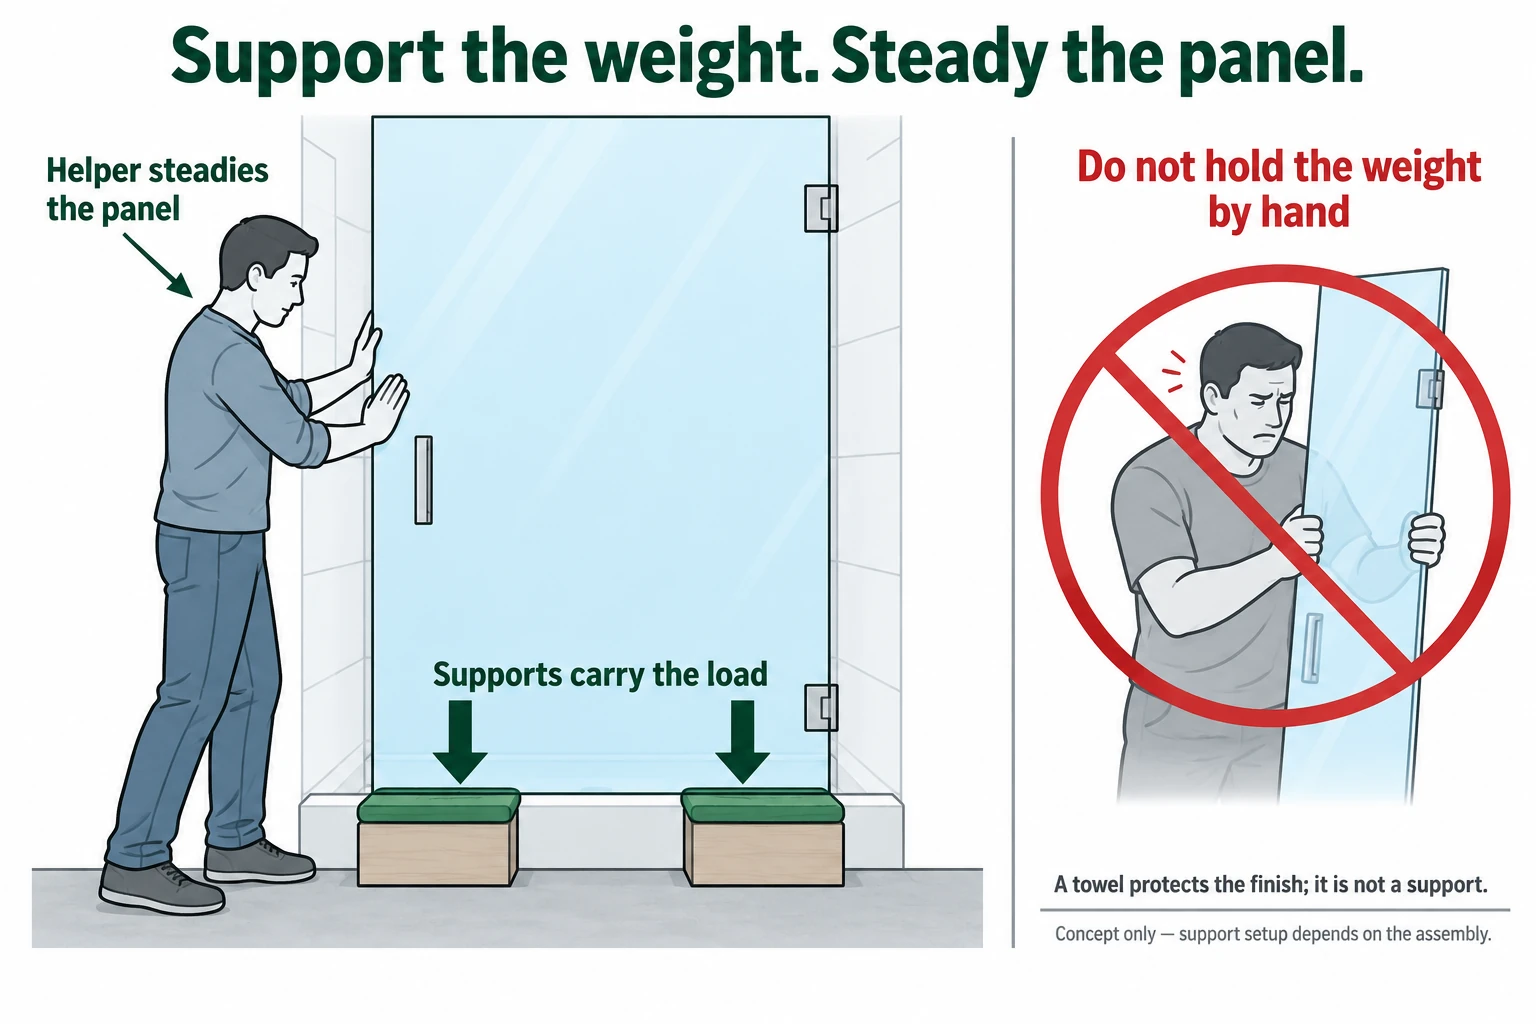
Supports carry the weight; a helper steadies the panel. Support arrangement depends on the assembly.
Close the door to the same position each time you measure. Record the gaps below and mark the glass beside the clamp edges. If a support has shifted, find which shower-door support moved. If the supports haven’t moved but the wall looks crooked, check the wall with a level.
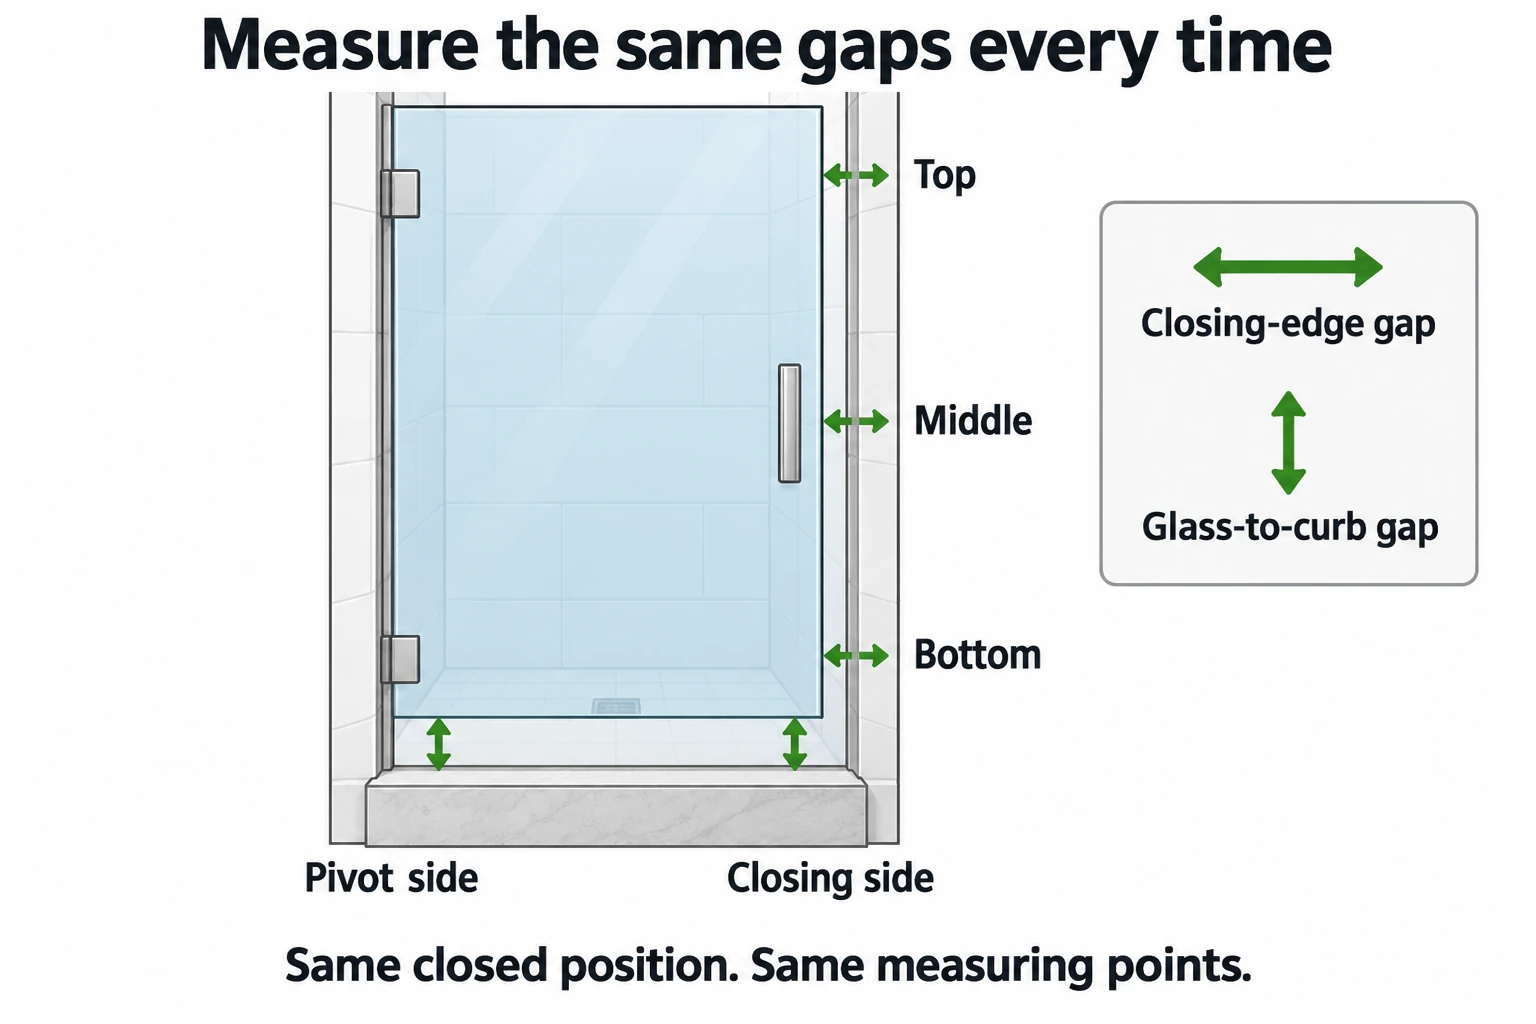
Measure the closing-edge gap at three heights and bottom clearance at both sides. Gaps are exaggerated, not fit targets.
| Measure at fixed points | Before | After |
|---|---|---|
| Closing-edge gap: top / middle / bottom | ___ | ___ |
| Glass-to-curb gap: pivot side / closing side | ___ | ___ |
| Clamp marks and first rubbing point | ___ | ___ |
For a quick first check, measure the closing-edge gap at the bottom and the glass-to-curb gap on the closing side. Those two readings help you check poor closure and bottom clearance. Take the full set above before loosening any connection that carries the glass.
The curb is the raised ledge under the door. The jamb is the upright frame or profile beside it. If your door runs on rollers, use the guide to reset a sliding panel that has left its track.
For a new door, follow the step-by-step pivot shower door installation guide. It covers the full setup, including lining up the pivot axis and supporting the panel.
Section 2: Diagnose sagging and adjust the verified closing hardware
Work through the diagnosis before adjusting anything. Section 2.3 applies only to the model identified in the screw diagram. Keep the glass held securely and the supports in place; a similar-looking screw on another hinge may do a different job.
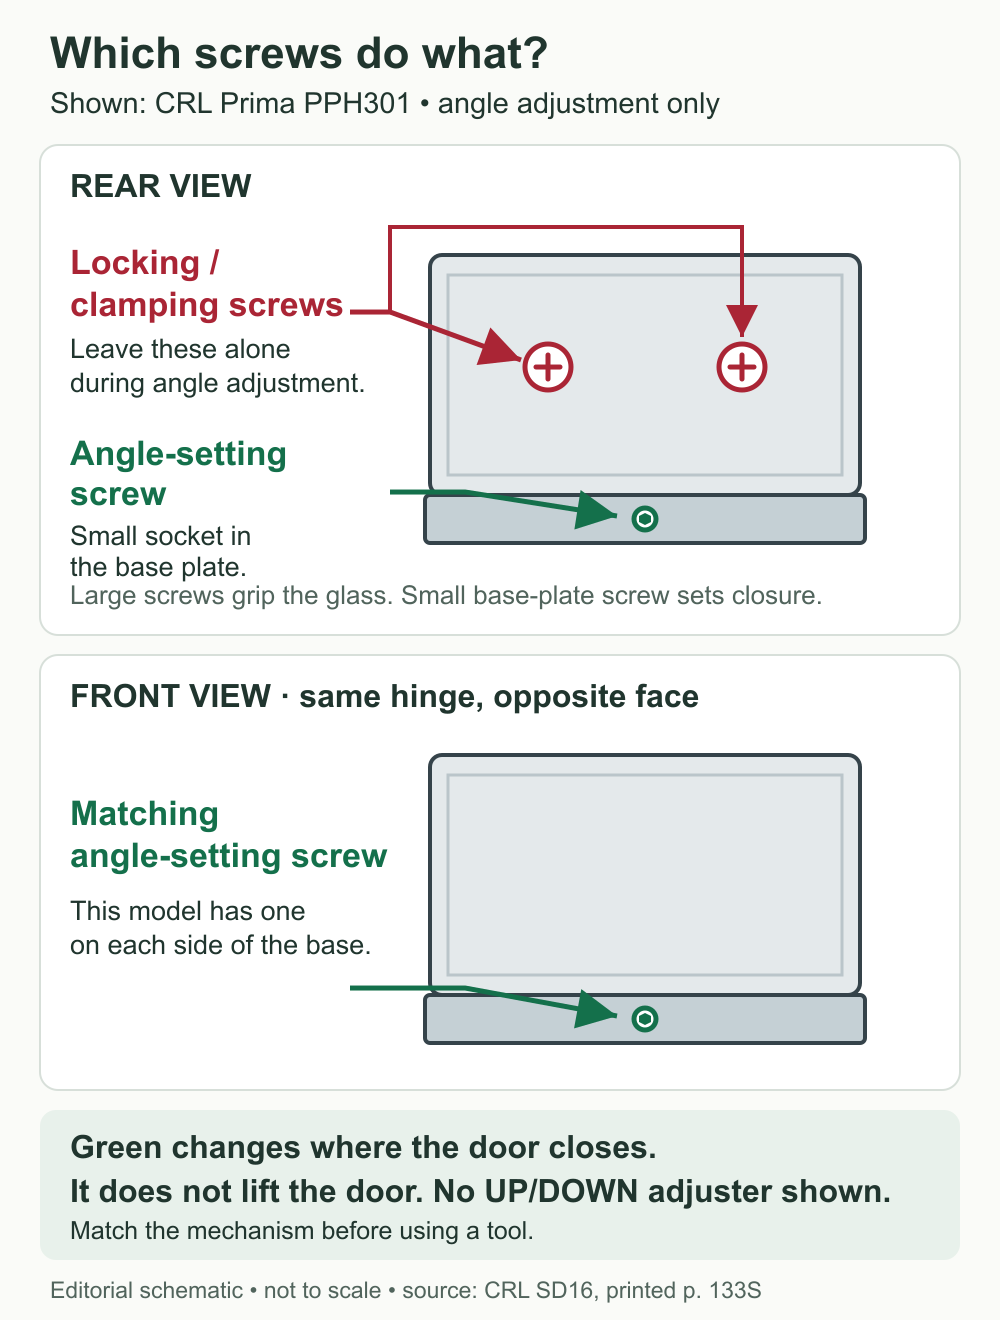
Screw identification on CRL Prima PPH301: red marks the glass-clamping screws; green marks the front and rear closing-angle screws. Green changes closure, not height. Editorial schematic redrawn from manufacturer diagrams; not a repair photo or a universal screw map. 5
2.1 Identify the screw’s function
Check what each screw does: grips the glass, mounts the hardware, or changes the closing angle. A UP/DOWN label can identify a height control, but this article doesn’t give steps for that mechanism. During angle adjustment, leave the glass-clamping and wall-mounting screws secured. Some clamp resets require removing the panel and are part of an installation repair. 2
Forum case: a screw hidden under a snap-on cover. Reddit user u/primexvegas posted in r/fixit about a semi-frameless door that had sagged so far a side seal would no longer fit. They couldn’t see a screw, and the top rail looked riveted. They weren’t sure whether to reposition the glass or take the rail apart.
The poster later found stubborn snap-on covers hiding the hinge screw. They adjusted the panel and reported that the problem was resolved. Read the original post and the owner’s update. This is the poster’s account from a public forum, not an Aurivedo customer repair or independently verified test.
Look for a cover before concluding there’s no adjustment route. A hidden screw may grip the glass rather than raise it. The post doesn’t identify the model, screw function, adjustment amount, or cover-removal method, so it can’t tell you how to operate a height adjuster. Don’t pry against the glass or drill out rivets to investigate. 6
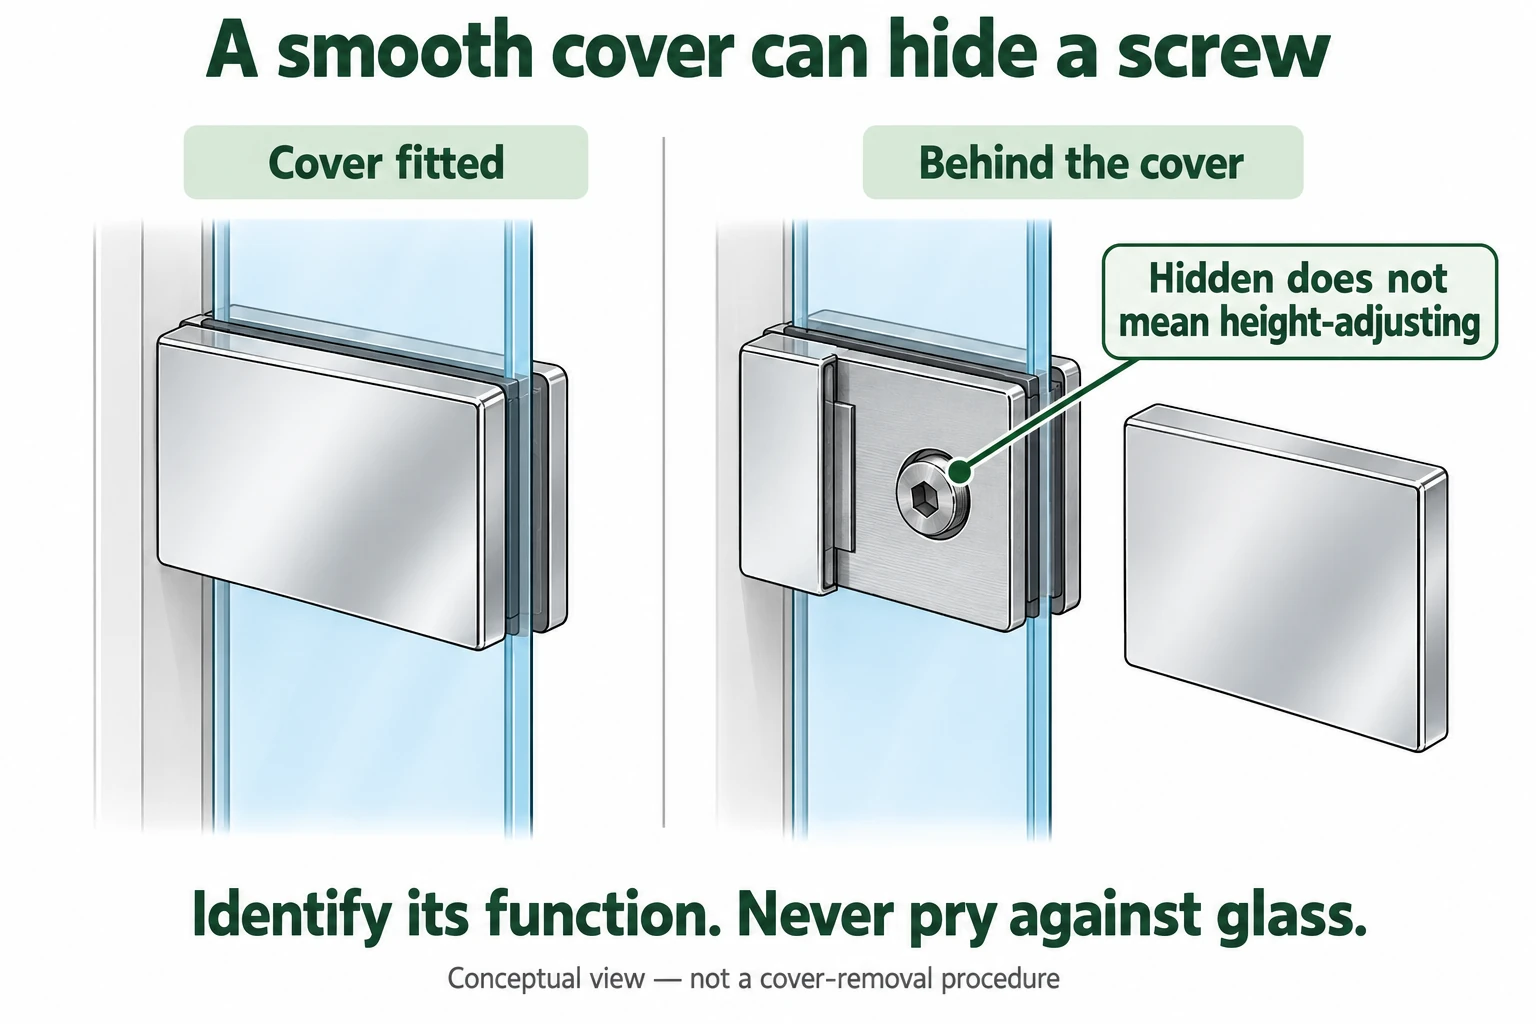
A cover can conceal a fastener without revealing its function. Concept only; not a cover-removal procedure.
2.2 Find why the glass sits too low
Compare the marks before loosening anything. Glass that has slipped inside a stationary clamp points to a grip or hinge-insert problem. A clamp or mount that has shifted against its support points to that connection. If the glass hasn’t moved and only the sweep folds, return to the strip check in Section 1.
Measure the closing-edge and glass-to-curb gaps at the same points. That tells you where the position changed. It doesn’t tell you how far to lift the door or which way to turn a screw. Repositioning glass, repairing a mount, and replacing an insert are different jobs. A quarter turn isn’t a universal height correction. 1 2
2.3 Set the closing angle on the pictured hardware
For CRL Prima PPH301 only: keep the glass secure and steady. With a 3 mm hex key, loosen the small front and rear base-plate angle screws one full turn counterclockwise. Move the door to the closing position you need, within the specified 5° inward or outward range, then retighten the angle screws. Keep the large glass-clamping screws secured throughout. This model is not compatible with header systems. 3
The adjustment changes where the door stops. It doesn’t lift the glass. The closing strips should meet without forcing the panel. If the bottom still scrapes, go back to the height and support checks; more angle adjustment won’t address that problem.
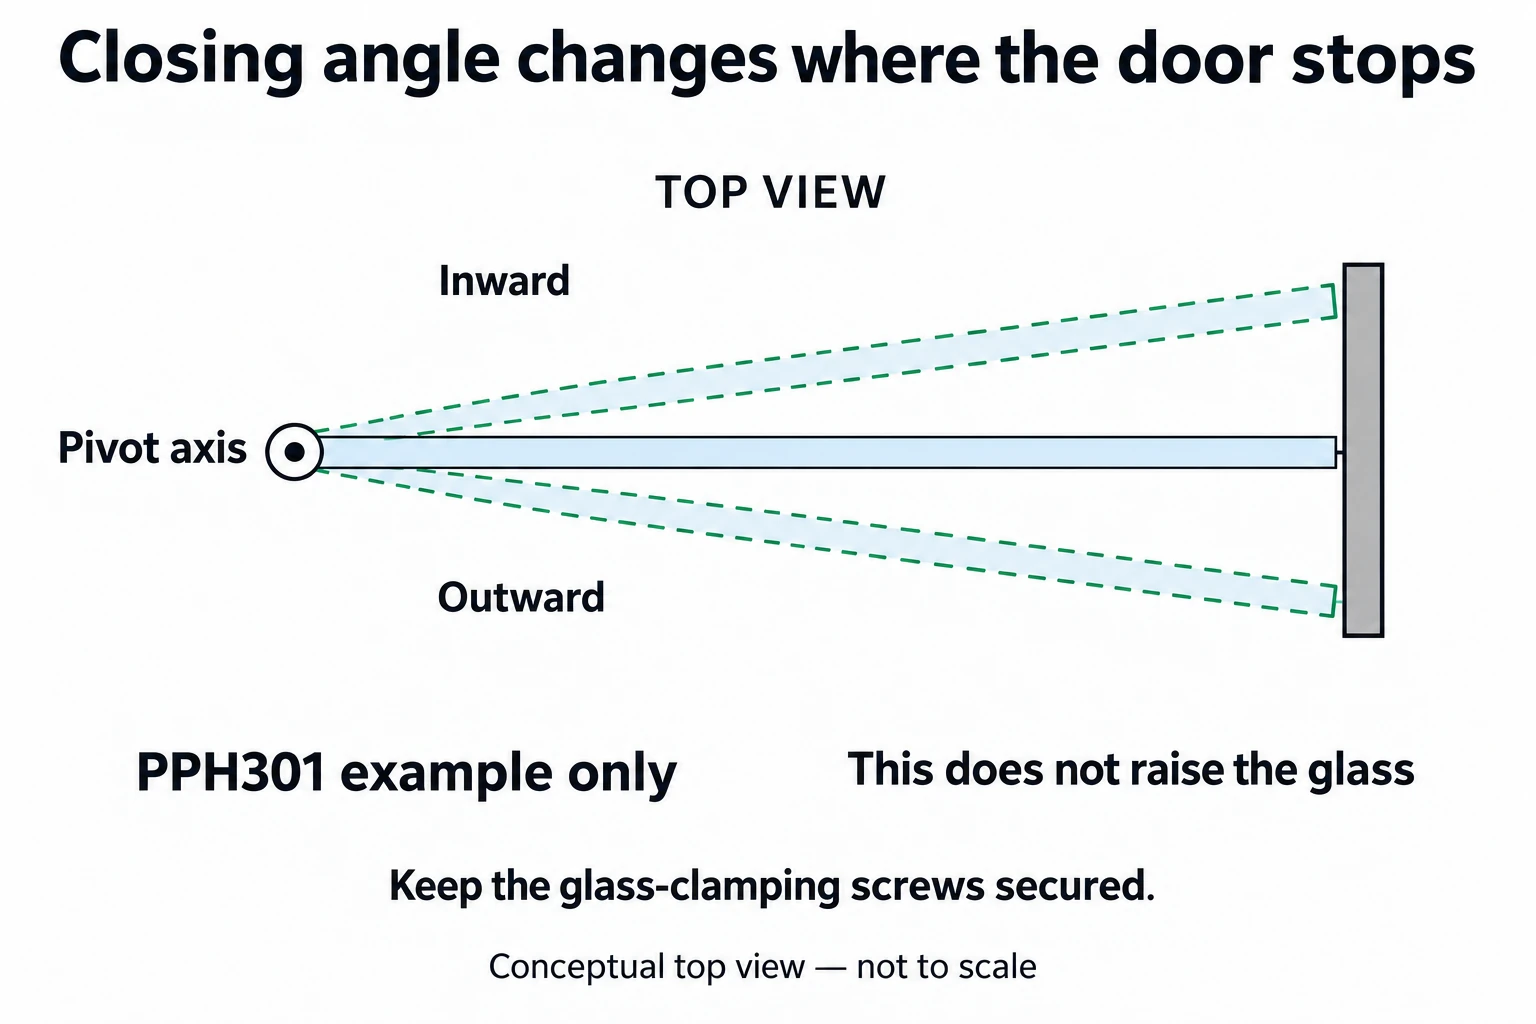
Top view of a changing closing position, not a height change. Not to scale. The illustrated hardware allows up to 5° inward or outward. 3
2.4 Check clearance, closure, and repeat movement
Remove the temporary supports only after the setting is locked and the door’s hardware is carrying the weight. Slowly open and close it through its permitted swing. The glass must clear the curb all the way, the pins must stay seated, and the closing strips should meet without a shove. Recheck the same gaps and tape marks.
| What you find | What to do |
|---|---|
| Clearance holds, strips meet, marks stay fixed | Accept the alignment |
| Glass touches, a pin separates, or a support moves | Stop using the door |
| Marks shift again | Find the slipping or worn connection before adjusting again |
| Movement is smooth but water escapes | Diagnose the leak separately |
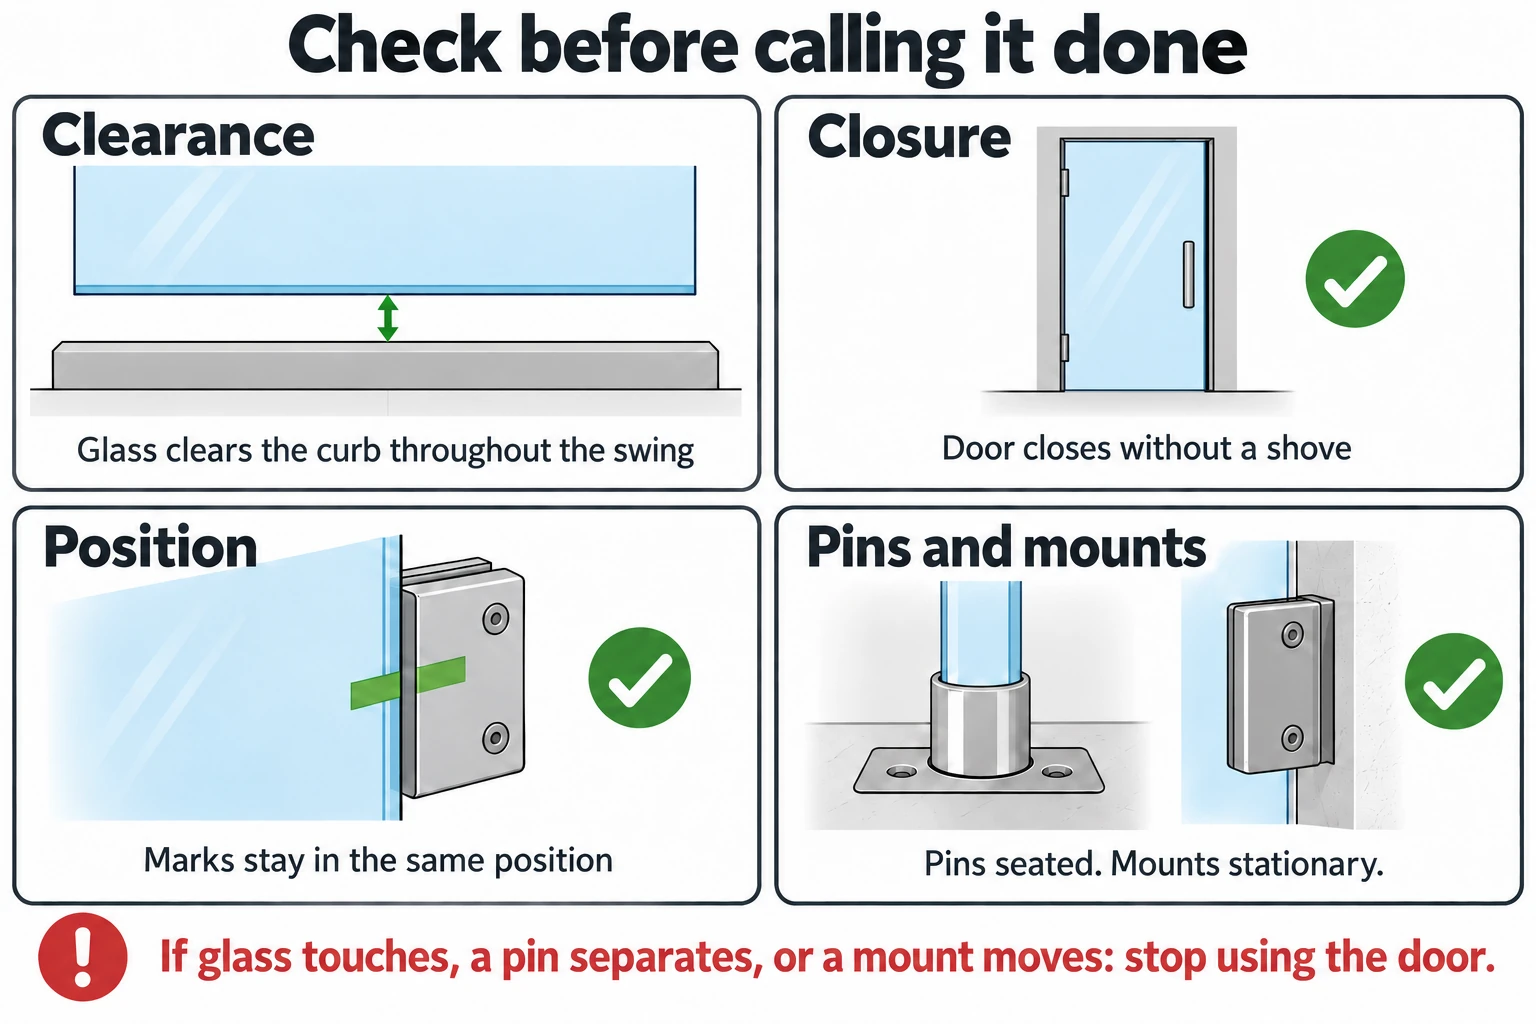
Final checks: clearance, comfortable closure, fixed witness marks, seated pins and stationary mounts.
Field case: a door that kept sagging. A customer’s 10 mm frameless door would close properly after realignment, then sag again within 1-2 months. Hinge adjustments and an earlier rubber-insert replacement hadn’t stopped it. I led the diagnosis, chose the replacement part, guided the repair, and handled the follow-up.
I checked the wall with a level and inspected the hinge fasteners and mounts. The wall mounts and metal hinge bodies hadn’t moved, but the glass had dropped relative to the mark at the upper clamp. When the black rubber insert came out, it showed compression and smooth contact surfaces. Together, those observations pointed to the glass slipping in the clamp.
I selected a clear plastic hinge gasket to suit the hinge and 10 mm glass. Under my guidance, a contractor cleaned the hardware, fitted the replacement, realigned the panel, and checked closure. The repair was completed on August 10, 2026. The repair dealt with the clamp’s grip; it was separate from the closing-angle adjustment described above.
At the follow-up on October 11, 2026, 62 days after the repair, the record showed no renewed drop or movement from the repair marks. The door closed smoothly, with no reported leaks, hinge noise, or looseness. It had stayed in place beyond its earlier 1-2-month recurrence window. That result applies to this door through the follow-up date. It isn’t a lifetime guarantee, and it doesn’t prove clear plastic grips better in every hinge.
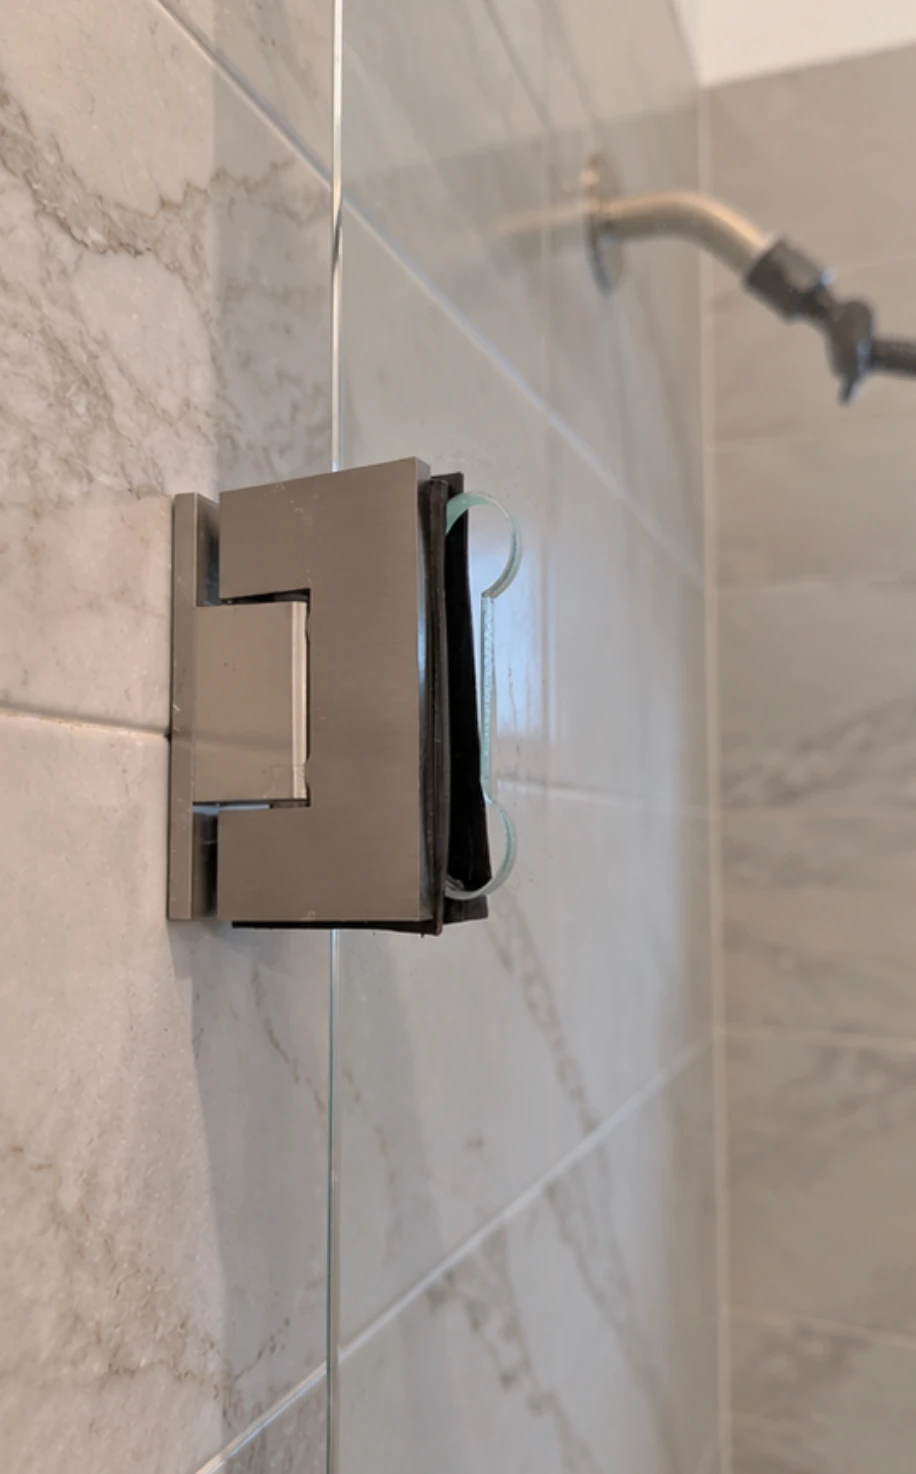
Customer-supplied photo of the upper wall-mounted clamp hinge and visible insert area. This is a different assembly from the top/bottom pivot diagram above. The supplied photo is not a before-and-after comparison; brand omitted.
For a door that keeps dropping, check the hinge insert, the pad between the metal and glass. It isn’t the water seal along the door edge. A replacement has to fit both the hinge and the glass thickness; color alone doesn’t tell you whether it fits. The gasket change in this case held through the 62-day check. Replacing a pad in a load-bearing clamp is a separate repair. Keep the glass-clamping screws secured during the angle-adjustment steps above.
The door should return to the same closing position and close comfortably. If the marks shift again, find the slipping or worn connection. If it moves properly but water still gets out, trace the first leak point.
Frequently asked questions
How do I identify a real adjustment screw?
Check whether a cover hides the screw, then identify what the screw controls. A smooth cover doesn’t mean there’s nothing underneath. On the pictured hinge, the small base-plate screws change the closing angle; separate screws clamp the glass. A hex socket or UP/DOWN label alone isn’t enough to tell you the full adjustment procedure.
Does a quarter turn always raise a pivot shower door?
No. Depending on the screw, a quarter turn might tighten a clamp, release a lock, or change a setting. It doesn’t tell you how far the glass will move. This guide covers diagnosing sagging and adjusting the named closing-angle mechanism, rather than lifting a door with a screw.
My pivot only has regular screws, no adjuster. Can I still fix sagging?
Turning a screw that only grips the glass or fixes a bracket won’t raise the door. Before calling an installer, look without loosening anything: do the wall mounts sit flush against the tile? Are the pivot pins fully seated in their sockets? Does the wall appear to lean? A mount pulling away or a partly disengaged pin needs repair. Use a level to check a wall that looks tilted; sight alone can’t confirm plumb. Repositioning the glass, repairing the mounting, or replacing worn parts may still fix the sag. For those jobs, consult a professional installer and check the original pivot-axis and support setup.
Why does the door sag again after adjustment?
The connection you adjusted may still be slipping, or another support or worn part may be moving. Compare the gaps and marks to see where the position changed. Repeated sagging doesn’t, by itself, prove the structure has settled. Check for glass slipping inside the clamp and inspect the rubber insert before adjusting again.
Sources and case records. The closing-angle instructions come from the manufacturer sources below; they weren’t field-tested for this article. The site owner supplied Sam’s account of the on-site diagnosis, contractor-guided repair, and dated follow-up, along with the customer’s hinge photo. The forum example links to the original poster’s account. The screw diagram was redrawn from the named hardware’s manufacturer diagrams.
Technical footnotes and sources
- Kohler 1246188-2-E: safety and quarter-turn context: Printed pp. 1-2 warn about damaged glass and loose parts. Steps 15-16 specify a quarter turn past hand-tight during initial clamp installation; this is not a height-adjustment increment.
- Delta Contemporary: panel removal before clamp repositioning: Step 36 on printed p. 29 requires panel removal before loosening both glass clamps and sliding the glass left or right. This repositions the panel sideways; it is not a screw-driven lift procedure.
- CRL Adjustable Prima PPH301: closing-angle example only: Printed p. 133S (PDF page 35), Adjustable Angle Instructions: loosen the front and rear base-plate angle screws one full turn counterclockwise with a 3 mm hex key. Position the door at the desired closing angle. Retighten the angle screws. The limit is 5 degrees inward or outward; this adjusts closure, not height. Not compatible with header systems.
- CRL Shower Hardware FAQ: approximate glass weight: The formula uses approximately 5 lb/ft² for 3/8-inch glass and 6.6 lb/ft² for 1/2-inch glass. Its 28 × 72-inch, 3/8-inch example weighs 70 lb; a 30 × 72-inch, 1/2-inch panel calculates to about 99 lb. The possible 60-100 lb weight is not a universal range or maximum.
- CRL SD16 catalog: screw-location reference: Printed p. 133S (PDF page 35) shows the PPH301 front and rear base-plate angle screws. The schematic simplifies those views and identifies the large rear cover-plate screws separately. It does not depict a height-adjustment mechanism.
- Reddit r/fixit: concealed screw and reported resolution: Public account by u/primexvegas, with a follow-up under the same username. Used for the concealed-fastener identification lesson, not as manufacturer instructions or Aurivedo field experience.