
Keep fluted glass shower doors on your shortlist if you love the look and the system fits your bathroom. The photo can win you over; your floor plan gets a vote, too. Check which panel moves, where you’ll step in, and what someone at the bathroom doorway will see.
Set aside five minutes for an initial fit check with your measurements and the drawing. One failed requirement crosses a model off before you order. That can spare you replacement glass and a rescheduled installation. Then decide whether to keep the look, change the configuration, or choose another finish.
We’ll follow one hypothetical bathroom through the shopping, fit, sightline, and cleaning checks. Its first candidate passes the opening-width check and still gets rejected. You can rule out the wrong product and keep the look you want.
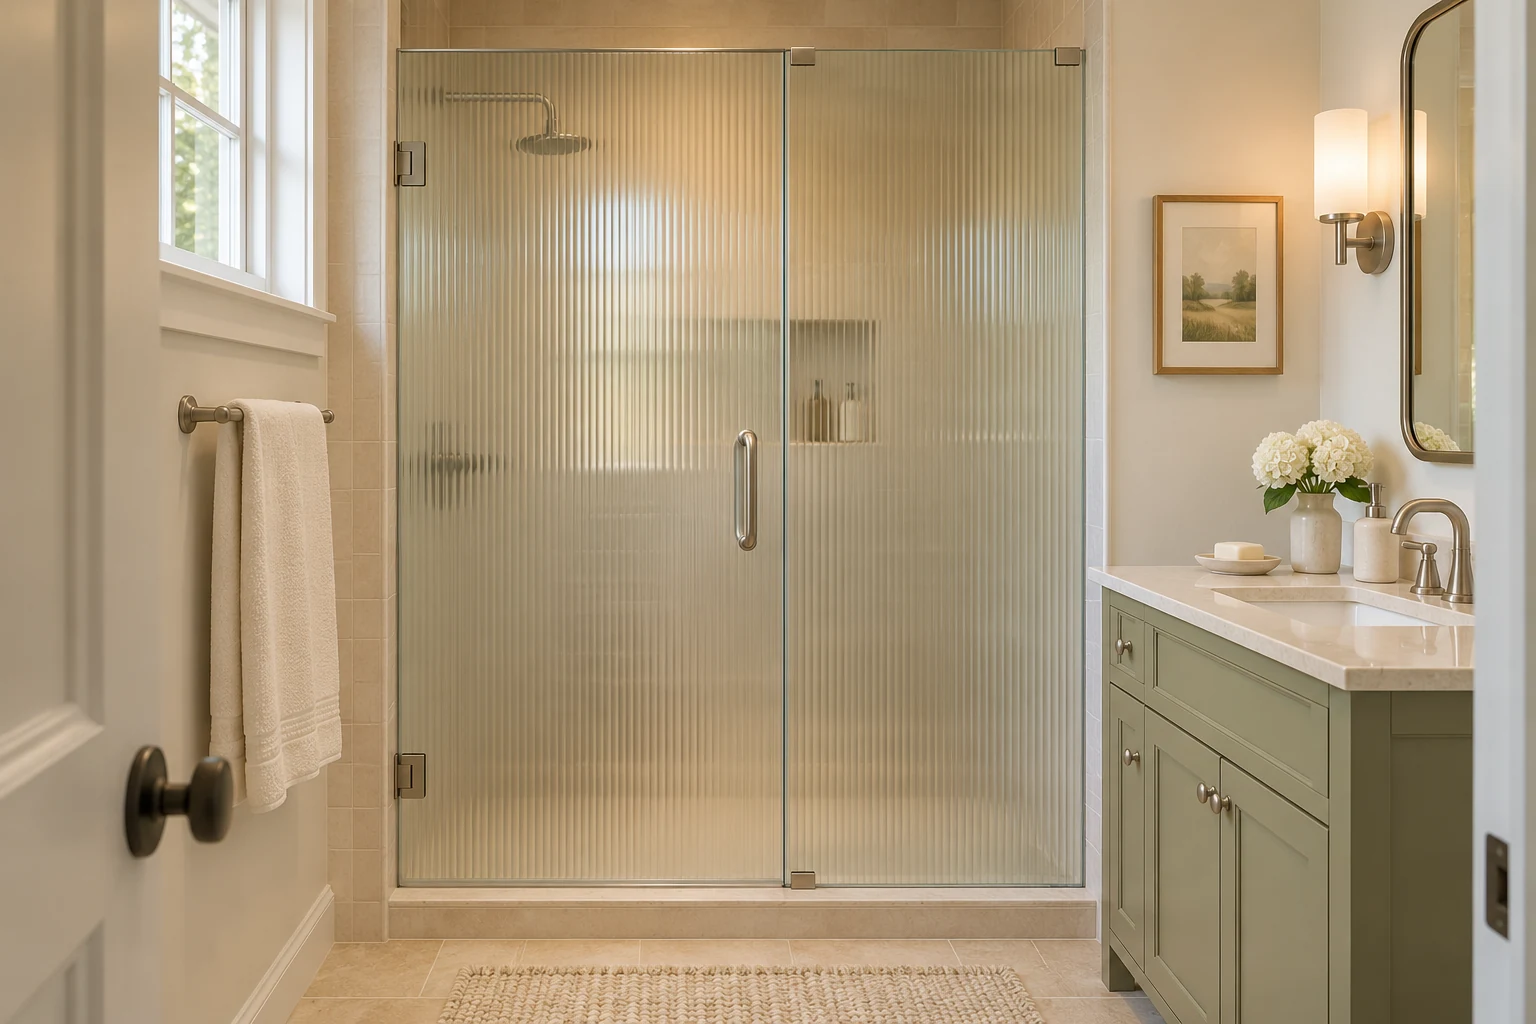
What Are You Buying With Reeded Glass Shower Doors?
Search for reeded glass shower doors and you’ll find full enclosures, stationary screens, and individual panes. Check what’s in the box. A panel-only bargain can look less tempting once you add the matching hardware and glass.
A Moving Door, a Fixed Screen, or Only a Panel?
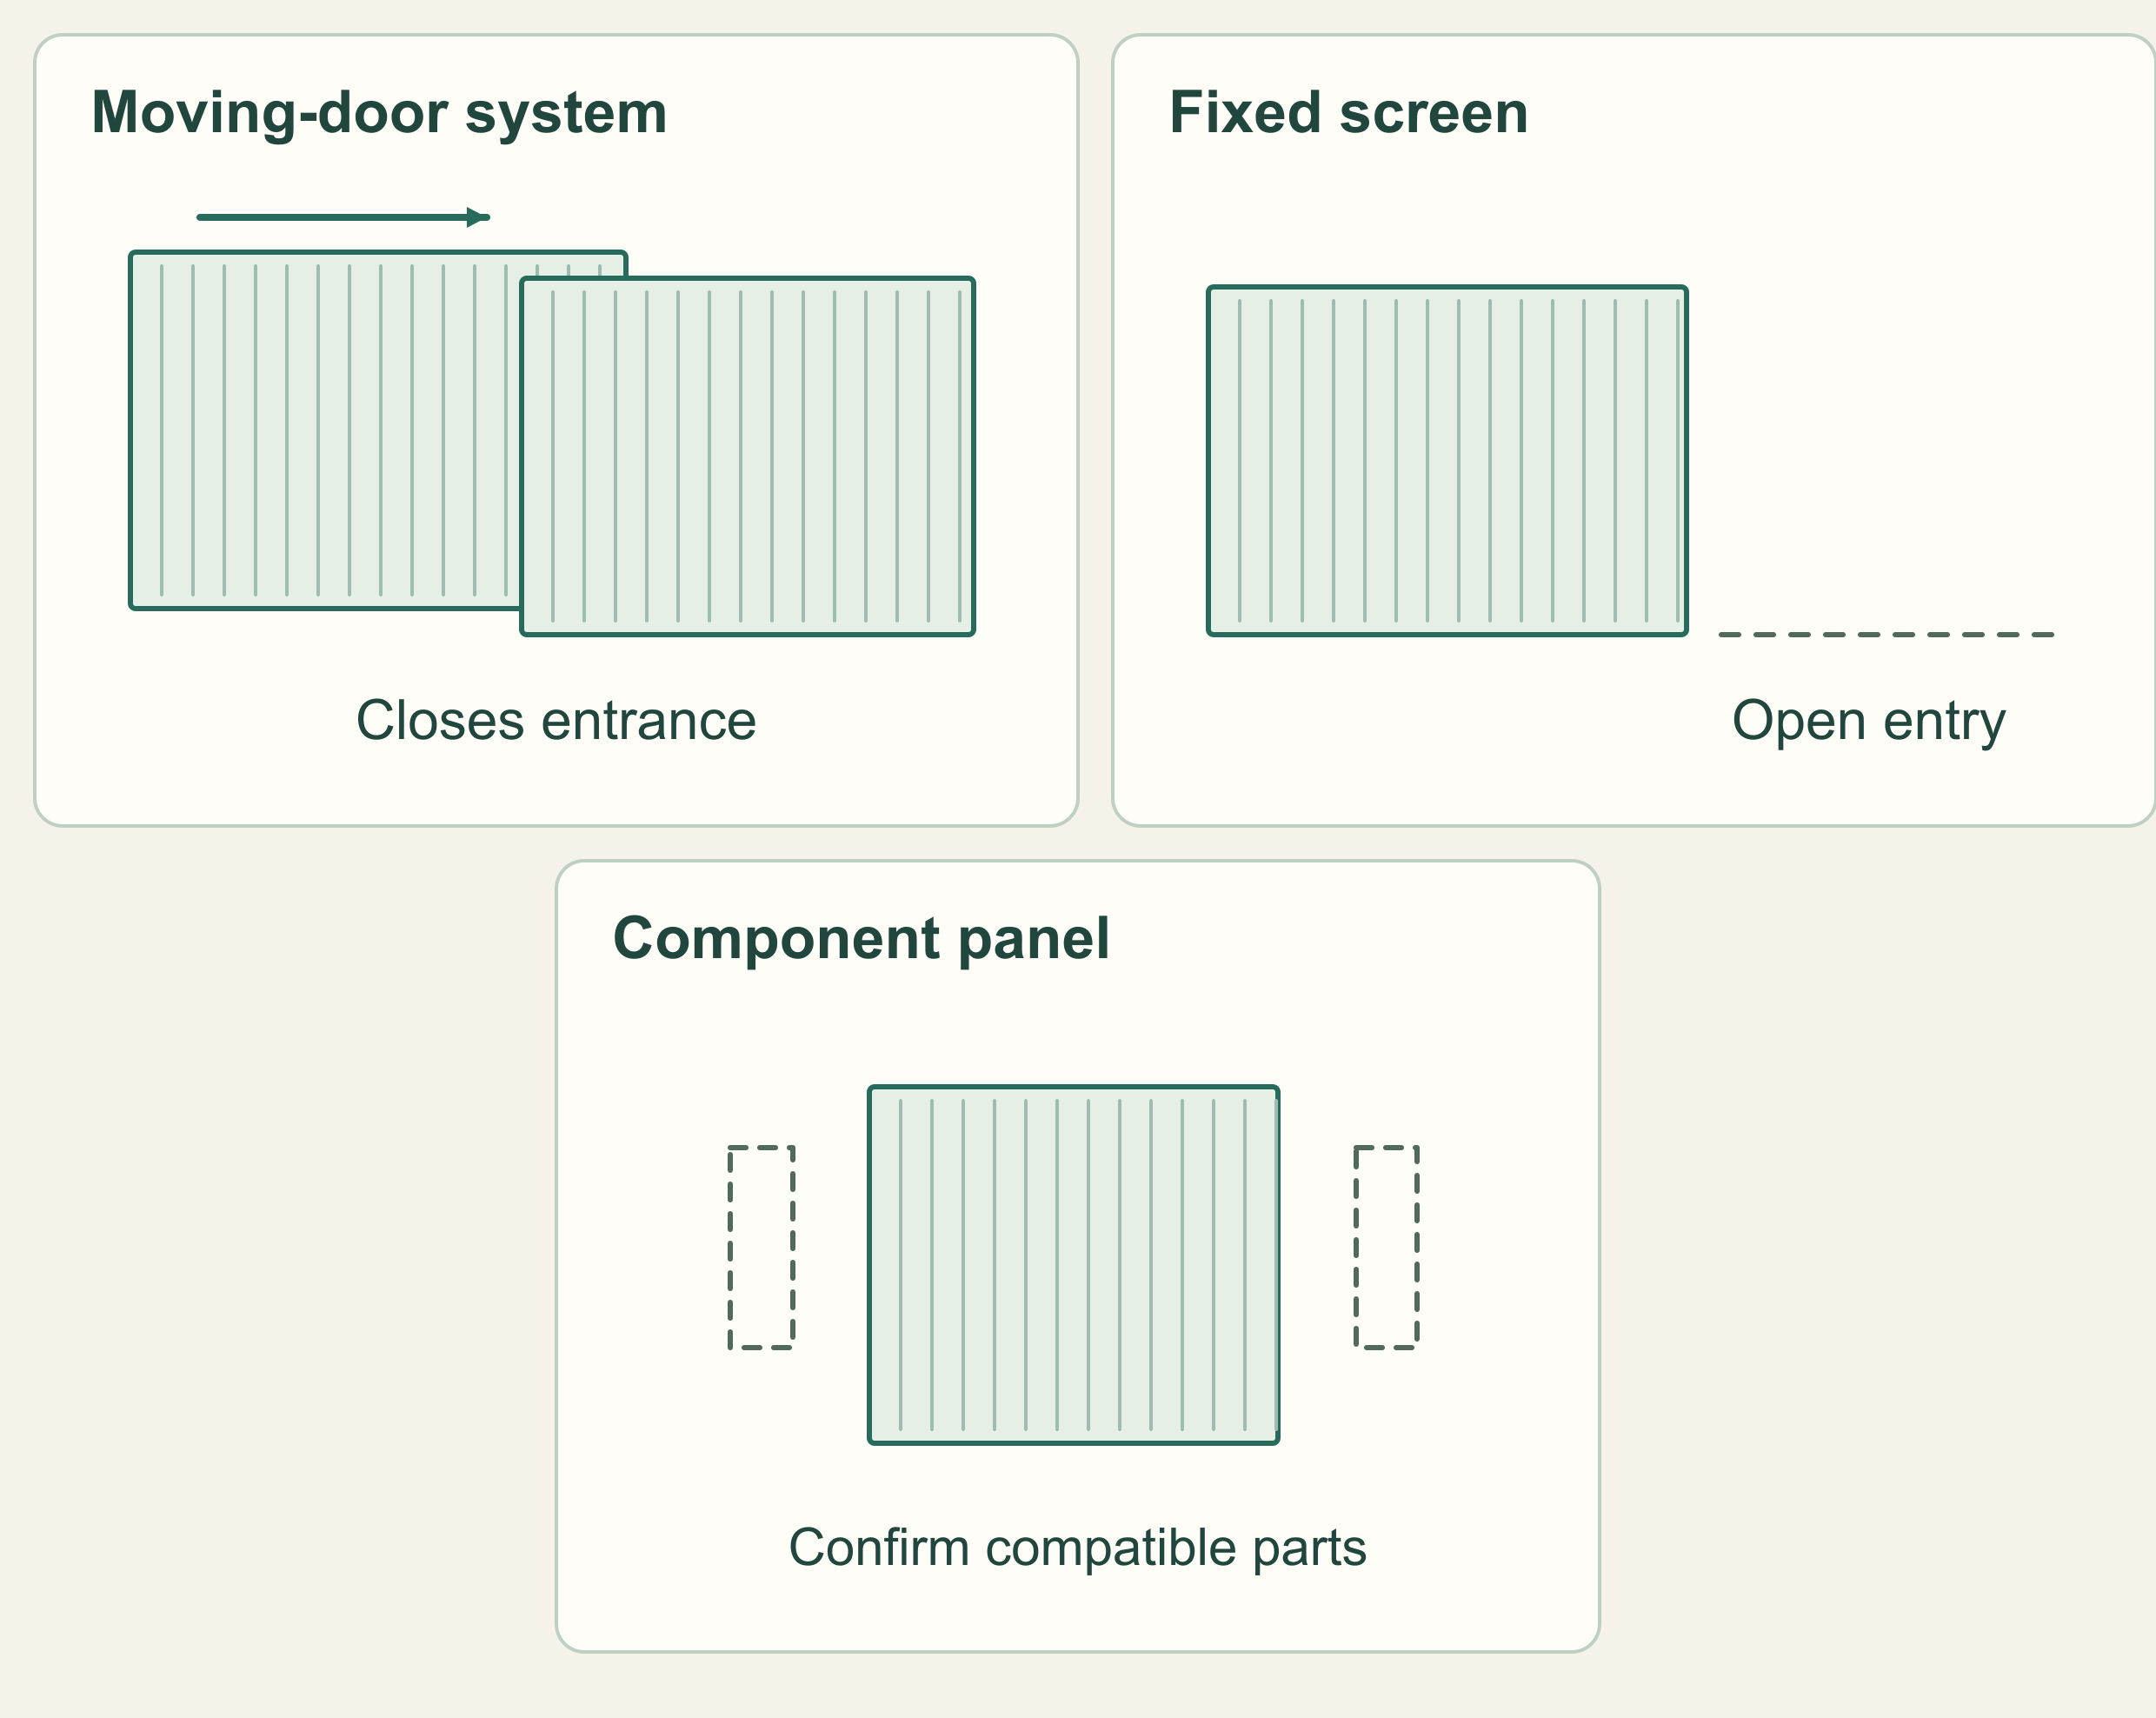
A moving door closes the entrance; a fixed screen leaves it open. A component panel is one compatible piece of a larger system. For a replacement pane, start with the component row and have the supplier confirm compatibility with your existing frame and hardware before buying. For a new closing door, start with the moving-door system row.
| Purchase | What to identify | Before comparing a quote |
|---|---|---|
| Moving-door system | Moving panel, fixed glass, and closing entrance | Exact model, shower/tub application, included hardware |
| Fixed screen | Stationary panel and open entry | Screen dimensions, supports, and the remaining entrance |
| Component panel | One door or fixed pane | Matching panel, compatible kit, and parts sold separately |
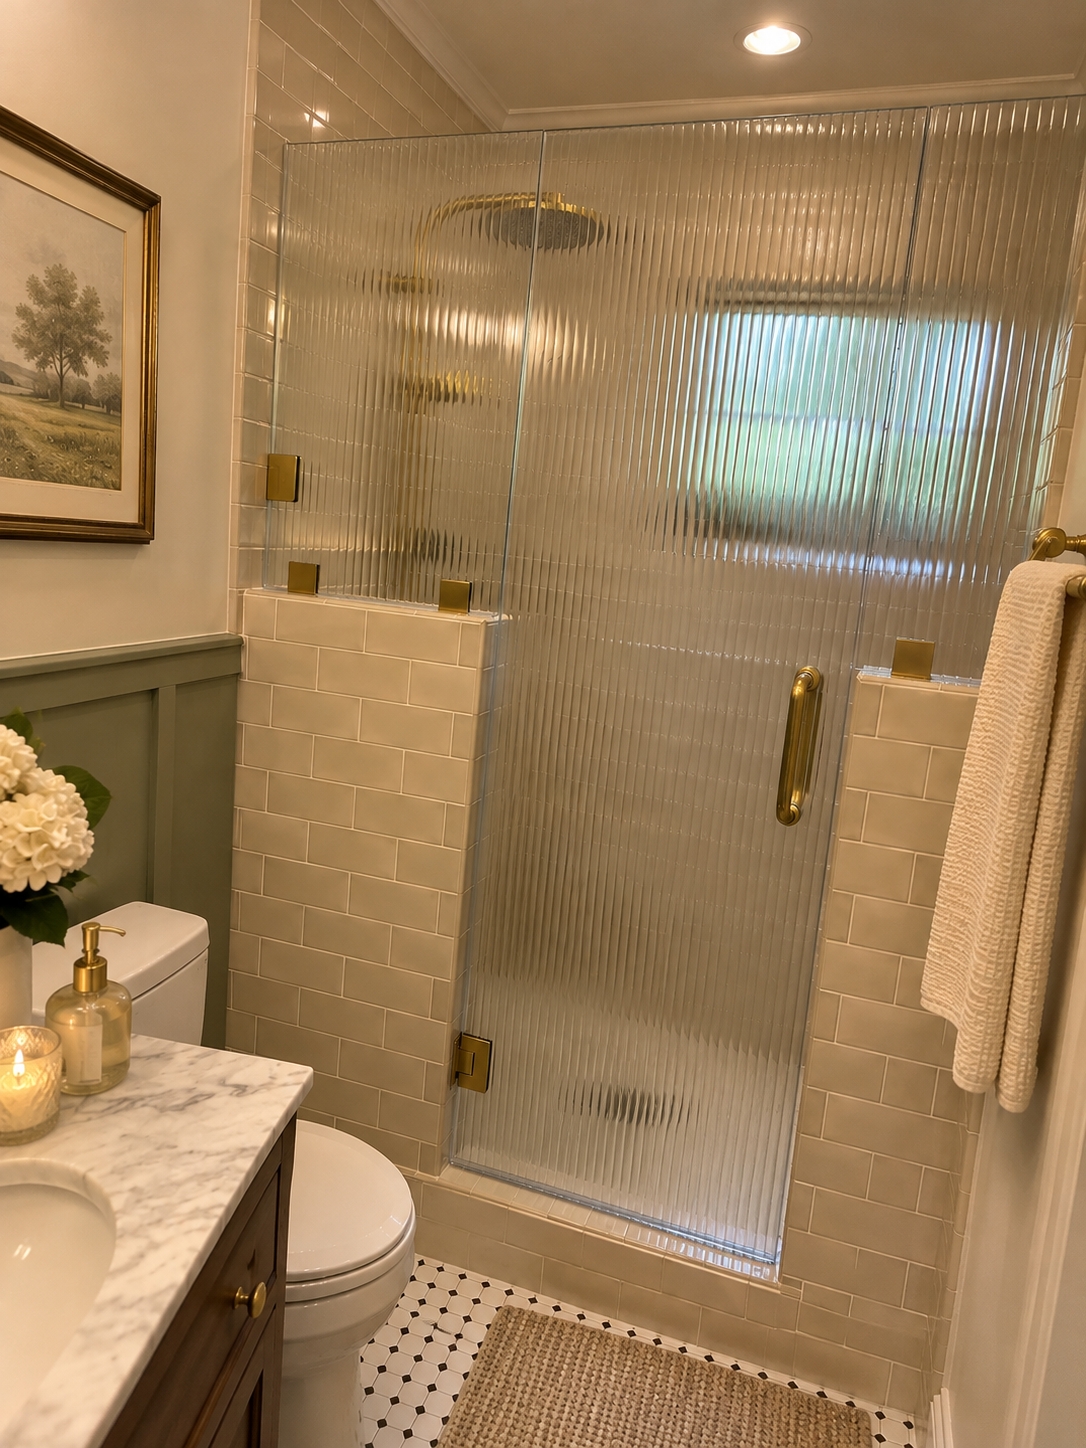
For example, Future Glass lists FL-SL-D-60-L as a left-hand slider panel that needs an Eclipse kit and a corresponding fixed panel. Add those to the total before comparing a full-system quote. Check “left-hand” against Future Glass’s drawing, too; one brand’s wording doesn’t define another’s. The photo may show parts sold separately.
What is the difference between reeded and fluted glass? Suppliers sometimes use these names for overlapping products. Interglass calls its Reeded Glass fluted or Moru glass. The name gets you to the right aisle. To match the actual pattern, compare the supplier’s pattern code, sample, and finished-door specification rather than assuming every brand’s grooves are identical.
If you’re shopping for a screen, check a fixed-screen layout and mark where its entrance stays open. That opening matters for the view into the shower. Adding texture to glass beside it won’t cover the gap.
Write “shower” or “tub” beside the model. Does the quote cover the whole enclosure pictured, glass alone, or one replacement part? Save the answer with a screenshot of your selected options so the next quote covers the same purchase.
“Frameless” Does Not Identify the Opening or the Compatible Parts
“Frameless” leaves plenty of shopping questions unanswered. How does the door move? Which glass and hardware go together? Put the pattern, opening mechanism, glass specification, and hardware system on the quote. A frameless fluted glass shower door still needs a complete, compatible set of parts.
For a replacement pane, get the finished-panel code and compatible hardware codes together. A decorative glass sheet alone doesn’t establish that compatibility. For a complete system, follow its parts list and drawing. Similar-looking hinges or rollers are no substitute for the specified ones.
The glass guide lets you compare shower-door glass options, including safety construction and thickness. For this purchase, pin down the pattern, panel arrangement, and documented system. Keep the selected-options screenshot with the quote.
Layout Pros and Cons of Fluted Glass Shower Doors
Start with what physically fits. Your favorite pattern can stay on the wishlist while an unsuitable model comes off it. Check the system against your room.
A Sliding Door’s Fit Range Is Not Its Walk-Through Opening
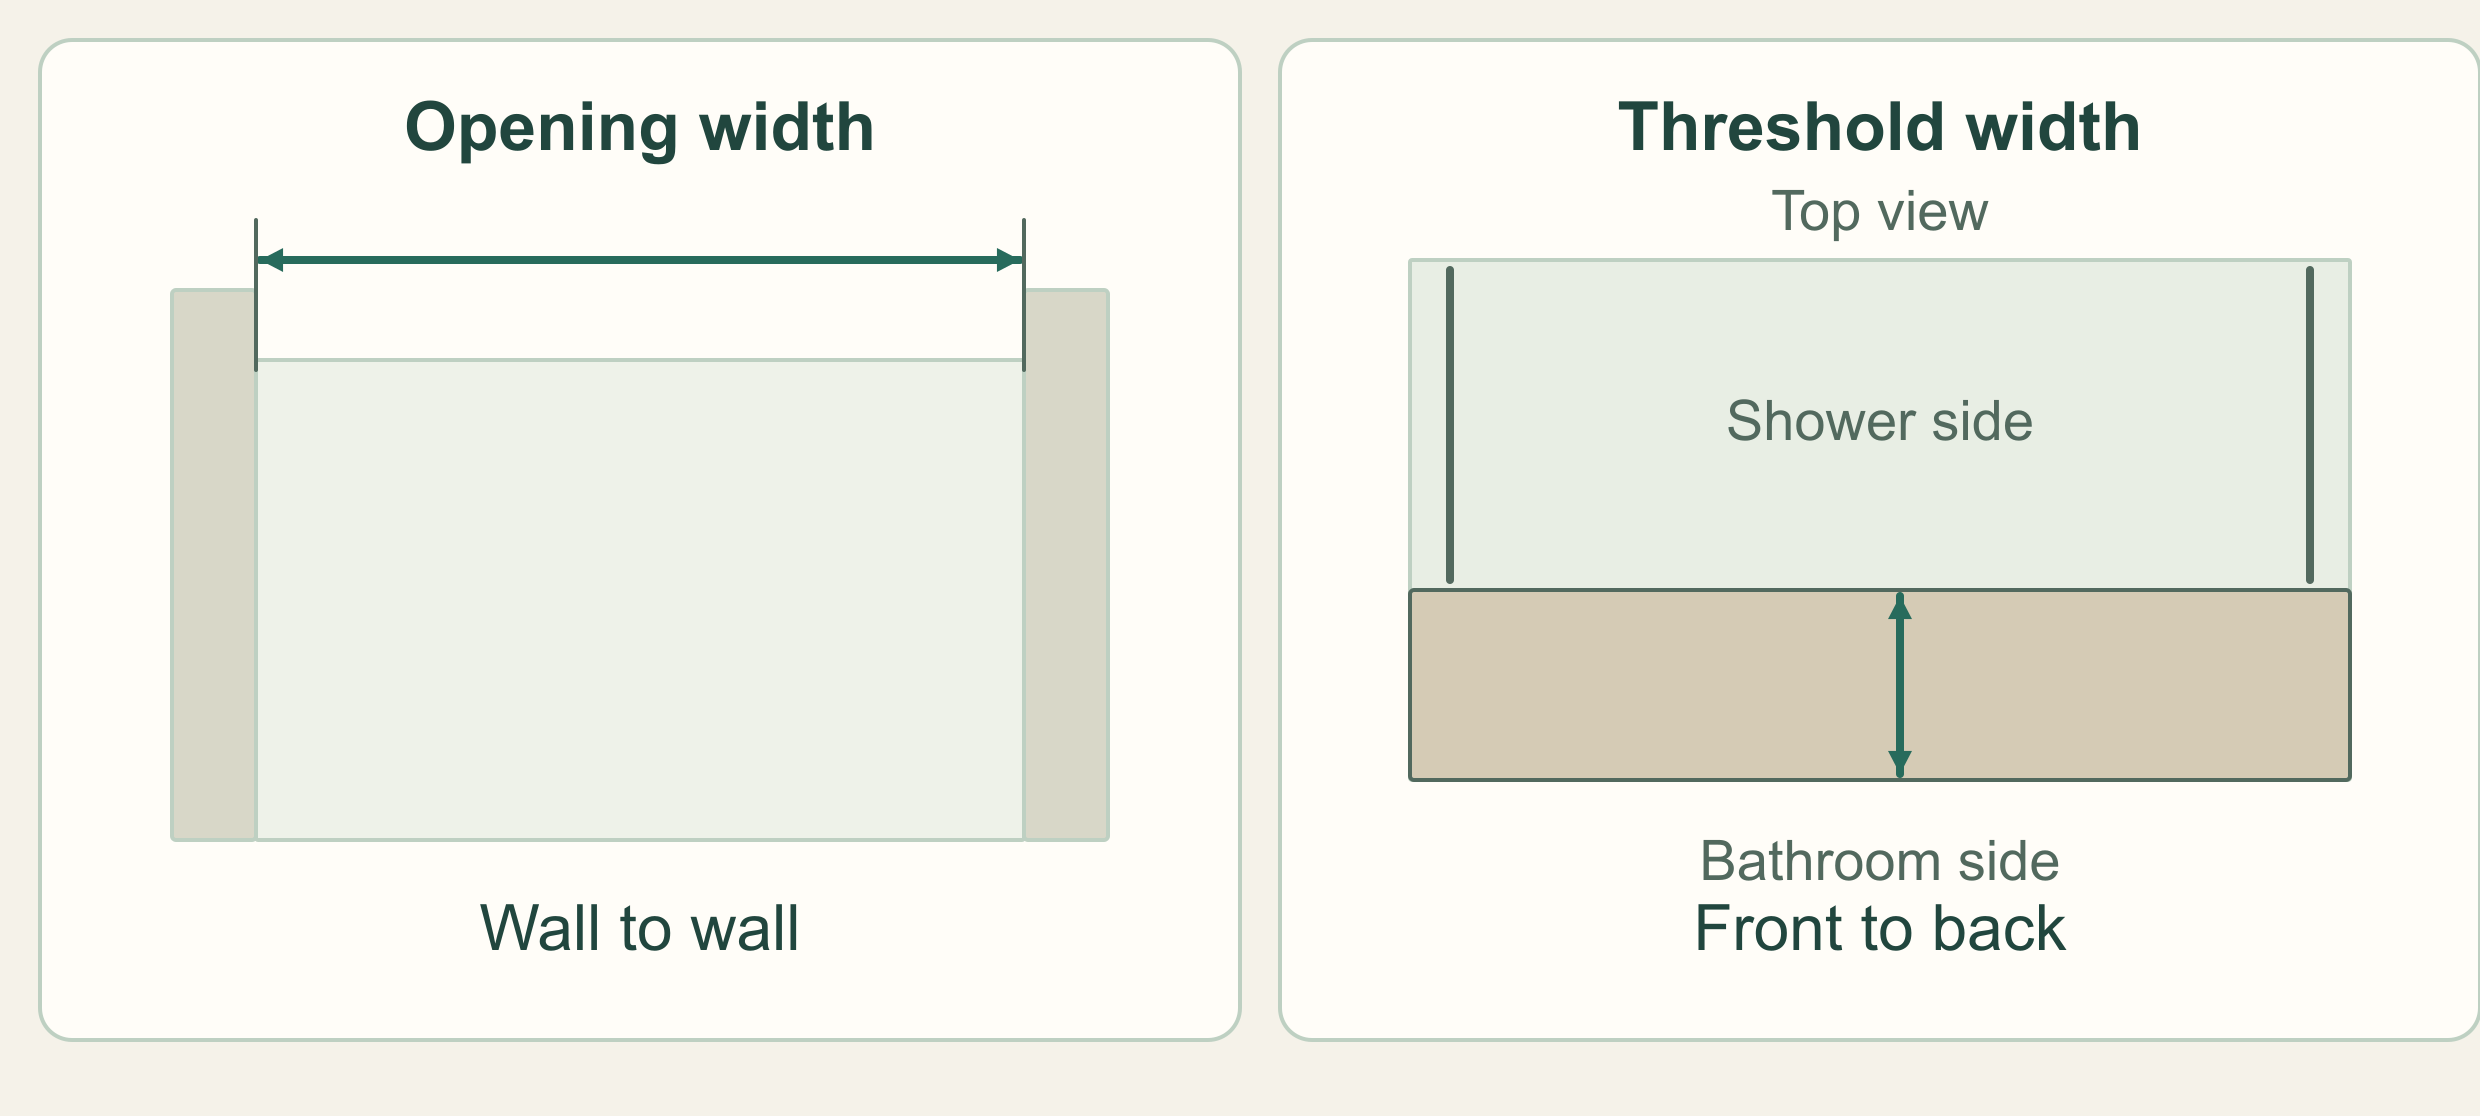
A slider’s fit range tells you which wall-to-wall openings it covers. Its walk-through tells you how much space your shoulders have when you step in. Check those separately, along with the threshold requirement and left/right arrangement. Keep the model code beside the numbers.
Look down at the strip beneath the entrance: that’s the threshold. Its width here runs front to back, from the shower side toward the bathroom, as shown in the Galaxy manual’s Figure 1.2. Measure that finished mounting surface separately from the opening between the walls.
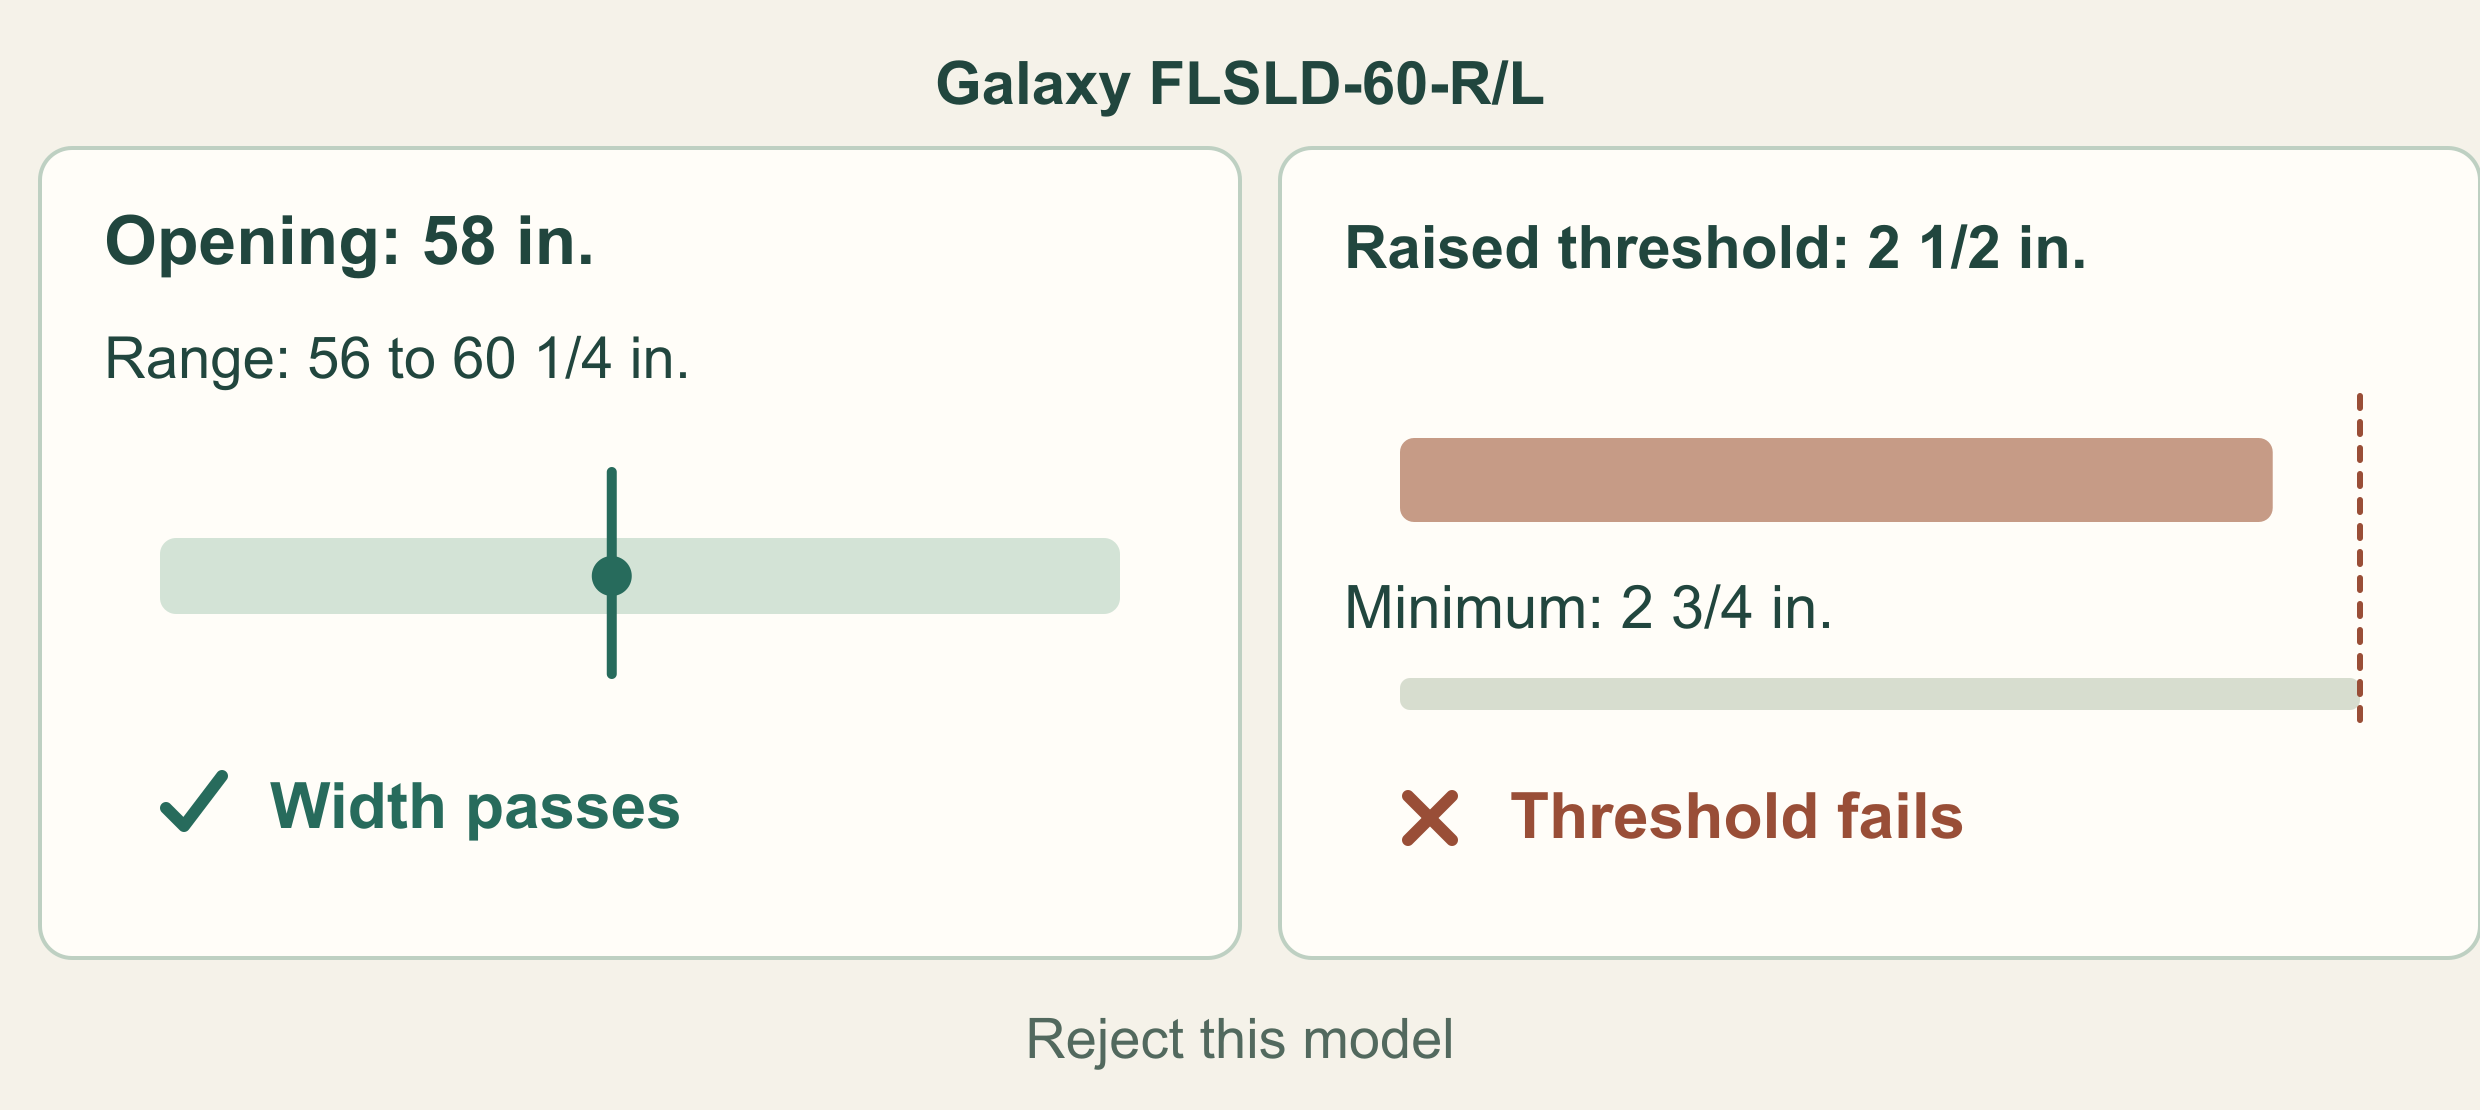
Hypothetical bathroom: Picture a shortest finished opening of 58 inches and a raised threshold 2 1/2 inches wide, front to back. Looking in from the bathroom, the showerhead and controls are on the left. A vanity sits near the right-hand approach, with a mirror on that side.
Now compare that room with the FLSLD-60-R/L requirements in the Glass Warehouse Galaxy FLSLD-60 installation manual, printed page 9. These are this system’s figures; use each alternative’s own manual when you compare it.
| Field | FLSLD-60-R/L manual | Hypothetical room and result |
|---|---|---|
| Adjustable opening width | 56 to 60 1/4 in. | 58 in.: within the width range |
| Walk-through | 24 to 28 in. | Exact opening at 58 in.: not established here |
| Raised-threshold width | Minimum 2 3/4 in. | 2 1/2 in.: fails this requirement |
| Threshold attachment | Drilling into the threshold required | Base/waterproofing assembly allows this drilled attachment: unconfirmed |
Reject this model for this bathroom: the mounting ledge is too narrow despite the passing opening width. For the next candidate, get its actual entry drawing. The published 24-to-28-inch walk-through range doesn’t tell you the exact entry at a 58-inch opening, so don’t divide the range to invent one.
For your own room, measure the finished opening at the top, middle, and bottom. Keep all three readings. Galaxy uses the shortest for its width check. Height, wall conditions, support, and the other installation requirements still need their own checks.
Check the Left/Right Model Against the Showerhead and Approach
Use the manufacturer’s drawing to settle left and right. In Galaxy’s printed page 10 view, FLSLD-60-L has the sliding panel on the left, and FLSLD-60-R has it on the right. The manufacturer recommends the moving panel on the showerhead side to reduce water escaping through the gap between panels.
Our left-side showerhead points to the L arrangement; this model still fails the threshold check. Write “viewed from the bathroom looking in” on the plan and quote request. Two people picturing opposite sides of a door can keep an email thread going for quite a while.
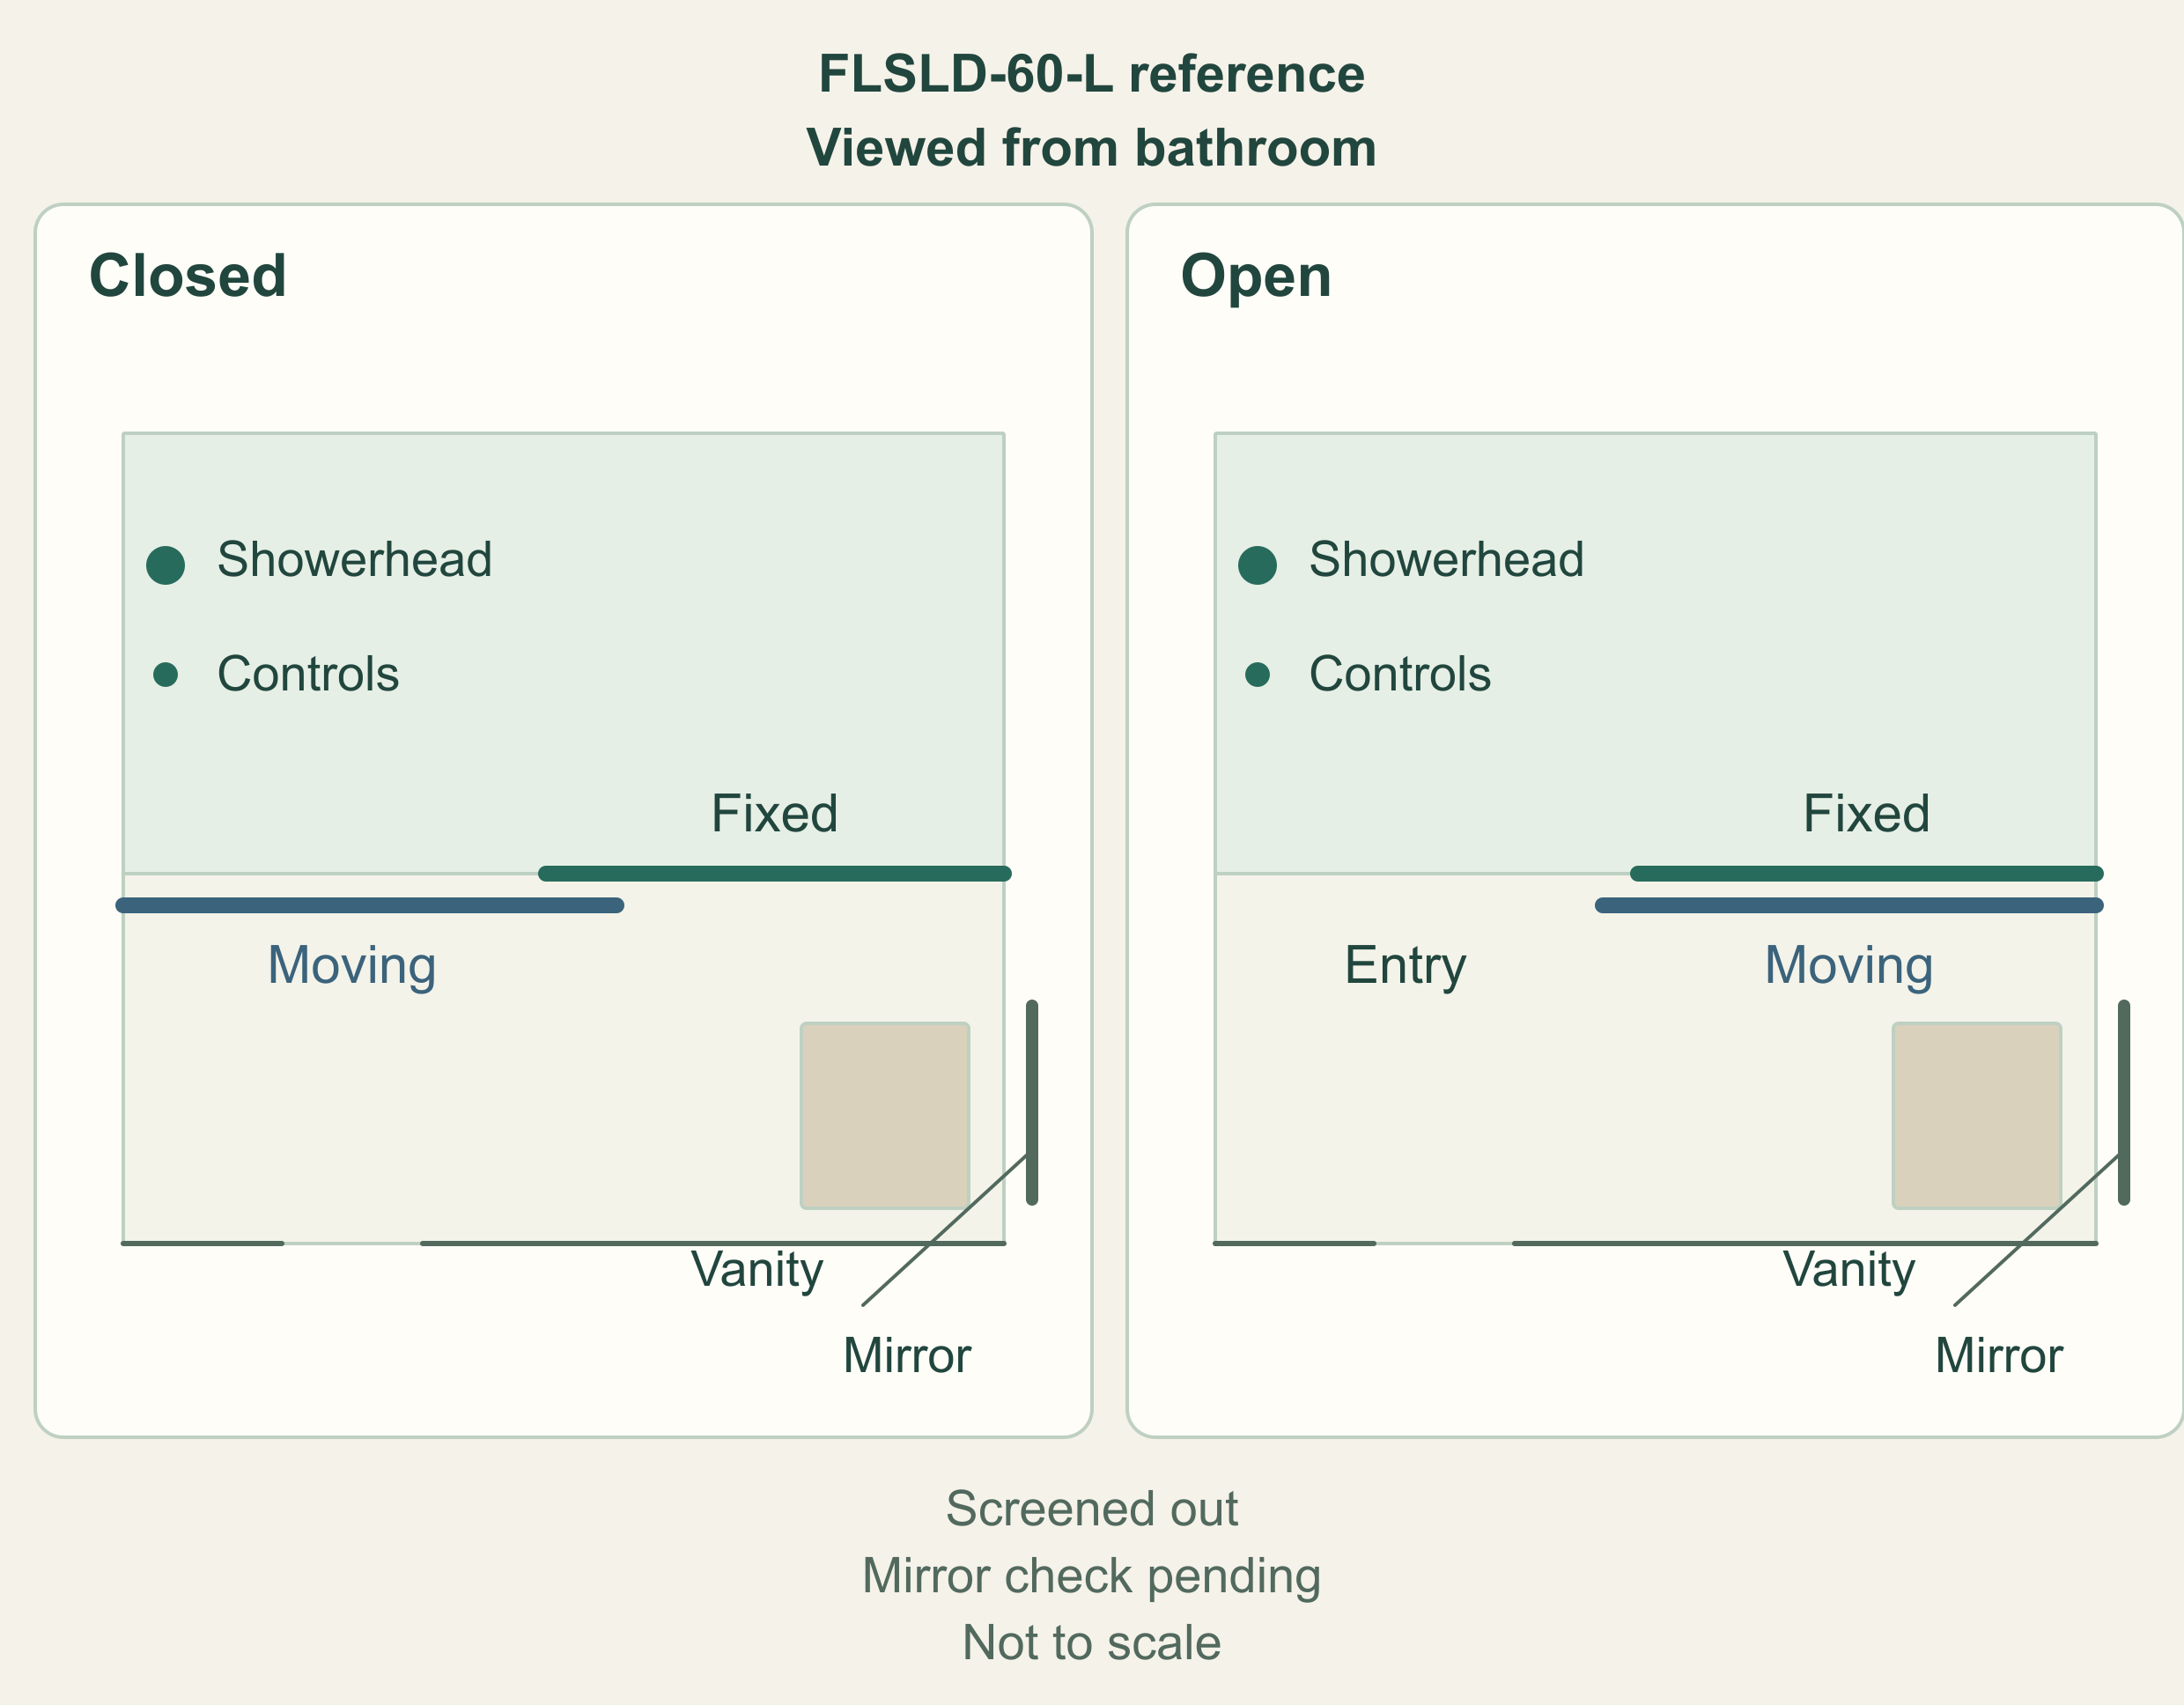
Walk through your shower routine on the plan: reach the controls, step in, then step out. Mark where you stand, the handle’s route, and the vanity. If your preferred approach clashes with the manual’s layout, compare another system. Use its approved handed parts and glass orientation.
Would a Hinged Option Leave a Usable Route in a Small Bathroom?
A hinged door and vanity can both want the same patch of floor. Use the candidate’s drawing and panel/handle dimensions to sketch or tape closed, partly open, and fully open positions. Include the vanity, toilet, towel storage, and bathroom door. Keep it only if its full movement fits.
Walk that route with the bathroom door in its usual position, then check handle and fixture clearances at their actual heights. Floor tape can’t settle a collision higher up. Get any missing dimensions from the drawing before deciding.
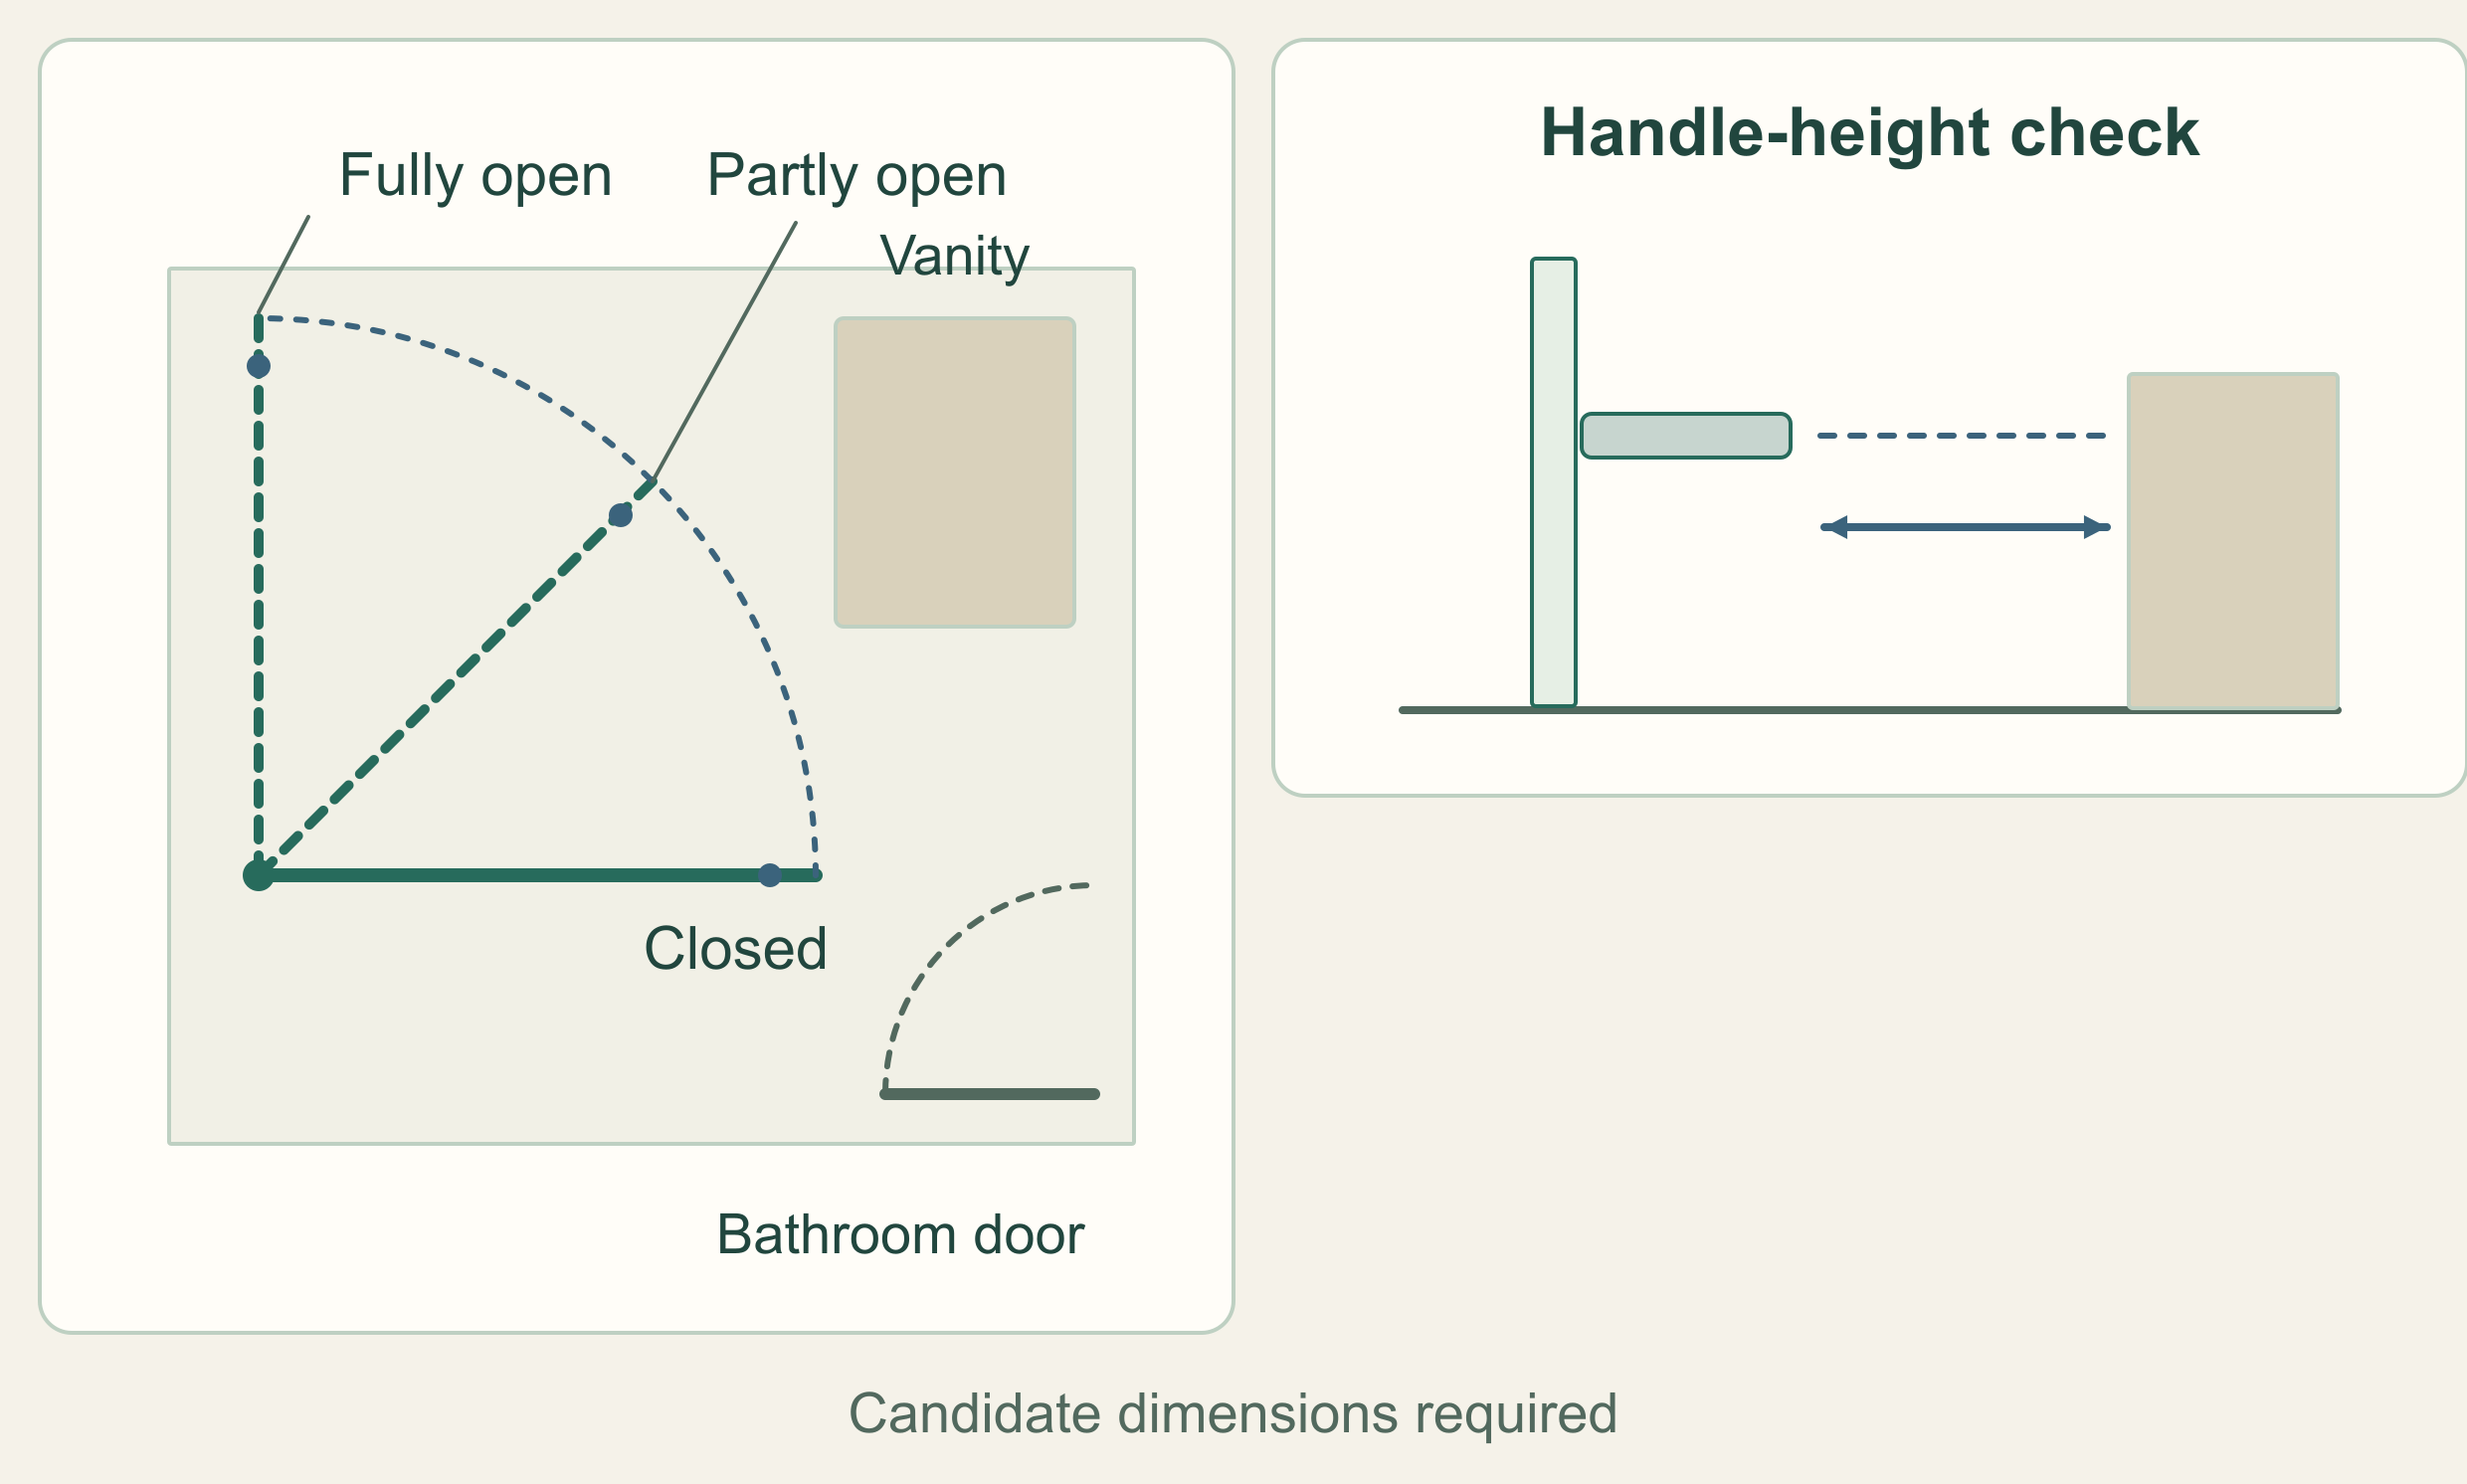
In our example, measure the gap beside the vanity before ruling a hinge in or out. Small bathrooms don’t all need the same mechanism; you need room to operate the door and get through. Stripes on the glass won’t add floor space.
Bring your measurements to the mechanism guide to compare sliding and hinged layouts. A hinge or fixed screen has its own fit requirements. Check the actual alternative before adding it to your replacement shortlist.
Will Reeded Glass Shower Doors Suit Your Sightlines and Finishes?
Look at the enclosure from the places you use every day. A sample helps you choose a pattern; walking the room helps you spot views through the entrance, another pane, or a mirror.
Follow the Sightline Through Each Panel and Door Position
Can we see through fluted glass? You may still recognize details, so check your chosen sample under your bathroom lighting and from the positions that matter. Then look at which panel the real sightline crosses. An open entrance or clear pane can leave a view that the textured sample never touches.
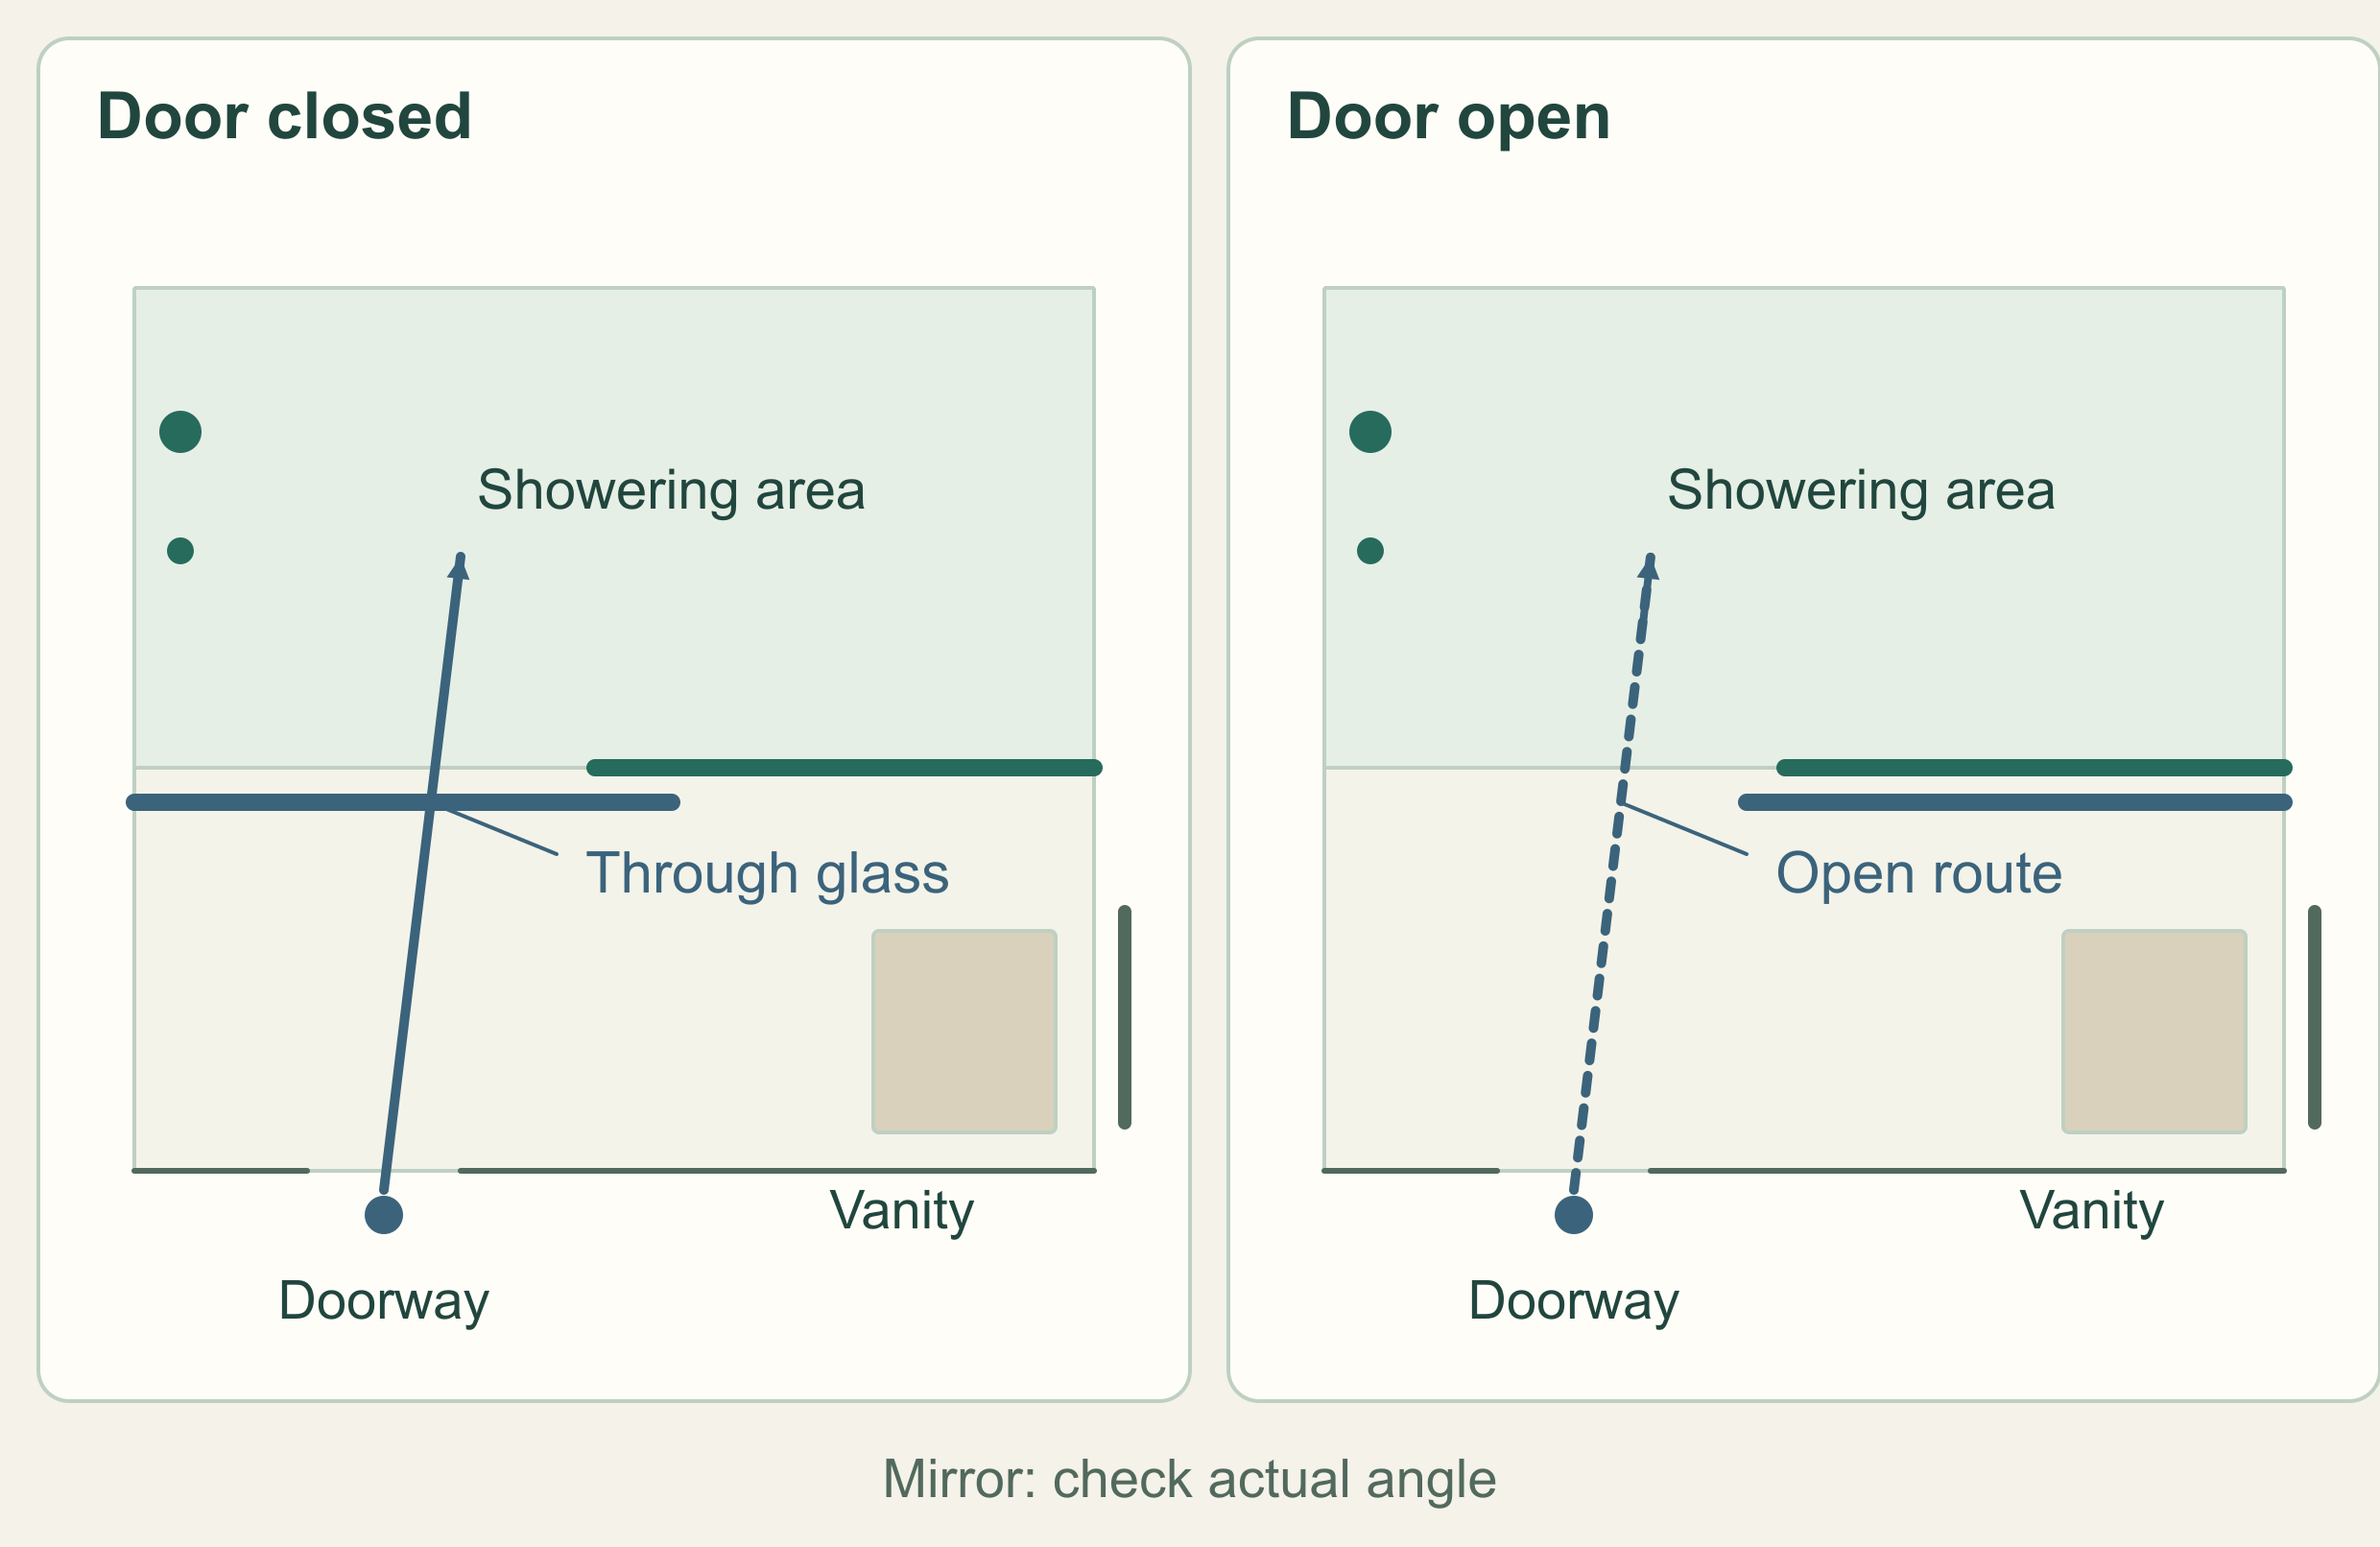
Without a floor plan, stand at the bathroom doorway, then the vanity and other shared-use spots. Look toward the showering area: does your view cross fixed glass, moving glass, another material, or open space? Check the shower door closed and open. For a future enclosure, mark proposed panel positions on a sketch.
Check the mirror from those same spots, using its actual position and angle. Does it reflect the showering area? A rectangle labeled “mirror” on paper won’t answer that. Our hypothetical room’s mirror geometry still needs checking.
| Position/state | Record | If the result is unacceptable |
|---|---|---|
| Doorway, door closed | Which panel the line crosses; recognizable detail | Reconsider coverage or finish |
| Doorway, door open | Any unobstructed route into the use area | Change the entry/coverage plan |
| Vanity/mirror | Direct view and any observed reflection | Resolve that specific route before ordering |
The glass-options guide has a fuller sample-checking method. Note the sample code, which face points where, your standing position, lighting, and door state. Our diagram maps the routes to inspect; judge the view through the actual sample.
If you dislike a view, name its route: “doorway to shower through the open entrance,” for example. Adding texture to another pane is like hanging a curtain on the wrong window: that view stays open. Change the coverage or entry arrangement for that problem; compare another finish when the view passes through the glass you’re choosing.
Judge the Background, Seams, and Overlap Before Choosing the Pattern
Treat the sample like a fabric swatch: put it beside the things it has to live with. From one ordinary standing position, include the tile, vanity finish, mirror, panel edges, and the overlap between moving and fixed glass.
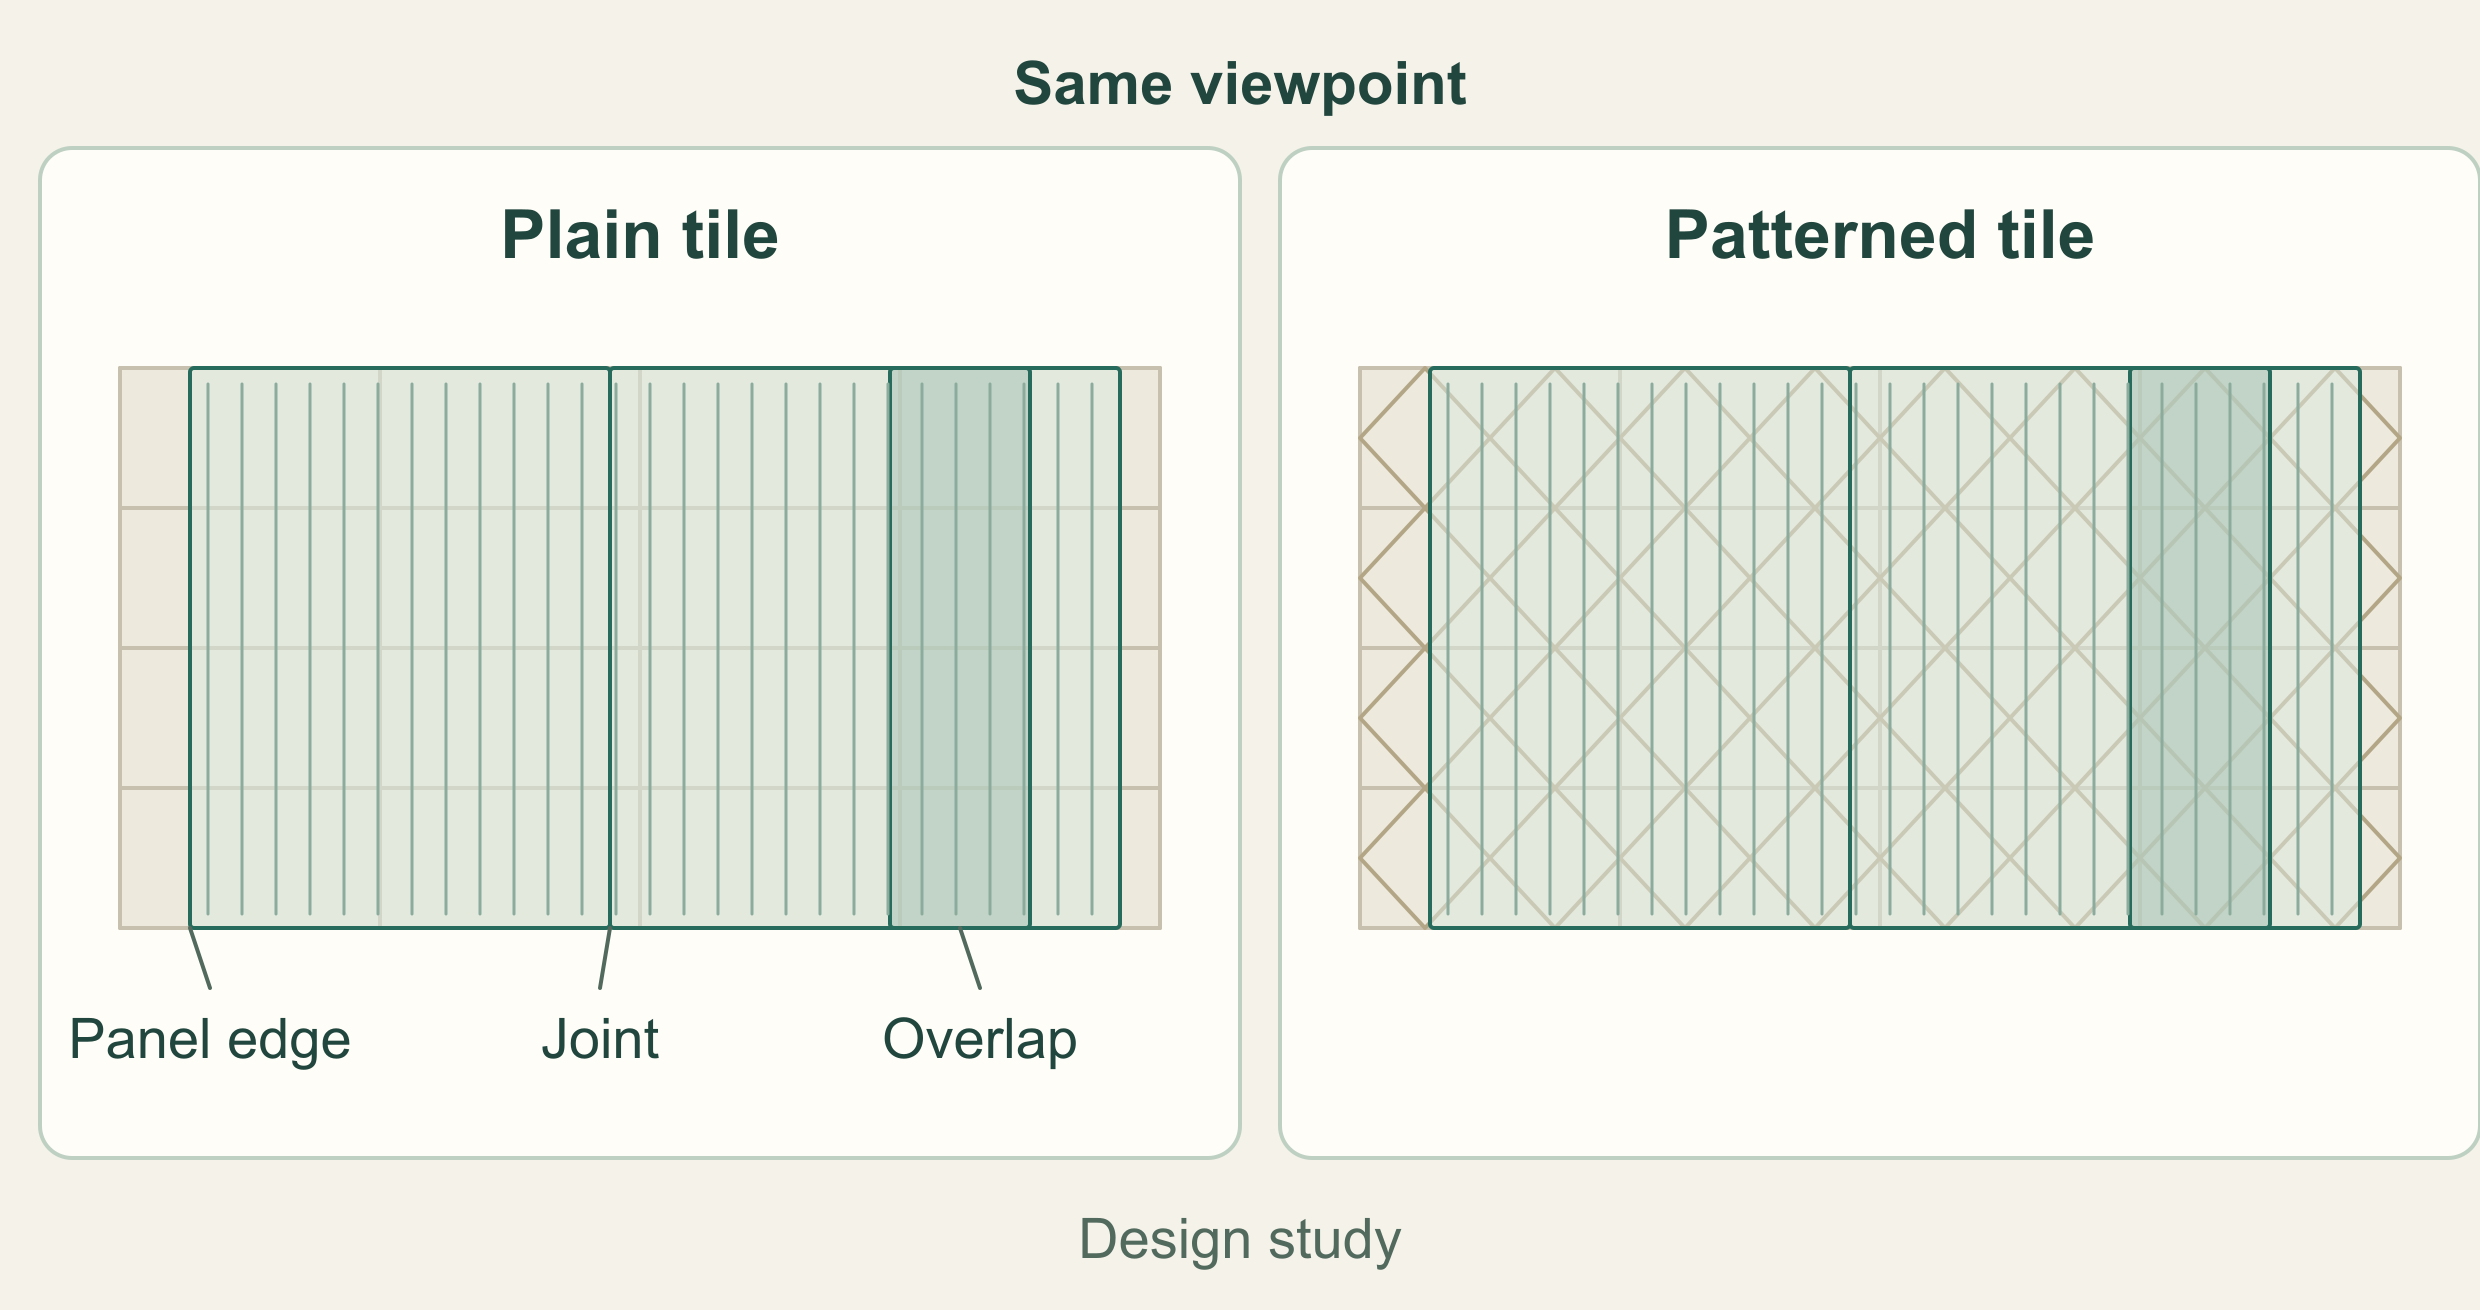
Compare the pane’s middle, joint, and overlap separately. Your note might read “I like the pattern against plain tile; I want another look at the overlap beside the patterned wall.” Keep that specific preference for the next comparison.
Where possible, hold an identified sample against your actual finishes, keeping lighting and viewpoint consistent between options. Look at tile joints through it and judge the room’s brightness. The flat sketch shows where to look; those visual judgments need real glass.
Mixed glass is an option in custom work. For a layout example, an India-based fabricator lists a fluted fixed screen with a clear door. For a U.S. project, take the idea to your supplier and ask for compatible panel and hardware codes. A mixed-glass Galaxy option remains unconfirmed.
Weigh the Practical Pros and Cons of Fluted Glass Shower Doors
Split your notes into “must fit” and “would like.” Minimum mounting width goes in the first column; a favorite finish goes in the second. Give unanswered fit or cleaning questions a next step.
One homeowner chose fluted glass for a guest-bath renovation and loved it. They’d received plenty of compliments, and the practical benefit mattered, too: the glass hid water spots, making it “so much easier to keep nice-looking.”
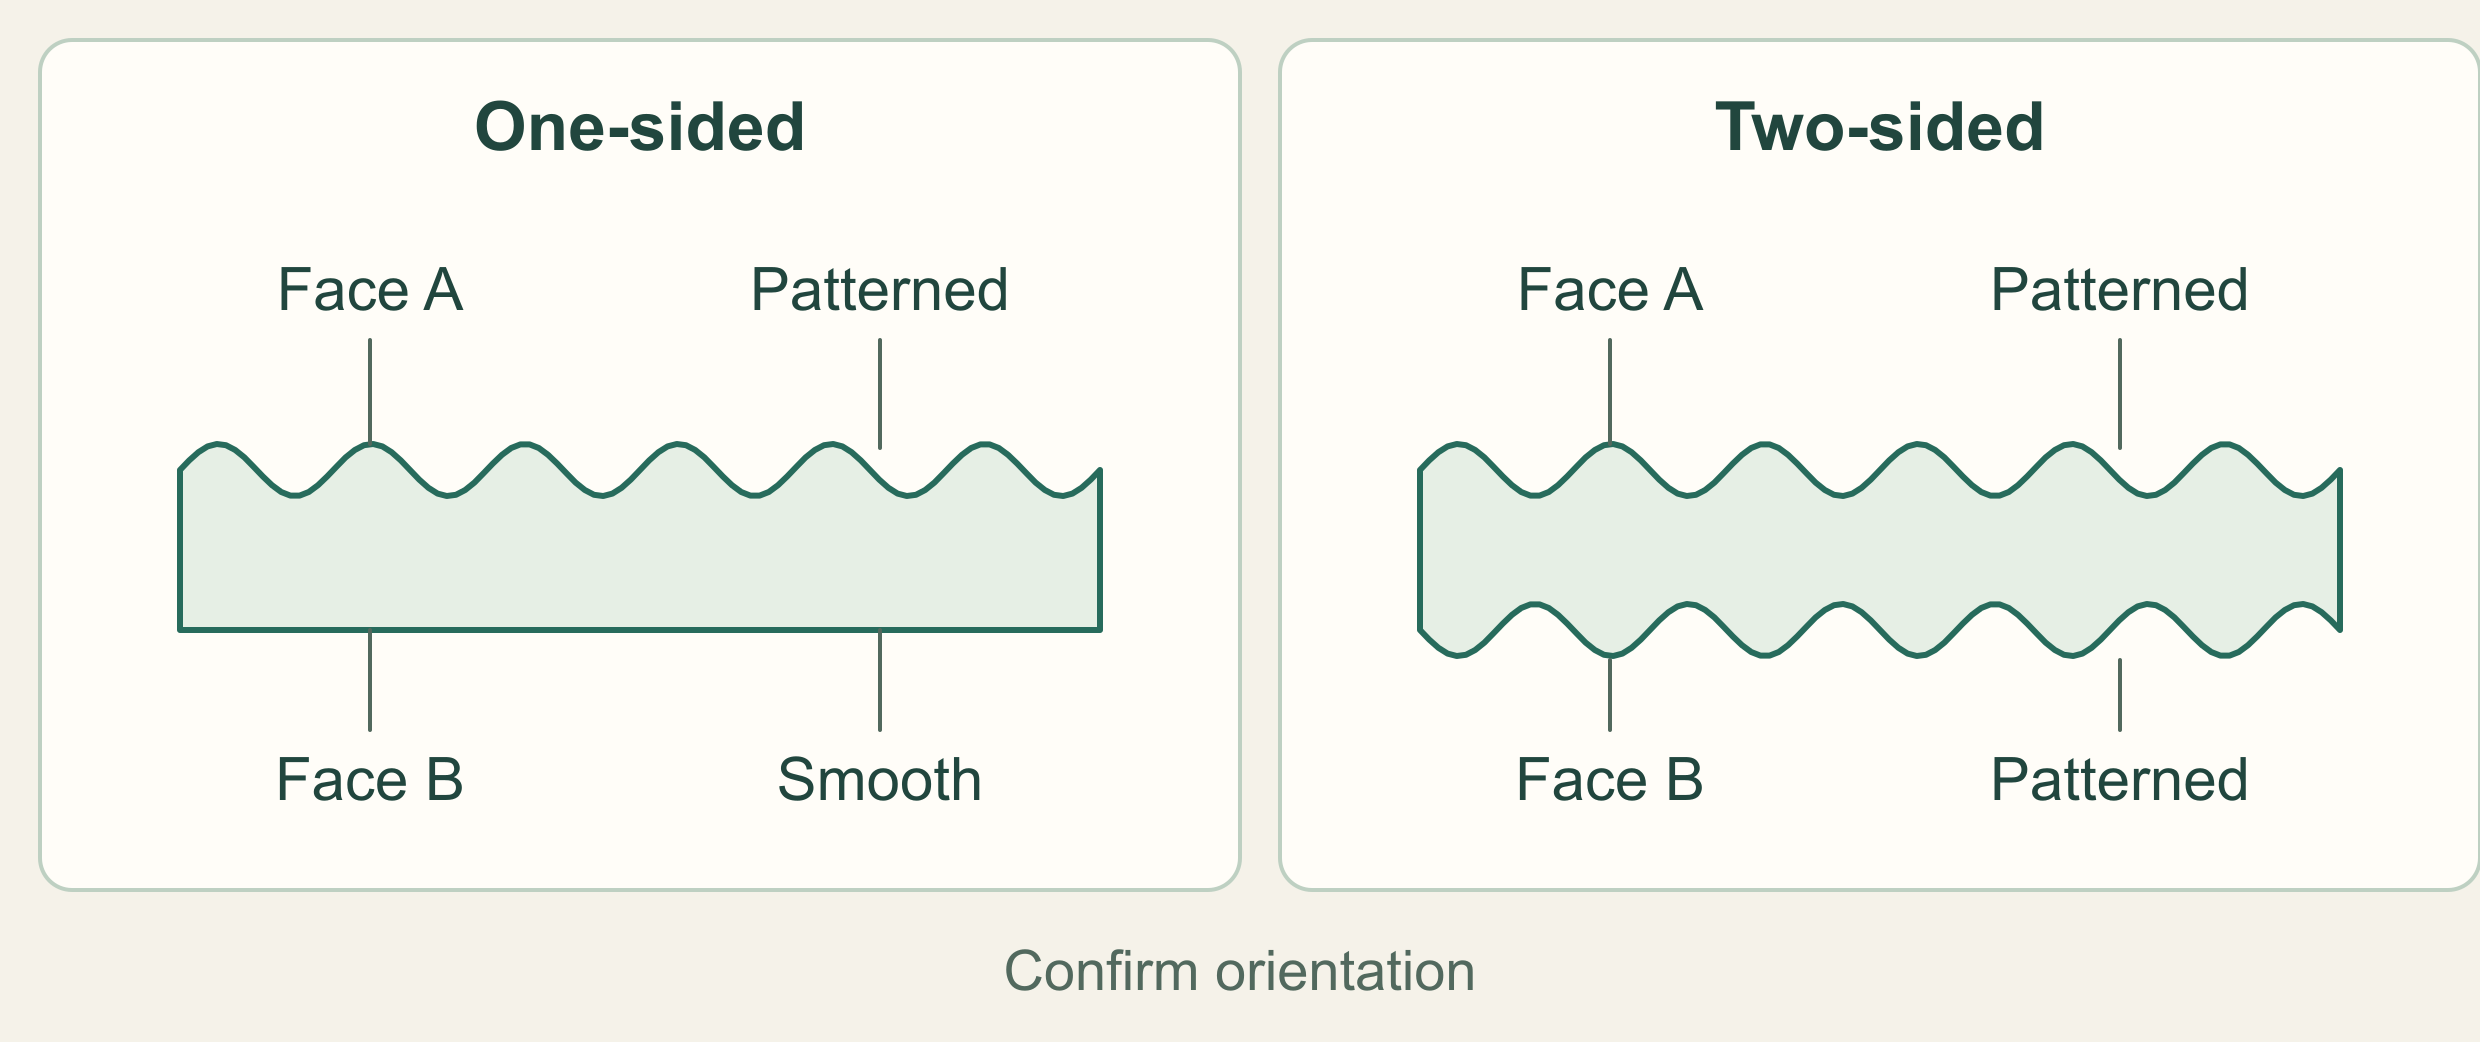
Can You Reach Both Faces, the Bottom Edge, and the Overlap?
Is fluted shower glass hard to clean? It can be awkward if you can’t reach the surfaces. Check whether fluting is one-sided (ribs on one face) or two-sided (both faces), whether either face is smooth or coated, and the required panel orientation. Less-obvious water spots still need the specified care.
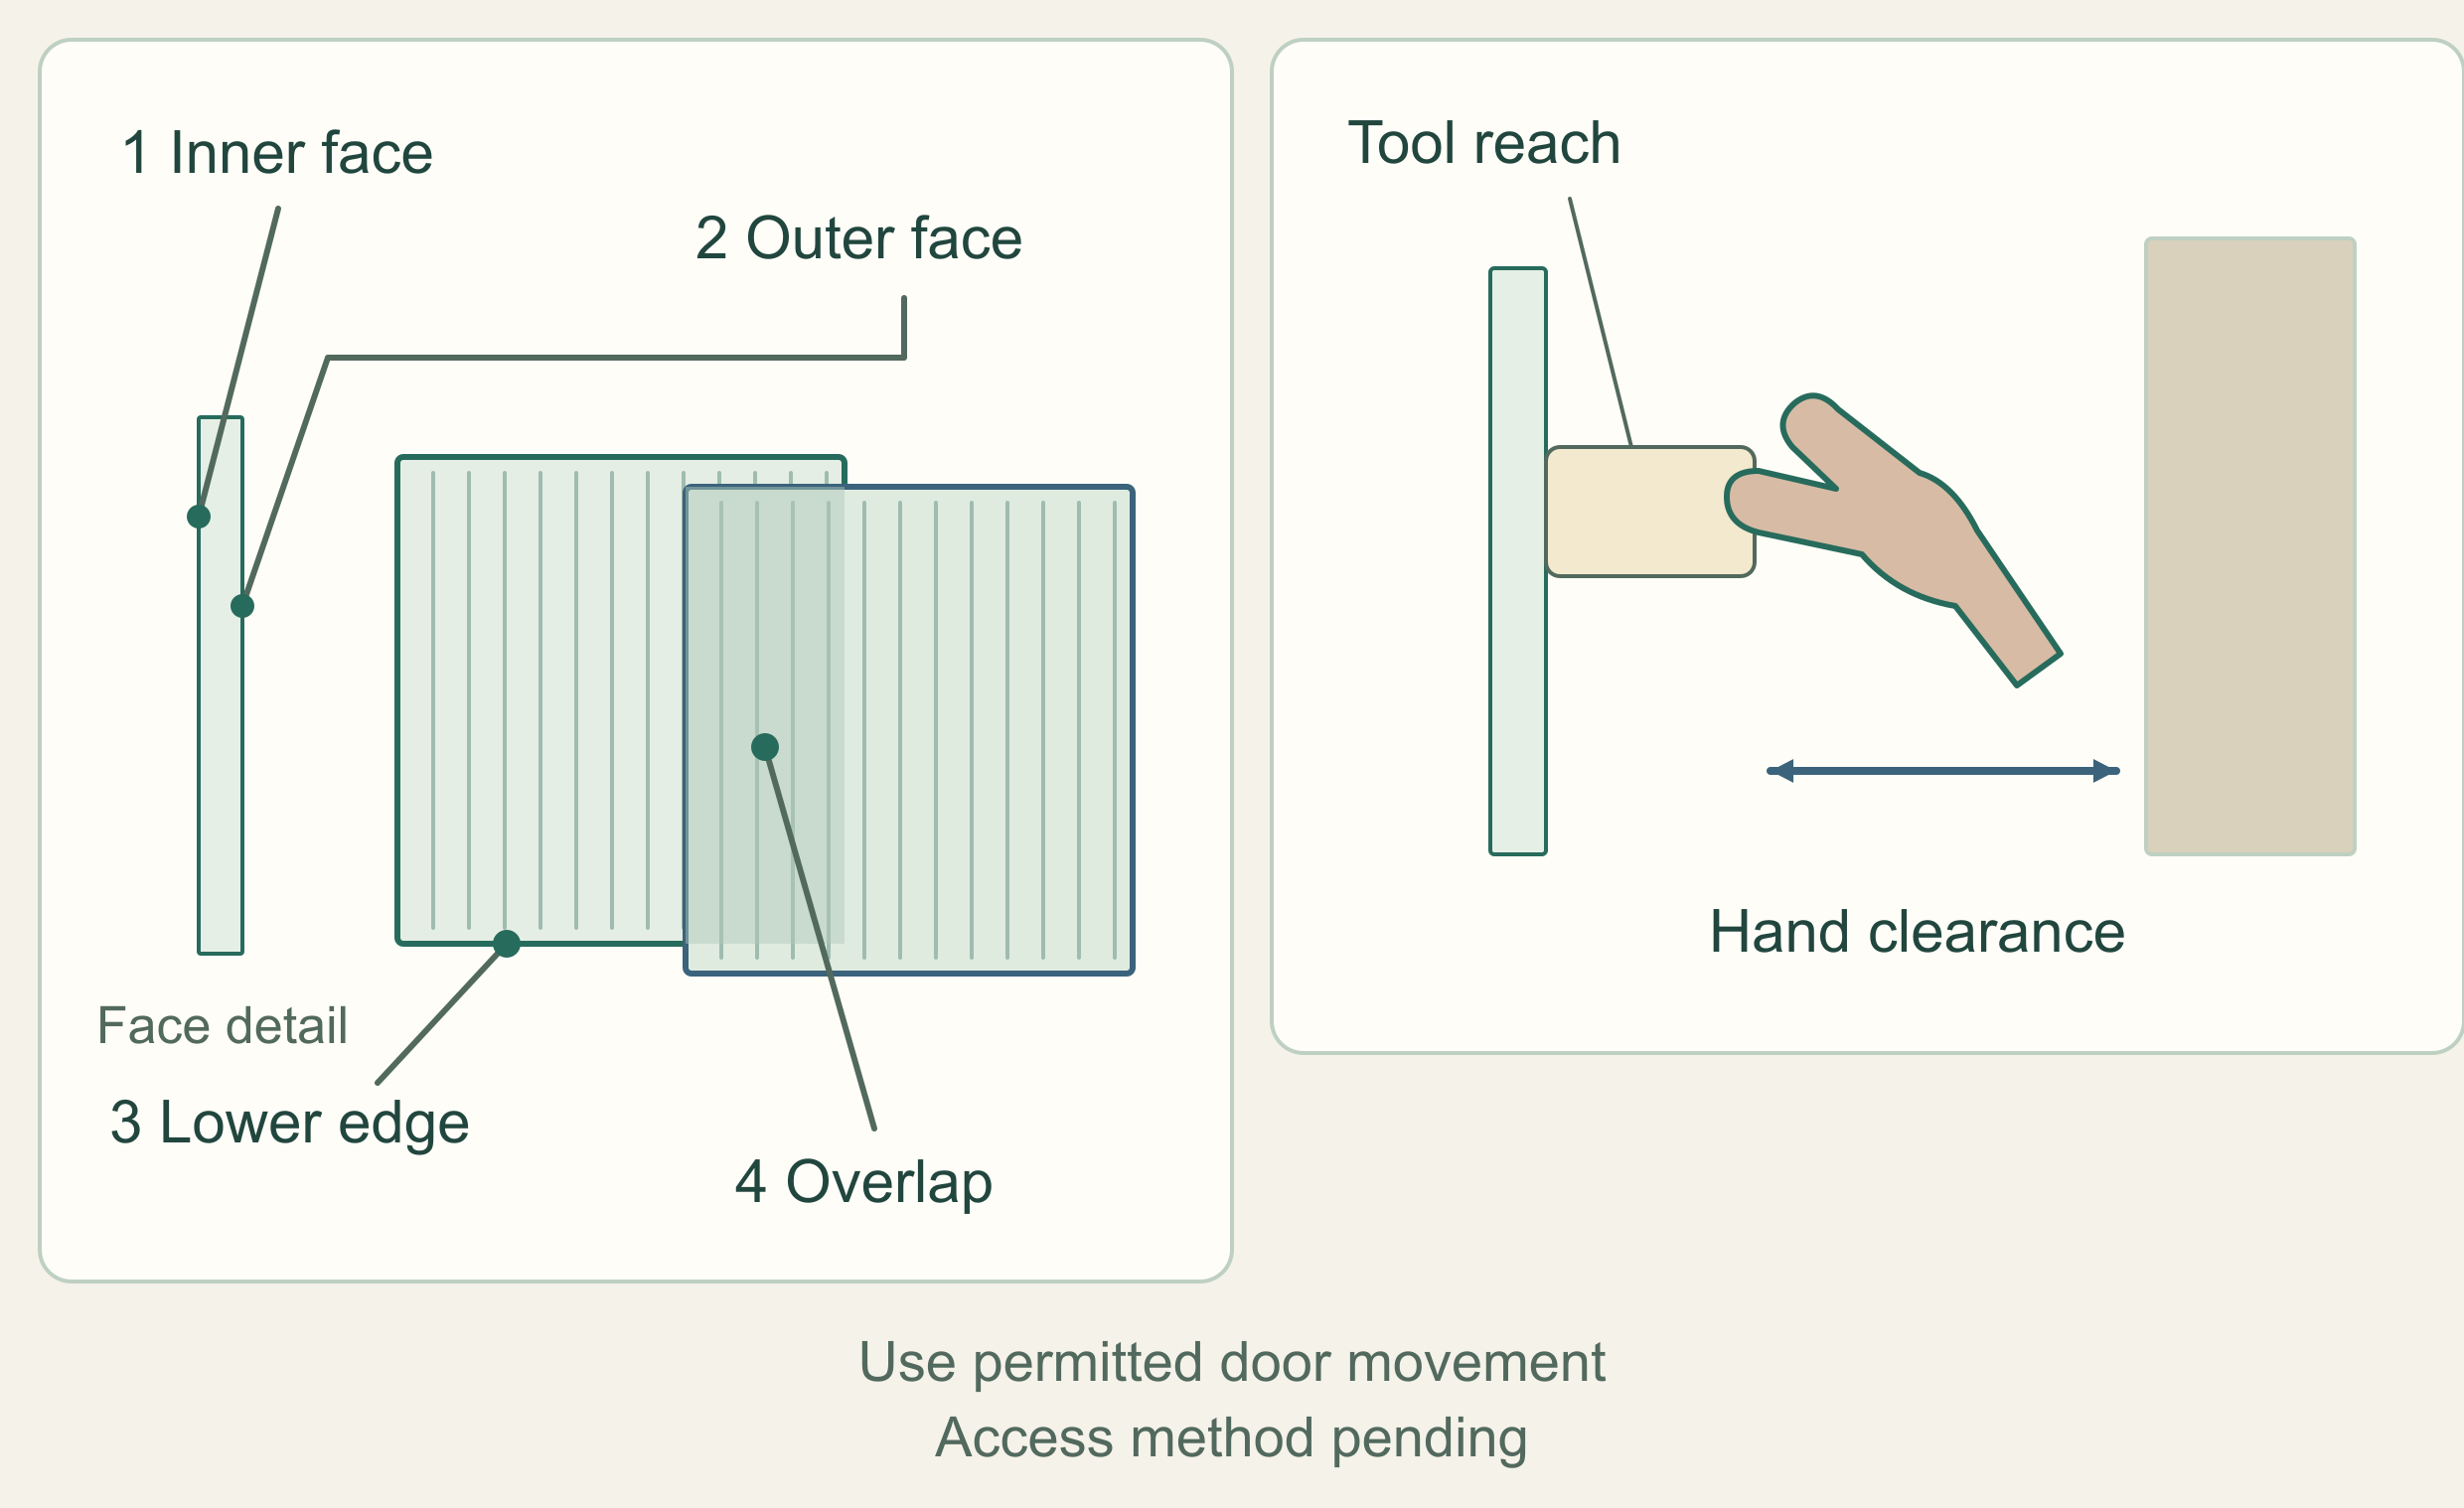
Check the outside face beside the vanity, handle, lower edge, and sliding overlap in the door positions the system allows. You need room to move a cloth or tool, not just poke a fingertip into the gap. Put any blocked area on your question list.
The Galaxy care guide, printed pages 34 to 35, separates hardware and glass care. Its treated-glass instructions call for a squeegee or towel after use and a damp microfiber cloth for cleaning. Follow the care instructions for the glass you order.
Check tool contact on every textured face. Two-sided fluting puts the wet face on that list, too. Where a squeegee blade misses the grooves, get the panel maker’s permitted cloth or soft-brush method and wiping direction.
If reaching a surface requires disassembly, get the system’s designed access method. Don’t remove the glass yourself to make room.
List the inner face, outer face, lower edge, and overlap separately: reachable with permitted movement, needs a confirmed access method, or unknown. Check the cabinet side on its own; an easy front face tells you little about that tighter spot.
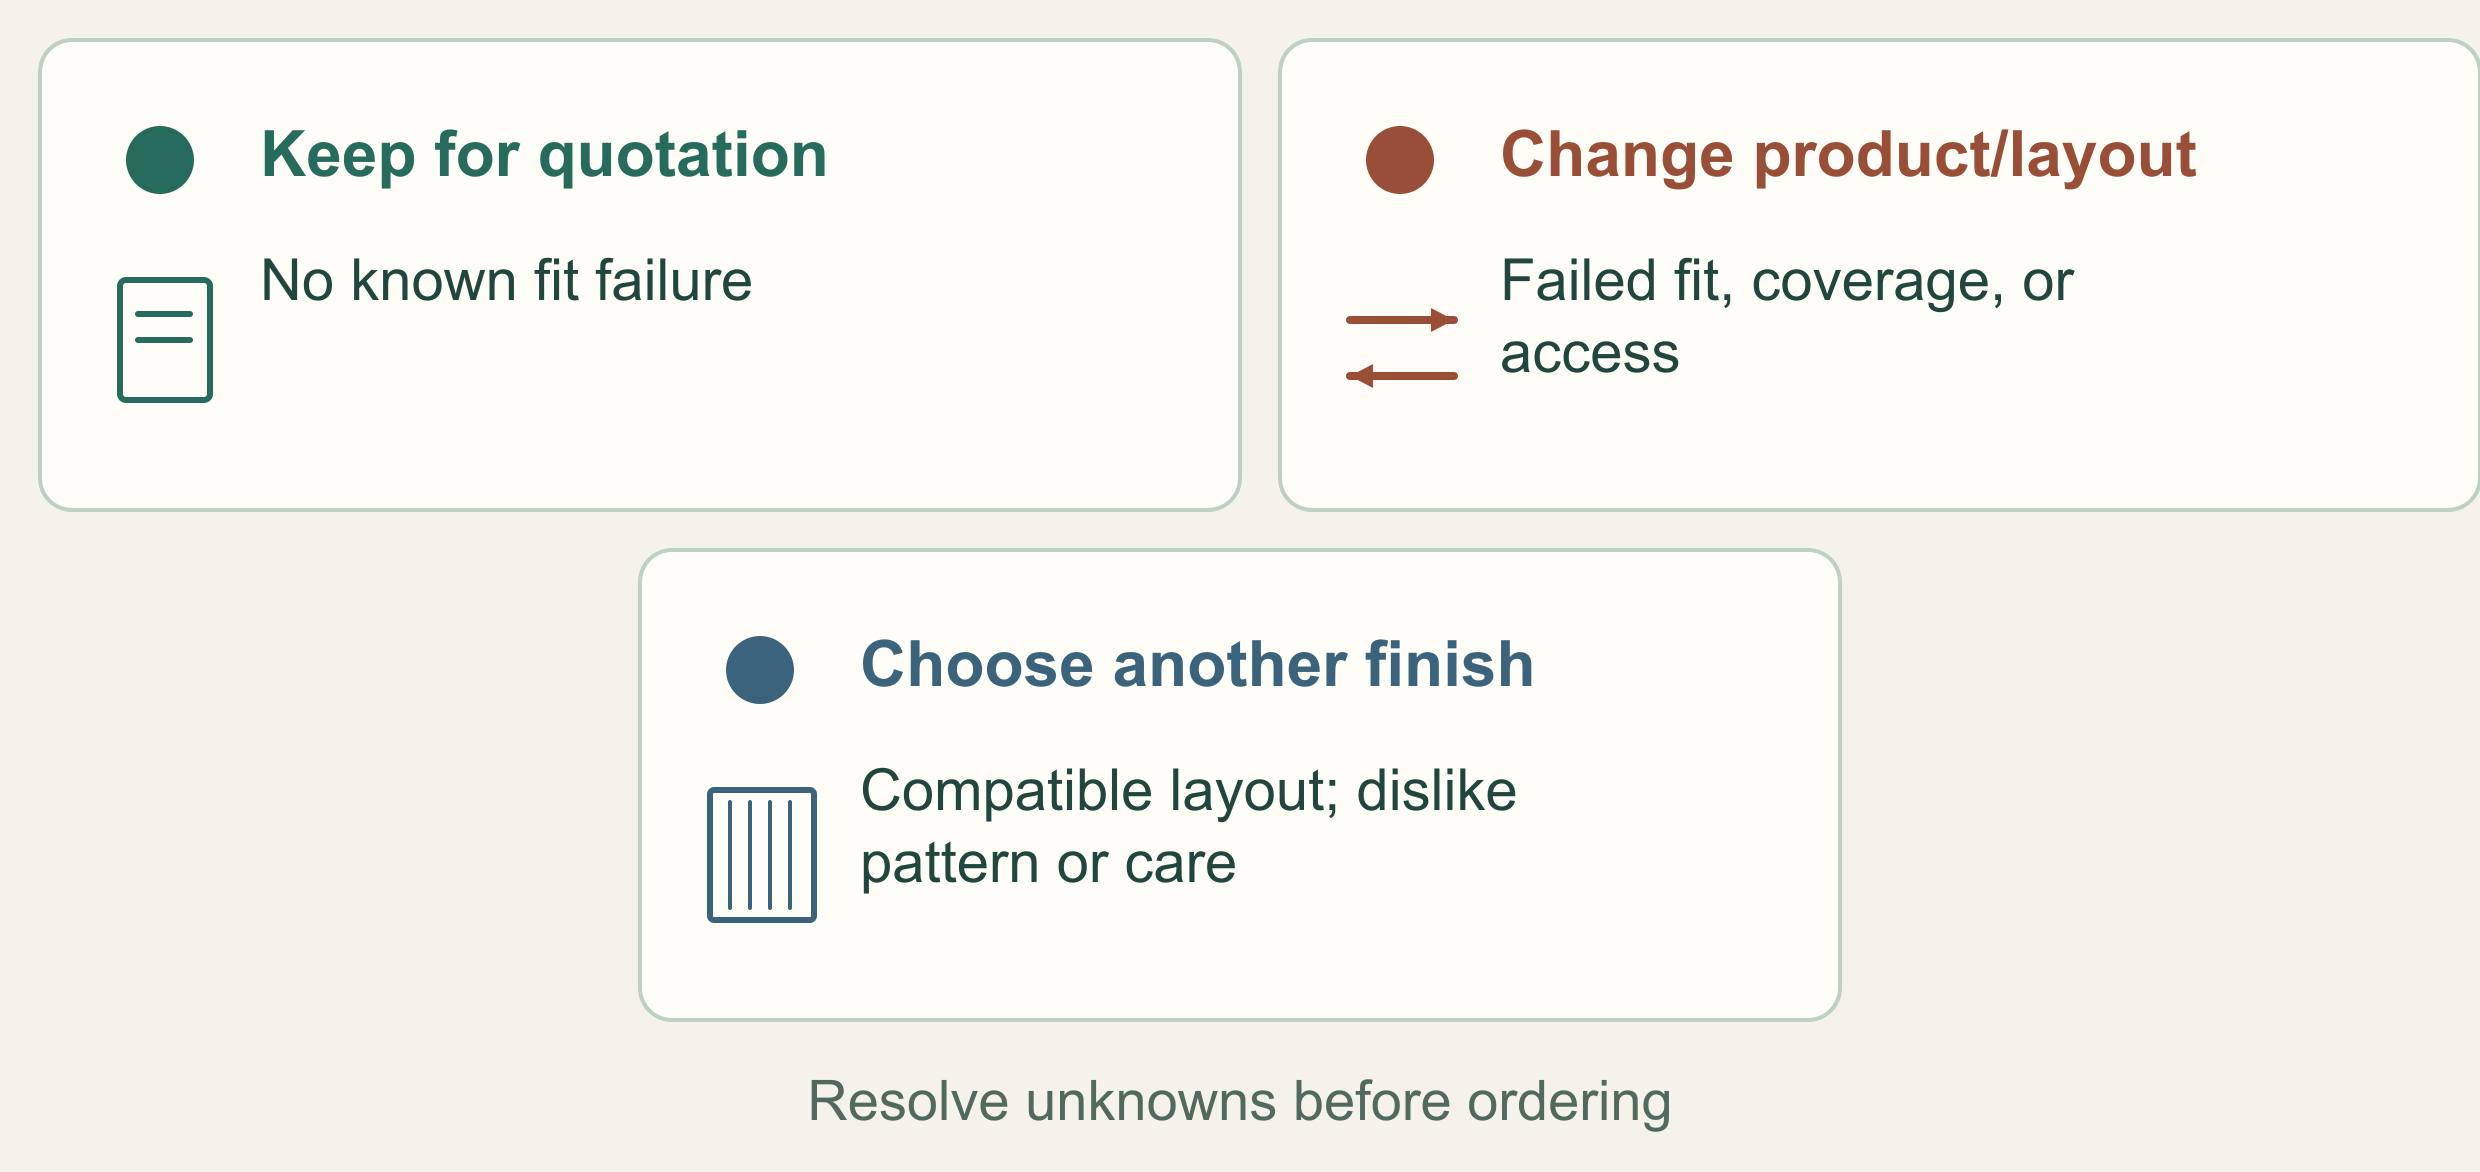
Keep the Candidate, Change the Configuration, or Choose Another Finish
Reject the Galaxy candidate for our example’s narrow raised threshold. Keep the model, selected options, manual, failed check, and remaining questions on one sheet. Carry the unfinished checks into the next comparison.
| Check | Record for this hypothetical room | Next action |
|---|---|---|
| Candidate | GW Galaxy FLSLD-60-L; manual checked Nov. 3, 2026 | Keep the source with the model |
| Opening width | 58 in.; within listed range | Do not label whole system approved |
| Raised threshold | 2 1/2 in.; below model minimum | Reject this candidate |
| Orientation | Left showerhead; L arrangement to inspect | Retain the view direction in replacement drawings |
| Entry/support/attachment | Exact entry and remaining conditions unconfirmed | Check a replacement system’s complete requirements |
| Sightlines/pattern/care | Observation and access checks unfinished | Carry these needs into the next comparison |
Keep a candidate for quotation if no known requirement rules it out. List and resolve the unanswered questions before ordering. Keep your fluted preference while you compare systems that fit.
Change the product or layout when fit, sightlines, entry, or cleaning access fails. For a narrow ledge, search “shower door minimum threshold width” or “minimum curb width” plus the door style. Match the mounting width and attachment requirements to your base. “Low-profile” or “slim-track” in a title doesn’t settle that. Look for a system suited to the existing base before considering a curb redesign.
Choose another finish when a compatible layout still leaves you disliking the pattern, view, or upkeep. Return to the glass-options guide with that complaint, then check the alternative’s glass and hardware specifications.
To decide whether the pattern is worth the money, get itemized clear and fluted quotes for the same dimensions, panel layout, hardware, and installation scope. Compare the actual difference. A glass-only price beside an installed-system quote won’t tell you what you’re paying for the pattern.
To approve the custom-door specification, send the marked sketch, finished-opening readings, threshold details, selected pattern, left/right drawing, and open questions together. Get included parts and compatible options in writing so the quote describes your actual bathroom and the parts you’ll receive.
For our hypothetical bathroom, you could send: “My finished raised threshold is 2 1/2 inches wide, front to back. Which model fits that existing base, what entry does it leave, and which parts are included? Please send the model’s requirements and drawing.”
A useful reply names the model and includes a configuration drawing and parts list. If one is missing, ask for it. Then check the reply against your measurements and base requirements before approving the order.
Choose fluted glass shower doors when the system meets its manual’s requirements and the view, pattern, and upkeep suit your room. Our example needs a different system for its existing base. Keep the fluted look on the list while you find that fit.
Sources and image notes
Use the exact model documents with your room measurements. The worked layout is hypothetical; the homeowner feedback is supplied separately.
- Glass Warehouse Galaxy FLSLD-60 manualChecked November 3, 2026: printed pp. 9–10 support the model-specific fit, raised-threshold, drilling and orientation checks; pp. 34–35 distinguish hardware and treated-glass care.
- Future Glass fluted slider panelSupports the FL-SL-D-60-L panel identity and corresponding panel/Eclipse kit requirement; its dimensions and handing are not borrowed for the Galaxy example.
- Interglass Reeded GlassSupports this supplier’s overlapping reeded, fluted and Moru terminology; match the actual pattern code.
- Interglass Reeded technical sheetSupports texture on one face or both faces. It does not establish Galaxy options or permission to reverse a finished panel.
- Fabrockers mixed-glass layout exampleAn India-based fabricator’s listed fluted-screen/clear-door configuration, used as a layout example rather than a U.S. supplier recommendation.
- Homeowner photo and feedbackThe guest-bath photo and comment were supplied by the publisher. The account concerns satisfaction, compliments and perceived water-spot visibility; it is separate from the hypothetical Galaxy layout.
- Editorial imagesThe cover is an AI-generated bathroom concept. The ten instructional figures are editorial diagrams, with stacked mobile alternatives; they are not field measurements or product installation drawings.